
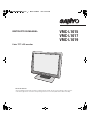
INSTRUCTION MANUAL
Color TFT LCD monitor
VMC-L1015
VMC-L1017
VMC-L1019
About this manual
• Before installing and using this unit, please read this manual carefully. Be sure to keep it handy for later reference.
• This manual gives basic connections and operating instructions for 3 models (VMC-L1015, L1017 and L1019).

–1–
Information to User
WARNING:
TO REDUCE THE RISK OF FIRE OR ELECTRIC
SHOCK, DO NOT EXPOSE THIS PRODUCT TO
RAIN OR MOISTURE.
DO NOT INSERT ANY METALLIC OBJECT
THROUGH THE VENTILATION GRILLS.
Explanation of graphical Symbols
FCC COMPLIANCE STATEMENT
CAUTION:
TO REDUCE THE RISK OF
ELECTRIC SHOCK.
DO NOT REMOVE COVER (OR BACK).
NO USER-SERVICEABLE PARTS INSIDE.
REFER SERVICING TO QUALIFIED SERVICE
PERSONNEL.
The lightning flash with arrowhead
symbol, within an equilateral triangle, is
intended to alert the user to the
presence of uninsulated “dangerous
voltage” within the product's enclosure
that may be of sufficient magnitude to
constitute a risk of electric shock to
persons.
The exclamation point within an
equilateral triangle is intended to alert
the user to the presence of important
operating and maintenance (servicing)
instructions in the literature
accompanying the product.
CAUTION
RISK OF ELECTRIC SHOCK
DO NOT OPEN
FCC INFORMATION: THIS EQUIPMENT HAS
BEEN TESTED AND FOUND TO COMPLY WITH
THE LIMITS FOR A CLASS B DIGITAL DEVICE,
PURSUANT TO PART 15 OF THE FCC RULES.
THESE LIMITS ARE DESIGNED TO PROVIDE
REASONABLE PROTECTION AGAINST
HARMFUL INTERFERENCE WHEN THE
EQUIPMENT IS OPERATED IN A COMMERCIAL
ENVIRONMENT. THIS EQUIPMENT
GENERATES, USES, AND CAN RADIATE RADIO
FREQUENCY ENERGY AND IF NOT INSTALLED
AND USED IN ACCORDANCE WITH THE
INSTRUCTION MANUAL, MAY CAUSE HARMFUL
INTERFERENCE TO RADIO COMMUNICATIONS.
OPERATION OF THIS EQUIPMENT IN A
RESIDENTIAL AREA IS LIKELY TO CAUSE
HARMFUL INTERFERENCE IN WHICH CASE
THE USER WILL BE REQUIRED TO CORRECT
THE INTERFERENCE AT HIS OWN EXPENSE.
CAUTION: CHANGES OR MODIFICATIONS NOT
EXPRESSLY APPROVED BY THE PARTY
RESPONSIBLE FOR COMPLIANCE COULD VOID
THE USER'S AUTHORITY TO OPERATE THE
EQUIPMENT.
THIS CLASS B DIGITAL APPARATUS MEETS ALL
REQUIREMENTS OF THE CANADIAN
INTERFERENCE-CAUSING EQUIPMENT
REGULATIONS.
CET APPAREIL NUMÉRIQUE DE LA CLASSE A
RESPECTE TOUTES LES EXIGENCES DU
RÈGLEMENT CANADIEN SUR LE MATÉRIEL
CAUSANT DES INTERFÉRENCES.

– 2 –
Precautions
• Use only the power source specified on the unit.
• When not using this unit for a long period of time, or when
cleaning it, be sure to disconnect the power plug from the
AC outlet.
• Do not allow anything to rest on the power cord. And do
not place this unit where people will tread on the cord. Do
not overload wall outlets or power cords as this can result
in a fire or electric shock.
• Avoid using this unit under the following conditions:
- in extremely hot, cold or humid places,
- in dusty places,
- near appliances generating strong magnetic fields,
- in places subject to direct sunlight,
- in badly ventilated places,
- in automobiles with doors closed.
• Do not cover the ventilation slots while in operation as this
could obstruct the required ventilation flow.
• When dust accumulates on the screen surface, clean it
with a soft cloth.
• Unplug this unit from the AC outlet and refer servicing to
qualified service personnel under the following conditions:
- when the power cord is frayed or the plug is damaged,
- if liquid has been spilled into the unit,
- if the unit has been dropped or the cabinet has been
damaged,
- when the unit exhibits a distinct change in
performance.
• Do not attempt to service this unit yourself as opening or
removing covers may expose you to dangerous voltage or
other hazards. Always refer servicing to qualified service
personnel.
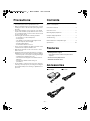
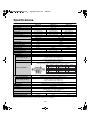
Contents
Names of controls/parts . . . . . . . . . . . . . . . . . . . . . . . . . . . 3
Connection instructions. . . . . . . . . . . . . . . . . . . . . . . . . . . . 4
Instructions for use . . . . . . . . . . . . . . . . . . . . . . . . . . . . . . . 5
Monitoring display adjustment. . . . . . . . . . . . . . . . . . . . . . . 6
Computer display adjustment . . . . . . . . . . . . . . . . . . . . . . . 7
Troubleshooting. . . . . . . . . . . . . . . . . . . . . . . . . . . . . . . . . . 8
External dimensions & adjustable angle . . . . . . . . . . . . . . . 9
Specifications . . . . . . . . . . . . . . . . . . . . . . . . . . . . . . . . . . 10
Features
• Multilingual menu support
English/Chinese/French/German/Spanish/Italian/
Japanese
• Picture in Picture (PIP) function
• NTSC/PAL automatic select
Accessories
■
■■
■ AC adapter ■
■■
■ AC cord
■
■■
■ VGA connecting cable

– 3 –
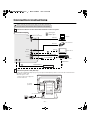
Names of controls/parts
Front view
Rear view
POWERMODEAUTOMENU
Viewing area
Power button (POWER)
Volume adjustment control
Power indicator
light
Input mode control (MODE)
Contrast adjustment control
Brightness adjustment control
OUT
IN
12
34
12
34
1
2
3
4
Signal
Y
C
BNC IN
DC IN
VGA IN
BNC OUT
Y/C IN
Y/C OUT
AUDIO OUT AUDIO IN
VGA signal input terminal (VGA IN)
S-Video signal input terminal (Y/C IN)
Audio-In terminal
(AUDIO IN)
S-Video signal output terminal
(Y/C OUT)
Adjustment control (MENU)
For fine adjustment. (Pages 6, 7)
For adjusting the screen contrast.
(Page 5)
Turns the power on or off.
Adjusts the brightness of the screen. (Page 5)
• Select the appropriate menu item.
Adjusts the volume level. (Page 5)
Changes the input mode. (Page 5)
For audio input.
Audio-Out terminal
(AUDIO OUT)
For audio output.
Power input terminal (DC IN) (Page 4)
For the input of a computer
VGA (Video Graphics Array) signal.
Composite signal input terminal
(BNC IN)
For the input of CCD camera surveillance image
signal.
Composite signal output terminal
(BNC OUT)
Sends the image to BNC IN.
For the input of S-Video signal.
For the output of S-Video signal.
Pin number
GND (Y)
GND (C)
• For adjustment, change the setting value.
• Select the appropriate menu item.
Automatic display adjustment control
(AUTO)
Automatically adjusts the screen
(for use with VGA connections).
(Page 5)

– 4 –
Connection instructions
Connect the devices to the connection terminals at the rear panel.
1
2
• When connecting, ensure the power supply to each unit is switched off.
BNC IN
DC IN
VGA IN
BNC OUT
Y/C IN
Y/C OUT
AUDIO OUT AUDIO IN
Monitor TV etc.
Hard-disk recorder etc.
AUDIO LINE IN
VGA OUT
BNC OUT
Y/C (S-VIDEO) OUT
Y/C (S-VIDEO) IN
AUDIO LINE OUT
BNC IN
CCD Camera etc.
(Included VGA connecting cable)
Computer
: Input signal
: Output signal
Amplifier etc.
Connection example
• The other devices and connection cables required are sold separately.
(Refer to 2 for steps.)
Connect the power cord (DC 12V).
Connect the included AC adapter plug to the power input terminal (DC IN), and then connect the AC cord between the
AC adapter and AC outlet.
• Once the power cord is
connected, the power supply will
reach the main unit.
AC adapter
(Included)
AC cord (Included)

– 5 –
Instructions for use
1
11
1
Switch the power button (POWER) on.
R The power indicator light will light up.
2
22
2
Press the input mode control (MODE) and
choose the input signal.
• Press once and the currently selected signal will be
displayed. Press again and the available signal
options will be displayed in the order shown below.
(The symbol for selected option will be displayed in
the upper left of the screen.)
3
33
3
Adjust the brightness ( ) [0 – 51].
• As the brightness is being adjusted, the symbol
will be displayed in the upper left of the screen.
4
44
4
Adjust the contrast ( ) [0 – 51].
• As the contrast is being adjusted, the symbol
will be displayed in the upper left of the screen.
A
Adjust the volume [0 – 51].
• As the volume is being adjusted, the
symbol will be displayed in the upper left of the
screen.
B
Screen automatic adjustment
(For VGA signal)
R The clock, phase and screen position are
automatically adjusted according to the
specified input signal.
5
55
5
When viewing is finished, press the
power button (POWER).
R The power indicator light will go out.
POWERMODEAUTOMENU
1 5
2
43
2
A
B
• When the signal is changed, initially a blue screen
will be displayed, followed by the display of the
chosen signal 2-3 seconds later.
• When there is no input detected on the chosen
signal, “NO SIGNAL” will be displayed.
• If the power to the connected device is off, “VIDEO
LOSS” will be displayed.
POWER
Power indicator light
MODE
: VGA signal (VGA IN)
: DVI signal (DVI IN)
Cannot be used
: Composite signal (BNC IN)
: S-Video signal (Y/C IN)
: Component signal (Y, Cb, Cr IN)
Cannot be used
Decrease Increase
Decrease Increase
Decrease Increase
AUTO

– 6 –
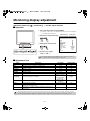
Monitoring display adjustment
Adjustment method for : Composite/ : S-Video signal selection
■
■■
■ Operation
■
■■
■ Adjustment item
* May differ depending on location of purchase.
Item Description Parameters Default setting
Color Adjust the color. 0 – 51 30
Tint Adjust the tint (only available for NTSC signal). 0 – 51 25
Brightness Adjust the brightness. 0 – 51 25
Contrast Adjust the contrast. 0 – 51 25
Sharpness Adjust the sharpness. 0 – 51 27
Volume Adjust the volume. 0 – 51 30
H-Position Adjust the horizontal position of the display. 0 – 51 25
Language Select the language of the display.
English, Chinese,
French, German,
Spanish, Italian,
Japanese
English
Color Temp. Select the color temperature.
9300
°
K, 6500
°
K,
Standard
9300
°
K*
Scan Select the image scan type. Over, Under, Full, 1:1 Full
PIP
Select to use Picture in Picture, showing an additional smaller
display in the upper left corner.
VGA, Off Off
Recall
Pressing the +, – buttons together will return the settings to the
default setting.
––
1 Press the adjustment control (MENU).
2 Choose the adjustment item.
3 Change the setting value.
4 If necessary, repeat
steps 2 and 3.
POWERMODEAUTOMENU
MENU
12 3
Composite In NTSC
30
25
25
25
27
30
25
English
9300K
Full
Off
Setting valueAdjustment item
Color
Tint
Brightness
Contrast
Sharpness
Volume
H-Position
Language
Color Temp.
Scan
PIP
Recall
R At the top of the screen, an adjustment panel as shown in the diagram
to the right will be displayed.
Down Up
• Pressing the adjustment control (MENU) again, or waiting for a number of
seconds will cause the adjustment panel to disappear.
• The settings will be retained even if the unit is switched off, but if the power supply is disconnected, settings will return to default.
• The default language display is English. If the language setting is changed, the menu display will be in the language chosen.

– 7 –
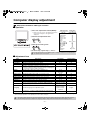
Computer display adjustment
: Adjustment method for VGA signal selection
■
■■
■ Operation
■
■■
■ Adjustment item
* Use this when pressing the automatic display adjustment control (AUTO) (page 5) does not achieve the desired result. Also, by pressing the
automatic display adjustment control (AUTO), these values will be changed.
Item Description Parameters Default setting
Brightness Adjust the brightness. 0 – 51 25
Contrast Adjust the contrast. 0 – 51 25
H-Position* Adjust the horizontal position of the display. 0 – 51 25
V-Position* Adjust the vertical position of the display. 0 – 51 31
Clock*
Adjust the clock (when vertical lines can be seen etc.).
• Make fine adjustments until the vertical lines disappear. Adjusting the
clock will also change the width of the display.
0 – 51 25
Phase* Adjust the phase (when the screen is flickering, etc.). 0 – 51 13
Color Temp. Select the color temperature.
9300
°
K, 6500
°
K,
User color
User color
User Color R Adjust the Red (when Color temp. is set to User color). 0 – 51 51
User Color G Adjust the Green (when Color temp. is set to User color). 0 – 51 51
User Color B Adjust the Blue (when Color temp. is set to User color). 0 – 51 51
OSD H-Pos. Adjust the horizontal position of the adjustment panel. 0 – 51 25
OSD V-Pos. Adjust the vertical position of the adjustment panel. 0 – 51 25
Volume Adjust the volume. 0 – 51 30
PIP
Select to use Picture in Picture, showing an additional smaller
display in the upper left corner.
Composite, S-Video,
Component, Off
Off
Language Select the language of the adjustment panel.
English, Chinese,
French, German,
Spanish, Italian,
Japanese
English
Recall
Pressing the +, – buttons together will return the settings to the
default value.
––
• The settings will be retained even if the unit is switched off, but if the power supply is disconnected, settings will return to default.
• The default language display is English. If the language setting is changed, the menu display will be in the language chosen.
Setting valueAdjustment item
POWERMODEAUTOMENU
MENU
12 3
VGA IN 1024x768@60Hz
Brightness
Contrast
H-Position
V-Position
Clock
Phase
Color Temp.
User Color R
User Color G
User Color B
OSD H-Pos.
OSD V-Pos.
Volume
PIP
Language
Recall
25
25
25
31
25
13
User color
51
51
51
25
25
30
Off
English
1
Press the adjustment control (MENU).
R At the top of the screen, an adjustment panel as
shown in the diagram to the right will be
displayed.
2
Choose the adjustment item.
3
Change the setting value.
4
If necessary, repeat steps 2 and 3.
Down Up
• Pressing the adjustment control (MENU) again, or waiting for a number of seconds will cause
the adjustment panel to disappear.

– 8 –
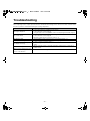
Troubleshooting
Before requesting service or repair, perform a check as described in the following section. If this does not work, return the unit to
the place of purchase or authorized repair agent to undergo adjustment.
Problem Points to check
No image is displayed.
• Is the connected device outputting a video signal?
• Is the connection correct? (Page 4)
• Using the input mode control (MODE), is the correct input signal selected? (Page 5)
No sound is heard.
• Is the connected device outputting an audio signal?
• Is the connection correct? (Page 4)
• Check the volume level is not set to 0. (Page 5 – 7)
The display is dark. • Are the brightness and contrast set to the correct level? (Page 5 – 7)
The display is flickering. • Is there a device nearby which is emitting a strong magnetic field? If so, remove it.
Colors displayed in different parts of
the display are strange.
• Is there a speaker or magnet nearby?
After removing the object, turn the unit off for at least 30 minutes and switch it on
again.
There is a hissing noise.
• Effects of this type may be caused by temperature changes in the room but do not
indicate a fault.
When 2 or more monitors are next
to each other, the display shakes or
there is some distortion.
• The monitors are interfering with each other. Increase the distance between them.

– 9 –
External dimensions & adjustable angle
■
■■
■ VMC-L1015
■
■■
■ VMC-L1017
■
■■
■ VMC-L1019
About the tilt adjustment
The screen may be adjusted 5° forward and 40° backward.
When adjusting the screen tilt, use a soft cloth to prevent damaging the screen.
After adjusting the tilt, check the cables to ensure the monitor is not pulled over.
5˚
40˚
353.2
170.0
36.4
229.1
286.052.0
338.0
305.2
Side viewFront view Angles of adjustment
(Unit: mm)
Side viewFront view Angles of adjustment
(Unit: mm)
5˚
40˚
375.0
170.0
41.6
273.4
317.752.0
369.7
341.0
Side viewFront view Angles of adjustment
(Unit: mm)
5˚
40˚
421.2
170.0
44.6
304.0
353.951.7
405.6
379.4

– 10 –
Specifications
Features and specifications are subject to change without prior notice or obligations.
VMC-L1015 VMC-L1017 VMC-L1019
Type Color video monitor
Color system NTSC, PAL
LCD display
15" active matrix
TFT LCD panel
17" active matrix
TFT LCD panel
19" active matrix
TFT LCD panel
Screen size 381 mm diagonal 432 mm diagonal 480 mm diagonal
Viewable size (H x V) 304 x 228 mm (4:3) 337 x 270 mm (5:4) 376 x 301 mm (5:4)
Pixel pitch (H x V) 0.297 x 0.297 mm 0.264 x 0.264 mm 0.294 x 0.294 mm
Horizontal resolution
500 TV lines or more (Y/C input mode)
1024 x 768 1280 x 1024
Scanning frequency
Horizontal: 30 K – 80 KHz
Vertical: 56 Hz – 75 Hz
Contrast ratio 350:1 500:1
Brightness 250 cd/m
2
Response time Tr/Tf 6/17 ms 15/10 ms
Display color 16.7 M
View Angle L/R 60°/60° 88°/88° 85°/85°
View Angle Up/Down 40°/60° 88°/88°
Display monitor timing VESA compatible
Display mode VIDEO & S-VIDEO & VGA
Input connector
Video signal (BNC IN) Composite sync signal, 1.0 Vp-p, 75 Ω BNC connector
S-Video signal (Y/C IN)
Separate Y/C signal, mini-DIN connector
Y signal: 1.0 Vp-p, 75 Ω negative sync
C signal: 0.286 Vp-p,75 Ω negative sync
Audio signal (AUDIO IN) –6 dBs (400 mVrms), RCA pin
VGA signal (VGA IN)
VGA Monitor Connector (15-pin)
Red signal, Green signal, Blue signal: 0.7 Vp-p, 75 Ω, positive sync
Output connector
Video signal (BNC OUT) Composite sync signal, 1.0 Vp-p, 75 Ω BNC connector
S-Video signal (Y/C OUT)
Separate Y/C signal, mini-DIN connector
Y signal: 1.0 Vp-p, 75 Ω negative sync
C signal: 0.286 Vp-p,75 Ω negative sync
Audio signal (AUDIO OUT) –6 dBs (400 mVrms), RCA pin
Menu language English/Chinese/French/German/Italian/Japanese
Audio power output Approx. 1 W
Power input DC 12 V/3 A
Operating condition
Temperature: 0°C – 40°C
Humidity: 20% – 85% (non-condensation)
Storage condition
Temperature: –20°C – 60°C
Humidity: 20% – 85% (non-condensation)
Power consumption Approx. 40 W Approx. 50 W
Weight (Adaptor included) 4.0 kg 5.0 kg 6.1 kg
Pin No.
1
2
3
4
5
Red signal
Green signal
Blue signal
No use
No use
GND (Red)
GND (Green)
GND (Blue)
No use
GND (sync)
No use
SDA
H sync
V sync
SCL
Pin No.
6
7
8
9
F
Pin No.
G
H
I
J
K
Signal Signal Signal
F6987
GKJIH
5
4
3
2
1

SANYO INDUSTRIAL VIDEO
VIDEO MONITOR LIMITED WARRANTY
LABOR PARTS
1 YEAR 1 YEAR
ATTENTION
For your protection in the event of theft or loss of this product, please fill in the information below for you own personal records.
Model No. _____________________________________________ ______________________________________________
(Located on back or bottom side of unit.)
Date of Purchase _______________________________________ _________________________________________
_____________________________________________________
OBLIGATIONS
In order to obtain warranty service, the product must be delivered to and picked up from an Authorized Sanyo Service Center at the user's expense,
unless specifically stated otherwise in this warranty. The names and addresses of Authorized Sanyo Service Centers may be obtained by calling the
toll-free number listed below.
For product operation, authorized service center referral, service assistance or problem resolution, call
CUSTOMER INFORMATION 1-800-421-5013
Weekdays 8:30 AM – 5:00 PM Pacific Time
For accessories and/or parts, call
PARTS ORDER INFORMATION 1-800-726-9662
Weekdays 8:30 AM – 5:00 PM Pacific Time
THIS WARRANTY IS VALID ONLY ON SANYO PRODUCTS PURCHASED OR RENTED IN THE UNITED STATES OF AMERICA, EXCLUDING ALL
U.S. TERRITORIES AND PROTECTORATES. THIS WARRANTY APPLIES ONLY TO THE ORIGINAL RETAIL PURCHASER OR END-USER. THE
ORIGINAL DATED BILL OF SALE, SALES SLIP OR RENTAL AGREEMENT MUST BE SUBMITTED TO THE AUTHORIZED SANYO SERVICE
CENTER AT THE TIME WARRANTY SERVICE IS REQUESTED.
Subject to the OBLIGATIONS above and EXCLUSIONS below, SANYO Fisher Company warrants this SANYO product against defects in materials
and workmanship for the periods specified below. SFC will repair or replace (at its option) the product and any of its parts which fail to conform to this
warranty. The warranty period commences on the date the product was first purchased or rented at retail.
EXCLUSIONS
This warranty does not cover (A) the adjustment of customer-operated controls as explained in the appropriate model's instruction manual, or (B) the
repair of any product whose serial number has been altered, defaced or removed.
This warranty shall not apply to the cabinet or cosmetic parts, batteries or routine maintenance.
This warranty does not apply to uncrating, setup, installation, removal of the product for repair or reinstallation of the product after repair.
This warranty does not apply to repairs or replacements necessitated by any cause beyond the control of SFC including, but not limited to, any
malfunction, defect or failure caused by or resulting from unauthorized service or parts, improper maintenance, operation contrary to furnished
instructions, shipping or transit accidents, modification or repair by the user, abuse, misuse, neglect, accident, incorrect power line voltage, fire, flood or
other Acts of God, or normal wear and tear.
The foregoing is in lieu of all other expressed warranties and SFC does not assume or authorize any party to assume for it any other obligation or
liability.
SFC DISCLAIMS ALL OTHER WARRANTIES EXPRESS OR IMPLIED, WITH REGARD TO THIS PRODUCT (INCLUDING THE WARRANTIES OF
MERCHANTABILITY AND FITNESS). IN NO EVENT SHALL SFC BE LIABLE FOR ANY SPECIAL, INCIDENTAL OR CONSEQUENTIAL DAMAGES
ARISING FROM THE OWNERSHIP OR USE OF THIS PRODUCT OR FOR ANY DELAY IN THE PERFORMANCE OF ITS OBLIGATIONS UNDER
THIS WARRANTY DUE TO CAUSES BEYOND ITS CONTROL. SFC'S LIABILITY FOR ANY AND ALL LOSSES AND DAMAGES RESULTING FROM
ANY CAUSE WHATSOEVER, ARISING OUT OF OR IN CONNECTION WITH THE SALE, USE OR OWNERSHIP OF THIS PRODUCT INCLUDING
WARRANTOR'S NEGLIGENCE, ALLEGED DAMAGED OR DEFECTIIVE GOODS, WHETHER SUCH DEFECTS ARE DISCOVERABLE OR LATENT,
SHALL IN NO EVENT EXCEED THE PURCHASE PRICE OF THE PRODUCT.
Serial No.
Purchase Price
Where Purchased
21605 Plummer Street,
Chatsworth, California 91311
1AC6P1P2921--
L8MAH, L8MAJ, L8MAK/US (041112KR)
Printed in Taiwan
-
 1
1
-
 2
2
-
 3
3
-
 4
4
-
 5
5
-
 6
6
-
 7
7
-
 8
8
-
 9
9
-
 10
10
-
 11
11
-
 12
12


Sanyo VMC-L1015 User manual
- Category
- TVs & monitors
- Type
- User manual
Ask a question and I''ll find the answer in the document
Finding information in a document is now easier with AI
Related papers
-
Sanyo VMC-L1017P User manual
-
-
Sanyo VMC-8414P User manual
-
-
-
-
-
-
-
Other documents
-
 Hi Sharp HS-ML1002 User manual
-
Eneo VMC-17LCD-HMPG1 Installation And Operating Instructions Manual
-
-
-
-
-
-
LG Electronics 37LC2R User manual
-
-
