Korg microKORG S Owner's manual

Category
MIDI keyboards
Type
Owner's manual
iv
Thank you for purchasing the Korg microKORG S synthe sizer/
vocoder. To ensure trouble-free enjoyment, please read this manual
carefully and use the product correctly.
Demo songs ......................................................................................................................7
Listening to the demo songs .......................................................................................... 7
Synth programs ................................................................................................................ 8
1. Selecting and playing a program ................................................................................ 8
2. Modifying the sound ................................................................................................... 8
Vocoder programs .......................................................................................................... 10
1. Playing a vocoder program ...................................................................................... 10
2. Modifying the sound ................................................................................................. 10
Arpeggiator .....................................................................................................................11
Using the arpeggiator ................................................................................................... 11
Editing .................................................................................. 12
Explains what you need to know when editing sounds on the microKORG S.
Basic editing ...................................................................................................................12
Basic editing procedure ............................................................................................... 12
Editing each timbre ...................................................................................................... 14
Editing a synth program ..................................................... 15
Explains the functions of the synth program parameters adjusted by edit control knobs
15 for the corresponding setting of the EDIT SELECT 1/2 dials.
The structure of a synth program ................................................................................ 15
Overview ....................................................................................................................... 15
Introduction ........................................................................... 1
Explains the features of the microKORG S, and the names and functions of each part.
Main Features ...................................................................................................................1
Front and rear panel ......................................................................................................... 2
Front panel .....................................................................................................................2
Rear panel ......................................................................................................................4
Preparations .......................................................................... 5
Explains how to connect external audio devices and the included mic, and how to turn on
the power.
Connections ...................................................................................................................... 5
Connections from the audio outputs .............................................................................. 5
Connections to the audio inputs .................................................................................... 5
Connections to MIDI equipment/computers .................................................................. 5
Connecting the included mic .......................................................................................... 5
Turning the microKORG S on .......................................................................................... 6
1. The power supply ....................................................................................................... 6
2. Turning the microKORG S on ..................................................................................... 6
3. Turning the microKORG S off ..................................................................................... 6
Quick Start ............................................................................. 7
Explains how to get started using the microKORG S (listen to the demos, select
programs, use the arpeggiator and performance functions), and perform basic editing.
Table of Contents
v
14. CH PAN A, 15. CH PAN BVOCODER ................................................................................... 38
Editing the effects and EQ.................................................. 39
Explains the function of the effect and EQ parameters adjusted by edit control knobs 15
for the corresponding setting of the EDIT SELECT 1/2 dials.
The microKORG S's effect structure ............................................................................ 39
Overview ....................................................................................................................... 39
16. MOD FX
— SYNTH/VOCODER ..................................................................................................... 40
17. DELAY
— SYNTH/VOCODER ........................................................................................................ 41
18. EQ
— SYNTH/VOCODER ............................................................................................................... 42
Editing the arpeggiator ....................................................... 43
Explains the function of the arpeggiator parameters adjusted by edit control knobs 15
for the corresponding setting of the EDIT SELECT 1/2 dials.
The structure of arpeggiator ......................................................................................... 43
Overview ....................................................................................................................... 43
19. ARPEG. A
— SYNTH/VOCODER .................................................................................................. 44
20. ARPEG. B
— SYNTH/VOCODER .................................................................................................. 45
Overall settings (GLOBAL) ................................................. 46
Explains the function of the Global parameters adjusted by edit control knobs 15 for the
corresponding setting of the EDIT SELECT 1/2 dials.
GLOBAL structure .......................................................................................................... 46
Overview ....................................................................................................................... 46
21. GLOBAL ......................................................................................................................47
1. VOICE
— SYNTH/VOCODER ....................................................................................................... 16
2. PITCH
— SYNTH/VOCODER ........................................................................................................ 17
3. OSC1 (Oscillator 1)
— SYNTH/VOCODER ............................................................................... 18
4. OSC2 (Oscillator 2)
— SYNTH .................................................................................................. 22
5. MIXER
— SYNTH .......................................................................................................................... 23
6. FILTER
— SYNTH .......................................................................................................................... 24
7. FILTER EG
— SYNTH .................................................................................................................. 26
8. AMP
— SYNTH .............................................................................................................................. 27
9. AMP EG
— SYNTH/VOCODER .................................................................................................... 28
10. LFO 1, 11. LFO 2
— SYNTH/VOCODER ................................................................................... 29
12. PATCH 1, 13. PATCH 2, 14. PATCH 3, 15. PATCH 4
— SYNTH ......................................... 30
Editing a vocoder program ................................................. 31
Explains the function of the vocoder program parameters adjusted by edit control knobs
15 for the corresponding setting of the EDIT SELECT 1/2 dials.
The structure of a vocoder program ............................................................................ 31
Overview ....................................................................................................................... 31
1. VOICE
— SYNTH/VOCODER ........................................................................................................... 32
2. PITCH
— SYNTH/VOCODER ........................................................................................................... 32
3. OSC1
— SYNTH/VOCODER ............................................................................................................ 32
4. AUDIO IN 1
VOCODER ............................................................................................................... 33
5. MIXER
VOCODER ........................................................................................................................ 34
6. FILTER
VOCODER ....................................................................................................................... 35
7. FC MOD
VOCODER ..................................................................................................................... 36
8. AMP
VOCODER ............................................................................................................................ 37
9. AMP EG
— SYNTH/VOCODER ....................................................................................................... 37
10. LFO 1, 11. LFO 2
— SYNTH/VOCODER .................................................................................... 37
12. CH LEVEL A, 13. CH LEVEL B
VOCODER ........................................................................ 38
Table of Contents
vi
Table of Contents
Using the microKORG S with other MIDI devices (MIDI) .....
48
Explains how to make connections with other MIDI devices, and explains the function of
the MIDI parameters adjusted by edit control knobs 15 for the corresponding setting of
the EDIT SELECT 1/2 dials.
MIDI on the microKORG S ............................................................................................. 48
Overview ....................................................................................................................... 48
Connecting MIDI devices/computers ........................................................................... 48
MIDI-related settings after connection ......................................................................... 49
22. MIDI ............................................................................................................................ 51
Messages transmitted and received by the microKORG S ....................................... 52
Saving Data .......................................................................... 58
Explains how to save a program or Global settings that you edited.
Saving your edited settings .......................................................................................... 58
Saving a program ......................................................................................................... 58
Saving GLOBAL, MIDI, and SHIFT function settings .................................................. 58
Favorites function ............................................................... 59
Explains how to select and assign a favorite program.
Selecting and assigning sa favorite program ............................................................. 59
Selecting a favorite program ........................................................................................ 59
Assigning a favorite program ....................................................................................... 59
SHIFT functions ................................................................... 60
Explains functions that use the SHIFT key, such as initializing a program and restoring
the factory settings.
Copying and exchanging timbres — SYNTH .................................................................................. 60
Initializing a program ........................................................................................................ 60
Initializing CH LEVEL and CH PANVOCODER ....................................................................... 61
MIDI Filter ......................................................................................................................... 61
Assigning control changes ............................................................................................... 62
Data dump ........................................................................................................................ 63
Restoring the factory settings .......................................................................................... 64
Write protect setting ......................................................................................................... 64
Other SHIFT key functions ............................................................................................... 65
Appendix .............................................................................. 66
Provides a troubleshooting checklist, and other information such as the specifications of
the microKORG S.
LFO 1/2 and delay time synchronization ......................................................................... 66
Troubleshooting ................................................................................................................ 67
Specifications and options ............................................................................................... 68
Conventions in this manual
Display indications
The numerical values of various parameters appearing in this manual are only for explanatory
purposes. They may not necessary match what appears in the display of your microKORG S.
Knob positions and parameters
Knob positions and parameter values appearing in this manual (p.16 and following) are approxi-
mations. There may be slight discrepancies between knob positions and parameter values.
Symbols , ,
These symbols respectively indicate cautions, advice, and MIDI-related explanations.
1
Introduction
3.
256 built-in programs
The microKORG S contains 256 built-in programs. When shipped, the TRANCE–
S.E./HIT banks contain synth programs, and the VOCODER bank contains
vocoder programs.
4.
Process the waveform of an external input source
The waveform of an external audio source can be input via the AUDIO IN 1 and
2 jacks, and processed in the same way as the internal waveforms.
5.
Virtual Patch function
Modulators and controllers such as filter EG, amp EG, LFO 1/2, keyboard
tracking, and wheel can be virtually patched (without using actual patch cables)
to parameters such as pitch, cutoff, and amp. This gives you even more creative
flexibility.
6.
Effects to add the finishing touch to your sound
For even greater possibilities, the microKORG S provides three types of
modulation effect, three types of delay, and an equalizer.
The delay effect can be synchronized with the arpeggiator or an external MIDI
clock, allowing numerous applications in live performance.
7.
Step Arpeggiator
The microKORG S's arpeggiator lets you produce an arpeggio simply by holding
down a chord.
You can choose from six arpeggio types, and adjust the duration and spacing of
the arpeggiated notes. You can also specify whether a note will be on or off for
each of up to eight steps, letting you create a broad range of modified rhythms
and other effects.
Main Features
1.
Analog modeling synthesizer
The analog modeling system of the microKORG S uses DSP technology to
simulate an analog synthesizer. Starting with a variety of different oscillator
algorithms (such as the sawtooth and square waves familiar to users of analog
synthesizers) you can use the various controls located on the front panel to edit
any sound, or to create sounds of your own. All sound parameters are organized
into “sections”. By selecting the appropriate section and turning the appropriate
knob you can edit sounds quickly, easily and intuitively. You can also modify the
sound in realtime as you perform.
Number of timbres: maximum 2 (when layer is used)
Maximum polyphony: 4 voices
Structure: 2 oscillators + noise generator: sawtooth wave, square wave,
triangle wave, sine wave, Vox wave, DWGS x 64, Noise,
Audio In (eight types)
PWM function, OSC Sync function, Ring Mod. function, OSC
Sync+Ring Mod. function
Multimode filters: -24 dB/oct LPF, -12 dB/oct LPF, -12 dB/
oct BPF, -12 dB/oct HPF (four types)
Filter EQ, Amp EG, LFO1, LFO2 (LFO: six waveforms, can be
synchronized to the arpeggiator or to external MIDI clock)
2.
Vocoder
You can connect a mic to one of the microKORG S's AUDIO IN 1 jacks, and use it
as a vocoder – a device that imposes the spectral character of a voice (or other
audio signal) on the sound of an oscillator, producing the impression that the
oscillator is speaking.
The vocoder consists of eight channels (sixteen filters used in pairs). In addition to
simulating the sounds of classic vocoder units, you can change the filter frequency
and adjust the level and pan of each band to create original vocoder sounds.
Maximum polyphony:
4 voices
Structure:
8 channel vocoder, adjustable level/pan for each channel,
Formant Shift function, 1 oscillator + noise generator (eight types)
Filter EG, Amp EG, LFO1, LFO2 (LFO: six waveforms, can be
synchronized to the arpeggiator or to external MIDI clock)
2
Front and rear panel
Front panel
VOLUME
knob
Adjusts the volume of the output
from the OUTPUT jacks (L/MONO,
R), built-in speakers and headphone
jack.
BANK SELECT
dial
Selects the program bank.
BANK SIDE
key
Switches between the two sides of each program bank.
This indicator will blink when the microKORG S
receives a MIDI program change, or if the BANK
SELECT dial no longer matches the actual bank.
AUDIO IN
1
/
2
LEDs
These will light if a signal is being input to the
AUDIO IN jacks. They will light red if an
input overload occurs.
Display
Indicates the current program number,
the value of the selected parameter, or
other various messages.
ARPEGGIATOR
ON
/
OFF
key
Switches the arpeggiator on/off.
(When on, the key LED will light.)
WRITE
key
Saves an edited program or global
setting. (p.58)
SHIFT
key
By holding down this key and pressing
another key, you can access various
utility functions. (p.60)
Also, while this key is lit, it will
function as an EXIT key to exit the
current state and return to normal
operation.
PROGRAM NUMBER
1
,
2
,
3
,
4
,
5
,
6
,
7
,
8
keys
Select program numbers (the LED of
the selected key will light).
You can also use these keys to turn each
of the eight steps of the arpeggio
on/off, adding variety to an
arpeggiated performance. (p.11)
In addition, you can hold down the
SHIFT key and press one of these keys
to access various utility functions.
(SHIFT function)
ARPEGGIATOR
TEMPO
LED
Blinks at the tempo of the
arpeggiator performance. If MIDI
CLOCK is set to External and MIDI
Clock data is being received from
the MIDI IN connector, this LED
will blink at that tempo.
PITCH
wheel
Controls the pitch.
MOD
wheel
Controls the depth of modulation.
OCTAVE SHIFT
UP
,
DOWN
keys
Shifts the pitch range of the
keyboard in steps of an octave, over
a range of +/-3 octaves.
Items on the front panel that relate
to the Vocoder are printed in green.
3
Vocoder parameters
These are the parameters
for a Vocoder program.
Synth parameters
These are the parameters
for a Synth program.
Built-in speakers
TIMBRE SELECT
1
LED,
TIMBRE SELECT
2
LED
If a Synth program using Layer is selected,
the LED(s) will light to indicate which
timbre(s) will be edited. If a timbre is being
soloed, its LED will blink.
If a Vocoder program is selected, the 1 LED
will light if the formants are being held.
EDIT SELECT 1
dial,
EDIT SELECT 2
dial
These dials select the section to edit.
(p.12)
SYNTH/VOCODER
1
LED,
SYNTH/VOCODER
2
LED
These indicate whether the selected
program is a Synth or a Vocoder program.
If both the SYNTH/VOCODER 1 and 2
LEDs are lit, the Performance Edit function
is enabled.
If only one LED is lit, the EDIT SELECT
dial corresponding to the lit LED will be the
object of your editing. If the object of
editing has not been finalized, the LED will
blink.
If a Synth program using "layer" is selected,
this key allows you to chose which timbre
will be edited or sounded, or lets you edit
both timbres simultaneously (Sync).
If a Vocoder program is selected, this key
switches Formant Hold on, letting you hold
the tone currently produced by the vocoder
without continuing to speak into the mic.
EDIT CONTROLS
1
,
2
,
3
,
4
,
5
knobs
These knobs edit the Performance Edit
parameters or the parameters of the section
selected by the EDIT SELECT 1 and 2 dials.
(p.8, 9, 10)
ORIGINAL VALUE
LED
This will light if the value of the parameter
currently being edited matches the value that is
stored in the program. (p.13)
(This LED does not function for Performance
Edit.)
TIMBRE SELECT
/
FORMANT HOLD
key
Front and rear panel
4
Front and rear panel
OUTPUT L/MONO, R jacks
Connect these to your powered
monitors, stereo amp, mixer, or
multi-track recorder.
If you want to use the microKORG
S in monaural, connect the
L/MONO jack.
HEADPHONES jacks
Connect a pair of
headphones to this jack
(1/4" stereo).
MIDI THRU connector
Received MIDI data is
re-transmitted without
change from this
connector. Use this when
you want to connect
multiple MIDI devices to
the same "stream" of
data.
MIDI OUT connector
This connector
transmits MIDI data.
MIDI IN connector
This connector receives
MIDI data.
MIDI
Use these connectors to connect the microKORG S to an external MIDI
device so that MIDI data can be exchanged.
MIC/LINE switch
If a mic is connected to the DYNAMIC
or CONDENSER jack, set this switch to
the MIC position. If an external
sequencer or audio device is connected,
set this switch to the LINE position.
VOLUME 1 knob
Adjusts the input level from the
DYNAMIC or CONDENSER jack.
CONDENSER jack
Connect a condenser mic to this jack.
DYNAMIC jack
Connect a dynamic mic, synthesizer, or
audio device to this jack.
If both the DYNAMIC jack and the
CONDENSER jack are connected, the
audio signal from the CONDENSER jack
will take priority.
AUDIO IN 1
A Synth program can use an audio signal from a synthesizer or external device
connected here as the oscillator 1 waveform.
A Vocoder program can use an audio signal from a mic etc. connected here as the
modulator audio.
VOLUME 2 knob
Adjusts the input level
from the LINE jack.
LINE jack
Connect a synthesizer
or audio device here.
AUDIO IN 2
A Synth program can use an audio signal from an
external device connected here as the oscillator 1
waveform.
A Vocoder program uses this input signal as the
external carrier for the vocoder.
Power switch
Switches the power on/off. (p.6)
AC adaptor jack
Connect the included AC adaptor to
this jack. After connecting the AC
adaptor to the microKORG S, plug
it into an AC outlet.
Grounding Screw
Use this screw to ground the unit.
To do so, loosen the screw and
attach a grounding wire. After
loosening the screw and attaching
the grounding wire to the unit, be
sure to tighten the screw. Do not use
the unit if the screw is removed.
Mic holder
You can attach the included
mic to this holder (p.5).
Rear panel
5
Preparations
If you want to use an external sequencer, rhythm machine, or audio source as the
carrier of the vocoder, connect that device to AUDIO IN 2 (p.34).
If you want to process the waveform of a synthesizer or sampler, connect a mic or
the output jack of your external device to the AUDIO IN 1 and 2 jacks (p.21).
Connections to MIDI equipment/computers
The keyboard, and controllers etc. of the microKORG S can be used to control an
external MIDI tone generator. Conversely, another MIDI keyboard or sequencer can
control the tone generator of the microKORG S to produce sound. (p.48)
Connecting the included mic
A mic for use with the vocoder is included with the microKORG S. Here's how to
attach the included mic to the microKORG S.
Do not apply excessive force to the neck of the mic, or repeatedly bend it back
and forth any more than necessary. Doing so may cause malfunctions such as
breakage of the internal wiring.
1
Grasp the base of the included mic, align the protrusion of the mic with the slit
of the mic holder, and push it into the holder.
Do not use excessive force.
When removing the included mic, grasp it by the base and pull it out.
2
Turn the rear panel AUDIO IN 1 VOLUME 1 knob
to the MIN position, and set the MIC/LINE switch
to the MIC position.
3
Connect the plug of the included mic to the
AUDIO IN 1 CONDENSER jack.
Connections
The diagram below shows basic connections for the microKORG S. Make substitu-
tions as appropriate for your equipment.
MIDI
IN
MIDI
OUT
Connect to an AC outlet
AC adapter (included)
DC plug
Powered monitors, etc.
Phones
MIDI keyboard, tone generator module, rhythm machine etc.
Included mic
Grounding Screw
Be sure to turn off the power of all devices before making connections. Failing
to take this precaution may cause your speaker system to be damaged, or may
cause malfunctions.
Connections from the audio outputs
Connect the microKORG S's OUTPUT L/MONO and R jacks to the input jacks of
your mixer or powered monitor system.
In order to take full advantage of the potential of the microKORG S, we recommend
that you use stereo outputs.
If you are making monaural connections, use the L/MONO jack.
Connections to the audio inputs
If you want to use the microKORG S as a vocoder, connect a mic or other audio
source to AUDIO IN 1, and use that audio source as the modulator (p.10).
Slit
Protrusion
Mic base
Neck
6
Turning the power on
2. Turning the microKORG S on
Before you turn the microKORG S on, you should lower the level of your
monitor system or other connected output device.
1
Turn the microKORG S's VOLUME knob all the way toward the left.
2
Hold down the power switch until the display lights up.
The display will indicate the program number.
3
Turn the microKORG S's VOLUME knob toward the right to an appropriate
position.
4
Adjust the volume of your external output device.
21, 3
3. Turning the microKORG S off
After saving any necessary data (such as a program you have edited) turn the
instrument off using the reverse order of the power-on procedure.
The Auto Power-Off Function
The auto power-off function automatically turns off the microKORG S if it is not
played or operated* for a set period of time. The factory default setting is 4 hours.
* Turning the [VOLUME] knob is not considered an operation.
( Quick Start Guide)
1. The power supply
Before you connect the power supply, make sure that the power switch is turned off
(i.e., that the display and switches are unlit).
Connecting the AC adaptor
Firmly insert the plug of the included AC adaptor into the jack. Then connect the
AC adaptor to an AC outlet.
Never use any AC adaptor other than the included one.
Inserting/exchanging batteries
The microKORG S can also be operated on batteries.
Batteries are not included. You will need to purchase them
separately.
1
Make sure that the power switch on the microKORG S is turned
off. Then open the battery cover located on the bottom of the case.
2
Insert six AA alkaline batteries.
Be careful to observe the correct polarity of the batteries.
3
Close the battery cover.
When the microKORG S is used with batteries, the speaker output level will be
lower than when the AC adapter is used. In addition, the output level will
gradually decrease as the battery power level diminishes.
Low battery display
When the batteries run low, the display will indicate " ," and the "." at the far
right will begin blinking. If you continue using the microKORG S, the Protect
setting will be turned on automatically, and you will be unable to edit program or
global settings. We recommend that you install new batteries or switch to the AC
adaptor as soon as possible. If this state occurs while you are editing, and you want
to save your settings, connect the AC adaptor and execute the Write operation.
You can cancel the "
" display by pressing the SHIFT key.
Batteries that have become unusable should be removed from the microKORG
S as soon as possible. Leaving such batteries installed may cause malfunctions
(due to battery leakage, etc.). You should also remove the batteries if you will
not be using the microKORG S for an extended period of time.
7
Quick Start
Demo songs
Listening to the demo songs
The microKORG S contains several demo songs.
Here's how to listen to the demo songs and hear the sounds of the microKORG S.
1
Hold down the SHIFT key and press the ARPEGGIATOR ON/OFF key.
The demo will begin playing. The SHIFT, OCTAVE SHIFT DOWN, UP, and
PROGRAM NUMBER key LEDs will light.
2
To switch the demo song during playback, press the OCTAVE SHIFT UP or
DOWN key.
You can also use the PROGRAM NUMBER 1–8 keys to select a demo song.
3
When you press the SHIFT key, demo playback will stop.
The SHIFT, OCTAVE SHIFT DOWN and UP key will go dark, and the
microKORG S will return to normal playing mode.
1, 31
22
8
Synth programs
2. Modifying the sound
On the microKORG S, you can modify the sound to add expression to your
performance by turning the edit control knobs 15, by moving the PITCH or MOD
wheels, or by the way that you play the keyboard.
Try out various ways to modify the selected program.
Using the Performance Edit function to modify the sound
When both the upper and lower SYNTH/VOCODER LEDs are lit, the Performance
Edit function is active. In this state, the edit control knobs 15 are automatically
assigned to control the parameters listed below. Turn these knobs to control the
sound in realtime.
When using Performance Edit, the display shows the program number.
Performance Edit will be cancelled if you turn the EDIT SELECT 1 or EDIT
SELECT 2 dial to select a different section, or if you hold down the SHIFT key
and press the BANK SIDE key. To enable the Performance Edit function, press
the PROGRAM NUMBER key that is lit.
When Performance Edit is active, you can edit the sound in the following ways.
Knob 1: CUTOFF
Adjusts the cutoff frequency of the filter. This will affect the brightness of the
sound. Normally, turning the knob toward the left will darken the sound, and
turning it toward the right will brighten the sound.
Edit control knobs 1–5
PROGRAM NUMBER keys 1–8
SYNTH/VOCODER LED
TIMBRE SELECT
1. Selecting and playing a program
The microKORG S contains 256 programs that you can select and play immediately.
Programs are arranged in Banks. Each bank contains two “Sides”, and each side
contains eight programs. To select different programs, use the front panel PRO-
GRAM SELECT knob and PROGRAM NUMBER keys. As an example, here's how
to select program "b.26".
1
Press the BANK SIDE key to select "b" as the program side.
The BANK SIDE key will light when side B is selected, and will be dark when
side A is selected.
2
Turn the BANK SELECT dial to the TECHNO/HOUSE position.
The display will indicate "2" as the program bank.
3
Press the 6 key to select the program number.
Notice that the SYNTH/VOCODER LED for the SYNTH position is lit.
The program will change at the moment you switch either the Side, Bank, or
Number.
4
Play the keyboard to hear the sound.
5
You can use the OCTAVE SHIFT UP or DOWN keys to shift the pitch range of
the keyboard. (p.9)
12
3
Program Side
EDIT SELECT 2
Program Bank
SYNTH/VOCODER
LED
Program Number
5
9
Knob
2
: RESONANCE
Adjusts the resonance of the
filter. This adds a distinctive
character to the sound.
Knob 3: EG ATTACK
(FILTER EG + AMP EG ATTACK)
Adjusts the attack time of the filter EG and amp EG. This will affect the amount of
time from note-on (when you press a key) until the attack level is reached. Turning
this knob will adjust the speed at which the filter EG and amp EG will rise.
Normally, turning the knob toward the left will shorten the attack time, and turning
it toward the right will lengthen the attack time.
Knob 4: EG RELEASE (FILTER EG + AMP EG RELEASE)
Adjusts the release time of the filter EG and amp EG. This will affect the amount of
time from note-off (when you release
a key) until the sound disappears.
Turning this knob will adjust the
release time of the filter EG and amp
EG. Normally, turning the knob
toward the left will shorten the release
time, and turning it toward the right
will lengthen the release time.
Knob 5: TEMPO
Adjusts the tempo of the arpeggiator, LFO, and DELAY (if "TEMPO SYNC" is ON).
Turning the knob toward the left will slow down the tempo, and turning it toward
the right will speed up the tempo. The ARPEGGIATOR TEMPO LED will blink at
the specified tempo.
If you have selected a Layer program that uses two timbres (one of the TIMBRE
SELECT LEDs is lit), you can choose which timbre will be affected by your
edits. Press the TIMBRE SELECT key to switch timbres. (p.14)
In the EDIT mode, the parameters that are assigned to each knob are also be edited
via the parameters of the section selected by the EDIT SELECT 1 and EDIT
SELECT 2 dials. For details on each function, refer to p.24 for CUTOFF and
RESONANCE, p.26 and 28 for EG ATTACK and EG RELEASE, or p.44 for TEMPO.
A sound modified modify using Performance Edit can be written into memory
if desired. (p.58)
Using the
PITCH
and
MOD
wheels for control
PITCH
wheel:
The effect will be applied when you move the wheel away from
or toward yourself. When the wheel is in the center position,
there will be no effect.
Normally this wheel is used as the pitch bender, so that the
pitch will rise when you move the wheel away, and fall when
you move the wheel toward yourself.
MOD
wheel:
The effect will be applied when you move the wheel away from yourself, and will
not apply when you move the wheel toward yourself.
You can use this wheel to control the vibrato depth (p.17), or to adjust the tone by
controlling the cutoff frequency (p.30).
Since the PITCH and MOD wheels can be used as virtual patch sources, you
can use them to produce a variety of effects other than described above. (p.30)
Using the OCTAVE SHIFT
UP
and
DOWN
keys for control
You can use these keys to shift the
pitches assigned to the keyboard,
in one-octave units over a range of
+/-3 octaves. (p.8, 52)
Using the keyboard for control
Keyboard Tracking:
Keyboard tracking uses the position of the note on the keyboard to affect the sound.
Normally, this is used to brighten the sound as you play upward, or to create
differences in volume between high and low notes.
Velocity:
The strength with which you play the keyboard can affect the sound.
Normally, your playing strength will affect the tone and volume.
Since velocity and keyboard tracking can be used as a virtual patch source, you
can use them to produce a variety of effects other than those described above.
(p.30)
Synth programs
0
0
Low resonance value High resonance value
In the case of a LPF (Low Pass Filter)
Cutoff Cutoff Cutoff Cutoff
0
Attack Level
Time
Note on
Note off
Cutoff
+
Level
[3]: Attack Time [4]: Release Time
a: Decay Time b: Sustain Level
[3]
b
[4]
a
C6–C9 UP lit red
C5–C8 UP lit orange
C4–C7 UP lit green
Key operation
Press UP key
Key operation
Press
DOWN key
C3–C6 dark
C2–C5 DOWN lit green
C1–C4 DOWN lit orange
C0–C3 DOWN lit red
Keyboard range Key LED
10
Vocoder programs
1. Playing a vocoder program
Here's how to connect the included mic and play a vocoder program.
A vocoder applies the spectral character of an externally-input voice (the "modula-
tor") to an oscillator or other sound (the "carrier"), and outputs the result. In the
most popular use of a vocoder, you can speak or sing into a mic and play chords on
the keyboard, to create the impression that an instrument is speaking or singing.
Alternatively, you can create a variety of interesting effects by inputting audio
signals other than a human voice (such as
rhythm sounds).
1
On the rear panel, turn the AUDIO IN 1
VOLUME 1 knob to the MIN position, and
set the MIC/LINE switch to the MIC
position.
2
Connect the included mic to the AUDIO IN
1 CONDENSER jack.
If you use a mic other than the included
one, connect it to the appropriate jack.
3
Select a vocoder program.
Using the procedure described on page 8,
select program "A.84" for this example.
With the factory settings, the VOCODER bank contains vocoder programs.
Notice that the SYNTH/VOCODER LED VOCODER is lit.
4
Vocalize into the mic, and turn the VOLUME 1 knob toward MAX without
allowing the AUDIO IN 1 LED to light red.
Raising the AMP "DIRECT LEVEL" value will cause the input sound to be
output directly, so raise the level if you want to hear the input sound while you
make adjustments. (p.37)
5
While vocalizing into the mic, play the keyboard.
Try pronouncing different words and changing the chords you play, and listen
to the vocoder effect.
If you cannot hear the effect, try adjusting the AMP "LEVEL" (knob 1) (p.37)
or MIXER "OSC 1 LEVEL" (knob 1) (p.34).
6
While vocalizing into the mic and using the keyboard to play vocoder sounds,
you can "freeze" the current tone of the vocoder by pressing the FORMANT
HOLD key. This allows you to continue to play the current vocoder sound, even
when you are not vocalizing. This tone will be remembered when you Write the
vocoder program to memory.
Several of the VOCODER bank programs will sound even if you simply play
the keyboard. These programs were written with FORMANT HOLD turned on.
2. Modifying the sound
In the same way as for a synth program, you can modify the sound of a vocoder
program by turning the edit control knobs 15, by moving the PITCH and MOD
wheels, and by the way that you play the keyboard. As described on the preceding
pages, try out various changes for the selected program.
The following Performance Edit operations work differently than for a synth
program.
Knob
1
: CUTOFF, Knob
2
: RESONANCE:
These control the carrier by adjusting the band pass filter cutoff frequency of the
carrier. See page 35.
Knob
3
: EG ATTACK, Knob
4
: EG RELEASE:
Only the amp EG can be controlled.
Also, a vocoder program does not allow you to switch timbres.
Included mic
1 1, 4 2
46
Edit control knobs 1–5
3
SYNTH/VOCODER
LED
11
Arpeggiator
Using the arpeggiator
The arpeggiator is a function that automatically plays the individual notes of a held
chord in a rhythmic pattern. The microKORG S's arpeggiator provides six types of
arpeggio pattern, and lets you adjust the duration (gate time) of the notes that are
sounded. The microKORG S also provides a "step arpeggiator" that lets you specify
the on/off status of each note in the chord for as many as eight steps, letting you
create an even wider range of arpeggio patterns.
When you play the chord shown above on the keyboard,
the notes will be sounded as shown at the right. (TYPE: UP)
1
Select a program. (p.8)
You can use the arpeggiator with either a synth program or a vocoder program,
but let's select synth program b.58 for this explanation.
2
Press the ARPEGGIATOR ON/OFF key to make the key LED light.
(LED lights up. Red: the latch is on / Orange: the latch is off.)
3
Hold down a chord on the keyboard, and the arpeggiator will run.
Modifying the arpeggio
4
Turn the EDIT SELECT 2 dial to the ARPEG.A or ARPEG.B position.
5
Turn the edit control 1–5 knobs to adjust the arpeggiator parameters, changing
the way that the arpeggiator is sounded.
For example if you selected ARPEG.A in step 4, the parameters shown in the
lower left diagram (below) will be selected as the knob functions. Turning knob
1 will change the tempo of the arpeggio, and turning knob 3 will change the
duration of the arpeggiated notes. Turning knob 4 will switch the arpeggio
pattern, changing the order in which the notes are sounded (p.44). (For
details on each parameter, refer to the appropriate page.)
Refer to page 13 for a note regarding cases in which the value does not change.
Using the step arpeggiator to vary the arpeggio
6
If the EDIT SELECT 2 dial is turned to the ARPEG.A or ARPEG.B position, the
PROGRAM NUMBER 1–8 keys will act as arpeggiator step keys, and will be lit
(the "on" state) for the number of valid steps.
You can vary the arpeggio pattern by muting individual steps. Pressing any
step key(s) will cause the LED to go dark, and that step(s) will be played as a
rest (see the diagram below). The Step Arpeggiator function lets you switch
each step of the arpeggio on/off in this way to modify the arpeggio pattern.
To change the number of valid steps in the arpeggio, set the EDIT SELECT 2
dial to ARPEG.B and turn knob 4. (p.45)
7
When you press the ARPEGGIATOR ON/OFF key (the key LED goes dark), the
arpeggio will stop playing.
2, 7
6
54, 6
TYPE: UP
LAST STEP: 8
12
Editing
Basic editing procedure
All of the editable parameters are organized into "sections". Each section contains
up to five parameters, which are controlled using the edit control knobs 15. The
two dials labelled EDIT SELECT 1 and EDIT SELECT 2 are used to select a section.
Notice the six columns of text under the five knobs. The first column identifies the
name of each section, and the following five columns show the parameter assigned
to each of the knobs above. The text to the left side indicates the parameters used
for a synth program. The text to the right side (in green) indicates the parameters
available for a vocoder program.
On the microKORG S there are two basic ways for you to create a sound.
Select the program that is closest to the sound you want to create, and edit that
program as necessary to change it as desired
Start from an initialized program ("blank slate"), and create the sound from
scratch
Broadly speaking, the procedure is as follows.
1
Select the program that you want to start from. (p.8)
If you want to start from scratch, execute the Initialize operation. (p.60)
2
Turn the EDIT SELECT 1 or EDIT SELECT 2 dial to select the section that
includes the parameter you want to edit. (The SYNTH/VOCODER LED for the
side you are editing will light.)
Consider how the current program differs from the sound you have in mind,
and select the parameter that you want to edit.
If you are creating the sound from scratch, note that the
EDIT SELECT 1 and EDIT SELECT 2 dials access param-
eter sections in a logical order for creating the sound. You
can turn the dials in sequence to step through these
parameter sections in the appropriate order.
By holding down the SHIFT key and pressing the BANK
SIDE key, you can switch between EDIT SELECT 1 and
EDIT SELECT 2 as the section to edit.
3
Turn edit control knob 1, 2, 3, 4, or 5 to edit the assigned parameters.
For example if you are editing a synth program and set the EDIT SELECT 1 dial
to FILTER, the parameters shown below the diagram at the bottom of this page
will be selected as the function of the five edit control knobs. (The left param-
eter of each pair is the synth program parameter, and the right parameter – in
green – is the vocoder program parameter.)
Turning knob 2 will change the cutoff frequency value, affecting the tone.
Turning knob 3 will change the resonance value, adding a distinctive character
to the tone. (p.24)
Go ahead and try editing the AMP EG parameters "ATTACK" and "DECAY"
(p.28), the PITCH parameter "PORTAMENTO" (p.17), or the MOD FX
(p.40) or DELAY (p.41) parameters to hear the result. (For details on each
parameter, refer to the appropriate page.)
4
If you want to make precise adjustments to a value, hold down the SHIFT key
and press the OCTAVE SHIFT UP or DOWN key (UP, DOWN, and SHIFT keys
will light). Now you can use the UP and DOWN octave keys to step through
the values for the selected parameter.
To cancel this function, press the lit SHIFT key.
If you press the UP and DOWN keys simultaneously, that parameter will return
to the value it had when you selected it.
5
Repeat steps 2–4 as necessary to create the desired sound.
6
Write the program into memory. (p.58)
Basic editing
234 ORIGINAL VALUEBANK SIDE
SYNTH/VOCODER LED
4
13
If you select another program or turn the power off before you write, your edits
will be lost.
If the parameter value does not change when you turn knobs
1
5
When you use EDIT SELECT 1 or EDIT SELECT 2 to select a section and turn
knobs 15 to edit the parameter values, the value in the display will sometimes
continue blinking, and the parameter value will not change.
This occurs when there is a discrepancy between the actual value of the
parameter being edited (the value that is blinking in the display) and the
position of the knob. If the actual value is significantly different from the
position of the knob, and the value changed immediately when you moved the
knob, the sound would change in a sudden and unnatural way.
To prevent this from happening, the knob and parameter will begin changing in
tandem only when the knob position corresponds to the actual value of the
edited parameter (the value in the display will stop blinking).
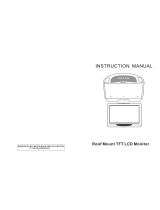
For example, suppose that you turn knob 1 to edit a parameter,
so that the knob is in the position shown at left.
Then you use the EDIT SELECT 1 dial to switch to a different
parameter section, and want to edit the parameter assigned to
knob 1. The actual value of this parameter is at the position of
the triangle in the diagram at left. (The actual value will blink
when you turn the knob slightly.) The parameter value will not
change until you turn the knob all the way to that position.
When the knob reaches the position of the actual value, the knob
and parameter value will begin changing in tandem, so that you
can edit the value. (When the knob reaches the actual value, the
value in the display will stop blinking.)
To return to the original parameter values of a program
The edit control ORIGINAL VALUE LED will light to indicate the parameter
values of a preset program or a program that you saved.
If you want to return parameters to their original values, turn knobs 15 so that
the ORIGINAL VALUE LED is lit.
If you select another program or re-select the same program while you are
editing, all parameters will return to the values of the preset program or the
previously-saved program.
In the same way as when editing a program, you can make settings for the
entire microKORG S or MIDI-related settings by selecting the desired param-
eter section and turning knobs 15 to make the settings (p.47, 51). Changes
you make to these settings will also be lost if you turn the power off, so you
must Write them if you want to keep your changes.
How to read the pages for each section (
p.16–)
24
CUTOFF [0...127]
Sets the cutoff frequency.
Increasing this value will raise the
cutoff frequency.
"CUTOFF" can be varied by
time-variant change produced
by Filter EG, by keyboard play-
ing dynamics (velocity), and by
note location (keyboard track-
ing).
If the "CUTOFF" value is low-
ered, the volume may be ex-
tremely low, or you may hear no
sound at all.
RESONANCE [0...127]
Sets the resonance of the filter.
This will emphasize the overtones
near the cutoff frequency specified
by "Cutoff," adding a distinctive
character to the sound. Increasing
this value will increase the effect.
(Figure 6-4)
Since movement of the "CUTOFF"
knob will affect the overtones that
are boosted by resonance, it is best
to adjust "CUTOFF" and "RESO-
NANCE" in conjunction with each
other.
TYPE [-24dB LPF, -12dB LPF,
-12dB BPF, -12dB HPF]
Selects the type of filter
24dB LPF ( ):
The -24 dB LPF (-24 dB/octave Low
Pass Filter) is the most common
type of filter; it passes the frequen-
cies that are below the cutoff fre-
quency, and cuts the frequencies
that are above (Figure 6-1). Low-
ering the cutoff frequency will
make the tone darker and more
mellow.
-12dB LPF ( ):
The -12 dB LPF (-12 dB/octave Low
Pass Filter) has a more gentle slope
than the -24 dB LPF, producing a
more natural-sounding effect.
("-24 dB LPF")(Figure 6-1)
Figure 6-1
LPF (Low Pass Filter)
-12dB/oct
-24dB/oct
Cutoff
Frequency
6. FILTER
— SYNTH
FILTER EG INT [-63...63]
This specifies how time-variant
modulation from the Filter EG will
be applied to the cutoff frequency
(Figure 6-5). The cutoff frequency
will change over time according to
the Filter EG settings, modifying
the tone. For example, you can use
this to create a sound that gradu-
ally begins to brighten when you
press the key, and then gradually
becomes darker.
This INT (Intensity) parameter
specifies the depth (sensitivity) to
which the Filter EG will affect the
cutoff frequency.
With a setting of 0, the Filter EG will
not affect the cutoff frequency. In-
creasingly positive (+) settings will
allow the Filter EG to have a corre-
spondingly greater effect on the
cutoff frequency. (Figure 6-6)
Increasingly negative (-) settings
will allow a correspondingly
greater effect in the opposite direc-
tion. (Figure 6-7)
FILTER KEY TRACK [-63...63]
This specifies how keyboard track-
ing (the keyboard location that you
play) will affect the cutoff fre-
quency.
For example if the sound played by
the C4 key has the desired tone but
higher notes no longer have reso-
nance or are too mellow-sounding,
you can adjust keyboard tracking to
make compensations so that the
cutoff frequency will rise for higher
notes.
With positive (+) settings, the cut-
off frequency will rise as you play
upward from the C4 note, and fall
as you play downward. With nega-
tive (-) settings, the cutoff frequency
will fall as you play upward from
the C4 note, and rise as you play
downward.
With a setting of +48, the change
in cutoff frequency will be pro-
portionate to the change in
pitch. With a setting of 0, key-
board tracking will not affect the
cutoff frequency.
The filter removes unwanted frequency regions of the sound produced by the oscillator. It determines the tone by allowing only the desired
portion of the sound to pass. "TYPE" (knob 1) selects the type of filter (i.e., the way in which it will cut the frequency). "CUTOFF" (knob 2) sets
the frequency at which the cut will occur. Normally, turning this knob toward the right will brighten the sound, and turning it toward the left
will darken the sound. "RESONANCE" (knob 3) emphasizes the frequency region near the cutoff frequency, adding a distinctive character to
the sound. Other parameters in this section let you specify the depth of the modulation applied by the filter EG, and the way in which keyboard
tracking will affect the cutoff frequency.
Figure 6-4
LPF
HPF
BPF
The effect of resonance
Low resonance value
High resonance value
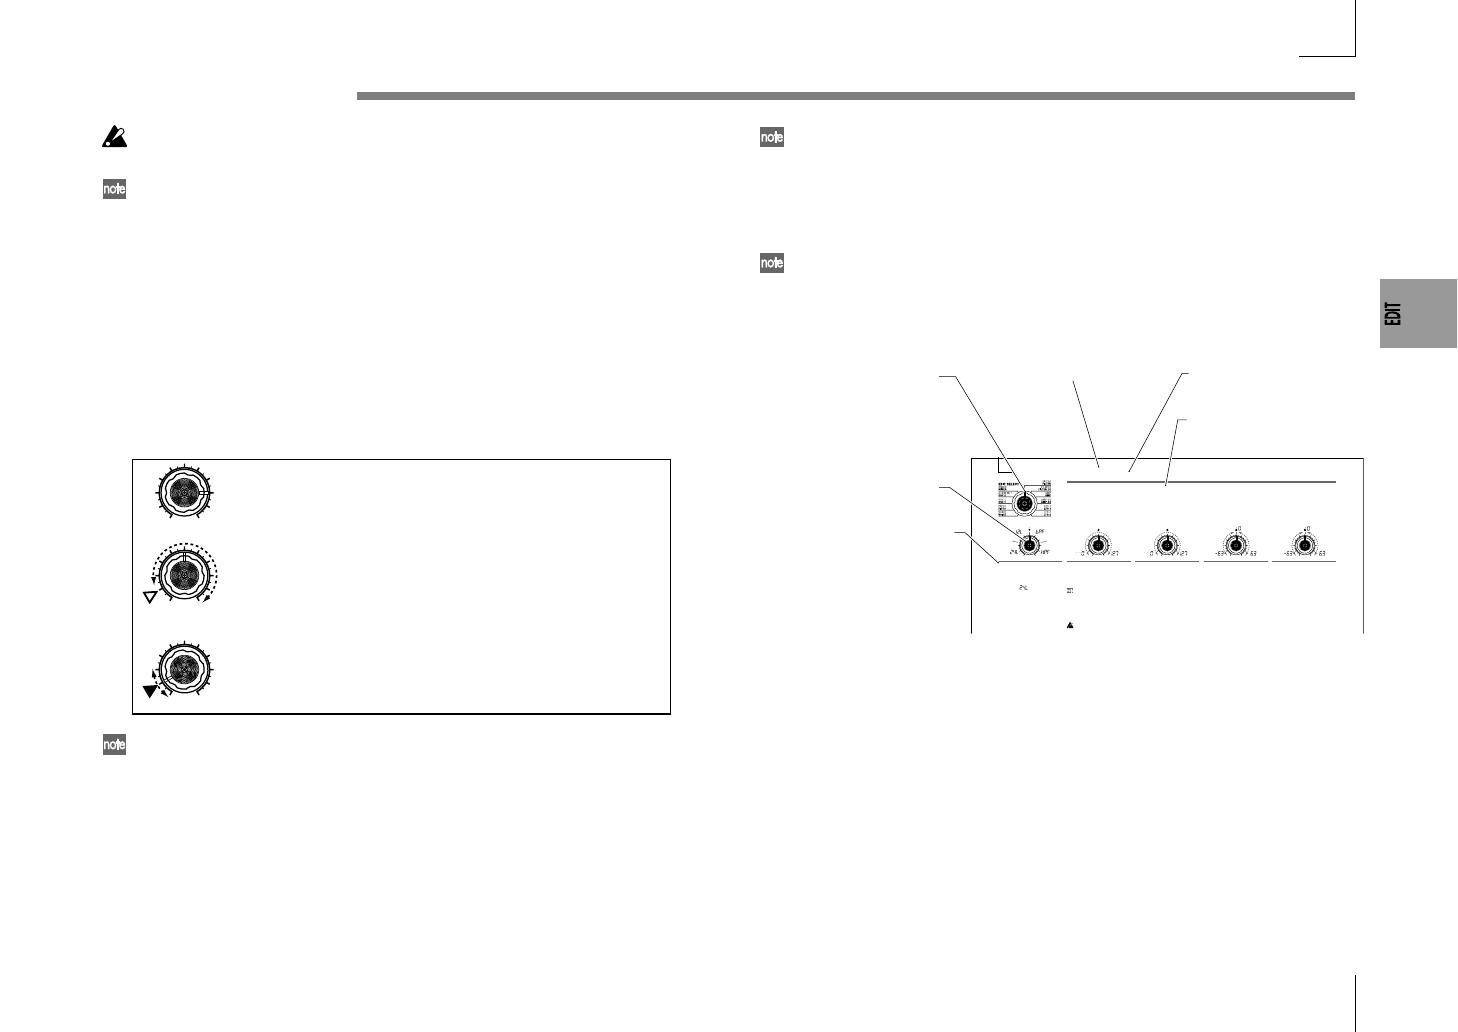
This indicates the position of
the EDIT SELECT 1/2 dial. The
EDIT SELECT 1/2 dial selects
the section that will be edited.
In this example, the FILTER
section is selected.
These are the edit control knobs
15. The markings printed
around each knob are the
values that will be selected
when you turn that knob. These
positions are approximate.
This area lists the parameters
that are edited by edit control
knobs 15 when the above
section is selected. The range of
values for each parameter is
given in square brackets [ ].
Explanations of each parameter
and its values are given below.
This is the name of the section.
When you have set the EDIT
SELECT 1 or 2 dial to the
FILTER position and would like
to see an explanation of the
parameters, refer to this page.
A summary of this section
is given here.
This section applies to
synth programs.
Basic editing
14
Editing each timbre
Synth programs can have up to two timbres.
A timbre consists of the parameters of EDIT SELECT 1 VOICE (except for
"SYNTH/VOCODER" and "SINGLE/LAYER") through LFO2 sections, and the
parameters of EDIT SELECT 2 PATCH 14 sections.
The VOICE section parameters "SYNTH/VOCODER" and "SINGLE/LAYER"
apply to the entire program.
Using both timbres (Layer)
Set the EDIT SELECT 1 dial to VOICE, and turn knob 2 to select LAYER
(
).
Selecting the timbre to edit
If you are editing a program that uses both timbres, here's how to select the timbre
to edit.
Press the EDIT SELECT TIMBRE SELECT key to select the timbre that you
want to edit. (The corresponding TIMBRE SELECT LED will light.)
Your editing will affect the selected timbre.
You can also edit both timbres simultaneously (Edit Sync).
1
Press and hold the TIMBRE SELECT key for at least two seconds.
Both TIMBRE SELECT LEDs will light, and editing will be synchronized for the
two timbres. The display will indicate the value for timbre 1. The value of
timbre 1 will also be used as the value at which editing begins.
2
To cancel edit sync, press the TIMBRE SELECT key.
Edit sync will be cancelled, and timbre 1 will be the object of
editing.
You can use the Solo function even while editing is
synchronized.
The state of the edit sync function is not saved.
Basic editing
SHIFT TIMBRE SELECT
Listening to only one timbre (Solo)
For a program that uses both timbres, you can use the Solo function to hear just one
timbre. This is convenient when you want to hear just one timbre while you edit.
1
Hold down the SHIFT key and press the TIMBRE SELECT key.
The TIMBRE SELECT LED for the timbre selected for editing will start blinking,
and only that timbre will sound.
2
If you want to hear only the other timbre, once again hold down the SHIFT key
and press the TIMBRE SELECT key.
The TIMBRE SELECT LED for the other timbre will start blinking, and only that
timbre will sound. The timbre selected for editing will also change at this time.
3
To cancel the Solo function, press the TIMBRE SELECT key.
The Solo state cannot be memorized.
Exchanging and copying the settings of the timbres
(SHIFT function)
You can exchange the settings of the two timbres, or copy the timbre settings from
another program. (p.60)
15
The structure of a synth program
As shown in figure 0-1, a synth program consists of timbres 1/2, effects, and the
arpeggiator.
TIMBRE 1/2
Each timbre consists of OSC, FILTER, AMP, EG, LFO, and Virtual Patch blocks. You
can create more complex programs by using two timbres together in one program
using the Layer feature.
EFFECTS
The output of timbres 1/2 is sent to the modulation effect (MOD FX) delay effect
(DELAY) equalizer (EQ).
For the modulation effect you can choose from three types of effect such as chorus.
For the delay, you can choose from three types of delay such as stereo delay. The EQ
is a two-band equalizer.
ARPEGGIATOR
You can apply the arpeggiator to a timbre. If the program uses two timbres, you can
apply the arpeggiator to either or both timbres. This is a step arpeggiator with six
arpeggio types.
Figure 0-1
Velocity
Mod. wheel
Pitch bend
KBD Track
Free Assign
(in the case of Layer)
Overview
The three attributes of sound: pitch, tone, and volume
Sound has three basic attributes; pitch, tone, and volume.
To control these attributes, the microKORG S analog modeling synthesizer provides
"oscillator," "filter," and "amp (amplifier)" sections, just as on the analog synthesiz-
ers of the past.
The "oscillator" settings vary the pitch, the "filter" settings modify the tone, and the
"amp" settings modify the volume.
The microKORG S's "oscillator," "filter," and "amp"
On the microKORG S, the OSC1, OSC2, and PITCH sections control the "oscillator".
The PITCH section specifies the pitch of the waveform that is the basis of the
sound, and the OSC1 and OSC2 sections select the waveforms. The waveforms
generated here are mixed by the MIXER section.
The microKORG S's FILTER section modifies the tone. Then the AMP section
modifies the volume and outputs the final sound.
These three sections determine the basic sound of the program.
EG, LFO, keyboard tracking, virtual patch, controllers
In addition to the sections described above, the microKORG S provides ways in
which the sound can be varied according to time, key range, or various types of
performance expression. These are controlled by modulators and controllers such as
EG (envelope generator), LFO (Low Frequency Oscillator), keyboard tracking,
Virtual Patch, and the PITCH and MOD wheels. You can use these modulators and
controllers to apply change to the basic sound of the program.
Figure 0-1 (at right) shows the structure of a synthesizer sound on the microKORG
S. Look at TIMBRE 1, and notice how the signal flows in the order of OSC
FILTER AMP. Also notice how modulators such as EG and LFO can affect these
blocks.
Editing a synth program
16
SYNTH/VOCODER
[Synthesizer, Vocoder]
Switches the currently selected pro-
gram between a Synthesizer pro-
gram and a Vocoder program.
Synthesizer ( ):
The program will be a synth pro-
gram. You can use two oscillators
to create the sound.
Vocoder ( ):
The program will be a vocoder pro-
gram. You can use sound input
from a connected mic to produce
"talking" instrument effects.
The parameters for editing will
vary depending on whether
Synthesizer or Vocoder is se-
lected here.
1. VOICE — SYNTH/VOCODER
SINGLE/LAYER [Single, Layer]
Specifies how many timbres the
program will use. This cannot be
selected for a vocoder program.
Single ( ):
Only one timbre will be used.
Figure 1-1
Timbre1
Layer ( ):
Two timbres will be used. When
you play the keyboard, both tim-
bres will sound simultaneously.
You can edit each timbre individually.
Figure 1-2
Timbre1
Timbre2
The maximum polyphony is four
voices (four notes). In the case of
a Layer program, these four
voices are divided between tim-
bres 1 and 2, so only two keys can
be played in a layered program.
VOICE ASSIGN
[Mono, Poly, Unison]
Specifies how the timbre will be
sounded.
Mono ( ):
The timbre will sound monophoni-
cally. The program will play only
one note at a time.
Poly ( ):
The program will sound polyphoni-
cally, allowing you to play chords.
The maximum polyphony is four
voices.
Unison ( ):
All four voices will sound in uni-
son at the same pitch. Use "UNI-
SON DETUNE" to specify the pitch
difference in steps of one cent.
"VOICE ASSIGN" and polyphony for
a Layer program
Timbre 1 Timbre 2
VOICE ASSIGN
Mono Poly
Polyphony 1 voice 3 voices
VOICE ASSIGN
Poly Poly
Polyphony 2 voices 2 voices
VOICE ASSIGN
Unison Mono
Polyphony 2 voices 1 voices
TRIGGER MODE [Single, Multi]
Specifies whether the EG and LFO
will be retriggered when you play
the next key while still holding
down the previous key.
You can edit this if "VOICE AS-
SIGN" is Mono or Unison.
Single ( ):
The EG and LFO will not be
retriggered by the second or subse-
quent key. Use this setting if you
want to play legato.
Multi ( ):
The EG and LFO will be retriggered
each time you press a key.
Figure 1-3
Single
Multi
Trigger
EG
Trigger
EG
Note on
Note on
UNISON DETUNE [0...99]
Specifies the amount of detuning
(in steps of one cent) between the
notes sounded by Unison mode.
You can edit this if "VOICE AS-
SIGN" is set to Unison.
The detuning method will depend
on the number of unison voices.
Figure 1-4
4 voice
Unison
Detune
0
99
2 voice
Unison
Detune
0
99
These settings determine the basic character of the program, and how it will sound.
"SYNTH/VOCODER" (knob 1) specifies whether the program will be a synth program or a vocoder program. If you want this to be a synth
program, select Synthesizer (
). "SINGLE/LAYER" (knob 2) specifies whether both timbres will be used (Layer) in the case of a synth
program. Other parameters in this section specify whether the program will sound monophonically/polyphonically/unison, and how the
notes will be triggered.
If you simultaneously press more keys than the specified number of voices, the last-pressed key will take priority.
  • Page 1 1
  • Page 2 2
  • Page 3 3
  • Page 4 4
  • Page 5 5
  • Page 6 6
  • Page 7 7
  • Page 8 8
  • Page 9 9
  • Page 10 10
  • Page 11 11
  • Page 12 12
  • Page 13 13
  • Page 14 14
  • Page 15 15
  • Page 16 16
  • Page 17 17
  • Page 18 18
  • Page 19 19
  • Page 20 20
  • Page 21 21
  • Page 22 22
  • Page 23 23
  • Page 24 24
  • Page 25 25
  • Page 26 26
  • Page 27 27
  • Page 28 28
  • Page 29 29
  • Page 30 30
  • Page 31 31
  • Page 32 32
  • Page 33 33
  • Page 34 34
  • Page 35 35
  • Page 36 36
  • Page 37 37
  • Page 38 38
  • Page 39 39
  • Page 40 40
  • Page 41 41
  • Page 42 42
  • Page 43 43
  • Page 44 44
  • Page 45 45
  • Page 46 46
  • Page 47 47
  • Page 48 48
  • Page 49 49
  • Page 50 50
  • Page 51 51
  • Page 52 52
  • Page 53 53
  • Page 54 54
  • Page 55 55
  • Page 56 56
  • Page 57 57
  • Page 58 58
  • Page 59 59
  • Page 60 60
  • Page 61 61
  • Page 62 62
  • Page 63 63
  • Page 64 64
  • Page 65 65
  • Page 66 66
  • Page 67 67
  • Page 68 68
  • Page 69 69
  • Page 70 70
  • Page 71 71
  • Page 72 72
  • Page 73 73

Korg microKORG S Owner's manual

Category
MIDI keyboards
Type
Owner's manual

Ask a question and I''ll find the answer in the document

Finding information in a document is now easier with AI