
INSTRUCTION MANUAL EN
Washing machine

2
EN
Dear Customer,
You have just purchased a BRANDT product and we thank you for your
trust.
We designed and manufactured this product with you, your lifestyle and
your needs in mind, in order to best meet your expectations. We have put
into it our expertise, our spirit of innovation and all the passion which has
driven us for over 60 years.
We make every effort to ensure our products better meet your require-
ments, and our Customer Relations Department is at your disposal and
will be happy to hear any questions or suggestions you may have.
You may also visit our website www.brandt.com where you will find our
latest innovations, as well as useful and complementary information.
BRANDT is happy to assist you in your daily life and hopes you will fully
enjoy your purchase.
Important: Before switching on your appliance, please read
this user guide carefully in order to familiarise yourself more
quickly with its operation.

3
EN
EN
This appliance has been designed exclusively for
domestic use for washing linen.
SAFETY
EN -
Recommended loads:
— The maximum capacity of the appliance is 7 kg.
The following instructions must be respected:
InstallatIon:
— This appliance is designed to be used for domestic and similar
applications such as:
- kitchen areas for staff in shops, offices and other professional
premises;
- farms;
- use by hotel, motel and other residential clients;
- B&B-type environments.
— The pressure of the water supply must be between 0.1 and 1 MPa
(1 and 10 bars).
— Do not use an extension, adapter, multi-socket or a timer plug.
— The electrical installation must be able to withstand the maximum
power indicated on the rating plate and the plug must be properly
grounded.
— Once your appliance has been installed, the plug must remain
accessible.
— Only use the hose and the new seals
F
supplied with the appliance.
— If the power cord is damaged, have it changed by the After Sales
Service or a qualified professional to avoid any risks.
— We recommend that the appliance is not placed onto a mat or car-
pet to avoid hampering the circulation of air at its base.
— If a problem occurs that you cannot solve (see page 12), do not
attempt to repair the machine yourself. Call the reseller’s or the
manufacturer’s technical service.

4
EN
Use:
— This appliance may be used by children of 8 years or older and
by persons with limited physical, sensorial or mental capacities or
without experience or knowledge of it, provided that they are cor-
rectly supervised or if they are given instructions on the use of the
appliance in complete safety if the risks incurred are understood.
Children should be supervised to ensure that they do not play with
the appliance and prevent children of less than 3 years old from
playing with it, unless they are constantly supervised.
—
The device should not be cleaned or maintained by unsupervised children.
— Do not load linen that has been treated with stain removers, sol-
vents or inflammable products –straight after they have been treated
(risk of explosion)
— This washing machine is fitted with a safety device to prevent any
spillage of water.
— At the end of the cycle, ensure the water tap is switched off and
the appliance unplugged.
ENVIRONMENT
SAFETY
(continued)
This washing machine has been designed to res-
pect the environment.
ProtectIng the envIronment
The dose of washing product depends on how dirty
the laundry is and the hardness of the water. Do not
exceed the dose recommended by the manufactu-
rer of the washing product.
This appliance’s packaging material is recyclable.
Help protect the environment by placing the pac-
kaging into the municipal containers provided for
this purpose.
Your washing machine also contains many
recyclable materials, it features this logo to
remind you that used appliances must not
be mixed with other waste.
The appliance must therefore be recycled.
Contact your town hall or your retailer for the used
appliance collection points closest to your home.
Energy savIng
Only programme a prewash when it is absolutely
necessary. For linen that is not very or normally
dirty, a low temperature programme is sufficient.

5
EN
2 - USE
RecommendatIons:
— Before inserting the linen, sort it by colour, how
dirty it is and the type of textile. Empty all pockets,
close zips, removes hooks from curtains, place
Small items of underwear in a mesh bag.
— Remove any loose buttons, pins and clips.
— Knot belts, and ties for aprons, etc.
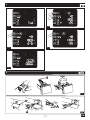
2.1 - LoadIng yoUr washIng
(Diagram 2.1)
Open the view port by pulling the handle.
1 - INSTALLATION
1.3 - ConnectIon to the water sUpply
(Diagram 1.3 )
Connect the feed pipe with its new washers to the
coupling on the rear of the washing machine and to
a tap with a threaded Ø 20x27 endpiece.
1.4 - DraInIng
(Diagram 1.4)
Position the drain hose, fitted with the curved part
G
,ensuring that the instructions shown on the
diagram are respected and especially that the
connection is not air-tight: air must pass freely
between the drain hose and the drain to avoid
used water from flowing back up the hose into the
machine and bad smells being caused.
1.2 - LevellIng the machIne
(Diagram 1.2)
The appliance must be installed on a horizontal
floor. If necessary and if it has adjustable feet, stabi-
lise your washing machine by levelling them.
1.5 -
ElectrIcal connectIon
(Diagram 1.1.1)
Ensure that the indications on the data plate of the
Appliance are respected.
1.6 - CleanIng before Use
Once installed, your washing machine must be
cleaned by programming a cotton cycle at 90°C
with nothing inside and with half a dose of washing
powder.
1.1 - UnpackIng
The following instructions must be respected:
— Lift the washing machine and remove the motor
B
chock and base
A
(Diagram 1.1.2).
— Remove the 5 transit bolts
C
and block the 5
Important: Never remove the top
E
from
your appliance
(Diagram 1.2).
holes with the caches
D
(Diagram 1.1.3)
2.2 - WashIng prodUcts and addItIves
(Diagram 2.2)
The product drawer has 3 compartments:
pre-wash
(powder), wash (powder or liquid),
softener.
— Use detergents that are certified for domestic
washing machines.
— Do not use liquid detergents with the pre-wash
cycle and/or delayed start.
— Do not exceed the maximum level.

6
EN
3 - PROGRAMMING
4
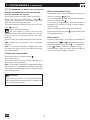
3.1 - The control panel
1
2
On / Off
Start/Pause
4
3
5
Selecting the Programme
Options
Display
1
2
3
5
°C
h : min
rpm
11
10
12
9
7
6
Degree of soiling
Selecting the temperature
8
Selecting the spin speed
9
Delayed start
11
10
«Easy start» function light
Child safety indicator light
12
Door lock light
CLOSE-UP OF THE DISPLAY
5
7
6
8

7
EN
3.2 - ProgrammIng a wash cycle
StartIng the applIance
Press the “On/Off” button
1
. When using your
washing machine for the first time, the manufac-
turer’s programme will appear, and then your pre-
ferred programme and options will be displayed
automatically, thanks to the «Easy start» function.
The indicatoris
10
on. If this programme suits you,
press «Start/Pause»
2
to start the programme.
Otherwise, you can change the programme by
turning the selector
3
. The LED corresponding to
the chosen programme switches on. The machine
displays the most suitable temperature and spin
speed for the selected programme and the esti-
mated cycle duration.
If you wish, you can modify the temperature
by pressing successively button
7
(Diagram
3.2.1).
Nota : For a cold wash, change the temperature
to «0».
Using key
8
, you may:
- modify the spin speed (automatic limit for certain
programmes)
(Diagram 3.2.2)
- choose drip dry
(Diagram 3.2.3).
The cycle will
end by draining the washing machine and will not
spin.
- or stop with the drum full
(Diagram 3.2.4).
You can select any options using keys
4
and
6
.
The led corresponding to your selection switches
on. A warning beep informs you of any options that
are not compatible with your programme.
Press «Start/Pause»
2
to start your programme.
The door lock indicator
12
lights up
(Diagram
3.2.5).
A few minutes after the cycle is launched, the dura-
tion is updated according to the quantity and type
of laundry in the machine.
Delayed start of a programme
Select your programme.
Press the «Delayed start» key
9
to delay the start
of your programme hour by hour, until you reach
the time you want (max. 24h)
(Diagram 3.2.6).
Confirm your cycle selection by pressing the
«Start/Pause» button
2
.
The display 9 shows the time remaining until the
start of the programme via a countdown in hours,
then in minutes during the last hour.
3 - PROGRAMMING
(continued)

8
EN
3 - PROGRAMMING
(continued)
3.2 - ProgrammIng a wash cycle
(continued)
End of the washIng cycle
The display shows «End»
(Diagram 3.2.7)
and the
door lock indicator
12
goes out.
You can programme a new cycle without having to
press the «On/Off» key
1
.
This display is automatically switched off after a
maximum of 5 minutes in order to save energy in
standby mode.
Open the view port and remove your washing.
Press and hold the «On/Off»
1
button to switch off
the washing machine.
ChIld safety
Activate «Child safety» to lock your programme by
pressing buttons
6
and
7
at the same time. Once
this safety device is active, light
11
, corresponding
to the ( ) symbol ,comes on
(Diagram 3.2.8).
Simultaneously press the same buttons again to
switch off the «Child safety» function.
CancellIng a programme
Press and hold the «On/Off» button
1
.
All the lights go out.
You can do this at any time: during the cycle, pro-
gramming or during a pause.
Nota : In all cases, cancelling a programme means
that you have to re-programme everything from the
start again
(see paragraph 3.2)
and a partial emp-
tying is carried out.
Information:
In the event of a power cut, the cycle will automa-
tically restart from the point where it stopped, as
soon as the power returns.
AddIng or removIng an Item dUrIng the
cycle (impossible during spin)
If you need to add or remove items of clothing:
Press and hold the «Start/Pause» button
2
to
interrupt the programme. If the water level is too
high, the view post does not open.
The time remaining flashes and the door lock indi-
cator
12
goes out.
Insert or remove the linen.
The time taken to unlock the view port
depends on the temperature inside the machine
and can last up to several minutes for safety
reasons.
Close the view port again and press «Start/Pause»
2
to restart the programme. The countdown
resumes.
Nota : If you have selected a delayed start, you
can open the drum at any time before the wash
programme starts.

9
EN
Programme delIcates
The very careful programme that takes care of
satin, silk and wool. Your linen is cradled, as if was-
hed by hand, and gently spun.
RInse/spIn programme
When this programme is selected, the «Sensitive
skin» option is activated automatically. Deactivate
this option for spin drying only.
SensItIve skIn optIon
Add an extra rinse. Ideal for people with delicate
skin.
Easy IronIng optIon
Wash and spin dry speeds adapted to avoid crum-
pling of the linen.
Dark coloUrs optIon
Enables your washing machine to take care of your
darks and prevent creases and traces of detergent.
degree of soIlIng optIon
Use this button to shorten or lengthen the wash
cycle between two levels that can be chosen by
pressing the button successively.
— Level 1 is for dirty laundry and increases the len-
gth of the cycle by 20% on average
(Diagram 3.2.9).
— Level 2 is for laundry that needs refreshing and
reduces the length of the cycle by 40% on average
(Diagram 3.2.10)
.
Important: For this programme, the doses of
detergent should be reduced by half.
Programme daIly optIa 39’
To wash a normal load of moderately dirty cotton
or mixed linen in 39 minutes with a perfect result.
Programme cotton
To wash moderately dirty cotton textiles with opti-
mised energy.
Programme stUrdy cotton fabrIc
For a load consisting of sponge, resistant white or
coloured cotton.
Programme cotton prewash
To remove earth, sand, blood... This sequence
includes a wash in clean water.
It is also necessary to put a detergent (was-
hing powder only) in the prewash product
compartment
(Diagram 2.2).
Programme mIxed
For a linen load of mixed fibres.
Programme synthetIcs
For a linen load of resistant synthetics.
Programme flash 25 minutes
To wash a moderately dirty small cotton or mixed
linen load in 25 minutes.
Important : For this programme, the doses of
detergent should be reduced by half.
Sport programme
For technical textiles. Wash designed to preserve
the elastic fibres contained in sportswear and not
slacken them.
Sheets/towels programme
Intensive cycle for deep wash and additional rinsing.
Optimised cycle with the non-removable “Sensitive
skin» and “Degree of soiling” options.
ShIrts programme
This programme is specially designed to wash six
moderately soiled shirts that have been worn for
one day in less than 40 minutes. The spin speed
is adjusted to limit wrinkling (“Easy ironing” option
not removable).
3 - PROGRAMMING
(continued)

10
EN
3 - PROGRAMMING
(continued)
FonctIon drIp dry (
Essorage
)
With very delicate laundry, this function empties the
washing machine without spin drying.
FonctIon fUll drUm stop ( )
This function allows you to defer the spin phase.
with your washing remaining in water to prevent
creasing.
When the machine has stopped with a full drum, the
« » icon flashes and the remaining time indica-
tor shows ”00:00”
(Diagram 3.2.11).
Then:
If you want to drain and spin, select a spin speed
suitable for the type of laundry.
Or, if you want to drain only, select the «drip dry»
function (spin speed ”
Essorage
”).
The programme will stop automatically.
Programmes table
Programmes
Temperature
(°C)
Maximum
weight of dry
clothes
Sensitive skin
Easy ironing
Soiling
Dark colours
Drip-dry
Full drum stop
COTTON Cold - 90 7,0 kg
STURDY COTTON FABRIC 40 - 60 7,0 kg
COTTON PREWASH Cold - 60 7,0 kg
MIXED Cold - 60 3,0 kg
SYNTHETICS Cold - 60 3,0 kg
Special programmes
Daily OptiA 39’ Cold - 40 3,0 kg
Flash 25 minutes Cold - 40 2,0 kg
Sport Cold - 40 2,5 kg
Sheets / towels Cold - 60 7,0 kg
Shirts Cold - 40 1,5 kg
Delicates Cold - 40 1,5 kg
Additional programmes
Rinse / Spin - -
ESSORAGEESSORAGE
TestIng programme for energy labellIng pUrpose :
- Standard cotton programme at 60°C : Cotton – 60°C – No option – Max spin.

11
EN
3 - PROGRAMMING
(continued)
- Adjustment to the degree of soiling:
The length and the intensity of the wash depend
on how dirty your laundry is, which is the reason
why your appliance can vary the length of the wash
cycle by up to 40% according to the selected set-
tings (see page 09).
- Adjustment to the type of textile:
Cotton shirts and cashmere pullovers do not
demand the same wash, which is the reason why
your washing machine adapts its tumble speed to
each type of textile.
For your information : The time shown on the
washing machine when you select a programme
corresponds to the time for an average load. This
time is adjusted, once the appliance has taken
its measurements and then throughout the pro-
gramme, according to any unexpected events (too
much washing powder, an unbalanced load when
spinning, etc.).
-
Easy start
Your washing machine memorises your habits.
Every time a programme starts, the machine
records the options that you use most frequently,
and proposes these same options as soon as you
switch on the appliance.
-
Opti 4
Your washing machine can automatically optimise
the length of the wash cycle and the water and
energy consumption of every wash.
- Adjustment to the quantity of laundry:
Washing 1kg of laundry is not the same as washing
a full load, which is the reason why your washing
machine is equipped with sensors that detect the
quantity of laundry in the drum and automatically
calculate the right levels of water and energy
required to produce a perfect wash.
- Adjustment to the hardness of the water:
The hardness of the water in your mains supply
affects the wash and rinse performances of your
appliance, which is the reason why your washing
machine automatically adapts the tumble time and
the number of rinses to produce a perfect result.
The water hardness is adjusted when you use your
washing machine for the first time (see special
insert).
4 - REGULAR CARE
4.1 - AvoIdIng bad smells
Follow the evacuation pipe installation instructions
in paragraph 1.3, leave the view port open at the
end of the cycle. Complete an empty cycle with a
washing agent at 60°C or 90°C once a month.
4.2 - Detergent drawer
(Diagram 4.1)
— Remove the detergent drawer by pulling and
pressing the softener part.
— Remove siphon
A
and rinse everything under
the tap.
— Re-install the detergent drawer siphon, then put
everything back in its place.
4.3 - PUmp fIlter
(Diagram 4.2)
— Open the service flap
A
.
— Place a suitable recipient under the service flap to
collect the water.
— Gently unscrew filter
B
. Water may run out; this
is normal.
— Remove any lint and residues before carefully
replacing the filter.
— Screw the filter back in. Close the service flap.
4.4 - OUtsIde panels
Do not use abrasive products or scourers. Use
liquid soap. Dry with a soft cloth.

12
EN
5 - PROBLEMS
Incidents may arise when using your washing machine:
If the screen shows one of the following errors and an alarm beeps, before calling Customer Service:
check whether:
the water tap is
open.
5.1
check whether:
- the view port is not
closed properly.
- the drump is block
5.2
check whether:
The pump filter is
clogged ; clean the
filter
(paragraph 4.3).
5.3
Problems: causes / Remedies:
The buttons do not work: - The child safety device is activated.
The washing machine will not start: - The appliance is not plugged in or there is a power cut.
- You haven’t pressed the «Start/Pause» button
.
- You have programmed a delayed start.
- See problems 5.1 and 5.2
The linen is not or not sufficiently spun: - You have selected a programme without spin drying or with
limited spin drying.
- The spin safety system has detected poor distribution of the
washing in the drum : unfold the linen and programme another
spin cycle.
- Check the height of the curved drain part
G
(Diagram 1.4).
A puddle of water forms on the floor: First remove the plug from the socket and turn off the water
supply.
- Check that the seals
F
are fitted and the connectors are
tightened
(Diagram 1.3)
.
- Check the curved part is positioned correctly
G
(Diagram 1.4).
- Check that the filter of pump
B
is correctly closed
B
(Diagram 4.2)
Strong vibrations when spin drying: - The washing machine has not been released correctly
(Diagram 1.1.3).
- The floor is not level
(paragraph 1.2).
The machine does not drain: -
You have programmed «Full drum stop».
- The drain hose is bent or squashed
(Diagram 1.4).
- See problem 5.3.
The view port doesn’t open: - The programme has not yet finished.
-
The water level is too high (above the bottom of the view port).
-
Wait until the temperature inside the machine drops.
At the end of the programme, the detergent
tray has traces of detergent:
-
The detergent was poured into a wet drawer.
- Check the water pressure.
-
You have poured too much washing product into the drawer
and exceeded the maximum recommended.
All the lights are off at the end of the pro-
gramme:
-
All the lights automatically switch off no more than 5 minutes
after the end of the programme in order to save energy. Press
any button to restart the display.
Here are a few points to check:
Note on operation - this is not an incident :
The programme time
decreases or increases
during the wash
This is not a fault. The length of time displayed at the start of the programme is
updated according to the load in the machine (automatic weighing). This gua-
rantees perfect washing results and water and energy consumption appropriate
to the load. This is normal. The spin safety and anti-foam systems may extend
the initial programme time displayed.

13
EN
1
80cm
maxi
60cm
mini
/
o 34mm
mini
1.4
13mm
13
E
1.1.1 1.1.2
1.1.3
1.3
C
D
1.2
A
B
F
G

14
EN
- 12
3
2.1
2.2
3.2.1
3.2.2
3.2.3 3.2.4
3.2.5 3.2.6
°C
h : min
rpm
°C
h : min
rpm
°C
h : min
rpm
°C
h : min
rpm
°C
h : min
rpm
°C
h : min
rpm
°C
h : min
rpm

15
EN
A
A
B
4
2.4
1.4
3.2.11
°C
h : min
rpm
°C
h : min
rpm
3
3.2.7
°C
h : min
rpm
3.2.8
3.2.9 3.2.10
°C
h : min
rpm
°C
h : min
rpm
°C
h : min
rpm
°C
h : min
rpm

Any work on your appliance must be carried out by a qualified professional who is a dealer of the brand. When
you call, so that we can handle your case efficiently, make sure you have the full references of your appliance
(commercial reference, service reference, serial number). This information is on the ID plate (Diagram 1.1.1).
Original parts:
When work is required, request exclusively original certified spare parts.
For information:
or contact your seller directly.
DPN
1 -
INTERVENTIONS / EXPORT CONSUMER RELATIONS
WF2N00369 - 01 02/19
-
 1
1
-
 2
2
-
 3
3
-
 4
4
-
 5
5
-
 6
6
-
 7
7
-
 8
8
-
 9
9
-
 10
10
-
 11
11
-
 12
12
-
 13
13
-
 14
14
-
 15
15
-
 16
16


Brandt BAM74WSUA Owner's manual
- Category
- Washing machines
- Type
- Owner's manual
Ask a question and I''ll find the answer in the document
Finding information in a document is now easier with AI
Related papers
-
Groupe Brandt BAM74WSE Owner's manual
-
-
-
-
Brandt BT650MA User manual
-
-
-
Groupe Brandt BT653MQE Owner's manual
-
-
Other documents
-
Siemens WD14H421GB Specification
-
Bosch Washer-dryer Operat/Install/Short Instruct/Progr.-tab
-
Bosch WVH28422GB Operating instructions
-
-
Bosch Washer-dryer Operating instructions
-
Siemens Washer-dryer User manual
-
-
-
United UWM-7104 Operating instructions
-