
Haler
What The World Comes Home To _
RoomAir Conditioner
Dei_e
0010551060
HWF06XC5, HWR06XC5,
E ,AM_) , ESA3055
(ESAM055/ESA3055 Only)
@
Readi_s#ructionsbeforei_dalling.
Call!-877-337-363_ for9u_stiensonpurrsandservices
LifeIesinsfructia_savanfdeprecedera I'indailafi©_.
P_orroutesquestionsco_rernantlospi_(esetI'eatretien,_omposezle 1-877-337-3639.
LeaIn_lastru(cione_emte_deie_luloreluporuto
Ll_tnenosal 1-877-337-3639slfichepreguntassobrerepuesfososerv_cios

Thank You for buying a dependable, energy saving and easy to operate
HALERroom air conditioner. This manual contains usefulinformalion [or
you to maintain, operate, inslall and safely use your room air conditioner.
Your air condi'rioner cleans, cools and dehumidifies the air in you," room to
provide you with the ultimate level of comfort.
Please read instructions care[_lly before using the product. Also, do not
forgetto fill out and mail the Product Registration Card.
Record Your Model and Serial Number.
For all your service callsduring the warranty period the following
information will be needed. Attach the sales receipt to this guide and keep
for future reference. This information can be obtained from the serial plate,
which is on your air conditioner. This is either on the cabinet (side or back)
or you may have to remove the frollt grille to locale it.
Model Number: ..............................................................
Serial Number: ...............................................................
Dale of Purchase: ...........................................................
Dealer's Name: ..............................................................
Dealer's Address: ............................................................
Dealer's Phone Number: ...................................................
TABLE
RECEPTACLE AND FUSE TYPES
RATE D VOLTS ¶ 25/60 250/60
AM_ 15 20 15 2,0 _9
FUSE SIZE 15 20 _ 15 20" 30
TIME DELAY FUSE
(_r €ircuit braker) Plug Plug PJ_

SAFETYPRECAUTIONS
A
WARNING: Following these basic precautions will reduce the
risk of fire, electrical shock, injury or death
when using your air conditioner,
1) Air conditioner must be connected to proper eledrical outlet with the
correct electrical supply, lsee table)
2)
Proper grounding must be ensured to reduce the risk of shock and fire.
DO NOT CUT OR REMOVETHEGROUNDING PRONG. If you do
not have a three-prong electric receptacle outlet in thewall, have a
certified electrician install the proper receptacle. The wall receptacle
MUST be properly grounded.
3)
Do not use if power cord is frayed or otherwise damaged_
Also avoid using it iFthere are cracks or abrasion damage
along the leng_, plug or connector.
A
4) DO NOT USEAN ADAPTEROR AN EXTENSION CORD.
5)
When installing your air conditioner in a window, make sure lhe window
is strong enough to hold the weight of the air conditioner.
You also want to secure and correctly install your air conditioner properly
to prevent it from falling. Extra brackets and or support may be required
depending on your window.
6) Do not block airflow inside or outside the air conditioner with blinds,
drapes, protective covers, shrubs or bushes.
7) Be careful oFsharp edges on the front and rear fins of the unit lhat could
cut and cause serious injury.
2
8) Be careful when lifting the air conditioner to install or remove the unit.
Always useIwo or more people Forthis.
9) Always unplug the air condilioner be_Coreservicing it or moving ik

PAGE
A Word From Haler .................................................................. 1
Product Registration 1
Safety Precautions 2
Warnings 4
Electrical Safety 4
Tips 5
Energy Saving Guide 5
Features ................................................................................... 6-7
Operating Guide ................................................................. 8-13
Normal Operating Sounds 8
Operating Instructions 8-1 3
Installations ......................................................................... 14-18
Parts Supplied 15
Tools........................................................................................... 15
Sfeps for Insfallation .................................................................. 16-I 8
Clean and Care Guide ......................................................... 19-20
Troubleshooting ................................................................. 20-21
Warranty Information
22
3

Following the sa_:etymessages is very important.
These messagescan save you from being injured or killed.
Warning symbols alert you to be careful and means Danger. Always
followinstructions to be safe and reduce chances of iniury or death.
Warning and Danger signs w;ll precede safety messages.
Grounding:
WARNING:
Adapter Plug:
Important:
This room air conditioner must be grounded.
Grounding reduces the risk of el_tric shock by
providing an escape wire for the electric current.
The power cord has a grounding wire with a
grounding plug. Plugit into an outlet that is
properly installed and grounded.
Improper use ol:the grounding
plug can result in a risk oFelectric shock,
Call a qualified eledrician il:you don't understand
the grounding instructions or if you are nol
sure if the air conditioner is properly grounded.
If the wall outlet is not grounded, please contact an
eledrician to have it replaced with a properly
grounded outlet.
Do not, under any circumstances, cut or remove the
third (ground) prong from the power cord.
We strongly advise against using an adapter plug.
Test power plug before each use:
1. Prcss "resel "bullon.
2, Press "test "buffon, unit should trip,
3, Press "reset" button again [or use
Do no1 use it above tesl [all,
In the event this device trips, the cause of the rnalfunction is to
be corrected before further use o"[ the device .

• This Air Conditioner is designed for use in a double hung window.
• While installing unit be sure to tilt air conditioner o degree outward to
have the water drip outside the house.
• Install the unit on the north side as normally that is the shaded side. This
will enhance the operation of your unit.
,_,_ Window has to be strong for installalTon. Extra brackets and or support
may be required depending on your window. (Bracketsand Supports
not included in all models)
• Measure the window before installing, il:the window is too big For the
unit you may require professTonal Tnstallation.
,_• Use correct electric voltage and proper ampere for the unit to run
effeclTvely.
_I_• Only let a certified electrician do a,ly modifications to your electrical
oultet.
• Use a dedicated line for the operation of your air conditioner to avoid
the possibility of an electrical surge.
• When installing your air conditioner make sure to seal all areas where
there is a possibility of air leakage.
• Airflow should nol be blocked inside either by curtains, drapes or
furniture or outside by shrubs or bushes.
• Do not needlessly use an electrical light or other appliances that
produce heat.
• Keep the blinds and the drapes drawn on all the other windows.
• While cooking use an exhaust {:anin the kitchen to remove the excess
heat produced.
• Always use the correct BTU size air conditioner to cool the room to
attain optimum efficiency.
5

easv access filtens
cont-o pDq_
MODEL: HWR06XCS, ESA3055
I. Thermostat
Th_s[_lows you i,.>a_iiL,slI['e ernperalu_e o[ Ir1_ []:r.
Th_ Iow_.r th_ s_llirlg. Fie ::o_'_erline _;ii I_lnpf_tatul,g
4Viq this you _:dr_s_l ll'_ I_mp_n:i _lr_ Io _,ou_
desireci c:_'nf_ eYel Y¢_J,:at sol Ihe le'rpe_cl _lre
BMv_een 6 I°k and g6%.
2. fa_ Speed
_u have_ levelsof kar speedtose"ct your
desirec comfo-ed.
3. Functio,.
You _air condi+:ar'er has 2 kurc_:ors.
a)COOl
He-e -no ar cofleJtJoner wjl operate the cDmp,essar
ard tl'e de_.:ireo -'at speed se" to give ¢o_ d'il ed
cold a;r 'or your corn:art.
b) --on
YOu car ,uq the fan oqy on p_-so qo_arJys. Tqe
ar can be sot -o "u,_ a' 2 saaads as cos:red by ve_.
4. Timer
You,cir condit;cnar cac _o set to go on o, el et
ve_r desire. Ths car oe, done 'dJ Io 24 hoers in
aovopce,
5.2 Way Air Flow
These qir dkcdiona k>u ors k: y_._uconlra In:: ,lircc an
of he d_lk._w in your "acNi'cd d:r_:clio'_.
The _i_llow f_;n [,a di'e_:k;d riah side --laJl sk_a.
6. Window Instoll Kit
:n_bles _,au -o n.ctoll the aPcordtione_ iq o doube
hung wincaw_ F_<tr¢_rcc_ets or ,supoo4 may oe needed
cependiqgon your _v:ndo_v.
7. Remote ¢ontr_l
Tqis :ul Sure" oral _vire ess ,en_o,e allows you to
ape-ate yo_,r air condi<o_ar Iron a distance. Vad
_ce_ '_ot q_vo to 9at u_ "o change -no so÷titus, the
hrC;ers o" to turn the unit or or off.
_. LED Di_pley Eledroni_ Control Panel
The 4 uqclioq LED d:soleys Room -errpe-alare,
Tcrn_c_olure Setlirg0 -imci Sctling ard -;me
R_;'r,'_:nng la Sk;_/S m l ll'e uril. Eec ,eric
Ccr'h_l _m_cl cts yctu sc IF:: lam_x._rolurc: Io Ihe
9, £1ectroslallc Filler (hal dl modcls_
Beirg _:,>rsI-Jcl_d o: tU_h e.ffici_qcy r_cdft:ng
_ec qssalia: aclive cdrbar rlearid olFerrqcl_rioln
't _urifies -I'le air _.ffe,,7vel_. ,s wavv 4ruc,_re
'ncreoses ÷h_ :apaoilty to :ilte_ e.u_ and srnok_
effective y. Due to tFe retertion of tFe active carbon
't nosa high p_rfyirg speeo capob e o:
#rang aiUcw.

easy access-'ilters centre pane
MODEL: HWF06XC5, ESAM055
1. Temperature Sel Knob
This kr_obadjuststhe temperature oFthe ain
The Higher the setting the cooler II_eair
temperaiure. With this knobyou can set the
temperature to your desired comfort level,Min, Cool
being the warmest and Max. Cool being the coldest.
2. MODE 5el Switch
W;I_ this knob you can co_trolthe Ibr_speedas
well asthe cooling speed.
You have2 Fall speedsto choosefrom HI _:,ndLO.
3. 2-Way Air Flaw
The air directional louvers letyou control the
direction of the airflow in your r_uirocl clirectiorb.
The alr_lowcon be dlrect_ right side - left side.
4, Window Install Kit.
Enablesya_ to install Ifl_ air condiiioner in a
double hung window. Extra bracketsor support
may be rJeededdepending on your window,

Nor aJ Operating Sounds
The following sounds are normally heard during the operation of an air conditioner.
• Thermostat clicks. As the thermostat cycles on/off you will
hear thissound.
° Cool airflow movement as dictated by the setfan speed.
° Water sounds. This is normal since your air conditioner acts as a
dehumidifier also. Thus you will hear water sounds from water drops
falling on the condenser.
° As the refrigera,lt flows through the i,lner sealed tubing a
rushing noise may be heard.
• Rattling or vibrating noises may be heard due to poor wall
or window installation.
• High pitch compresso, sound may be heard.
Operating |nstructions
Following are the operating instrudions of your electronic air conditioner.
MODEL: HWRO6XC5, ESA3055
Remote control and control panel operations
After installing your air conditioner plug it in to the proper electricaloutlet
in the wall. Keep the vent in the closed position, Now setthe nir
conditioner al your comfort levek This full functional wireless remote allows
you to operate your air condilioner wilhout having to get up and go to the
unit. The full function feature allows you to change the settings and turn the
unil on or off from the remote itself. This control pad works the same as
the control pad on the air conditioner.
(See Fig. # 1)
Fig. # 1
Remote Control
_ZY

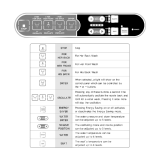
After you plug inthe unit it will pertorrn a self test, All the display lights
will turn on for 3 seconds. The LEDdisplay will read "88". If any display
light fails to lure on you may need service on the unit. Al:ter the 3 seconds
self test the unit will automatically go to the stand by mode. Now all lights
will be off and you will have to turn "ON" by pressing the On/Off key.
After pressing "On/Off", the unit starts to work and enters the status of
"Fan" with low setting. You will have to press the (A} or (v) key on the
lemp/Time to set the temperature at your desir_ comfort. You can choose
between 61 °F and 86°E Once the temperature is set you can raise or
lower it by pressing the (A) or (T)keys, (Only when the unit is cooling,
can the temperature setting be adiusled.) (See Fig. # 2)
I laving sel Iqe lemperalure you ¢_illse Ine r,_nclion o[ Ihe air conditioner,
Fig. # 2
Control Panel.
f
I,L.DE _'_E[E ) TIVER
?
o
.. J
E,,'elvlime you p_ess he MODE bul on, il wil cqonge bel*een FAN, COOL. (See
-'ig,_ 3)
9

Fig, # 3
Control Panel.
I
_1 :;,I I D _IIR
f
0 _,an
®@
©u. @o,_
L_"/ IVL @
_ovJ_
J
O'lce lhe fundior" m,:,d_ is aecidecl you wil hclve o sel Ive far' speed.(SBe fig. i¢4)
I-ve,y time you press the SPEll3 bdtor', ton speed will cnonge between _OW. HIOH.
) I[ vou dToc-se Ihe COOL nlod_ you can run he rat, :r, ore of Ihe 2 speecs I IIGI I,
LOW.
2) F¢ cool days you rr'uv wunt o rur' Ihe 'FAN unclio,1. Here InB run ru,ls ul one
d ? spe0ds, HIGH or -QW.
10

Fig, # 4
Control Panel.
I
_VPFIIM_
@
o
l imer on o, limer al[ mode is used to p,e-start or shut o;[/our unit in
advance. Yo_J_r_nprogram this up to 24 l_ot_rsin advnnc_,_You cr_nusa the Timer in lun_ions
.e. COOL, FAN .
a Timer on (See Fig° # ,_i
,Jni- mus- be on t,-,se-the tHner. Ur:t will sl_utdown outoma-icallv Mte_ it accep-s -he settings in
5 secor'ds. Use Ihis "naoe Io pfe-sel Ihe slat lime o[ I_e ,rail 24 haurs in odvar'ce.
a) P'ass TMER ON, LED d splciywill shaw XX' (time set lost time} whet power s cornactod first
-irne, LEDdisplay will show '0 _'
b) Set desired n_maer a[ hours by pressin_ the (1) pao of the lemp!lirne b_ttons, one Jo, each
haL;_.If you passer;-he desi-ed t:me L;se-he iTi pad key to I,-,we,the selec-ion.
c)A[ler sel TIMER ON, LED o:splay wil show lhe I:r'e. This lime disalayed:
unit wil starts afterX hours.
• Timer of: (See Fig. # 5i
dnil rpus 0e ,unnirg Io sel lne limer o[[. Use Inis ia p,esel the if'he you woud like he un:l Io
shut aft.
a) PressTIMER OFF, LED display,wil st"aw XX' {lime sel lasl lime) when power is connected firsl
-ime, LEDdisplay will show'O '.
b) Set desired number by aressin9 -he (i) pad of -he -emp/T:me butters.
Oqe ;or each no,m If you passed Ihe aesired lime, use Ihe {v') pea key Io lower Ihe seleclion.
c)After sot TIMER OFF, LEDdisplay will show -he room tampora-ure about ._socords laton
_hen Jsir'g the time" the unit will usel-everf to the last COOL and :on settirgs when adivated.
Ihe tin'e, n'ust 0e reset every time you choose ta use P.
11

Fg. #5
Control Panel.
I
@ @
@_,_ @_ ©_,
o
J
Operating instructions
MODEL: HWF06XC5
ESAM055
[Seef;g. # 1)
big. # I
TEMPERATURE
5 6
4 7
.....lo _i__
3 _ 8
MIN MAX
COOL _ COOL
FAN ON LY
I II _ LOW
SPEED
QN_ OFF
POWER
12

After installingyour air condilioner, plug it into the proper
electricalouzel in thewall.
POWER Turns air conditioner off.
SPEED "LOW" Low speed fan operation with cooling or not.
SPEED "HI" High speed fan operation with cooling or not,
This automatically controls the temperature of indoor air. Turn the knob
so that arrow points to the cooler marks for more moderate cooling.
Normal Fan
1. Turn the SPEED mode switch to the "HI' or the "LOW' setting.
2. Set the thermostat control to tile temperature mark "FAN ONLY'.
Normal cooling
1. Turn the SPEED mode switch to the "HI' or the "LOW' setting,
2. Set the thermostat control to tile desire temperature (the mid-point
is a good garfing position).
If the room temperature is not satislractory after a reasonable time, adjust
Ihe conlrol Io a wormer soiling, os approprialc.
Maximum cooling
1. Turn the ,SPEED mode _witch to the "1I1' seffing
2. Set the thermostat control to the MAX COOL temperature mark.
Quieter operation
1. Turn the ,SPEED nqode switch to the "LOW' seffing.
2. Set the thermostat control as needed.
CAUTION:
") Remember the compressor of your air conditioner will not work
when the temperature goes below 65_F.
) Also when you shut off the air conditioner wait for 3 minutes
before turning it on again. This is the compressorcycle time.
2} If you have any trouble in operating your air conditioner please refer to
the Trouble Shootlng section.
13

Before you install your air conditioner check the following:
The unit is free of all obslructions inside and outside the room e.g. drapes,
curl'ains, furniture, plants, shrubs, bushes, trees, other structures like building,
garage etc. Air conditioner must have clear unobstructed airltow through the
condenser to remove the heat.
2>Thewindow is strong enough to hold the weight of the air conditioner.
Extra brackets or supports may be needed depending on your windows.
(Bracketsor Supports nol provided in all models}
3) The window sill and track are strong enough to hold the weight of the
air conditioner.
4)
The wall is strong enough to hold the unite Extra brackets or supports may be
needed depending on the wall_ (Brackets or Supports not provided in all models)_
5) There is adequate and proper power supply near the air conditioner.
__6) DO NOT use adapter plugs_
7} DO NOT use extension cords.
DO NOT cut or remove the ground prong.
DO NOT modify the plug or the electrical wall outlet in any way_
If plug does not fit the electrical outlet have a certified electrician do the
necessary change.
__10) DO NOT connect electrical power to the unit before installation.
11) DO NOT use if power cord is worn out, frayed or otherwise damaged.
Avoid using if there are cracks or abrasion damage along the length,
plug or connection.
,_12) DO NOT install into any existing cabinet or sleeve which does not have side
and top air vents.
_1 Be careful o1 ofthe cabinet and coils
3) ex[go_ed sharp edcjes sharp (tins)
on
the back of the unit that could cut and cause serious injury.
14

PartsSupplied
skert screws 13132'
wood screws 31/32'
op "all
Mode :k Wk06XC,b, ESAM0a_
side curtains
"_ ' wirdow sea 9ask_l _
"<_mrJt_
corhd
short sc_e_vs13/32'
Model:l IWRO6XCS, :5_3055
Youwill need to havefl_efollowing toolsto help you in lhe installationof
your air conditioner.
•Scissors
• Phillips Screwdriver
•Standard Screwdriver
-Pliers
•Wrench
• Drill and Drill Bits
•Tape Measure
,Gloves
-Level
•Sockets
15

InstallingUnit intoA Window
Window Opening Requirements
The air conditioner is designed to fit into double or single hung sash type windows. Each of the
units comes with an installation kit that provides adjustable mounting louvers, to fill the gaps
between lhe sides of lhe unit, and lJ_ewindow frame. The chart below reflecls the dimensions
of Ifle units with, and wilhc_t installation kits. Measure your window opening widlh and compare
it to the chart below to ensure thai" it meets the minimum and maximum window widlh requirements.
_M °del IIW106XC5, tWRD6X .5, ISA3055, I SAMD55
Dimendon_
A(inch) _!,,
9S
B(inch) "_"_5
C(inch) ":¢s"_'"
D(inch) Max _"
D(inch) Min _7,
Co_e High --_!,
Case Width _,
Case Depth _._,,
ASSEMBLE
CURTAINS/TOP RAIL
Installtop rail v¢ith3 s_o_
scre_zs13/32'.
In_er "t'_ _e,e cu,ta:n_ iqtc, the
top arid oe'-om rals eftq_ air
_Ol_OiliG'JO! [.1,_101_ I;Io _UIIoiI'_
ta the unt wi+ _ _hoff scmev,s
13 32'.
Cautia_: Never expose plastic:front
or g_illetaextremelainpb_r-_llulo$,
16

PREPARE
WINDOW FOR
INSTALLATION
I lqi_. Jril i_ oc'_gnd fc,r insla lalior if" _cH'd(Fd do,.b_ Funl_wi_'claw_
_<itn ach_a _aen:rg wid+_ o; _211'i'le__aI1, Tr,e upcer and Iowe_ sawn
n_ugtopcr s_.ffciert_ -c,alow a clear vc'tic0l opeFing o; 1" h'am "fie,
bollorn €3[ I',£, so._h Icj l;_c WinooW SOO_
_'I __e 'm WndcJ_ pre._ert_:me4erence, -'dsfer d 2 I1wiJe we_c,d_tri_In_t
in,:luda_) ,OUTER SILLi"o 4_c :Pn,:r wroow sill across tqc _ul widtl"
ll,e sll. _,a wood _;dl, _.,o_Id ao,lh_:k c'm_Jgl' Io K_" _,_"._eig}.l of
the v<indew _i I _,_tha" tl'e Lrii" car be nd'd lea wVnobt interference h_
the sorm _v:rdow frame (STORM W I_,DOW :RAME) or wooo sr:p
?C_t.ilI)'_>ORS) Io hda condanso On la clr_,i.,a'opc'rly h+_lnc r_ui_;or...
3. In#oil e _ecend woad :-_'rijoappre×ii_afel7 6'i Irmg _v ;_/2 II w:de <lr'd
same lqckqcss as :ir_ srp) i.i l,c £_nl_rd l'c oc, c's:ll fl_s<i a0oi'Is
lilo l)oe:k of lhc iq'i_', s II,-h swill ros_, ao_Ol_orl o.iglo .
4. I_the d dar_e _lwe.erl STORM _IINZ>OW F_V,E _no _C,OD 5TRP
MOUNIED Oi% IOP Ok INNER SI_L s "_oro lhan 1", lwo a: wood
SILL
; I 114T--<
I' VlA,'t
! _-I "! 4
iviO_i4r.... i _ I_-
<21' (7'- INN-'it 511 / / '_/4" 7 PARANCt"
_3iGW
/ I #, -----_ _/i4D.-Jwrb_v-
_,k_i_ Iw,qcr_S hi; t, o
SILL i¢_-r_:_X_ _ 'j
NIjhc_L: II _
J I l/C-J_[_ D
at I/ _i o
,J "-G ItI o
_, I Iu t
S S
LOCATING UNIT IN
WINDOW
Oper thewindoA and marl<cen-er lira on "t'_
cane, o; Iha innc" sl.
If, DOOR SIDE
ATTACH BASEPAN
ANGLE
Ins-al the aaseaar angle Behird "be inter ,vndcA s:ll, with
lha sl':o_ sac o" aasopan a,'gle as sFown. Lisa Iha 2 snarl
_C'eWs_3/_2' 0rovt0ed.
Tr,_ bes.e<m_r<_._ge hel<_sto, r,o,e.tml s_cJ,_ly "n _ _.c_.
De st,re Io pkicc I;_a::OpOl,ong_ cage: lushaga nst aac_
or 'nner S:I
CEIqTE_ _INE
IN,SIDE
OUTSIDE
BAst P,_N_tkOl I
1T

INSTALLTHE AIR CONDITIONER
IN THE WINDOW
(':m'_÷Jlly i_ the oi< _r_ild_lioi'ei d,_d _licJeif iqt_ tqe. ,_per
cvi'_aow,Make _<e he Do-tom guMe of "h_ ai, _or dt'o",er
dlop:_ iqlo Iho I'olche_ o I1:ob<_olJaq ci'lole,
WI-iI_ _+_sdyiqg tl'e _Jirccqdi_ oner coretJIIv bring +e
_v:ndew sesh o,owr be_i_d :he Jppar 0uidc of t_c air
co'/oi iDIIOl
_,PPERGd
3OTTOM GUID-:
ABOUI I//"
f
AND SASH LOCK
WINDOW SEALGASKE"
18

Always unplug your air conditioner before cleaning.
The air filter behlnd the front grille should be checked and
cleaned at least once every 2 weeks or more often if necessary.
To remove:
1, Open the inle.f grille downward by pulling out l,he fop of the inle.f grille.
2, Remove l,he air'iil.fer "from"the fron.f grille assembly by pulling t'he air'hi"for
up sligly"fly,
3, Clean the fill,er with warm, soapy water below 40"C(104°F).
4. Rinse and genl,ly shake l,he wal,er {:ram l-he fil"fer and let it dry before replacing
if,.
DO NOT use your air conditioner without the air filter in place.
To clean the front panels or the cabinet DO NOT use harsh
chemicals, abrasives, ammonia, chlorine, bleach, concentrated
detergents, solvents or metal scouring pads.
Some of these chemicals may dissolve, damage and/or discolor your
air conditioner.
Always use a soft cloth dampened with water or mild soap
and water solution to wipe the front of the cabinet.
Wipe dry wilh a soft clolh.
lg
Page is loading ...
Page is loading ...
Page is loading ...
-
 1
1
-
 2
2
-
 3
3
-
 4
4
-
 5
5
-
 6
6
-
 7
7
-
 8
8
-
 9
9
-
 10
10
-
 11
11
-
 12
12
-
 13
13
-
 14
14
-
 15
15
-
 16
16
-
 17
17
-
 18
18
-
 19
19
-
 20
20
-
 21
21
-
 22
22
-
 23
23
Haier HWR06XC5 Owner's manual
- Type
- Owner's manual
Ask a question and I''ll find the answer in the document
Finding information in a document is now easier with AI
Related papers
-
Haier HWR05XC9 User manual
-
Haier HWR05XCJ User manual
-
Haier 200 BTU Window Air Conditioner User manual
-
Haier HWE18VCR User manual
-
Haier HWR10XCJ Owner's manual
-
Haier HWR10XC6 Installation guide
-
Haier ESA3055 Owner's manual
-
Amana AP099R Owner's manual
-
Haier ACA055R Owner's manual
-
Haier HWF05XCJ Owner's manual
Other documents
-
Thule 102 User manual
-
Havis-Shields QUESTAR CD-QS-1 User manual
-
 Upper Bounce UBSF01-7.5 Operating instructions
-
 Climette CA0616KR Owner's manual
-
 Chunghop K-1010E User Instructions
-
 urban ambiance UHP4367 Installation guide
-
 urban ambiance UHP4366 Installation guide
-
mundoclima Series MU-EMP “Embedded Air Curtain” Installation guide
-
TERK Technologies DTOC User manual
-
 SmartBidet SB-2000WE Operating instructions


