Kenmore Elite 46513323600 Installation guide

Type
Installation guide

This manual is also suitable for

Kenmore Elite 46513323600 dishwasher offers a range of features to make dishwashing easier and more efficient. Its 120 VAC, 60 Hz grounded electrical circuit and individual wiring system ensure safe operation. Installation requires a qualified individual and adherence to national and local codes. The dishwasher must be connected to a grounded metal wiring system or an equipment-grounding conductor. Proper plumbing is also crucial, and the instruction manual emphasizes the need for a 3/4" DLListed Approved Strain Relief and a 60" Flexible Water Supply Line.

Kenmore Elite 46513323600 dishwasher offers a range of features to make dishwashing easier and more efficient. Its 120 VAC, 60 Hz grounded electrical circuit and individual wiring system ensure safe operation. Installation requires a qualified individual and adherence to national and local codes. The dishwasher must be connected to a grounded metal wiring system or an equipment-grounding conductor. Proper plumbing is also crucial, and the instruction manual emphasizes the need for a 3/4" DLListed Approved Strain Relief and a 60" Flexible Water Supply Line.

Appendix A
ns alia ion
ns ru ions
/
Tip Over Hazard
Do not use dishwasher drawer until inside cabinet
m opening. Doing so can result in serious injury or cuts.
InstallationInstructions
LeaveInstallationInstructionsandUse&CareGuidewithOwner
ALLELECTRICALWIRING,GROUNDINGANDPLUMBING
SHOULDBEDONEINACCORDANCEWITH NATIONAL
ANDLOCALCODESBYQUALIFIEDINDIVIDUALS.
This dishwasher is designed for oper-
ation on an individual 120 VAC.60 Hz
grounded electrical circuit. Use
required fuse (15 amp) or comparable
circuit breaker. Twowire with ground
service to the dishwasher is recom-
mended for connection at the termi-
nal box for grounding.
Topreventaccidentalcontactwith electricalconnections,
built-indishwashermodelsmust notbe connectedtoa
powersourceunlessthedishwasheris completelyenclosed,
with front panelsin place.If the back or eithersideofthe
dishwasherisexposed,a panelmust be usedto complete
this enclosure.Failureto follow this warningcould resultin
deathor seriousinjury.
GROUNDING INSTRUCTIONS
This appliance must be connected to
a grounded metal, permanent wiring
system; or an equipment-grounding
conductor must be run with the cir-
cuit conductors and connected to the
equipment-grounding terminal or
lead on the appliance.
Topreventthe possibilityof electricalshock,this dishwash-
er,as otherelectricalappliances,mustbe adequately
grounded.It isthe responsibilityofthe installerat the point
ofinstallation,takingintoconsiderationlocalconditionsand
requirements.Failureto follow this warningcouldresultin
death orseriousinjury.
CHECKLOCALPLUMBING CODES
oPPOVLUB
PROCEDURESAND ACCESSORIES.
ALLPLUMBINGSHOULDBE DONE
ACCORDANCEWITH
Disconnectelectricalpowerto
dishwasherbeforeyoustart!
Failuretofollow thiswarningcould
resultindeathorseriousinjury.
11/4
Tira _[dstlca de cierre
Attache
@" FlexibleWaterSuppJyLine 2 AppropriateSizedULListedWireConnectors
Tubedaflexlbt_ _amsum/mslroae/aguade 60"(152,40cm 2conectoresdecable cat_certlflcactot7UL. dWtamanoadecuado
Tuyaud'alimentatJoneneauflexiblede 152.40cm 60po 2 serre-fllsdetallleappropneenomo]oguesUL
4 CrackerMounting Screws 2 UnRMountingScrews
4 tomt/ios deinstaiaci6n 2 tomittos de insta/act6n
detsoports _ deta u/ddaa
4 vis de montage pour suppor[s 2 visde montage Douri'aDDarel]
2 Brackets
2 SOpOtYSS
2 suppods
2_Jm Strips
t.25" BoseClamp
AWaz_del_pa/_ maf_guera
de .25pmg.
Collie]ae serrage1,25 po.
2 t#a$ d8 motgu}'as
2 Panties de garnilure
3/4" DLListed Approved Strain ReBel
SopotTepasacaeles ae 3/4"/1,90 cm) con certificactSn UL
Reducteur de tension de 1,90 cm (3/4 po)homologue UL
Do not push or lift unit in this area./No empuje ni levante/a unidad por este
/ado./Ne pas poussernisoulever I'appareil par sa partiesupdrieure.
==18112"Max.
H= Opening HeightlH=Altura de aperturelH = Hauteurd'ouverture
Beforeinstallation turn offwater and disconnectpower,/Antesdela insta-
lacidn, cierre el suministro deagua y desconecte el suministro el_ctricoJAvant
I'installatien, fermez I'eau et coupezle ceurant.
Prefered Utility Areal
Area de la cocina
preferida/
Emplacement
recommande
Drill openingas shown. If the hole(s) are not located as shown, the utilitiesmay prevent
the dishwasherfrom being pushedall the way in as needed./Ta/adree/agujero cored se
muestra. Silos agujeros no quedan ubicados coredse muestra en la figura, es posible que
las conexiones de suministro impidan empujar completamente hasta el rondo el lavavajillas,
como es necesario./Percez une ouverture tel qu'Ulastre. Si le ou les trous ne sont passitars
aa m_me endroit que sur I'illustmtion, il est possible que le lave-vaissene ne puisse _tre
pouss_compl_tement au fond, comme requis.
Checklocalcodesto determinewhether Romax,Armored,or Power cordis
needed.Allwill work with steps12 and 13./Paradeterminarsi necesitaun
cable tipo Romax,blindado ode alimentaci6n, consulte lasnormas localesal
respecto. Todofuncionar&con lospasos 12y 13,/V6rifiezles codesIocauxpour
savoirsi un cordon avecpretecteur, un cordon arm6 on un cordon d'alimentatien
sent requis. Tonscenviendront aux 6tapes 12 et 13.
Route powersupply through strain relief and secureto electrical plate. Must
make all terminationsinside box./Gu[eloscables desuministro e/_ctrico a
tray,s del soporte pasacablesy f[jelos a la placa de electricidad. Todaslas termi-
nacionesdeben quedar dentro dela caja./Faitespasser le cordon d'alimentation
61ectriquedans le r6ducteur detension et fixez-le _ la plaque 61ectrique. Veus
devezfaire tons les raccerdements _ I'int6rieur de la bo_te.
Join wires togetherusing ULlisted connectors.Must attach groundwire to
green ground screw./Una los cables utilizando conectores con certificaci6n UL,
Esnecesario conectar el cable de puesta a tierra al tomillo verdedepuesta a
tierra,/Attachez ensemble les fils 61ectriques_ I'aide de serre-fils homelegu6sUL.
Vousdevezfixer lefil de mise_ la terre &la vis verte de mise _ la terre.
Reinstallelectricalboxcover./Vue/vaainsta/ar/acubiertade/a cajadecircuitos
el_ctricos./Remettezle couvercledela bo_te61ectriqueenplace.
Turnonwater and checkfor leak at water valve./Abrael suministro del aguay
compruebe si hay alguna fuga enla v&lvulade agua,/OuvrezI'eau afin de v6rifier
lesfuites d'eau au robinet.
Feedhosesand wiringintocabinet whilesliding unitintoposition.Watchfor
kinks. NOTE:Push against the outsideedges ofdrawer./Insertelas mangueras
y los cables en el gabinete,mientras desliza la unidadpara que quede en la
posici6n correcta, Compruebeque nohaya dobleces,NOTA:empuje contra los
bordes exterioresdel compartimiento./Introduisez les tuyaux et lescircuits 61ec-
triques dans I'armeire tout en glissant I'appareil enplace.Assurez-vous que les
ills et lestuyaux ne se tortillent pas. REMARQUE: Poussezcentre les coins
ext6rieurs du tiroir.
Setdrawer on chair using protectivecovering.Push rails in./Coloque el com-
partimiento sobre una silla, utilizando material protector,Empujehacia adentro
los rieles,/Placez le tiroir sur une chaise recouverte d'une couverture protec-
trice. Poussezles glissi_res &I'int_rieur.
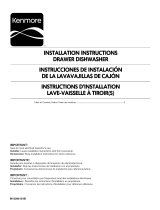
While drawer is out,check if wiring and drain hose in back of unit are kinked as shown
in box A.If needed, straightenwiring and drain hose as shown inbox Bto allow unit to
move all the way in./Mientras el compartimiento est,_fuera, compruebe si el cableado y la
manguera de desague situados en la parte trasera de la unidad est&n doblados, como se
muestra en el cuadm A. En caso necesario, est/relos para que queden rectos, como se
muestra en el cuadm B,a fin de que la unidad se pueda introducir hasta el rondo./Pendant
que le tiroir est retire,assurez-vous que les circuits electriques et le tuyau de vidange
situes _ I'arriere de I'appareil ne sent pas tortilles tel qu'illustre dans la bo_teA. Au besoin,
redressez les circuits electriques etle tuyau de vidange tel qu'illustre dans la bo_teB pour
permettre _ I'appareil d'etre pousse completement au fond.
Check level left to right and front to back./Compruebe la nivelaci6n de izquier-
da aderecha y dedelante hacia atr&s,/Assurez-vousque I'appareil est de niveau.
Adjustlegs to level unit with 3/16" socket.After leveling, turn front legs only
oneadditionalcompleteturn clockwise./Ajuste/as patas para nive/ar /a unidad
utilizando una/lave de3/16". Trasterminar denivelar la unidad,d_ s61ouna
vuelta completa adicional hacia la derecha alas patas delanteras,/Mettez I'ap-
pareil de niveau en r_glant la hauteur des pattes &I'aide d'une deuille de0,46
cm (3/16 po).Aprgs la raise &niveau,teurnez les pattes avant d'un tour suppl_-
mentaire dans le sensdes aiguilles d'une montre.
USETHESEHOLESTOAL
FLUSHWmTHEFRONT
CONLAPARTEBELAN (: ,,_r'r
j,
UTILISEZCESTRousPO_ _, t
AVECLEDEVANTDESPORTESDEL'ARMOIRE.....
!' 'll'll
USETHESEHOLESTOALIGNUNIT
FLUSHWITHTHEFRONTOFCABINETFRAME,
UTILICEESTOSAGUJEROSPARAALINEARLAUNIOADARASCON
LAPARTEDELANTERAOELMARCOOELGABINETE.
UTILISEZCESTROUSPOURALIGNERL'APPAREIL
EXACTEMENTAVECLEDEVANTDEL'ARMOIRE,_
Attachto cabinet brackets with screws provided.//nsta/e
nete con los torni//os suministrados,/Fixez lessupports deI'armoireavecles vis
fournies.
  • Page 1 1
  • Page 2 2
  • Page 3 3
  • Page 4 4
  • Page 5 5
  • Page 6 6
  • Page 7 7
  • Page 8 8
  • Page 9 9
  • Page 10 10

Kenmore Elite 46513323600 Installation guide

Type
Installation guide
This manual is also suitable for

Kenmore Elite 46513323600 dishwasher offers a range of features to make dishwashing easier and more efficient. Its 120 VAC, 60 Hz grounded electrical circuit and individual wiring system ensure safe operation. Installation requires a qualified individual and adherence to national and local codes. The dishwasher must be connected to a grounded metal wiring system or an equipment-grounding conductor. Proper plumbing is also crucial, and the instruction manual emphasizes the need for a 3/4" DLListed Approved Strain Relief and a 60" Flexible Water Supply Line.

Ask a question and I''ll find the answer in the document

Finding information in a document is now easier with AI