Page is loading ...

© 2020 by Bobrick Washroom Equipment, Inc.
Form No. 5050-69 r6/1/20 Printed in U.S.A.
In the U.S.A.: BOBRICK WASHROOM EQUIPMENT, INC.
Los Angeles: 6901 Tujunga Ave North Hollywood, California 91605-6213 • Tel: (818) 982-9600 • FAX: 818-503-1102
New York: 200 Commerce Drive, Clifton Park, NY 12065-1350 • Tel: (518) 877-7444 • FAX: (518) 877-5029, or
email: [email protected]
In Canada: BOBRICK WASHROOM EQUIPMENT COMPANY
45 Rolark Drive, Scarborough, Ontario M1R 3B1 • Eastern Canada: Tel: (877) 423-6555 • FAX: (877) 423-8555
• Western Canada: Tel: (877) 423-6444 • FAX: (877) 423-8444
INSTRUCTIONS FOR INSTALLATION AND MAINTENANCE
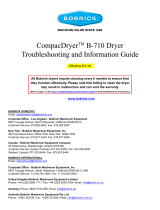
Bobrick Model B-5050 Soap Dispenser
CAT. 74
Allen Head
Screw
Bottom
Mounting Tab
Key Hole
Slot (2)
Container
Valve Assembly
5050-30
Movement
of Lid
CAT. 74
Key Slot
Lid
5050-45
CAT. 74 Key
HOW TO INSTALL THE DISPENSER:
1. Locate soap dispenser so the push button spout will be over the
lavatory. Allow a minimum 4" (100mm) clearance between top of
dispenser and bottom of any shelf, cabinet, or other horizontal
projection to provide enough space to fully open the lid and ll
dispenser.
2. Remove the lid with key provided by inserting end of key into slot
at back of lid. Push key into slot and lift up the back of the lid at the
same time. Rotate lid forward and lift up to remove.
3. Provide (3) #10 x 1-1/2" (4.8 x 38mm) mounting screws. Use the
vessel as a template to mark the three mounting hole locations on
the wall. On the top (2) holes use the small end of the key hole slot to
mark the hole locations. Drill (3) mounting holes.
4. Without the vessel, screw the (3) screws into holes leaving
approximately 1/4" (6.4mm) between the screw head and the wall.
5. Place the bottom mounting tab of the vessel over the bottom
mounting screw. Place the large end of the key hole slots at the
top over the two mounting screws. Rotate the top of vessel to the
right. This will locate the small end of the key hole slots behind the
mounting screws. Finally, tighten all three screws to secure unit to
wall.
The surface on which the unit is to be mounted determines the
specic type of mounting required for best installation:
For plaster or dry wall on studs, provide concealed backing and secure
wall bracket with screws. Backing must comply with local building
codes.
For hollow tile partitions and other instances where applicable, provide
1/8" (3.2mm) round-head toggle bolts.
For brick, concrete, or solid tile walls, provide #10 (4.8mm) ber plugs
or expansion shields and mounting screws, or provide 1/8" (3.2mm)
cinch bolts or expansion bolts.
For mirrors or glass surfaces, use the pressure-sensitive tape strips
provided. Do not use the tape for other types of wall surfaces. Clean
any dirt, dust, or oils from the surface and back of vessel. Apply both
tape strips horizontally on the back of the vessel. Press the vessel to
thelmirro or glass surface. Allow the tape to set for 24 hours before
lling the soap vessel.
HOW TO REFILL THE SOAP VESSEL:
1. Remove the lid with key provided by inserting end of key into slot and
lifting up the back of the lid at the same time. Rotate lid forward and
lift up to remove.
2. Filling soap vessel B-5050: Fill vessel with commercially marketed
all-purpose hand soaps.
3. Insert the tab on the front of lid into the recess inside the front of
vessel. Rotate the lid towards the back. Push down on the back of the
lid to secure the latch on the lid into vessel.
MAINTENANCE:
1. Warm water mixed with soap from dispenser is the best cleaning
solution for all soap dispenser parts. Pump warm water through the
vessel and valve periodically to ush out any contaminates or dried
soap residue. NEVER USE ABRASIVE CLEANERS.
2. Periodically give the dispenser an overall cleaning. Remove the soap
vessel by rst removing the lid as described earlier. Then loosen all
three mounting screws about 1/8" (3.2mm). The top of vessel may
then be rotated to the left. This will allow the top of the vessel to move
slightly forward so that the whole vessel may be lifted up from the
bottom mounting screw.
3. The valve assembly may be removed from the vessel by removing
the Allen screw from the bottom of the vessel. Do not disassemble the
valve assembly.
4. When cleaning the valve assembly, be sure the cylindrical hole in the
vessel is free from all debris and dried soap. Be sure to remove any
plastic that may have been created by threading the Allen screw up
into the bottom screw hole.
REPLACEMENT PARTS LIST
Part Name Part No.
Lid 5050-45
/