Minka Group 2290-613 is a versatile and stylish light fixture that can be used to enhance the ambiance of any room. With its adjustable chain loop, you can customize the hanging height to suit your needs. The fixture's durable construction and high-quality materials ensure longevity and可靠性.
Here are some of the key capabilities and possible use cases for the Minka Group 2290-613:
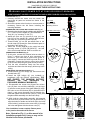
- Adjustable hanging height: The chain loop allows you to adjust the hanging height of the fixture to create the perfect ambiance for your space. This makes it ideal for use in rooms with high or low ceilings.
Minka Group 2290-613 is a versatile and stylish light fixture that can be used to enhance the ambiance of any room. With its adjustable chain loop, you can customize the hanging height to suit your needs. The fixture's durable construction and high-quality materials ensure longevity and可靠性.
Here are some of the key capabilities and possible use cases for the Minka Group 2290-613:
- Adjustable hanging height: The chain loop allows you to adjust the hanging height of the fixture to create the perfect ambiance for your space. This makes it ideal for use in rooms with high or low ceilings.


-
 1
1
-
 2
2


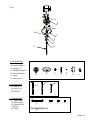
Minka Group 2290-613 User manual
- Type
- User manual
- This manual is also suitable for
Minka Group 2290-613 is a versatile and stylish light fixture that can be used to enhance the ambiance of any room. With its adjustable chain loop, you can customize the hanging height to suit your needs. The fixture's durable construction and high-quality materials ensure longevity and可靠性.
Here are some of the key capabilities and possible use cases for the Minka Group 2290-613:
- Adjustable hanging height: The chain loop allows you to adjust the hanging height of the fixture to create the perfect ambiance for your space. This makes it ideal for use in rooms with high or low ceilings.
Ask a question and I''ll find the answer in the document
Finding information in a document is now easier with AI
Related papers
-
Metropolitan N6679-274 User manual
-
Minka Group 2257-613 User manual
-
 Minka Lavery 4347-593 User manual
-
-
 Minka Lavery 3290-613 User manual
-
The Great Outdoors 72252-66 User manual
-
-
-
Minka Group 3070-613 User manual
-


Other documents
-
 Minka Lavery 2257-576 Installation guide
-
 Minka Lavery 4347-593 Installation guide
-
-
 George Kovacs P5013-084 User manual
-
 Minka Lavery 3290-613 Installation guide
-
 George Kovacs P800-077 Installation guide
-
Triarch 31483 User manual
-
Minka-Lavery 4699-107 User manual
-
Minka Lavery 3308-84 Installation guide
-
 Minka Lavery 4870-283 Operating instructions


