Page is loading ...

10x10 PERGOLA
OUTDOOR PRODUCT
MODEL: # 1505513
Made in China
INS-1505513-A-(10x10) PERGOLA-ENG 7-06-18
Save this assembly manual for future reference in the event that
you need to order replacement parts.
For the most up to date assembly manual,
to register your product or to order replacement parts please visit
www.backyarddiscovery.com
BOOKLET INCLUDES:
• Owner's Manual
• Frequently Asked Questions
• Assembly Instructions
• Warranty Information


PLEASE HAVE THE FOLLOWING INFORMATION WHEN YOU MAKE YOUR CALL:
1 – MODEL NUMBER OF THE PRODUCT LOCATED ON THE FRONT OF THE ASSEMBLY MANUAL
2 – DESRIPTION OF THE PART FROM THE PARTS LIST
POR FAVOR TENGA VISIBLE LA SIGUIENTE INFORMACIÓN CUANDO LLAME:
1 - NÚMERO DE MODELO DEL PRODUCTO QUE SE ENCUENTRA UBICADO AL FRENTE DEL MANUAL
DE ENSAMBLAJE
2 - DESCRIPCIÓN DE LA PIEZA QUE SE ENCUENTRA EN LA LISTA DE PIEZAS
PLEASE READ THIS BEFORE STARTING ASSEMBLY
P
OR FAVOR LEA ESTAS INSTRUCCIONES ANTES DE COMENZAR EL ENSAMBLAJE
STOP
PARE
Missing A Part?
CALL US BEFORE GOING
BACK TO THE STORE!
The store where you made your purchase
does not stock parts for this item.
If you have assembly questions or if you need parts,
whether they are missing or damaged
Call Toll-Free Help Line or visit www.backyarddiscovery.com
¡LLÁMENOS ANTES DE REGRESAR A LA TIENDA!
La tienda donde realizó la compra no almacena piezas de este producto.
Si tiene preguntas sobre el ensamblaje o si necesita piezas debido a que
faltan o están dañadas
llame gratis a la línea de ayuda
1-800-856-4445
• READ THE ASSEMBLY MANUAL COMPLETELY, PAYING SPECIAL ATTENTION TO THE IMPORTANT TIPS AND
SAFETY INFORMATION.
• AFTER YOU HAVE READ THE ASSEMBLY MANUAL, YOU WILL BE ABLE TO DECIDE IF YOU NEED PROFESSIONAL
HELP TO COMPLETE THE ASSEMBLY OF THE STRUCTURE.
• SEPARATE AND IDENTIFY ALL PARTS TO MAKE SURE THAT YOU HAVE ALL OF THE PARTS LISTED.
• IF YOU CAN’T FIND ALL OF THE PARTS, CHECK THE PACKING MATERIAL. SMALL PARTS MAY HAVE FALLEN INTO IT
DURING SHIPMENT.
DAMAGED, PLEASE CALL THE
• IF YOU HAVE PROBLEMS WITH THE ASSEMBLY OR IF ANY PART IS MISSING OR
HELP LINE
1-800-856-4445 OR VISIT www.backyarddiscovery.com
• LEA EL MANUAL DE ENSAMBLAJE COMPLETAMENTE, PRESTANDO ESPECIAL ATENCIÓN A LOS CONSEJOS ÚTILES
IMPORTANTES Y A LA INFORMACIÓN SOBRE SEGURIDAD.
• DESPUÉS DE QUE HAYA LEÍDO EL MANUAL DE ENSAMBLAJE, PODRÁ DECIDIR SI NECESITA AYUDA PROFESIONAL
PARA EFECTUAR EL ENSAMBLAJE DE LA ESTRUCTURA.
• SEPARE E IDENTIFIQUE TODAS LAS PIEZAS PARA COMPROBAR QUE DISPONE DE TODAS LAS PARTES INDICADAS.
• SI NO PUEDE ENCONTRAR TODAS LAS PIEZAS, REVISE EL MATERIAL DE EMPAQUE. ES POSIBLE QUE ALGUNAS
PIEZAS PEQUEÑAS PUEDAN HABERSE CAÍDO ALLÍ DURANTE EL ENVÍO.
• MANTÉNGASE ALEJADO DE LOS NIÑOS MENORES A LA EDAD RECOMENDADA.
• SI TIENE PROBLEMAS CON EL ENSAMBLAJE O SI ALGUNA PIEZA FALTA O ESTÁ DAÑADA, LLAME A LA LÍNEA DE
AYUDA AL
1-800-856-4445 O VISITE www.backyarddiscovery.com

Owner’s Manual Outdoor Product
ENG OWNER OP-2012
Dear Customer:
Please read entire booklet completely before beginning the assembly process.
Structures are not intended for public use. The Company does not warranty any of its
residential structures subjected to commercial use such as: Recreational Park, or any
similar Commercial Application.
Please follow all recommendations below. Failure to do so may result in the warranty
being void and/or safety violations that could result in serious injury. This manual
contains helpful information concerning Assembly Preparation, Installation Procedure,
and Required Maintenance. Always keep safety in mind as your structure is being built.
PLEASE RETAIN THESE INSTRUCTIONS FOR FUTURE REFERENCE. KEEP THEM IN A SAFE
PLACE WHERE YOU CAN REFER TO THEM AS NEEDED. IN ORDER TO PROVIDE YOU
WITH THE MOST EFFICIENT SERVICE, IT IS REQUIRED THAT YOU PROVIDE US WITH THE
PART NUMBERS WHEN ORDERING PARTS.
For Your Records:
Please take time and fill out the information below. This information will be needed for
warranty issues.
Where Purchased: ______________
Date of Purchase: ________________
Installation Date: _______________
Installed by: ______________________
Tracking Number Reference Label
Tracking ID number on the carton and back of the ID plate are included for
tracking purposes associated with warranty claims.
Staple Receipt Here

Owner’s Manual Outdoor Product
ENG OWNER OP-2012
Maintenance Instructions:
1. Check all nuts and bolts twice monthly during the usage season and tighten as required.
(But not so tight that you crack the wood) It is particularly important that this
procedure be followed at the beginning of each season.
2. Oil all metallic moving parts monthly during the usage period.
3. Check all coverings for bolts and sharp edges twice monthly during usage season to be
certain they are in place. Replace when necessary. It is especially important to do this
at the beginning of each new season.
4. For rusted areas on metallic members such as hinges, brackets, etc. sand and repaint,
using a non lead-based paint meeting the requirements of Title 16 CRF Part 1303.
5. Inspect wood parts monthly. The grain of the wood sometimes will lift in the dry season
causing splinters to appear. Light sanding may be necessary to maintain a safe
environment. Treating your Product with protection (sealant) after sanding will help
prevent severe checking/splitting and other weather damage.
6. We have applied a waterborne translucent stain to your unit. This is done for color only.
Once or twice a year, depending on your climate conditions, you must apply some type
of protection (sealant) to the wood of your unit. Prior to the application of sealant,
lightly sand any “rough” spots on your set. Please note this is a requirement of your
warranty.

Outdoor Product Assembly Manual FAQs:
1. Is the wood treated with chemicals? Backyard Discovery uses 100% Chinese Cedar wood
which is naturally bug resistant, decay and rot resistant. To help ensure your families safety,
our wood is completely chemical free and we do not use pressure-treated wood. The stain
we use is a top coat using a water-based product that is for appearance only.
2. How often should the product be stained? Backyard Discovery recommends the product be
stained once each year. A water or oil based stain can be used at the customer’s discretion.
3. Why does it seem that my product is developing cracks? Wood is a natural material; no two
pieces are exactly alike. Each piece has its own characteristics and personality and reacts
differently to climate changes. When any wood product is exposed to the elements, it
develops “wood checks”. A check is the radial separation of the wood fibers running with
the grain of the wood. These are caused by the varying temperature and moisture
conditions. A check is not a crack – it does not affect the strength or durability of the wood
or structural integrity of the product.
4. Do Backyard Discovery products come with a warranty? Yes. All Backyard Discovery
products carry a 1-year replacement warranty on all parts for manufacturer’s defect. Our
wood carries a 5 year warranty on rot and decay as well. Please see warranty details for
more information.
5. What is the best way to get started assembling the product? Backyard Discovery
recommends taking all the parts out of the boxes and arranging them by part number before
you begin any assembly. This will not only allow faster assembly, but will also identify any
parts that may be missing or damaged so they can be replaced before assembly. If parts are
missing or need replacement, go to
www.backyarddiscovery.com/support and follow the prompts to order them. Next, read the
assembly manual and get the tools ready for the job as recommended in the manual. If the
assembly manual is lost or misplaced a new one can be printed from Backyard Discovery’s
website: www.backyarddiscovery.com .
6. The 2”x4” boards do not measure 2”x 4”. Why not? In the U.S. it’s common practice to
describe lumber dimensions using the rough cut sizes from the sawmill and not the finished
dimensions. Retailers, home stores, etc. all use this accepted practice for describing lumber
dimensions. However, Backyard Discovery products are designed and constructed using the
actual dimensions so everything fits properly and remains so during the life of the product.
For more information and frequently asked questions, please refer to our website at
www.backyarddiscovery.com .

(Level 24")
(Square)
(Tape Measure)
(Cordless Drill or Electric Drill)
(Drill Attachments: Phillips
Head & 5/16" Socket Driver)
(An Adult w/ an Adult Helper)
(Rubber Mallet - Optional)
(Ladder)
(Phillips Screw Driver)
Tools Required for Installation:
(These are the tools that are generally required for assembly of our outdoor products. These tools
are not included with the outdoor product purchase.)
(3/16" Concrete Drill Bit)

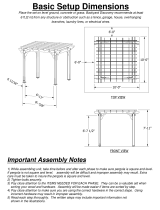
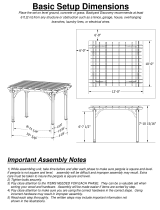
Basic Setup Dimensions
Place the set on level ground, concrete or grass. Backyard Discovery recommends at least
6 ft [2 m] from any structure or obstruction such as a fence, garage, house, overhanging
branches, laundry lines, or electrical wires.
Important Assembly Notes
1) While assembling unit, take time before and after each phase to make sure pergola is square and level.
If pergola is not square and level, assembly will be difficult and improper assembly may result. Extra
care must be taken to insure the pergola is square and level.
2) Tighten bolts securely.
3) Pay close attention to the ITEMS NEEDED FOR EACH PHASE. They can be a valuable aid when
sorting your wood and hardware. Assembly will be made easier if items are sorted by step.
4) Pay close attention to make sure you are using the correct hardware in the correct steps. Using
incorrect hardware may result in improper assembly.
5) Read each step thoroughly. The written steps may include important information not
shown in the illustrations.
TOP VIEW
FRONT VIEW
6'-0"
6'-0"
10'-0"
10'-0"
7'-11"
6'-7 1/2"

Parts Identification
Wood Components
(NOT TO SCALE)
D4 - JOIST - W4L04587
1 3/8"x5 1/4"x90" (36x134x2286)
(2)
D6 - JOIST END - W4L04588
1 3/8"x5 1/4"x15" (36x134x381)
(12)
D9 - SHORT ANGLE BRACE - W4L04594
1 3/8"x5 1/4"x29 3/4" (36x134x755)
(8)
WP1 - PERGOLA POST - W4L04584
5 1/2"x5 1/2"x89 1/2" (140x140x2273)
(4)
D10 - JOIST - W4L05827
1 3/8"x5 1/4"x90" (36x134x2286)
(2)
D5 - JOIST - W4L04591
1 3/8"x5 1/4"x90" (36x134x2286)
(4)
D3 - SLOTTED JOIST - W4L04586
1 3/8"x5 1/4"x114" (36x134x2896)
(7)
P1 - LONG PURLIN - W4L05476
1 3/8"x1 3/8"x70 3/4" (36x36x1798)
(12)
P2 - SHORT PURLIN - W4L05477
1 3/8"x1 3/8"x38 5/8" (36x36x981)
(12)
D7 - JOIST END - W4L04592
1 3/8"x5 1/4"x15" (36x134x381)
(4)

Parts Identification
Hardware
VP - BOLT WH 5/16x7-1/4 BLK - H100196
(34)
VM - BOLT WH 5/16x2-1/2 BLK - H100194
(18)
CQ - CONCRETE ANCHOR 1/4" x 2" - H100120
(17)
-
T
-
4
0
T
O
R
X
W
R
E
N
C
H
-
A
1
0
0
0
4
1
(
2
)
VX - LAG SCREW WH 5/16x5-1/2 BLK - H100204
(15)
VW - SCREW PFH 8x1/2 BLK - H100203
(2)
VZ - LAG SCREW WH 5/16x3 BLK - H100206
(9)
VU - SCREW PFH 8x2-1/2 BLK - H100201
(88)
VT - SCREW PFH 8x1-1/2 BLK - H100200
(17)
VS - WASHER LOCK EXT 12x19 BLK - H100199
(52)
VR - WASHER LOCK EXT 8x19 BLK - H100198
(74)
VL - NUT BARREL WH 5/16x1-1/2 BLK - H100193
(34)
VK - NUT BARREL WH 5/16x7/8 BLK - H100192
(18)
- T-40 TORX BIT - A100042
(2)
VV - SCREW PWH 8x5/8 BLK - H100202
(2)

Parts Identification
Accessories
(NOT TO SCALE)
HT - FOOT 142 SQUARE POST - A100029
(
4)
XR - BYD ID TAG (SMALL) WITHOUT AGES - A100241(1)
SQ - "A" REVISION TAG - A100314
(1)
(1) STAIN MARKER - LT BRN-2UV - A6P00170

STEP 1
REPEAT PROCESS FOR OPPOSITE SIDE.
***HAND TIGHTEN ONLY AT THIS TIME.***
NUT BARREL WH 5/16x7/8 BLK
(4 PLCS)
WASHER LOCK EXT 12x19 BLK
(4 PLCS)
BOLT WH 5/16x2-1/2 BLK
(4 PLCS)
WASHER LOCK EXT 8x19 BLK
(4 PLCS)
D9 - SHORT ANGLE BRACE - W4L04594
1 3/8"x5 1/4"x29 3/4" (36x134x755)
(4)
BOLT WH
5/16x2-1/2
BLK
(8)
WASHER
LOCK EXT
8x19 BLK
(8)
WASHER
LOCK EXT
12x19 BLK
(8)
NUT BARREL
WH 5/16x7/8
BLK
(8)
D4
D9
D9
D4 - JOIST - W4L04587
1 3/8"x5 1/4"x90" (36x134x2286)
(2)

STEP 2
REPEAT PROCESS FOR OPPOSITE SIDE.
WASHER
LOCK EXT
8x19 BLK
(8)
BOLT WH
5/16x2-1/2
BLK
(8)
WASHER
LOCK EXT
12x19 BLK
(8)
NUT BARREL
WH 5/16x7/8
BLK
(8)
BOLT WH 5/16x2-1/2 BLK
(4 PLCS)
WASHER LOCK EXT 8x19 BLK
(4 PLCS)
NUT BARREL WH 5/16x7/8 BLK
(4 PLCS)
WASHER LOCK EXT 12x19 BLK
(4 PLCS)
D9 - SHORT ANGLE BRACE - W4L04594
1 3/8"x5 1/4"x29 3/4" (36x134x755)
(4)
D10
D9
D9
D10 - JOIST - W4L05827
1 3/8"x5 1/4"x90" (36x134x2286)
(2)
P
I
L
O
T
H
O
L
E
S
U
P
.
PILOT HOLES UP.

STEP 3
REPEAT PROCESS FOR OPPOSITE SIDE.
BOLT WH 5/16x7-1/4 BLK
(4 PLCS)
WASHER LOCK EXT 8x19 BLK
(4 PLCS)
WASHER LOCK EXT 12x19 BLK
(4 PLCS)
NUT BARREL WH 5/16x1-1/2 BLK
(4 PLCS)
LAG SCREW WH 5/16x3 BLK
(2 PLCS)
WASHER LOCK EXT 8x19 BLK
(2 PLCS)
90" JOIST - SUPPORT
ASSEMBLY
WASHER
LOCK EXT
8x19 BLK
(12)
BOLT WH
5/16x7-1/4
BLK
(8)
WASHER
LOCK EXT
12x19 BLK
(8)
NUT BARREL
WH 5/16x1-1/2
BLK
(8)
LAG SCREW
WH 5/16x3
BLK
(4)
(4)
WP1 - PERGOLA POST - W4L04584
5 1/2"x5 1/2"x89 1/2" (140x140x2273)
90" JOIST - SUPPORT ASSEMBLY
(2)
ATTACH 'D5' TO
INSIDE HOLE
LOCATIONS.
1
2
3
4
5
6
7
8
9
1
0
1
1
1
2
1
3
1
4
1
5
1
3
1
2
1
1
1
0
9
8
7
6
5
4
3
2
1
1
2
3
4
5
6
7
8
9
1
0
1
1
1
2
1
3
1
4
1
5
1
6
1
7
1
8
1
9
2
0
2
1
2
2
2
3
2
2
2
1
2
0
1
9
1
8
1
7
1
6
1
5
1
4
1
3
1
2
1
1
1
0
9
8
7
6
5
4
3
2
1
!
NO HOLES IN TOP EDGE.
WP1
D5
D5 - JOIST - W4L04591
1 3/8"x5 1/4"x90" (36x134x2286)
(2)

NUT BARREL
WH 5/16x1-1/2
BLK
(8)
WASHER
LOCK EXT
8x19 BLK
(12)
BOLT WH
5/16x7-1/4
BLK
(8)
WASHER
LOCK EXT
12x19 BLK
(8)
LAG SCREW
WH 5/16x3
BLK
(4)
STEP 4
REPEAT PROCESS FOR OPPOSITE SIDE.
WASHER LOCK EXT 8x19 BLK
(2 PLCS)
LAG SCREW WH 5/16x3 BLK
(2 PLCS)
BOLT WH 5/16x7-1/4 BLK
(4 PLCS)
WASHER LOCK EXT 8x19 BLK
(4 PLCS)
NUT BARREL WH 5/16x1-1/2 BLK
(4 PLCS)
WASHER LOCK EXT 12x19 BLK
(4 PLCS)
1
2
3
4
5
6
7
8
9
1
0
1
1
1
2
1
3
1
4
1
5
1
3
1
2
1
1
1
0
9
8
7
6
5
4
3
2
1
1
2
3
4
5
6
7
8
9
1
0
1
1
1
2
1
3
1
4
1
5
1
6
1
7
1
8
1
9
2
0
2
1
2
2
2
3
2
2
2
1
2
0
1
9
1
8
1
7
1
6
1
5
1
4
1
3
1
2
1
1
1
0
9
8
7
6
5
4
3
2
1
!
90" JOIST - SUPPORT
ASSEMBLY
HOLES IN TOP EDGE.
(2)
90" JOIST - SUPPORT ASSEMBLY
D5
D5 - JOIST - W4L04591
1 3/8"x5 1/4"x90" (36x134x2286)
(2)

D6 - JOIST END - W4L04588
1 3/8"x5 1/4"x15" (36x134x381)
(4)
NUT BARREL
WH 5/16x1-1/2
BLK
(4)
WASHER
LOCK EXT
8x19 BLK
(4)
WASHER
LOCK EXT
12x19 BLK
(4)
BOLT WH
5/16x7-1/4
BLK
(4)
NUT BARREL WH 5/16x1-1/2 BLK
(4 PLCS)
WASHER LOCK EXT 12x19 BLK
(4 PLCS)
BOLT WH 5/16x7-1/4 BLK
(4 PLCS)
WASHER LOCK EXT 8x19 BLK
(4 PLCS)
STEP 5

NUT BARREL
WH 5/16x1-1/2
BLK
(4)
WASHER
LOCK EXT
12x19 BLK
(4)
WASHER
LOCK EXT
8x19 BLK
(4)
BOLT WH
5/16x7-1/4
BLK
(4)
STEP 6
NUT BARREL WH 5/16x1-1/2 BLK
(4 PLCS)
WASHER LOCK EXT 12x19 BLK
(4 PLCS)
BOLT WH 5/16x7-1/4 BLK
(4 PLCS)
WASHER LOCK EXT 8x19 BLK
(4 PLCS)
D6 - JOIST END - W4L04588
1 3/8"x5 1/4"x15" (36x134x381)
(2)
D6
D7
D7 - JOIST END - W4L04592
1 3/8"x5 1/4"x15" (36x134x381)
(2)
D6
D7

WASHER LOCK EXT 8x19 BLK
(4 PLCS)
BOLT WH 5/16x7-1/4 BLK
(4 PLCS)
WASHER LOCK EXT 12x19 BLK
(4 PLCS)
NUT BARREL WH 5/16x1-1/2 BLK
(4 PLCS)
WASHER
LOCK EXT
12x19 BLK
(4)
NUT BARREL
WH 5/16x1-1/2
BLK
(4)
WASHER
LOCK EXT
8x19 BLK
(4)
BOLT WH
5/16x7-1/4
BLK
(4)
STEP 7
D6 - JOIST END - W4L04588
1 3/8"x5 1/4"x15" (36x134x381)
(4)
D6
D6

WASHER LOCK EXT 8x19 BLK
(4 PLCS)
BOLT WH 5/16x7-1/4 BLK
(4 PLCS)
NUT BARREL WH 5/16x1-1/2 BLK
(4 PLCS)
WASHER LOCK EXT 12x19 BLK
(4 PLCS)
D6 - JOIST END - W4L04588
1 3/8"x5 1/4"x15" (36x134x381)
(2)
WASHER
LOCK EXT
12x19 BLK
(4)
NUT BARREL
WH 5/16x1-1/2
BLK
(4)
WASHER
LOCK EXT
8x19 BLK
(4)
BOLT WH
5/16x7-1/4
BLK
(4)
STEP 8
D6
D7
D7
D6
D7 - JOIST END - W4L04592
1 3/8"x5 1/4"x15" (36x134x381)
(2)

LAG SCREW WH 5/16x5-1/2 BLK
(14 PLCS)
WASHER LOCK EXT 8x19 BLK
(14 PLCS)
WASHER
LOCK EXT
8x19 BLK
(14)
LAG SCREW
WH 5/16x5-1/2
BLK
(14)
STEP 9
ALIGN COUNTER BORED HOLES IN SLOTTED JOISTS WITH PRE-DRILLED
HOLES IN BOTTOM JOISTS AND ENDS.
JOIST SPACING
FLUSH
D3
14 3/4APPROX. "
(6 SPCS)
D3 - SLOTTED JOIST - W4L04586
1 3/8"x5 1/4"x114" (36x134x2896)
(7)
/