Page is loading ...

OM72-1008-01E
HEAD OFFICE(FACTORY)
#58, SUNG SAN-DONG, CHANG WON, KYUNGNAM, KOREA
TEL: (82-55) 239-7000 / FAX: (82-2) 467-9997
OWNER S MANUAL

2010. 8 PRINTED
2010. 8 PUBLICATION
NO
COPY
WELCOME
Thank you for purchasing an Daelim vehicle. We hope you enjoy safe riding.
OPERATOR AND PASSENGER
This motorcycle is designed to carry the operator and one passenger.
Attempting to change the pre-set maximum speed may cause danger and will void the Daelim warranty.
ON-ROAD USE
This motorcycle is designed to be used only on the road.
READ THIS OWNER'S MANUAL CAREFULLY
Pay special attention to statements preceded by the following words:
Indicates a strong possibility of severe personal injury or death if instructions are not followed.
Indicates a possibility of personal injury or equipment damage if instructions are not followed.
Gives helpful information.
This manual is an important and integral part of your vehicle. keep it with your vehicle at all times, even though your vehicle is resold.
IMPORTANT NOTICE
WARNING
WARNING
CAUTION
NOTE
OWNER S MANUAL

SPECIFICATION
OPERATION INSTRUCTION(SAFETY PRECAUTIONS)
PRIOR TO STARTING VEHICLE / OPERATION
CORRECT ATTIRE
CARGO/MODIFICATION/ATTACHMENT/MUFFLER
PARTS LOCATION
METER READING AND USAGE
METER
INDICATING LAMPS/MAIN SWITCH
SWITCH OPERATION
START BUTTON / ENGINE STOP SWITCH
UP-DONW ADJUSTING SWITCH OF HEADLIGHT
PASSING SWITCH / HORN BUTTON
WINKER SWITCH/ EMERGENCY SWITCH
SEAT BUTTON
EQUIPMENT USAGE
AT STARTING
REPLACEMENT OF THE SMART KEY’S BATTERY
STEERING STEM LOCK / ADJUSTING REAR CUSHION
OPERATION
SEAT LOCK / TRUNK
SEAT BACK REST / INNER BOX LID / CHARGE SOCKET
CORRECT DRIVING OPERATION/ ENGINE STARTING
AT STARTING
PROPER DRIVING METHODS
DRIVING IN A SLOPING ROAD
SELF INSPECTIONS BEFORE OPERATION
INSPECTION OF SUSPICIOUS AREA OF THE VEHICLE WHEN DRIVING
IN THE PREVIOUS DAY
BRAKE INSPECTION
TIRE INSPECTION
FUEL CHECK
ENGINE OIL LEVEL CHECK
LIGHT / WINKER INSPECTION
INSPECTION OF STOP LAMP
BULB REPLACEMENT METHOD
MAINTENANCE SCHEDULE
SIMPLE MAINTENANCE / REPLENISHING FRONT, REAR BRAKE FLUID
BRAKE HOSE, PIPE LEAKAGE,DAMAGE,ASSEMBLY STATE
FRONT, REAR BRAKE PAD
CHANGING ENGINE OIL
FRONT, REAR BRAKE PAD
COOLING WATER REPLACEMENT
CLEANING OF TERMINALS OF BATTERY
FUSE REPLACEMENT
AIR CLEANER ELEMENT INSPECTION
CVT DUST COVER ELEMENT INSPECTION, CLEANING
1
CONTENTS
3
4
5
6
7
8
10
10
11
12
12
12
13
13
13
14
14
15
15
16
16
17
18
19
21
24
25
25
25
26
27
28
29
29
29
32
34
34
35
36
37
38
39
40
41
42

CABLE RUBBER PART
SIDE STAND INSPECTION
CLEANING
INSPECTION SHEET
DAILY INSPECTION(BEFORE DRIVING)
REGULAR INSPECTION
ABOUT REGULAR INSPECTION
DAILY INSPECTION, REGULAR INSPECTION
RECOMMENDED REPLACEMENT PARTS
STEERING STEM LOCK
OIL REPLACEMENT AT REGULAR SCHEDULE
INSPECTION AND MAINTENANCE
DAILY INSPECTION CHECK LIST
DAILY INSPECTION METHOD
INSPECTION METHOD, TIPS
CHECKING POINTS
INSPECTION RECORDS
SAFE DRIVING(PREPARATION BEFORE DRIVING)
DRIVING POSITION
TAKING POSE OF FELLOW PASSENGER
PRECAUTION WHEN DRIVING
STARTING
TURNING METHOD
PRINCIPLE OF TURN
EFFECT OF SPEED
3 POSITIONS OF TURNING
TURNING METHOD
BRAKING METHOD
BASIC PRINCIPLE OF BRAKE(FRICTION FORCE)
RESTRAINT OF BRAKING EFFECT (INERTIA)
BRAKING METHOD
COMPARISION OF BRAKING DISTANCE
IMPACT WHEN COLLISION
WIRING DIAGRAM
2
42
43
43
44
45
45
46
47
49
50
50
51
52
53
55
56
68
72
73
74
75
76
77
77
77
78
79
80
81
81
81
82
82
84

3
SPECIFICATION
DATA (14 inch)DATA (14 inch) DATA (13 inch)DATA (13 inch)ITEM
LENGTH×WIDTH×HEIGHT(mm)
WHEEL BASE(mm)
GROUND CLEARANCE(mm)
SEAT HEIGHT(mm)
DRY WEIGHT(kgf)
PASSENGER
PISTON DISPLACEMENT(cc)
BORE AND STROKE(mm)
STARTING SYSTEM
TRANSMISSION TYPE
IGNITION SYSTEM
BATTERY CAPACITY
SPARK PLUG
FUSE
ITEM
FR.
RR.
FR.
RR.
FR.
RR.
FUEL CAPACITY (L)
USAGE FUEL
COOLING WATER (L)
TOTAL
REPLACEMENT
ENGINE OIL (L)
ENGINE TYPE
WATER COOLING
4 STROKE 4 VALVE
(1,310 Large W/Screen)
STARTING MOTOR
CVT
TRANSISTOR
MF TYPE)
GASOLINE
TELESCOPIC
UNIT SWING
HYDRAULIC DISK
HYDRAULIC DISK
SUSPENSION
TIRE SIZE
BRAKE

This manual describes matters pertaining to correct operation,
safe operation and simple maintenance of the vehicle you
purchased.
To ensure more comfortable and safer operation, make sure to
read this manual carefully prior to operation.
●The photographs and drawings shown in this manual may
differ from those of actual vehicles due to changes in vehicle
specifications and modifications made.
●This vehicle is designed for 2 riders including the operator.
●Careful driving and the wearing of proper attire and safety
equipment are the most important factors in the safe operation
of the scooter. Please obey traffic regulations and do not be
hurried and careless.
●Many new vehicle owners operate their newly purchased
vehicles with great care and attention to safety factors.
However, after becoming accustomed to the operations are
often discarded, which can lead to accidents. Please don't let
this happen to you and always approach the operation of your
vehicle with the safety considerations needed.
When operating the vehicle, always keep in mind and obey the
notes of precaution printed on the “Safety Precaution Label”
attached to the vehicle.
4
OPERATION INSTRUCTION
SAFETY PRECAUTIONS
CAUTION
●
Do not use polluted gasoline.
Using polluted gasoline will cause rust inside the fuel
tank, and will close the supply of fuel to the
carburetor, leading to an improper engine starting or
may cause serious damage to an engine.
●
Do not use polluted or low-grade oil.
Always use genuine oil to protect and extend vehicle
performance and its life span.
●
If any failure occurs due to the use of polluted gasoline
or oil, such failure will be excluded from being eligible
for repairs under the warranty.
●
Be sure to wear helmet at all time.
●
Be sure to put on gloves at all time.
●
Observe the speed regulations.
●
Beware of muffler affer driving as it is still hot to be
burnt.
Especially never children touch on it.
●
For safety, do not change, alteration or modification the
vehicle.
●
Regularly conduct specified maintenance inspections.
<Maintenance Inspection Points>
Brakes, Tires, Oil, Lights, Horn, Instruments

●Read user's manual carefully.
●Conduct maintenance checks prior to operation.
●Always maintain vehicle in clean status and carry out specified
maintenance checks.
●Make sure to stop engine and stay away from fire when
fueling.
●Exhaust gas contains harmful substance such as carbon
monoxide. Start engine in well-ventilated places.
●Operators should naturally fix bodies to keep smooth driving.
●Please check whether or not you are unnaturally strained and
strung up.
●Driving pose has a great influence on safe operation.
Please always maintain the center of your body in the middle of
seat. Especially do not sit at the rear seat because it may lessen
the weight of front wheel and cause trembling steering wheel.
●A passenger should hold on to the vehicle or the operator with
both hands and keep both feet on the pillion step bar.
●When wanting to turn, slightly lean to body toward the
direction of the turn. It is unsafe if the body is not moved in
union with the vehicle.
●Curvy roads and poor, unpaved roads constantly change in
surface quality. Driving on these roads can be unsafe if certain
safety precautions are not followed.
●In order to safely drive through these driving conditions,
anticipate coming road conditions, slow down to at least half
the normal speed, and relax your shoulders and wrists while
securely holding the handles.
5
PRIOR TO STARTING VEHICLE OPERATION

●Always make sure to wear helmet for safety. Wear gloves and
safety goggles.
●Do not wear uniforms which might hinder operation. It is
dangerous if the uniform is caught by brake lever or by the
rotating part of drive chain.
●Many automobile/motorcycle accidents happen because the
automobile driver does not “see” the motorcyclist.
Make yourself conspicuous to help avoid the accident that
wasn’t your fault :
- Wear bright or reflective clothing.
- Don’t ride in another motorist’s “blind spot”.
6
CORRECT ATTIRE
A helmet should always be
worn and the helmet chin
strap should be securely
fastened.
Always put on gloves.
Correct shirts or jackets with
tight-fitting sleeves should be
worn,
Shoes should fit properly, and shoes having little or
no heel should be worn.
WARNING
●
Be sure you and your passenger always wear a helmet,
eye pretection and other protective apparel when you
ride.
●
Not wearing a helmet increases the chance of serious
injury or death in a crash.

●When carrying cargo, you must keep in mind that operating the
motorcycle, especially when turning, will be different.
●Make sure not to overload the motorcycle with goods as this
can make the motorcycle unstable during operation.
●Modification of vehicle structure of function deteriorates
manipulatability or causes exhaust noise to become louder
shortening the vehicle life. These modifications are not only
prohibited by law but also are the acts harmful to other people.
Modifications are not covered by warranty.
●Except designated attachment by DAELIM MOTOR CO.,
LTD., don't attach any extra lighting device, because it may
cause an early discharging of battery.
●Pay particular attention to fellow passenger so that he/she can
prevent getting burnt by the hot muffler during travel.
7
CARGO
TRUNK MAXIMUM LOAD : 10kg
ATTACHMENT
MUFFLER
MODIFICATION
CAUTION
●
Only load cargo in or on desibnated areas as placing or
fastening cargo to other areas can cause damage to the
vehicle.
●
Do not place articles between the frame body cover and
engine as this can burn the goods.

8
PARTS LOCATION

9
PARTS LOCATION

10
METER READING AND USAGE
<SPEEDOMETER>
Indicates driving speed. Maintains legal speed
limit to ensure safe operation.
<ODO : Odometer>
Indicates total distance in kilometers travelled by the
vehicle.
<TRIP : Trip>
Before starting, push the ‘ SET BUTTON ‘ and
select ‘ TRIP ‘. If pushing more 2(two) seconds, it
indicates ‘ 0 ‘. Next, the distance by pushing again
till ‘ 0 ‘ will be indicated on ‘ TRIP
<CLOCK (to fit the correct time) >
If you push HOUR/MIN button for more 1 second,
HOUR/MIN lamps. Then, adjust hour and minutes
by that button.
<RPM(Tachometer)>
It indicates engine RPM per one minute(x 1,000 rpm).
<Thermometer>
It indicates the temperature of cooling water.
If the gauge of thermometer indicates below the
middle, it means ‘ Normal limit ‘.
<Fuel meter>
The fuel meter indicates the gasoline level inside the
fuel tank. Gasoline should be put in the fuel tank as
soon as possible if the needle is resting in the red
area.
METER
TACHOMETER
WINKER
INDICATOR
WINKER
INDICATOR
TRIP
THERMOMETER
SET BUTTON
SPEEDOMETER
ENGINE CHECK LAMP
ODO(METER)
CLOCK
FUEL METER
HR/M ADJUSTING BUTTON
(Adjust by pushing more
one sec.)
HEADLIGHT
HIGHBEAM
INDICATOR
FUEL METER
WARNING
●
If driving continuously within the
area ‘ I ‘ of fuel meter, the fuel can be
consumed totally. Because of total
fuel consumption, it results in the
vehicle stop and it may occurs the
collision from the behind vehicle to
happen serious damage or even death.
NOTE
●
During riding, please drive the
scooter in order that the RPM of
engine shall NOT be positioned in
the dangerous area(red area) of
tachometer.
NOTE
●
At ‘ TRIP’, if you want to set the
driving distance to ‘ 0 ‘, push for
more 2 seconds SET Button at TRIP
Mode.

11
METER READING AND USAGE SWITCH OPERATING
<Winker indicators / Emergency lamp>
The lever of main switch shall be , lift up the
emergency lamp switch, the emergency lamp lights.
<Engine Check lamp(indicates repair and
maintenance>
If there is something wrong in sensor relating with
engine controlling system to control the regular
operation of engine or emission gas control system,
this Engine check lamp lights. During riding, if it
lights, visit the designated service shop to request the
repair as soon as possible.
Pushing the lever
If push the lever, search the Smart Key and be
completed the certification of the vehicle, then at
the time when blue lamp lights, the turning from
(OFF) to (ON) can be done.
(within 5(five) seconds)
ON)
This indicates the engine is able to be operated.
At the time that blue lamp lights, the rotating can
be done(the voltage will be supplied at electrical
diagram)
OFF)
The position of Engine stop.
STEERING LOCK)
Push the lever, turn to the left, the steering will be
locked(In order to release steering lock, push the
lever and if the certification of Smart key is OK,
the lever can be rotated.)
FUEL CAP OPEN)
The cover of fuel cap opens.
Push the lever then certificate Smart key, turn the
lever to the left, the cover of fuel cap will open.
INDICATING LAMPS
MAIN SWITCH
SEAT
SEAT
CAUTION
●
Only when the Smart key positions with
vehicle antenna within 1(one) meter, the
main switch system can be operated.
●
If leaving after parking the vehicle, be sure
to rotate the lever position to OFF or
LOCK. (At the status of lever ON, starting
is available regardless of smart key.)
●
In this vehicle, by using the Smart key,
only pushing the starter button can the
vehicle to be started. At being operated,
the headlight always lights. If you
intentionally remove always turn on lamp
diagram, at night, during night riding, you
may not able to see the front side then it
occurs collision and other accidents.
CAUTION
●
If you keep riding the scooter even at
the engine check lamp lighting, it
may occur damage to the emission
control system to effect driving
performance and fuel consumption.
Also, you may get restriction relating
with emission gas regulations then
take precautions about it.
●
When the engine check lamp lights,
it may occur damage to the catalyst
system then causing getting the
engine power lower. So, please
request the designated repair shop to
repair as soon as possible.

12
CAUTION
●
The usage of upward light shall be only
used on condition that it does not interrupt
the former positioned vehicle’s driving.
CAUTION
●
If you do not grip the front or rear brake
lever, the engine can not operates.
●
At starting, do not pull the throttle grip
by gripping the brake lever. If so, the
vehicle performance can be lower
because of the earlier heating of
transmission, and if you release the
brake, the vehicle can suddenly start to
occur the accident
SWITCH OPERATION
Be the main switch lever (ON), grip
the brake and push the starter button, the
engine operates(the green lamp lights).
Engine stop switch is the equipment to
stop the engine.
<Lighting method of headlight>
If the vehicle starts, the headlight turns on.
In order to prevent the unnecessary
discharge of battery, this vehicle adopts
the automatic lighting system of
headlight at the same time of vehicle
operation.
<Adjusting switch to up-down of headlight>
upward Use only at the time of
lighting the headlight far
away.
downward
START BUTTON
ENGINE STOP SWITCH
UP-DOWN ADJUSTING SWITCH
OF HEADLIGHT
K
H
F
G
S
R
WARNING
●
Do not use the engine stop switch
except the emergency or stop.
●
During riding, if operate the engine
stop switch to (OFF), the engine
can be stopped then it occurs
collision, turning over, etc that can
happen serious damage or death.
NOTE
●
The ‘ Always Turn On ‘ system of headlight
gets the rider to be able to drive safely by the
scooter visibility on the road then the
vehicle’s position to be acknowledged
easily. Also, especially at the time sunset or
bad weather conditions, it gives good effect.
(However, the headlight shall be downward
for the purpose that riding vehicle from the
opposite way can not be interrupted.

13
If the main switch lever is (ON), push
it 2 or 3 times. This switch is used when
passing the other vehicle.
If the main switch lever is (ON), push
the horn button make horn sound.
If the main switch lever is (ON) and
put into the winker switch, the winker
(winker indicator) operates.
Regardless of main lever switch position, the
emergency switch can be operated. (If the
emergency switch operates for a long time,
this may cause battery discharge.)
If the Smart key is within 1 meter, push the
seat button then the seat opens. But, at the
time that the battery of the vehicle or the Smart
key’s battery are discharged or the seat does
not open at the area of strong electricity, by
using the key to open the inner box lead and
pull the seat wire loop, the seat can be opened.
PASSING SWITCH
K
H
F
G
S
R
HORN BUTTON
K
H
F
G
S
R
WINKER SWITCH
K
H
F
G
S
R
EMERGENCY SWITCH
SEAT BUTTON
CAUTION
●
The winker switch does not return
automatically. If finishing to use it,
surely return the winker switch to the
original position.
●
If you forget returning, this may
occur to interrupt the other vehicle’s
riding.

14
EQUIPMENT USAGE
The rider gets the Smart key and gets on the
vehicle(within 1 meter), turn the main switch
lever to the position (ON), push the button
then the vehicle starts.
If the turn the engine stop switch or main
switch lever to the (OFF), the vehicle stops.
If the battery of Smart key being discharged, it may not
operates normally. Then, replace its battery promptly.
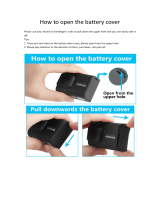
Do not disassemble the ‘ home ‘ part located at the
lower side of Smart key loop. At this moment, do not
disassemble surely the part of diagram. Smoothly
broaden the fixed loop and remove the used battery,
next replace with the new one.
At re-assembly of Smart key, assemble correctly
not in order to damage the waterproof rubber.
AT STARTING
AT TURNING OFF THE VEHICLE
REPLACEMENT OF THE SMART
KEY’S BATTERY
BATTERY SPECIFICATION
CR2032 (3V)
NOTE
●
After the vehicle being stopped by the
engine stop switch, turn the main switch
lever to the (OFF). Otherwise, battery
can be discharged early or other person can
start the vehicle.
CAUTION
●
When the battery is not installed or
completely discharged, the vehicle does
not start and this occurs the Smart key
have something wrong.
●
If starting the vehicle by Smart key, surely
stand up the main stand and grip the brake,
push the ‘ starter switch ‘ and start.
●
The Smart key shall be brought by the
rider, if the rider does not have it, the
vehicle can not be started.
●
If the rider leaves from the vehicle at the
vehicle operated, the rider shall stop and
do not keep the Smart key at the vehicle.
This may occur the vehicle theft.
CAUTION
●
Surely check whether the engine stop switch
is ON before starting or it has out of order. If
the engine stop switch is OFF, starting the
vehicle is impossible.
●
If you temporarily disassemble or assemble
or modify the Smart key temporarily, it may
occurs the Smart key to be out of order. If so,
the warranty can not be applied.
●
When, having the Smart key, posed at the
near of the vehicle, be careful so that child or
other does not push the engine start switch.
If unwanted starting, it may occurs the
accident.
●
If the battery of Smart key is discharged, the
Smarty key does not operate. Then, at
operating smart key, if its LED does not
light, replace with the new battery of smart
key.
●
If the vehiclestarts, the blue lamp of the main
switch lights 10 times rapidly.
●
At keeping the Smart key, if you keep it near
the electric devices like television, electric
oven, computer, note-book, monitor, etc, the
battery of Smart key may be worn rapidly.
Be careful keeping it at the proper location.
●
If you keep the Smart key to the washing
machine that complete waterproof is needed for,
this may occur the Smart key be out of order.
●
In order to prevent the damage of the Smart
key, do not fall down or not get wet or not
being exposed to the heat, the direct sun light.
●
At replacing battery, take precaution about
its polarity. This may cause something
wrong of smart key.

15
CAUTION
●
Move lightly the steering stem to the
left and the right to check whether it is
locked completely to the “ LOCK “
position.
●
Park the vehicle at the safe place not to
interrupt the traffic.
●
If the vehicle is located at sliding place
or unstable road , it may be turned over
or slipped. At parking or stopping,
check completely the safety.
To be theft, surely lock the steering stem lock at parking.
<LOCK>
To lock the steering, turn the handlebar to the left,
turn the key to (LOCK) which pushing in.
<UNLOCK>
By pushing the main switch lever, certificate the
Smart key, then if turn to the (OFF) by
smoothly pushing main switch lever, unlock the
vehicle.
The strength of rear cushion is adjusted at 5 steps.
The basic step is 2nd.
Depending upon the weight of rider or the road
condition, adjust the rear cushion. To adjust, do by
turning the adjuster.
ADJUSTING REAR CUSHION
STEERING STEM LOCK
CAUTION
●
The adjuster marks of the left and the
right shall be the same.

16
OPERATION
TRUNK MAXIMUM LOAD
<LOCK>
Push and close the seat, it automatically locked.
Check the seat locked by lifting it slightly.
<OPEN>
When the Smart key is within 1 meter from the
vehicle, push the seat button and the seat
automatically opens. (But, at this time, the battery
voltage shall be in normal limit).
Manual Open.
Open the inner box lid by the general key, pull the
seat wire loop and the seat opens.
There is a trunk under the seat.
At opening the seat, the lamp inside it lights
There is a document or helmet storage area inside
the trunk.
Store the owner’s manual packed in vinyl cover
inside the trunk as always.
10kg
TRUNKSEAT LOCK
CAUTION
●
Be carful about that if closing the
seat at the key being in trunk, it
automatically closes.
●
When the seat lock is out of order, do
not use it by force. Visit the
designated service shop and request
the mechanic to check and repair.
CAUTION
●
Do not load the excessive cargo in
the trunk. If the seat being locked by
force , the trunk lamp can not be OFF
then the battery will be discharged
early(In this case, the rider shall open
the seat by hand)
●
After closing the seat, check whether
the seat completely locked or not.
If the vehicle not being locked and
you drive it, you may be damaged by
the seat opening at sudden stop.
●
The temperature inside the trunk
rises due to heat from the engine. Do
not place foodstuffs and other articles
that can be damaged easily by heat.
Also do not place flammable
materials in the trunk.
●
At washing the vehicle, water
inflows to the trunk can be done. If
you put the important thing into the
trunk, be careful to keep it.

17
Depending upon the rider’s convenience, you can
adjust the position of SEAT BACK REST.
Open the seat and untie the screw lever in back side
of seat, adjust the position of back rest and lock the
screw lever.
When open or close the inner box lid, use the normal
key.
<How to lock>
Turn the normal key to the right and close the cover,
next turn it to the left and pull it out.
<How to open>
By turning the normal key to the left, open it.
At starting the engine, open the inner box lid and put
the proper charge socket below 12V, 1A in and use.
CHARGE SOCKETINNER BOX LIDSEAT BACK REST
CAUTION
●
Do not place valuable or fragile thing(s).
●
At washing the vehicle, the water may
inflows. So, if you place the important thing,
CAUTION
●
Use at engine starting.
●
When not using, close the inner box lid
cover.

18
Make sure to check the oil, gasoline, etc., before
starting the engine.
Please ensure that the main stand and side stand are
lift up at starting the engine.
At starting the engine, grip the brake as always.
Drive with care for both safety reasons and longer
vehicle life.
For 1 month(or 500 km) after purchasing the
vehicle, drive moderately avoiding fast starts and fast
acceleration.
Lock the rear wheel
After certificating the Smart key, turn the main
switch to the (ON) position. (Blue lamp lights)
The start is possible when the Smart key is in 1
meter from the vehicle.
Press the start button. At operating start, the green
lamp of the main switch lever lights.
<USING THE ELECTRIC START(CELL)>
Press the start button without rotating the throttle grip.
At searching the Smart key, the time of certification
make take long, keep pressing the start button by
the time when the vehicle starts by motor rotating.
ENGINE STARTINGCORRECT DRIVING OPERATION
WARNING
●
Make sure that the rear wheel is
locked when starting the engine to
prevent an unexpected sudden start of
the vehicle.
●
At standing the main stand, if
accelerating by operating the throttle,
the rear wheel may touch the body,
then it occurs a serious damage.
CAUTION
●
Immediately release the starter button
as soon as the vehicle has been started.
●
Do not push the starter button when
the engine is running. This can damage
the starting motor.
●
If you take the Smart key together cell
phone, navigation, note-book
computer, metallic material, the
communication error between the
Smart key and the vehicle may occur
then the vehicle may not start.
/