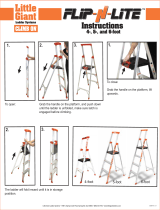
Werner C111506 User manual

Type
User manual
FALL PROTECTION
Field Guide and
Inspection Log
1
100,000+ injuries occur as a result of falls each year.
Struck by equipment or machinery
Electrical
Caught in equipment of machinery
Falls
11%
11%
11%
34%
What is Fall Protection?
How Long Does it Take to Fall?
Statistics Employer’s Costs
A series of reasonable steps taken to eliminate or control the injury effects
of an unintentional fall while working at height or same level surface.
Why is it
important?
Falls are the number
one cause of fatalities
in the construction
industry.
Standard
4
16
36
Height (Feet)
Fall Arrest
0.5
1.0
1.5
Time (Seconds)
2.0
2.5
3.0
4.0
64
100
144
256
of falls
occurred at a height
of 10-feet or less
Most victims
were not using
fall protection
Most falls occur on
scaffolds or roofs
53%
About
of fall
fatalities…
25%
• on a Monday than
any other day
• in the morning than
any other time of day
• were from heights
of 11-20 feet
• were from heights
of 20-30 feet
One
FATALITY
Hundreds of
RECORDABLE
INJURIES
Thousands of
FIRST AID CASES
Tens of Thousands of
NEAR HITS
WORKER’S COMPENSATION COSTS
Increased
Safety =
Decreased claims and decreased
worker’s compensation
2
Fall restraint:
Worker’s center of gravity cannot fall over the unprotected edge in any direction.
A – anchor = 2 x force exerted, or 3,000 lbs.
B – body belt or full body harness = 3,000 lbs
C - Lanyard/rope = 3,000 lbs
Personal fall arrest:
Basic system with Lanyard
A – 5,000 lbs anchorage per person. (Certified anchor may be 3,600 lbs)
B – full body harness
C – 6 ft shock-absorbing lanyard
Minimum clearance = 17.5 ft from anchor (6-ft lanyard, 3.5 ft shock
absorber, 5 ft surface to dorsal D-ring, 1 ft harness stretch, 2 ft safety factor).
System with Self-Retracting Lifeline (SRL)
A – 5,000-lb anchorage per person (Engineered anchor may be 3,000 lbs)
B – full-body harness
C – web or cable self-retracting lifeline with or without shock absorbing pack
Minimum clearance = non-shock-absorbing SRL = 5 ft; shock absorbing
(read label) = 7.5 ft; account for pendulum effect
Work positioning:
A – 3,000 lbs anchorage per person
B – belt of full body harness
C – 5,000 lb lanyard
Minimum free-fall = 2 ft
Rescue planning:
Prompt rescue plan in place prior to beginning work can decrease the response
time to a fall and therefore lower the danger of suspension trauma to the victim
Types of Fall Protection
Safety monitor: (Low slope) Roong work only, roof > 50 ft requires warning line at 6 ft, monitor to edge.
Guardrails, parapets:
42 ± 3 in. high; withstand 200 lb at top rail; guardrails must have mid-rail and toeboards if tools, material can fall to lower level
Materials: Constructed of minimum 500-lb strength material (no barrier tape). Pipe 1½ in. minimum; Wood 2 x 4 in.
minimum; two cables minimum ¼-in. diameter, top cable flagged at 6-ft intervals, no deflection under pressure below 39 in.
Mid rail (rated 150), toe board (rated 50)
Skylights: Every skylight oor opening and hole shall be guarded by a standard skylight screen or a xed standard railing on all exposed sides.
Warning line systems: Low slope roofs only.
General industry—“Designated Area”—minimum 6 ft from unprotected edge.
Construction—“Nonconforming Guardrail”—minimum 15 ft from unprotected edge.
System requirements—uprights withstand 16-lb force at 30-in. height; line to be rope, wire, chain of 500-lb
tensile strength, flagged at 6-ft intervals; height 34-39 in.; line attached to uprights—no line slip.
Horizontal lifeline: Horizontal lifeline: 5000 lbs. per person attached, unless designed by qualied person with a safety factor of 2.
Vertical lifeline: 5,000-lb anchor (only one worker per lifeline) for clearance add 1 ft for rope grab to activate, minimum clearance = 7.5 ft + lanyard length.
Ladder climbing devices: Maximum 9-in. connector between the ladder safety device and a front (chest) D-ring, engineered support.
Must limit fall distance to 2 ft or less.
FAQs
Full Body Harness
Restraint Lanyard
Anchorage Connector
Anchorage
RESTRAINT
Full Body Harness
Connecting
Anchorage Connector
Anchorage
FALL ARREST
Fall Protection FAQ
3
The ABC’s and DE of Fall Protection
Must be able to support at least 5,000 lbs. for each worker who will
be attached
Always try to tie off above your head to reduce the distance of a fall
and to help avoid the pendulum or superman effect
Always try to tie off as close as possible to where you are working to
limit your fall distance
Insure that there is adequate fall arrest clearance
Anchorage
The secure point that your fall protection is connected to
Full Body harnesses are mandatory for fall arrest and attach to a shock absorbing lanyard
or self-retracting lifeline. The maximum allowable force to be placed on a body as a
result of a fall is 1,800 lbs
Body Holding Device
What the worker wears
Chest Strap–Mating Buckle
Lanyard Keeper
Webbing Keeper
Sub-Pelvic Strap
Leg Straps–Tongue Buckle
Positioning D-Rings
1¾ Webbing
6000 lb. Strength Requirement
Contrast Torso/ Leg Colors
Buckle/Adjusters
5 points of adjustment
4000 lb. Strength
Requirement
The Back D-Ring
Fall Arrest Connection
5000 lb. Strength Requirement
Back
Strap
Basic Anatomy of a Harness
The ABC’s and DE of Fall Protection
Extends and retracts automatically during typical use, but a
brake activates in the event of a fall
Reacts immediately to reduce fall distance
The shorter the fall, the less impact there is on the body
Allows more freedom of movement on jobsite
Available in web strapping or cable
4
Connecting Devices
To connect a worker’s body harness to the anchor point
Three Options:
Shock absorbing lanyards when activated, can extend an additional 3.5’
Shock packs are designed for controlled tearing action to reduce fall arrest force
Never use a lanyard that has a knot tied in it
Do not connect one lanyard to another for additional length
The shock pack end of the lanyard should always attach to
the D-ring of the harness
Remain calm
Initiate pre-planned rescue procedures
Determine if medical attention is warranted
The nature of fall hazards in the work area
Procedures for erecting, maintaining, disassembling
and inspecting fall arrest equipment
Use and operation of fall arrest equipment
Lanyard
Easily move up and down vertical lifelines
Provide continuous fall protection
Some models offer complete hands-free operation
for increased productivity
Lock quickly in the event of a fall
Can be rigged for fall arrest and fall restraint
Rope & Rope Grab
Descent / Rescue
An appropriate rescue plan needs to be in place, falls do happen
Education
All employees exposed to fall hazards must receive training by
a competent person that addresses:
Self-Retracting Classifications
Class A Maximum arresting distance up to 24 inches. Average arresting force not to exceed 1350 pounds
Class B Maximum arresting distance up to 54 inches. Average arresting force not to exceed 900 pounds
Self-Retracting Lifelines (SRL)
Always calculate your fall distance before selecting your fall protection equipment
Choosing the Right Components
5
Calculating Fall Height
Fall
Distance
for Shock
Absorbing
Lanyard
Fall
Protection
Distance
for Class B
Self-Retracting
Lifeline
Fall
Distance
for Class A
Self-Retracting
Lifeline
Working Level
Lower Level or Obstruction
Self Retracting
Lifeline
Bottom of Retractable Lifeline
0.6 m (2 ft.)
Maximum Free Fall
Maximum Arrest
Distance (per ANSI)
1.35 m (4.5 ft.)
0.75 m (2.5 ft.)
Maximum Deceleration
0.6 m (2 ft.)
Safety Factor
0.3 m (1 ft.) Harness Stretch
1.5 m (5 ft.)
To Worker’s Back D-Ring
Total Estimated
Fall Distance
3.75 m (12.5 ft.)
Total Fall
Distance
(Free Fall +
Deceleration)
Free Fall
Working Level
Lower Level or Obstruction
Energy
Absorbing
Lanyard
Length of Anchorage Connector
1.8 m (6 ft.)
Length of Lanyard
3.4 m (11 ft.)
1.2 m (4 ft.)
Deceleration Free Fall Distance
0.6 m (2 ft.)
Safety Factor
0.3 m (1 ft.) Harness Stretch
1.5 m (5 ft.)
To Worker’s Back D-Ring
Total Estimated
Fall Distance
5.5 m (18 ft.)
Working Level
Lower Level or Obstruction
Self Retracting
Lifeline
Maximum Arrest Distance
(per ANSI Z359.14)
2 ft. (0.6 m)
Safety Factor
2 ft. (0.6 m)
1 ft. (0.31 m) Harness Stretch
To Worker’s Back D-Ring
5 ft. (1.5 m)
Total Estimated
Distance
10 ft .
(3.0 m)
Estimated Clearance
Required
5 ft .
(1.5 m)
6
Harness Adjustment and Use
Tongue Buckle
I. The most common leg closure type with
function similar to the belt holding your
pants. Ensure that straps are not twisted.
II. Put open end of strap with grommets
through the buckle, pull until snug on the
leg and engage the tongue into a grommet.
III. User MUST ensure that webbing ends are
tucked into the web keepers to keep this
type of buckle connected while in use.
Failure to properly secure the leg strap
ends in the keepers could result in
unintentional disengagement.
Mating/Pass-Through
Buckle
I. Ensure straps are not twisted and the
loose end is on the outside.
II. Pass the buckle with the center bar
through the open buckle. The slot will
assist. Tug to ensure buckle is in place.
III. Pull the webbing to tighten the strap
so there is a snug t.
IV. User MUST slide plastic keepers to
strap end or nd other location to tuck
end to ensure there are no loose and
dangling ends.
Quick Connect
I. Ensure straps are not twisted and the
loose webbing end is on the outside.
II. Pull webbing through adjuster to loosen
or tighten until snug.
III. Insert male connector into buckle, tug
straps to verify rmly engaged.
IV. User MUST slide plastic keepers to
strap end or nd other location to tuck
end to ensure there are no loose and
dangling ends.
Torso Length Adjuster
I. The torso adjuster ensures the overall t
of the harness. Check to see that the
sub-pelvic strap is situated below the
buttocks. If it is too high the torso adjuster
should be loosened to lower the
sub-pelvic strap. If it is too low the torso
adjuster can be tightened to raise the
sub-pelvic strap.
II. To shorten or lengthen the torso webbing
push the top of the torso adjuster down
so it is horizontal.
III. Pull up either the inside web to lengthen,
or pull up the outside web to shorten the
torso length.
For BaseWear harnesses, separate the
small mating buckle from the larger
pass-through to allow web to ow
through the torso adjustment.
IV.When at the right length, slide the lower
plastic keeper down near the torso
adjuster and the upper plastic keeper up
so the webbing end is not dangling.
Webbing Keepers
All webbing ends are equipped with
plastic webbing keepers, which are
important to the safe use of the harness.
Sliding one keeper close to the buckles
ensures the buckle can’t be accidently
opened or moved while in use. Sliding
the other close to the end of the strap
keeps it from being loose and dangling
and a possible snag hazard.
Joining belts to harnesses
Some Werner harnesses made without
integrated belts have loops through which
accessory belts can be looped, joining
the accessory to the harness. The loops
are found on the inside of the harness
webbing, below the impact indicators.
Choosing and Fitting the Right Harness
Harness Attachment Locations
POSITIONING
These harnesses have D-Rings located at the hips for use with positioning
lanyards to allow for hands-free working in vertical structure applications
STANDARD
For fall arrest only, features only a dorsal D-Ring on the back.
CLIMBING
For climbing applications and attachment to fixed ladder safety systems,
these harnesses include a frontal attachment point.
CONSTRUCTION STYLE (POSITIONING WITH BELT)
Construction harnesses feature belts and additional attachment points for
a variety of applications. The belt allows users to carry tools, and additional
padding improves user comfort.
RETRIEVAL
D-rings on the shoulders are used for lifting or lowering a user, typically in
confined space or rescue applications
100 (45)
120 (54)
140 (63)
160 (73)
180 (82)
200 (91)
220 (100)
240 (109)
260 (118)
280 (127)
300 (136)
310 (145)
SMALL
MEDIUM/LARGE
UNIVERSAL SIZE
X-LARGE
XX-LARGE
6’8" (2.03)
6’6" (1.98)
6’4" (1.93)
6’2" (1.88)
6’0" (1.83)
5’10" (1.78)
5’8" (1.73)
5’6" (1.68)
5’4" (1.63)
5’2" (1.58)
5’0" (1.52)
4’10" (1.47)
WEIGHT - LBS (KG)
HEIGHT -'/IN (M)
Full Body Harness Sizing Chart
Harness closures and keepers ensure proper harness fit. which is of fundamental importance for safe use.
Chest straps should fit across the middle of the sternum. not higher or lower. leg straps should be snug.
Adjusting the leg straps too loosely will cause injuries in the case of a fall. Correct harness adjustments will
place the sub-pelvic strap snugly below the buttocks, the position necessary both to absorb energy in the
case of a fall, but also to provide somerelief from suspension trauma after a fall has occured. correct
sub-pelvic position is the result of the correct combination of all the harness adjustments.
Adjustment
7
Inspection & Maintenance
Inspect the units
housing for
damaged parts
Test the lifeline
retraction by pulling
it out several feet
and allowing it to
retract slowly
Test the breaking
mechanism by
applying a sharp
steady pull
downward
Inspect the snap
hook and
anchorage connection
for damage
Examine webbing
for excessive
fraying, cuts or
burns
Examine shock
packs for signs of
elongation
Examine snap
hooks for proper
action
Examine lifelines for
frays, cuts, and
tight braid
Examine beam
trollies for smoothly
moving parts,
distortion or
corrosion
Examine anchor for
operation and
broken components
Examine cross-arm
straps for excessive
fraying, cuts and
burns
Examine rings for
deformation or
corrosion
Examine rope grabs
for cam wear, pin
wear, distortion or
corrosion
Examine rope
for frayed ends,
excessive
wear, broken
components,
cuts and burns
Inspect for
cracks, burrs or
deformities.
Inspect for
corrosion, which
effects the
operation and/or
strength
Make sure certain
marking(s) are
legible
Self-Retracting
Lifeline
Lanyard Anchor Rope/Rope Grab Hook/Carabiner
A
A
C
B
D
Always refer to the manufacturer’s instruction for details on storage and maintenance
WebAlert inspectable polyester webbing makes wear and
damage visible and obvious making inspection easier.
A. Examine buckles and D ring for wear or corrosion
B. Examine webbing for excessive fraying, cuts or burns
C. Examine stitching for loose or torn threads
D. Examine grommets for looseness and deformities
Inspections should be recorded in a centralized logbook that includes the serial number, date of purchase, dates of
inspection, service work performed and authorized signatures. Werner does not specify a pre-determined shelf life for
fall protection products. Product life expectancy will be determined by routine inspection, conducted before each use by
the user and conducted at least semi-annually by a competent person per OSHA requirements. This process can begin
with the date of rst use of the product when it goes into service.
THE WERNER PRODUCT PROMISE
8
Must
in the event of a fall
Must be able to
Chest Strap Adjustment
be
in a post-fall condition
to eliminate pain,
pressure points
and improve
ability to assist
in a rescue
perform safely
manipulated
Must offer
to indicate wear or damage
prior to use
Must be to
accommodate most body frames
to ensure and
with or without tools
inspectability
adjustable
comfort
productivity
DO’s and DONT’s of Ladder Climbing
9
THE "RIGHT" WAY TO USE A LADDER
RIGHT
Properly set-up and use the
ladder in accordance with safety
instructions and warnings. Wear
shoes with non-slip soles.
THE "WRONG" WAY TO USE A LADDER
WRONG
DON'T stand above the second
step from the top of a stepladder
or the fourth rung from the top of
an extension ladder.
If you have any questions please email us at [email protected]
ACCESS A HIGHER STANDARD
www.wernerco.com/us/
RIGHT
Center body on the ladder and
keep belt buckle between the rails
while maintaining a rm grip.
WRONG
DON'T climb a closed stepladder.
DON'T climb on the back of a
stepladder. DON'T stand or sit on
a stepladder top or pail shelf.
RIGHT
Haul materials with a line rather than
carry them up an extension ladder.
Use extra caution when carrying
anything on a ladder.
WRONG
DON'T climb a ladder if you are
not physically and mentally up to
the task.
RIGHT
Climb facing the ladder, move
one step at a time and rmly set
one foot before moving the other.
WRONG
DON'T place the base of an
extension ladder too close to or
too far away from the building.
RIGHT
Have another person help with a
heavy ladder. Have another person
hold the ladder while you are
working on it.
WRONG
DON'T over-reach, lean to one side
or try to move a ladder while on it.
Climb down and then reposition the
ladder closer to your work.
RIGHT
Move materials with extreme
caution so as not to lose balance
or tip the ladder.
WRONG
DON'T exceed the maximum load capacity
or duty rating of a ladder. DON’T permit
more than one person on a single-sided
stepladder or an extension ladder.
Smart ladder users are safe climbers
Ladders are such common everyday tools that many workers take them for
granted. As you read the safety guidelines, you may say: “I know that, that’s just
plain common sense.” You can avoid a ladder injury if you think before you act and
use ladders correctly. Your work will be easier and more productive, too. Ladder
related injuries are preventable, if you think before you climb.
Fall Protection Standards
10
OSHA Federal Standard
OSHA 1926.501 (b) – Unprotected Sides and Edges
(1) Each employee on a walking/working surface (horizontal and vertical surface) with an unprotected side or edge which is 6 feet or more
above a lower level shall be protected from falling by the use of guardrail systems, safety net systems, or personal fall arrest systems.
OSHA 1926.501 – Duty to Have Fall Protection
(1) This section sets forth requirements for employers to provide fall protection systems. All fall protection required by this section shall conform
to the criteria set forth in 1926.502 of this subpart..
OSHA 1926.502 – Fall Protection System Criteria and Practices
(a)(1) Fall Protection systems required by this part shall comply with the applicable provisions of the section. (d)(15) Anchorages used for attachment
of personal fall arrest equipment shall be independent of any anchorage being used to support or suspends platforms and capable of supporting
at least 5,000 pounds per employee attached. (e)(1) Positioning devices shall be rigged such that an employee cannot free fall more than 2 feet.
OSHA 1926.503 (a) – Training Requirements
(1) The employer shall provide a training program for each employee who might be exposed to fall hazards. The program shall enable each
employee to
recognize the hazards of falling and shall training each employee in the procedures to be followed in order to minimize these hazards.
OSHA 1910.66 App C
(ii) Limit maximum arresting force on an employee to 1,800 pounds when used with a body harness.
ANSI Federal Standard
To view all OSHA and ANSI standards, please refer to https://www.osha.gov/ and https://www.ansi.org/
Height where fall protection is required:
ANSI/ASSE Z359.0-2012 Denitions and Nomenclature Used For Fall Protection and Fall Arrest
ANSI/ASSE Z359.1-2007 Safety Requirements for Personal Fall Arrest Systems, Subsystems and Components
ANSI/ASSE Z359.2-2007 Minimum Requirements for a Comprehensive Managed Fall Protection Program
ANSI/ASSE Z359.3-2007 Safety Requirements for Positioning and Travel Restraint Systems
ANSI/ASSE Z359.4-2013 Safety Requirements for Assisted-Rescue and Self-Rescue Systems, Subsystems and Components
ANSI/ASSE Z359.6-2009 Specications and Design Requirements for Active Fall Protection Systems
ANSI/ASSE Z359.7-2011 Qualication and Verication Testing of Fall Protection Products
ANSI/ASSE Z359.11-2014 Safety Requirements for Full Body Harnesses
ANSI/ASSE Z359.12-2009 Connecting Components for Personal Fall Arrest Systems
ANSI/ASSE Z359.13-2013 Personal Energy Absorbers and Energy Absorbing Lanyards
ANSI/ASSE Z359.14-2014 Safety Requirements for Self-Retracting Devices for Personal Fall Arrest and Rescue Systems
ANSI/ASSE Z359.15-2014 Safety Requirements for Single Anchor Lifelines and Fall Arresters for Personal Fall Arrest and Rescue Systems
Scaffolding
10 Feet
Steel Erection
15 Feet
General Industry
4 Feet
Construction
6 Feet
Inspection Log - Anchor
11
Serial Number
Date in Service
Pass or Fail
Pass or Fail
Pass or Fail
Webbing Cable
Pass or Fail
Pass or Fail
Pass or Fail
Stitching Hardware Mechanisms Labels Inspector Name
Pass or Fail
Pass or Fail
Pass or Fail
Pass or Fail
Pass or Fail
Pass or Fail
Pass or Fail
Pass or Fail
Pass or Fail
Pass or Fail
Pass or Fail
Pass or Fail
Pass or Fail
Pass or Fail
Pass or Fail
Pass or Fail
Pass or Fail
Pass or Fail
Pass or Fail
Pass or Fail
Pass or Fail
Pass or Fail
Pass or Fail
Pass or Fail
Pass or Fail
Pass or Fail
Pass or Fail
Pass or Fail
Pass or Fail
Pass or Fail
Pass or Fail
Pass or Fail
Pass or Fail
Pass or Fail
Pass or Fail
Pass or Fail
Pass or Fail
Pass or Fail
Date of Inspection
Pass or Fail
Pass or Fail
Pass or Fail
Pass or Fail
Pass or Fail
Pass or Fail
Pass or Fail
Pass or Fail
Pass or Fail
Pass or Fail
Pass or Fail
Pass or Fail
Pass or Fail
Pass or Fail
Pass or Fail
Pass or Fail
Pass or Fail
Pass or Fail
Pass or Fail
Pass or Fail
Pass or Fail
Pass or Fail
Pass or Fail
Pass or Fail
Pass or Fail
Pass or Fail
Pass or Fail
Pass or Fail
Pass or Fail
Pass or Fail
Pass or Fail
Pass or Fail
Pass or Fail
Pass or Fail
Pass or Fail
Pass or Fail
Pass or Fail
Pass or Fail
Pass or Fail
Pass or Fail
Pass or Fail
Pass or Fail
Pass or Fail
Pass or Fail
Pass or Fail
Pass or Fail
Pass or Fail
Pass or Fail
Pass or Fail
Pass or Fail
Pass or Fail
Pass or Fail
Pass or Fail
Pass or Fail
Pass or Fail
Pass or Fail
Pass or Fail
Pass or Fail
Pass or Fail
Pass or Fail
Pass or Fail
Pass or Fail
Pass or Fail
Pass or Fail
Pass or Fail
Pass or Fail
Pass or Fail
Pass or Fail
Pass or Fail
Pass or Fail
Pass or Fail
Pass or Fail
Pass or Fail
Pass or Fail
Pass or Fail
Pass or Fail
Pass or Fail
Pass or Fail
Pass or Fail
Pass or Fail
Pass or Fail
Pass or Fail
Pass or Fail
Pass or Fail
Pass or Fail
Pass or Fail
Pass or Fail
Pass or Fail
Inspection Log - Body Harness
12
Pass or Fail
Pass or Fail
Pass or Fail
Pass or Fail
Pass or Fail
Pass or Fail
Pass or Fail
Pass or Fail
Pass or Fail
Pass or Fail
Pass or Fail
Pass or Fail
Pass or Fail
Pass or Fail
Pass or Fail
Pass or Fail
Pass or Fail
Pass or Fail
Pass or Fail
Pass or Fail
Pass or Fail
Pass or Fail
Pass or Fail
Pass or Fail
Pass or Fail
Pass or Fail
Pass or Fail
Pass or Fail
Pass or Fail
Pass or Fail
Pass or Fail
Pass or Fail
Pass or Fail
Pass or Fail
Pass or Fail
Pass or Fail
Pass or Fail
Pass or Fail
Pass or Fail
Pass or Fail
Pass or Fail
Pass or Fail
Pass or Fail
Pass or Fail
Pass or Fail
Pass or Fail
Pass or Fail
Pass or Fail
Pass or Fail
Pass or Fail
Pass or Fail
Pass or Fail
Pass or Fail
Pass or Fail
Pass or Fail
Pass or Fail
Pass or Fail
Pass or Fail
Pass or Fail
Pass or Fail
Pass or Fail
Pass or Fail
Pass or Fail
Pass or Fail
Pass or Fail
Pass or Fail
Pass or Fail
Pass or Fail
Pass or Fail
Pass or Fail
Pass or Fail
Pass or Fail
Pass or Fail
Pass or Fail
Pass or Fail
Pass or Fail
Pass or Fail
Pass or Fail
Pass or Fail
Pass or Fail
Pass or Fail
Pass or Fail
Pass or Fail
Pass or Fail
Pass or Fail
Pass or Fail
Pass or Fail
Pass or Fail
Pass or Fail
Pass or Fail
Pass or Fail
Pass or Fail
Pass or Fail
Pass or Fail
Pass or Fail
Pass or Fail
Pass or Fail
Pass or Fail
Pass or Fail
Pass or Fail
Pass or Fail
Pass or Fail
Pass or Fail
Pass or Fail
Pass or Fail
Pass or Fail
Pass or Fail
Pass or Fail
Pass or Fail
Pass or Fail
Pass or Fail
Pass or Fail
Pass or Fail
Pass or Fail
Pass or Fail
Pass or Fail
Pass or Fail
Pass or Fail
Pass or Fail
Pass or Fail
Pass or Fail
Pass or Fail
Pass or Fail
Pass or Fail
Pass or Fail
Pass or Fail
Pass or Fail
Pass or Fail
Pass or Fail
Pass or Fail
Pass or Fail
Pass or Fail
Pass or Fail
Pass or Fail
Pass or Fail
Pass or Fail
Pass or Fail
Pass or Fail
Pass or Fail
Pass or Fail
Pass or Fail
Pass or Fail
Pass or Fail
Pass or Fail
Pass or Fail
Pass or Fail
Pass or Fail
Pass or Fail
Pass or Fail
Pass or Fail
Pass or Fail
Pass or Fail
Pass or Fail
Pass or Fail
Serial Number Date in Service Impact Indicators Webbing Stitching Hardware Grommets Padding Date of Inspection Inspector NameLabels
Notes
13
14
Notes
  • Page 1 1
  • Page 2 2
  • Page 3 3
  • Page 4 4
  • Page 5 5
  • Page 6 6
  • Page 7 7
  • Page 8 8
  • Page 9 9
  • Page 10 10
  • Page 11 11
  • Page 12 12
  • Page 13 13
  • Page 14 14
  • Page 15 15

Werner C111506 User manual

Type
User manual

Ask a question and I''ll find the answer in the document

Finding information in a document is now easier with AI