Page is loading ...

- 1 -
Product names listed herein are trademarks of AS America, Inc.
© AS America, Inc. 2018
Thank you for selecting American Standard...
the benchmark of fine quality for over 140 years.
To ensure that your installation proceeds smoothly-please read
these instructions carefully before you begin.
RECOMMENDED TOOLS
ROUGHING-IN DIMENSIONS
1
INSTALL SPOUT
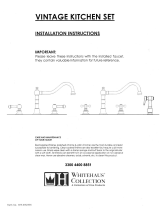
TOWN SQUARE
®
S
DECK-MOUNT BATH FILLER
INSTALLATION
INSTRUCTIONS
T455900
T455901
Certied to comply with ANSI A112.18.1M
CAUTION
Turn off hot and cold water
supplies before begining.
M965903 (4/18)
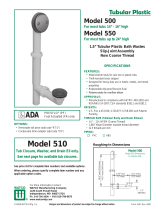
ROUGHING-IN
DIMENSIONS
8.5"
(225 mm)
9-13/4"
(250 mm)
2-3/4"
(70 mm)
3-1/4"
(83 mm)
24"
(62 mm)
42"
(109 mm)
2-3/4"
(69 mm)
3-3/4"
(96 mm)
21-1/2"
(546 mm)
12" MAX.
(305 mm)
12" MIN.
(305 mm)
1" MAX.
(25 mm)
2-1/16"
(50 mm)
7-13/16"
(199 mm)
Adjustable Wrench
Channel Locks
Flat Blade Screwdriver
Phillips Screwdriver
Hex Wench
(supplied)
Hex wench
(supplied)
RECESS
MOUNTING
SURFACE
1
5
4
3
2
• Thread DIVERTER INSERT (5) carefullyit touches the
installation surface, be sure the RUBBER RING (4)
is properly seated in it’s RECESS at the base of the
SPOUT (1).
• Thread SET SCREW (3) using 5 mm hex wrench supplied.
Make certain SET SCREW (3) is properly aligned and tight
so that SPOUT (1) is locked in place.
• Install PLUG BUTTON (2).

- 2 -
VALVE
LOCK RING
FITTING
MOUNTING
DECK
VALVE
LOCK RING
SPOUT
SHANK
HOT
COLD
FRICTION WASHER
MOUNTING NUT
# 8
SCREWS
1
2
3
4
6
5
M965903 (4/18)
2
• Remove PLASTER GUARDS.
• Thread INSERT (1) into SIDE VALVE (2) until it touches the installation surface.
• Thread INSERT (3) into SIDE VALVE (4) until it touches the installation surface.
• Tighten COUPLING (5) into TEE (6) for products without hand shower.
VALVE ASSEMBLY
INSTALL HANDLES
3
• Turn VALVE to OFF position.
• Push ADAPTER (1) on VALVE STEM (2), so that the hole of the ADAPTER (1) without a spline is facing up. Fig. A.
Tighten STEM SCREW (3) to secure ADAPTER (1).
• Align DECK ADAPTER (5) to LEVER HANDLE ASSEMBLY (4). Push LEVER HANDLE
ASSEMBLY (4) onto DECK ADAPTER (5) rmly to ush against mounting surface.
1
2
3
5
6
4
TOP
MALE TEETH
SPLINE END DOWN
Fig. A.
FEMALE TEETH
HEX WENCH
SUPPLIED

- 3 -
CARE INSTRUCTIONS:
HANDSHOWER INSTALLATION (Model T455.901 series only)
M965903 (4/18)
DO: SIMPLY RINSE THE PRODUCT CLEAN WITH CLEAR WATER. DRY WITH A SOFT COTTON FLANNEL CLOTH.
DO NOT: DO NOT CLEAN THE PRODUCT WITH SOAPS, ACID, POLISH, ABRASIVES, HARSH CLEANERS, OR A CLOTH
WITH A COARSE SURFACE.
5
6
4
• To change direction of handle rotation,
proceed as follows:
— Turn valve to OFF position.
— Loosen SET SCREW (1) and pull of HANDLE ASSEMBLY (2).
— Loosen HANDLE SCREW (3) and pull off HANDLE ADAPTER (4).
— Remove SPRING CLIP (5).
— Lift STOP WASHER (6), turn 90° and replace.
— Replace SPRING CLIP (5).
— Refer to step four for HANDLE ASSEMBLY (2) instructions.
• If spout drips, operate handles several times from OFF
to ON position. Do not force handles turn only 90°.
SERVICE
1
2
3
4
5
7
8
10
9
9
11
6
LOCKNUT
• Drop SPRAY ESCUTCHEON (1) through the fourth hole of the tub ledge
(12" max from SPOUT center) with SPRAY ESCUTCHEON (1) directed
towards tub center. Be sure RUBBER RING (2) is properly seated in
ESCUTCHEON (1). Install RUBBER WASHER (3) BRASS WASHER (4)
and LOCKNUT from underside of ledge.
• Secure SPRAY ESCUTCHEON (1) by tightening LOCKNUT.
• Add SEAL WASHER (5) and connect
HOSE (10) to outlet nipple at the bottom
of COUPLING (7). Tighten rmly.
• Slip SHOWER HOSE (8) with COUPLING
NUT through SPRAY ESCUTCHEON (1).
Install SEAL (9) and connect both HOSES (8)
and (10), Connect HAND SHOWER (11)
to SPRAY HOSE (8).
NOTE: When not in use, HANDSHOWER
should be seated in the HOLDER.
Hex wench
(supplied)
1
2
3
4
5
6
90°

- 4 -
918049-0070A
HANDLE ADAPTER
M970478-0070A
SHANK KIT
M970479-0070A
SHANK
MOUNTING KIT
A912629-0070A
RUBBER RING
M970480-YYY0A
HAND SHOWER
HOLDER
M970477-0070A
SHANK SLEEVE KIT
(T455.901)
030278-0070A
TRANSFER
SEAL KIT
(T455.901)
M950807-0070A
TRANSFER
ROD ASSEMBLY
(T455.901-002/013/295)
M950807-2780A
TRANSFER
ROD ASSEMBLY
(T455.901-278)
1660608-YYY
HAND SHOWER
(1.8 GPM)
FOR T455.901 ONLY
M950535-0070A
VALVE KIT
M970472-0070A
DECK ADAPTER KIT
M970471-YYY0A
HANDLE KIT
918555-0070A
HANDLE SCREW
M970468-YYY0A
LIFT KNOB (T455.901)
M962850-YYY0A
BUTTON & SCREW SET
028667-YYY0A
HAND SHOWER HOSE
M910270-0070A
STREAM
STRAIGHTENER
- 4 -
M965903 (4/18)
TOWN SQUARE
®
S
DECK MOUNT TUB FVILLER
MODEL NUMBER
T455900 / T455901
Replace the “YYY” with
appropriate finish code
POLISHED CHROME 002
POLISH NICKEL 013
LEGACY BRONZE 278
BRUSHED NICKEL 295
HOT LINE FOR HELP
For toll-free information and answers to your questions, call:
1 (800) 442-1902
Mon. - Fri. 8:00 a.m. to 8:00 p.m. EST
Saturday 10:00 a.m. to 4:00 p.m. EST
IN CANADA 1-800-387-0369
(TORONTO 1-905-306-1093)
Weekdays 8:00 a.m. to 7:00 p.m. EST
IN MEXICO 01-800-839-1200
/