Page is loading ...

VOILIER MONOTYPE
Photo : Ronny Kiaulhen
Torbole , Italy– Sept 2007
OWNER’S MANUAL

INDEX
1. Introduction
2. EEC Documents
Conformity Declaration
3. Description
Hull identification
Technical Data
Maximum load
Maximum power
4. Assembly Manual
5. Navigation
a) Manoeuvres
b) Man overboard
c) Towing, mooring
6. Security
7. Maintenance

Dernier enregistrement 16/06/2008- 9:36
1
1. Introduction
You have just acquired an OPEN 5.00 monotype sailing boat from the manufacturer Phileas.
This handbook is to help ensure your pleasure and safety in navigation. It contains technical
information, descriptions for assembly, manoeuvres and maintenance tips.
If this is your first sailing boat, or a new kind of sailing boat for you, first of all familiarize yourself
with it under lenient navigating conditions of.
Get in touch with local qualified clubs and schools in order to obtain the advice necessary for
possible training.
PLEASE KEEP THIS HANDBOOK AND IF YOU SELL YOUR BOAT . PLEASE GIVE IT TO THE
NEW OWNER
2. Documentation CE
EEC Documents
Declaration of Conformity : 2 originals joined to this handbook
We certify that the boat type OPEN 500 bearing the hull number FR PHI E
is built respecting in all points of the conformity certificate herewith according to directives 94/25/CE amended
by directive 2003/44/CE.
Specifications :
- Type of boat: sailing boat
-Category of design: D/4 people - C/2 people
- Module : A
- Length of hull (m): 5.00
- Width of hull: 2.24
- Displacement (Weight) (kg): 300
- Maximum Power engine (cv): 2.2
- Maximum Number people: 4 for category D - 2 people for category C
- Maximum weight for people + luggage (kg): 175kg for category C/
- 310 kg for category D
Conception
categories
Maximum
wind force
Maximum
height of
waves
Possible categories of
navigation
A (haute mer)
High Sea
> force 8 > 4 m 1 à 6
1 to 6
B (large)
Open Sea
force 8 4 m 2 à 6
2 to 6
C (zones côtières)
coastal zones
force 6 2 m 4 à 6
4 to 6
D (eaux abritées)
sheltered waters
force 4 0,50 m 6
6

Dernier enregistrement 16/06/2008- 9:36
2
3. Description
Standards used by the manufacturer
ISO DIS 10087 Hull number identification
Hull Identification
FR PHI E
Technical data
- Longueur HT : 5.00 m
Length
- Longueur flottaison : 5.00 m
Floating length
- Bau max. (largeur) : 2.24 m
Beam max. (width)
- Déplacement : 300 kg
Displacement (Weight)
- Surface de voile au près : 20.60 m2
Sail surface close-hauled
- Manufacturer : PHILEAS
Maximum load
- 175 kg in category C
- 310 kg in category
Maximum power
Outboard Motor max. 2.2 horsepower
Rochefort, Date
Stamp and signature

4. Assembly manual
The Main Sail Halyard
The main sail halyard is threaded in the boltrope
(see photos), up to the masthead after removing
the sheave. It is then passed in the masthead
after having been slid into the sheave. It comes
down again and passes into the flying pulley
(#224) equipped with a shackle (# 27.04), which
will be used for fixing the head of the main sail. It
then goes back up then up to the masthead
where it is fixed by a simple knot. The reefing of
the main sail halyard is accomplished

The Spinacker Halyard
First of all install the spinnaker hound pulley
(#098) using the small end of the shackle
#RF634, then install the #’retenue de spi’ to
the becket, 40cm above.
Be careful to leave the shackle turned
towards the outside in order no to damage
the mast(see photos).
The halyard is simply passed into the hound
pulley and comes down along the mast.
It is possible to use a Rilsan attach or an
elastic at the level of spreader to prevent
the spinnaker halyard from getting stuck
behind spreader.
Shrouding (haubannage)
The shrouds are fixed to the mast by a
shackle # HR08.
The forestay is fixed thanks to the swivel
attached to the HR08 fixed on the hound
shackle.
Nylon plastic washers have to be located
correctly, as shown in the photograph.
Tighten the shackles with pliers to make
sure that they are well fastened and if
possible assure the fixture with adhesive
tape or a small piece of rope.
Jib Halyard (drisse de foc)
The jib halyard goes simply into the swivel
hook (see photo).

Spreaders
It is imperative to assemble in the following
order:
1- Release the adjuster then fix to the mast.
2- Fix the diamond cable to the adjuster by
the central fixing.
3- Fix the diamond cables to the top fluke
making sure that they stay clear (without
turning).
4- Slip the spreaders into the mast.
5-Position the tips of the spreaders on the
cables, and then fit into the spreaders. The
washers must be positioned above the
spreaders.
6-Tighten the adjuster so that the mast has
a longitudinal spread (a tension of 180kg is
recommended).
Once the diamond is correctly tightened,
make sure that spreaders are
perpendicular to the mast.
The cord drum for the snuffer
The Open 500 has a jib snuffer as standard
equipment. The cord drum should be fixed
to the chain plate situated at the mouth of
the trumpet. It is imperative to put the split
ring behind the snuffer.
The snuffer control rope should be fixed to
the snuffer cord drum by making an
overhand knot. It passes under the roof by
the thro-hull then under the mast foot (port
side light) and is fixed in the aluminium clam
(see photos).
The aluminium clam is fixed to the snuffer
cord drum with the surplus of the blue string
from the jib pulleys #2661.

Stepping the Mast
It is best to leave the trailer hitched on the car
while raising the mast, to assure the stability of
the boat and the trailer. Otherwise you need to
block the back of the trailer so that it cannot
move or tip up.
It is advisable to start by arranging the mast on
the boat, with the mast foot close to the
rotation ball.
Fix the forestay to the hull plate (second hole
from the front).
The adjuster plates should just have an
average adjustment
Remove the pin and arrange with a flat profile
(spreaders vertical) engage the mast onto the
rotation ball and put the pin back in place.
It is imperative to keep the profile flat until
the mast is vertical.
The same thing goes when bringing the mast
down. This is why we advise not to help by
pulling on the forestay, (it is better to use the
spinnaker halyard).
A
crew member gets into the boat and raises
the mast until the shrouds are stretched. The
j
ib halyard is then fixed to the winch of the
trailer by 2
fingertip bowline knots which will
be used for tightening the rigging while you fix
the forestay.
Once the forestay is fixed to the adjuster plate
of the drum, the winch is loosened.
Your mast is in place.
It is imperative when bringing the mast
down to also respect the flat profile
position of the mast (spreaders vertical)
and to avoid lowering by the forestay or
the jib halyard. If the pin of the mast foot
has been taken out during navigation it
must be put back into place before
lowering the mast.

The jib
The jib is hoisted around the forestay, (both
extremities of the halyard being fixed to the
point of the jib halyard so that the halyard is
uninterrupted) by closing the zip around the
forestay and both parts of the halyard.
The tack point of the jib is fixed to the adjuster
plate on the top of the drum (1st hole from the
bottom).
Once the jib is hoisted, a loop is made in the
downward part of the halyard (see photo) and
the end fixed to the aluminium clam #CL230,
passed through the loop before returning to the
clam (see photos).
The right tension of jib halyard is the least
possible which allows the removal or the
reduction of the horizontal folds on the luff once
the sail is hoisted. To protect it, avoid leaving the
jib rolled up with a strong tension of the halyard
rope.
Some people prefer using a halyard in 2 parts, a
halyard and a messenger that needs to be
removed once that the jib has been hoisted, and
then put back before lowering the sail.
Jib sheet
The jib reefing pulleys #2651 are fixed to the
shackle #2704 by the pieces of string enclosed
in the supplied pulley bag (see instructions
inside the pulley bag).
The jib should be rolled anticlockwise by hand
before fixing the sheet, the snuffer drum empty
(the working part of the snuffer having been
pulled out and put on the cleat).
Respecting this safeguards the cables.

We can now fix the pulleys# 2616 on the #
2750 traveller and insert the plastic springs
#369 on the shackle .
Now pass jib sheet as in the photograph,
without interruption in to the cockpit.
To unroll the jib, release the end of the
snuffer and pull on the sheet.
To roll up the jib, take care that the shettes
are clear and draw on the end to wedge it
on the clam.
The elastic of the sheet guard fixes in the
hood on both sides of the bulkhead (see
photo). It ends with a fingertip bowline knot
which fixes on the plastic hook after having
passed around the mast.
The boom is fixed on the gooseneck.

The Main Sail
The Open 500 mainsail is "Full Batten" which
means that its battens go from the leech to luff.
Tighten the battens slightly by using a six sided key.
Main sail supplied with black battens ends :
Screw to tighten, unscrew to slacken.
Main Sail supplied with grey battens ends :
Unscrew to tighten, screw to slacken.
The fabric must be very slightly stretched.
It is possible that after the first navigation you may
need to tighten again the battens a little as they will
have found their places in the slots.
Caution: A tension too strong will make it difficult :
- to engage the sail in the mast when
hoisting,
- to change the direction of the battens when
changing tack and will make the sail too
hollow.
The double ringot block #2603 is fixed on the strap
in the middle of the boom; the triple pulley is fixed
on the turret of the main sail.
The sheet passes as in the photo and is fixed on
the ringot by a fingertip bowline knot, with a figure
of eight knot to hold the extremity of the sheet.
The Main Sail halyard is fixed at the head, taking
care that it does not turn right up to the top. Also be
careful, when you hoist the main sail to guide it with
the rope (by pulling towards the front of the boat) so
that the edge of the main sail is lax.
The clew is fixed on the boom by the shackle (see
photos of main sail sheet). This shackle needs to
be tightly fixed.
The tension of edge is set by drawing or by
slackening the regulator located towards the front
and on the top of the boom.
Attention, just turning the boom when it is fixed on
the mast makes the tackle located inside the boom
rolling up.
The reefing point cord, if any use requested,
passes in the tack point, in the reef eyelet then
goes down onto the starboard pulley on the boom
before being fixed in the clam.

The Cunningham
The Cunningham is fixed by a fingertip bowline
knot on the gooseneck (see photo); it then
passes in tack eyelet , goes down around the
axis of the boom, back up into the main sail
eyelet then into the turret block pulley (see
photo).
When you use a reef, the Cunningham passes
through the reef eyelet instead of the
Cunningham eyelet.
The Boom Vang
The Boom Vang is fixed to the mast thanks to
the unused triple pulley shackle of the main sail
( #2658 )and to the boom on the strap (remark :
the boom vang is only used to moderate the
rising of the boom when bearing, it should not
be used for the adjustment of the tension of
the leech).
The tension of the leech is regulated by the
tension of the main sail sheet.
Boom vang fixation.
Les sangles de rappel ???

Spinnaker Pole Assembly
Fix a simple pulley # 348 at one end of the
control rope of the spinnaker pole. The other
end is passed through the pulley located at the
front of the boat (A) , then fixed on the pad-eye
at the back of the spinnaker pole.
Spinnaker bag
The spinnaker bag has to be slipped inside the
mouth of snuffer with the string holding the
elastic placed into the guiding rail.
The lower part is fitted with some Velcro strap
and has to be located onto the Velcro band
taped on the cockpit.
Each end of the elastic is then passed in the
fairlead ring then up through the loop and ends
in two half hitch knots after having acquired the
right tension.
The back end of the snuffer bag is fixed on the
eye-pad at the end of the starboard jib rail by a
piece of elastic.
On boats recently delivered , the spinnaker bag
lyes onto the cockpit out of the roof.
The bag must be stretched so that the snuffer
functions well.

Spinnaker halyard
Leave one end of the spinnaker halyard in front
of the boat ( the HEAD)
With the other end :
- Go through the pulley situated just in
front of the mast foot.
- Then, through the spinnaker pole
control pulley #348
- Back to the keel case going through the
starboard hole under the foot of mast,
then into the block A
- through the flying pulley #348 on elastic
(on the becket located along the keel
case, porthole)
- then, through the pulley #348 to be
located at the central fixing of the
starboard foot strap,
- then into the pulley located on the front
of jib rail ( B)
- and returns into the snuffer bag before
coming out of the mouth of the trumpet
(it is advised to use the stick to carry out
this passage).
This same spinnaker halyard end will be used
to enter the spinnaker.
For this it goes through the eyelet situated on
the bottom of the spinnaker, then through the
second eyelet of the patch and is held in place
by a single knot.
Note: The spinnaker halyard may appear to be
a bit too short because of the sunken position
of the boom when the boat is on its trailer.
348

To help the spinnaker in and out of the snuffer, a
specific product is delivered with each boat to
treat the spinnaker. Vaporize the product,
insisting on the surfaces close to the patches. Let
it dry before carrying out the same operation on
the other side of the spinnaker.
The spinnaker tack is fixed to the boom with the
help of a strap - length 70 cm -diameter 4,
provided with a ball to block it. It is fixed to the
spinnaker by a fingertip bowline knot (made
short) which can be solidified with adhesive.
Spinnaker sheet
The automatic winch pulleys #2625 allow you to
gybe smoothly (without applied tension the pulley
is traditional).
The sensitivity of these pulleys is adjustable (see
Harken instructions).
The pulleys are assembled on the most forward
hole of the shroud chain plate. It is best to
position the shackle towards the inside.
The spinnaker sheet is without interruption. ( clew
/ winch pulleys/ back to clew).
When hoisting the spinnaker, you need to have
the wind behind you or with a very slight reach.
The crew who carries out the manoeuvre will
stand upright, legs bent, a foot of each side of the
keel casting. Take care that his feet do not
obstruct flow of the halyard.
To lower, the crew’s position is the same. While
holding the patch in the right hand, he needs to
release the halyard with the left hand. As soon as
it comes out of the cleat, do not retain it but take
up the slack of the patch very quickly while the
spinnaker comes down.
To pass the "cap" he will need to exert a
greater effort.

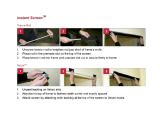
The rudder:
The open 500 is equipped with a hinged rudder.
Its action is controlled by the tiller.
Be careful that the rudder blade is always raised
in the air before lowering the tiller to lock in
place.
If the blade is blocked in the low position in spite
of the raised tiller, we recommend you to use a
part of the main sail sheet under the blade and
onto the tiller then raise the tiller with force.
(see photos).
Be careful not to give any important angles
to the tiller until the rudder has been lowered
and locked in place.

The Keel
The Open 500 is equipped with a keel (more
than 90 kg) entirely retractable into its casing.
When the keel is in the low position, (draft 1,58
meters) a trap door covers the keel casing.
When the keel is brought up, the trap door is
retracted. This action of the trap door is
automatic. A bail system helps to empty the keel
casing when the speed of the boat is sufficient.
The keel is raised and lowered by moving the
loop of rope which activates the sheave which
notches into a threaded rod. It is this threaded
rod which moves the keel due the movement of
the bronze part( located inside the upper part of
the keel).
This loop of rod goes all along the keel casing
through the #348 pulley fastened to an elastic
at the rear of the boat ( see picture 2.)
When the keel touches the sea bed, or the
lowering control is activated but the keel is
unable to go down (beached or on the trailer)
then it is only normal the mechanism "slips out"
and that the threaded rod appears.
To put the system back in working condition, it
may be necessary to activate the threaded rod
the in the same way as raising the keel before
going afloat, while still holding the keel.
Never put hands or fingers into the
mechanism.
It is imperative to regularly lubricate or oil the
ball bearings, the stainless steel nuts and its
spring, as well as the threaded rod and bronze
part (by the trap door).
It is imperative to
regularly lubricate or oil
the ball bearings, the
stainless steel nuts and
its spring, as well as
the threaded rod and
bronze part (by the trap
door).
Keel in lower position,
you can see the
bronze nut
System disconnected

5. Navigation
a) Manœuvres
These few indications are not intended to replace training needed to handle a sailing boat. The
skipper of the boat is responsible for the control and condition of the boat; he must be able to sail in
complete safety under the wind and sea conditions at the time of launching and the weather
provisions for the time that he is on the water.
The Open 500 is conceived to make all of the manoeuvres on board as easy as possible. All of the
controls are accessible from the cockpit.
Tacking
The boat is tacked in the conventional way; bend down to let the boom pass.
Gybing
Gybing is also done in the conventional way; it is advisable to take the new sheet firmly and to
guide it for an easy passage of the spinnaker onto the new tack. By constant wind, keep the
mainsail sheet slightly in, to moderate the passage on the new tack and to carry out a manoeuvre
"fast and smooth" with the highest speed possible of the boat (thus decreasing the wind effect).
The skipper determines the passage of the boom and will take care to inform the crew in time, in
order to avoid any incident at the time of the passage of the boom onto the new tack.
b) Man overboard :
With the sail hoisted the skipper carefully approaches the man overboard by going around down
wind keeping the sheet in or shocking the sail to moderate the speed (it is possible to carry out
a loop while gybing or to make a ' figure of eight’ while veering, then to go down wind).
With an engine the approach can be made easier, however you need frequently to control your
position in comparison to the man overboard, taking in to consideration the reduced visibility
from the back of the boat; it is essential to make sure that the engine is out of gear at the time of
recovery.
c) Towing, mooring
It is possible to be towed if need be, by respecting the following instructions:
- Only use the stem plate made for this purpose.
- Only use elastic cords (avoid the pre-stretched ropes, spectra, dynema, kevlar...) in order to
have the flexibility necessary to deaden the shocks.
- leave a sufficient length to allow a reaction time in the event of the towing boat changing
direction or slowing down.
It is possible to moor the boat by using the stem plate made for this purpose as well as the pad-
eyes located on the back of the main sail rail; it is recommended to use rubber shock absorbers
as well as a safe fixing system (i.e. snap shackle with ‘baionette’) when mooring at sea (i.e.
buoy outside a port).

Dernier enregistrement 16/06/2008- 9:35
1
6. Security
MAKE SURE THAT THE PLUG-CAP IS SCREWED IN WELL BEFORE PUTTING THE BOAT
ON THE WATER
It is the owner’s responsibility to ensure that the boat is equipped with all of the mandatory safety
equipment, and that this equipment is easily accessible while sailing if it should be needed. The
standards can vary according to the country of registration.
♦ On ground or on the water, always keep far away from electric wires. The contact of
the mast with electric wire can involve serious injuries, even death.
♦ NEVER navigate under the influence of alcohol or drugs.
♦ Always sail under comfortable conditions in which you feel at ease and in security. Never
sail under conditions exceeding your competences. Consult the marine weather
conditions before leaving.
♦ Everyone on board must wear a life jacket at all times.
♦ If you fall overboard, stay in contact with the boat, even if it capsizes. A boat drifts faster
than a person can swim.
♦ Wear appropriate clothing. Wear a dry suit or a neoprene wet suit in cold waters or if it is
cold. Protect yourself from the sun and heat. Hydrate yourself. (Don’t forget to drink)
♦ Learn the priorities at sea, if you have a doubt, let the others go by first.
♦ When you are not sailing, always direct the nose of the boat towards the wind, whether
you are on the beach or at sea.
♦ Read this manual carefully.
♦ Make sure that everyone has read and understood these security rules

Dernier enregistrement 16/06/2008- 9:35
2
7. Maintenance
A few tips in order to keep your boat in perfect sailing condition :
♦ The use of a boat cover (cockpit or complete) will give an adequate protection to the ropes,
it will keep the equipment, deck and cockpit clean and protect against UVs.
♦ When used at sea, rinse the deck, cockpit, and deck equipment with fresh water regularly.
♦ Be careful to dry the inside of the hull, as well as the sails and accessories.
♦ After each navigation, fold the spinnaker and roll the sails in order to store them in the best
possible position; this will guarantee a better longevity for them (do not to leave the jib rolled
up too tightly or in the same position for too long at a time because of the risk of deforming
it).
♦ Only wash the sails with cold or lukewarm water, eventually a little gentle soap ; never use
strong detergents.
♦ Have your sails checked each winter by a sail-maker.
♦ Make a regular control of your deck equipment to avoid problems while navigating due to
wear and tear.
♦ The pulleys and the roller with ball bearings are sensitive to dust and the accumulation of
salt. Capsizing ( Rinsing) even in sea water gives a satisfactory function to them.
♦ Repair of any small damages without waiting until they are accentuated.
♦ If your boat must remain in water, it is strongly recommended to apply epoxy
undercoat before the anti-vegetative paint (antifouling).
/