Black & Decker BEMW351 User manual

Category
Lawnmowers
Type
User manual

Black & Decker BEMW351 is a reliable lawnmower designed for efficient grass cutting in your garden. It offers a powerful performance with its electric motor, making lawn care effortless. The BEMW351 features a sturdy blade that ensures a precise and even cut, leaving your lawn looking neat and well-maintained.

Black & Decker BEMW351 is a reliable lawnmower designed for efficient grass cutting in your garden. It offers a powerful performance with its electric motor, making lawn care effortless. The BEMW351 features a sturdy blade that ensures a precise and even cut, leaving your lawn looking neat and well-maintained.

www.blackanddecker.co.uk
BEMW351
1
4
5
2
3
6
7
8
2
3
69
5
5a
6b
6c
6a
6b
6c
A B
C
E
F
D
6a
6b
1
1a
1b
1c
2
3
4
4b
4a
5
4b
4c
H
I
J
L
10
11
K
3
2
G
4
ENGLISH
(Original instructions)
1
2
3
4
10
12
13
N
10
O
M1
Intended use
Your BLACK+DECKER BEMW351 lawn mower has been
designed for mowing grass. This appliance is intended for
consumer use only.
Safety instructions
Warning! When using mains-powered
appliances, basic safety precautions,
including the following, should always be
followed to reduce the risk of re, electric
shock and personal injury.
u Read all of this manual carefully before
using the appliance.
u The intended use is described in this
manual.
The use of any accessory or
attachment or the performance of any
operation with this appliance other
than those recommended in this
instruction manual may present a risk
of personal injury.
u Retain this manual for future
reference.
Training
u Read the instructions carefully. Be
familiar with the controls and the
proper use of the appliance.
u Never allow children or people
unfamiliar with these instructions to
use the machine. Local regulations
can restrict the age of the operator.
u Never operate the machine while
people, especially children, or pets are
nearby.
u Keep in mind that the operator or user
is responsible for accidents or hazards
occurring to other people or their
property.
M2
5
ENGLISH
(Original instructions)
Preparation
u While operating the machine always
wear substantial footwear and long
trousers. Do not operate the machine
when barefoot or wearing open
sandals. Avoid wearing clothing that is
loose tting or that has hanging cords
or ties.
u Thoroughly inspect the area where the
machine is to be used and remove all
objects which can be thrown by the
machine.
u Before using, always visually inspect
to see that the blade, blade bolt and
the blade assembly are not worn or
damaged. Replace worn or damaged
components in sets to preserve
balance. Replace damaged or
unreadable labels.
u Before use check the supply and
extension cord for signs of damage or
aging. If the cord becomes damaged
during use, disconnect the cord
from the supply immediately. DO
NOT TOUCH THE CORD BEFORE
DISCONNECTING THE SUPPLY.
Do not use the machine if the cord is
damaged or worn.
u Wear safety glasses or goggles when
operating this tool. Use a face or dust
mask whenever the operations take
place in dusty surroundings. Hearing
protection should be worn whenever
the sound level seems uncomfortable.
u Guard against electric shock.
Prevent body contact with earthed or
grounded surfaces (e.g. metal railings,
lampposts, etc.).
Operation
u Never operate the appliance with
defective guards or shields, or without
safety devices, for example deectors
and/or grass catchers, in place.
u Only use the appliance in daylight or
good articial light.
u Do not expose the appliance to rain.
Do not use the appliance in damp or
wet conditions. Preferably do not use
the appliance in wet grass.
u Be sure of your footing, particularly on
slopes. Be aware that freshly cut grass
is damp and slippery. Do not work on
steep slopes.
u Work across the face of slopes, never
up and down. Take extreme caution
when changing direction on slopes.
u Do not mow excessively steep slopes.
u Walk, never run when using the
appliance. Do not pull the appliance
towards you or walk backwards when
using the appliance.
u Switch on the appliance according to
instructions and with your feet well
away from the blade.
u Do not start the machine when
standing in front of the discharge
opening.
u Do not tilt appliance when switching it
on, except if the appliance has to be
tilted for starting. In that case, do not
tilt the appliance more than absolutely
necessary and lift only the part that is
away from the operator. Always ensure
6
ENGLISH
(Original instructions)
that both hands are in the operating
position before returning the appliance
to the ground.
u Switch off the appliance and wait for
the blade assembly to stop running
if the appliance has to be tilted
for transportation when crossing
surfaces other than grass, and when
transporting the appliance to and from
the area to be mowed.
u Do not lift or carry the appliance until
the blade has come to a complete
standstill.
u Keep your hands and feet well away
from the blade.
u Do not put your hands or feet near or
under rotating parts.
u Keep away from discharge openings at
all times.
u Switch off, remove the plug from
the socket and ensure that moving
parts have stopped rotating before
leaving the appliance unattended
and before changing, cleaning or
inspecting any parts of the appliance
or clearing a blockage. After striking
a foreign object. Inspect the machine
for damage and make repairs before
restarting and operating the machine;
u If the appliance starts to vibrate
abnormally or if you hit a foreign
object, switch the appliance off and
remove the plug from the socket.
Check for any damage to the
appliance, replace or repair any
damaged parts, check for and tighten
any loose parts.
u Take care to keep the mains cable
away from the blade. Always be aware
of the position of the cable.
u The motor will continue to run for a few
seconds after switching the appliance
off. Never attempt to force the blade to
come to a standstill.
Maintenance and storage
u Before use, check the appliance for
damaged or defective parts. Check for
misalignment and seizure of moving
parts, breakage of parts, damage
to guards and switches and any
other conditions that may affect its
operation. Ensure that the appliance
will operate properly and perform
its intended function. Never use
the appliance when any guard or
enclosure is damaged or not in place.
Do not use the appliance if any part is
damaged or defective. Do not use the
appliance if the switch does not turn it
on and off.
Have any damaged or defective parts
repaired or replaced by an authorised
repair agent.
u Check the cable frequently for
damage. If the cable is damaged, it
must be replaced by an authorised
repair agent in order to prevent a
hazard. Inspect extension cables
periodically. Replace a damaged
extension cable immediately.
u Keep all nuts, bolts and screws on
the appliance tight to ensure a safe
working condition.
7
ENGLISH
(Original instructions)
u Check the grass collector for wear or
damage and replace it if necessary.
Never use the appliance without the
grass collector.
u Be careful during adjustment of the
machine to prevent entrapment of the
ngers between moving blades and
xed parts of the machine.
u When servicing the blades be aware
that, even though the power source is
switched off, the blades can still be
moved.
u When not in use, the appliance should
be stored in a dry place. Children
should not have access to stored
appliances.
u Always allow the machine to cool
down before storing.
u Ensure that only replacement cutting
means of the right type are used.
u Use only BLACK+DECKER
recommended spare parts and
accessories.
Additional safety instructions for
Lawnmowers
u Always use an approved extension
cable suitable for the power input of
this tool (see technical data). The
extensioncable must be suitable for
outdoor use and marked accordingly.
Up to 30 m of 1.5 mm2 HO5VV-F
extension cable can be used without
loss of product performance.
Before use, inspect the extension
cable for signs of damage, wear and
ageing. Replace the extension cable
if damaged or defective. When using
a cable reel, always unwind the cable
completely.
u Do not transport the machine while the
power source is running
u Firmly grip handle with both hands
when operating the lawn mower.
u If at any time it is felt necessary to tilt
the lawn mower, make sure that both
hands remain in the operating position
while the lawn mower is tilted. Keep
both hands in the operating position
until the lawn mower is returned to rest
correctly on the ground.
u Never wear radio or music
headphones while operating the lawn
mower.
u Never attempt to make a wheel height
adjustment while the motor is running
or while the safety key is in the switch
housing.
u If the lawn mower stalls, turn mower
off, wait for blade to stop, before
attempting to unclog the chute or
remove anything from under the deck.
u Keep hands and feet away from
cutting area.
u Keep blades sharp.
Always use protective gloves when
handling the lawn mower blade.
u If you are using the grass collector,
check it frequently for wear and
deterioration. If excessively worn,
replace with a new grass collector for
your safety.
u Use extreme caution when reversing
or pulling the lawn mower towards you.
8
ENGLISH
(Original instructions)
u Do not put hands or feet near or under
the lawn mower. Keep clear of the
discharger opening at all times.
u Clear the area where the lawn mower
is to be used of objects such as rocks,
sticks, wire, toys, bones etc., which
could be thrown by the blade.
Objects struck by the blade can cause
severe injury to persons. Stay behind
the handle when the motor is running.
u Do not operate the lawn mower
barefooted or while wearing sandals.
Always wear substantial footwear.
u Do not pull lawn mower backward
unless absolutely necessary. Always
look down and behind before and
while moving backward.
u Never direct discharged material
toward anyone. Avoid discharging
material against a wall or obstruction.
Material may ricochet back toward the
operator. Release the start handle to
turn the lawn mower off and stop the
blade when crossing gravel surfaces.
u Do not operate the lawn mower
without the entire grass collector,
discharge guard, rear guard, or other
safety protective devices in place and
working. Periodically check all guards
and safety protective devices to
ensure they are in good working order
and will operate properly and perform
their intended function.
Replace a damaged guard or other
safety device before further use.
u Never leave a running lawn mower
unattended.
u Always release the bail bar to stop the
motor and wait until the blade comes
to a complete stop before cleaning the
lawn mower, removing the grass bag,
unclogging the discharge guard, when
leaving the lawn mower, or before
making any adjustments, repairs or
inspections.
u Operate lawn mower only in daylight
or good articial light when objects in
the path of the blade are clearly visible
from the operating area of the lawn
mower.
u Do not operate the lawn mower while
under the inuence of alcohol or drugs,
or when your are tired or ill. Always
stay alert, watch what you are doing,
and use common sense.
u Avoid dangerous environments.
Never operate the lawn mower in
damp or wet grass, never use lawn
mower in the rain. Always be sure of
your footing, walk, never run.
u If the lawn mower should start to
vibrate abnormally, release the on/off
switch, wait for the blade to stop and
then check for the cause immediately.
Vibration is generally a warning of
trouble, see the troubleshooting guide
for advise in the case of abnormal
vibration.
u Always wear proper eye and
respiratory protection when operating
the lawn mower.
u The use of any accessory or
attachment not recommended for
use with this lawn mower could be
9
ENGLISH
(Original instructions)
hazardous. Only use accessories
approved by BLACK+DECKER.
u Never overreach while operating the
lawn mower. Always be sure to keep
proper footing and balance at all times
while operating the lawn mower.
u Mow across the face of slopes, never
up and down. Exercise extreme
caution when changing direction on
slopes.
u Watch for holes, ruts, bumps, rocks or
other hidden objects. Uneven terrain
could cause a slip and fall accident.
Tall grass can hide obstacles.
u Do not mow on wet grass or
excessively steep slopes. Poor footing
could cause a slip and fall accident.
u Do not mow near drop-offs, ditches, or
embankments.
You could lose your footing or balance.
u Always allow the mower to cool down
before storing.
Pull the plug from the socket and pull
the battery pack from the machine. Make
sure that all moving parts have come to a
complete stop:
u Whenever you leave the machine;
u Before clearing a blockage;
u Before checking, cleaning or working
on the appliance.
Vibration
The declared vibration emission values
stated in the technical data and the
declaration of conformity have been
measured in accordance with a standard
test method provided by EN60335 and
may be used for comparing one tool with
another. The declared vibration emission
value may also be used in a preliminary
assessment of exposure.
Warning! The vibration emission value
during actual use of the power tool can
differ from the declared value depending
on the ways in which the tool is used.
The vibration level may increase above
the level stated. When assessing
vibration exposure to determine safety
measures required by 2002/44/EC to
protect persons regularly using power
tools in employment, an estimation of
vibration exposure should consider, the
actual conditions of use and the way the
tool is used, including taking account of
all parts of the operating cycle such as
the times when the tool is switched off
and when it is running idle in addition to
the trigger time.
Do not operate the tool if the vibration
registers as abnormal.
Safety of others
u This appliance is not intended for use
by persons (including children) with
reduced physical, sensory or mental
capabilities, or lack of experience
and knowledge, unless they have
been given supervision or instruction
concerning use of the appliance by a
person responsible for their safety.
u Children must be supervised to
ensure that they do not play with the
appliance.
10
ENGLISH
(Original instructions)
u After striking a foreign object. Inspect
the appliance for damage and make
repairs as necessary.
Residual risks
Additional residual risks may arise when
using the tool which may not be included
in the enclosed safety warnings. These
risks can arise from misuse, prolonged
use etc. Even with the application of
the relevant safety regulations and the
implementation of safety devices, certain
residual risks can not be avoided. These
include:
u Injuries caused by touching any
moving parts.
u Injuries caused by touching any hot
parts.
u Injuries caused when changing any
parts or accessories.
u Injuries caused by prolonged use of
the appliance.
When using any appliance for
prolonged periods ensure you take
regular breaks.
u Impairment of hearing.
u Health hazards caused by breathing
dust developed when using your
tool (example:- working with wood,
especially oak, beech and MDF.)
u If operating the mower in a damp
location is unavoidable, use a residual
current device (RCD) with a tripping
current of not more than 30 mA.
Use of an RCD reduces the risk of
electric shock.
u Never pick up or carry an appliance
while the motor is running.
Warning symbols
The following warning symbols are found
on the appliance along with the date
code:
Warning! Read the manual
prior to operation.
Do not expose the appliance
to rain or high humidity.
Beware of sharp blades.
Blades continue to rotate after
the motor is switched off.
Remove plug from mains
before maintenance or if cord
is damaged.
Beware of ying objects. Keep
bystanders away from the cut-
ting area.
Keep the cable away from the
cutting blades.
The blades will continue to
rotate after the machine is
switched off.
Directive 2000/14/EC
guaranteed sound power.
Electrical safety
Warning! This tool is double
insulated; therefore no earth wire
is required. Always check that
the power supply corresponds to the
voltage on the rating plate.
u If the supply cord is damaged, it must
be replaced by the manufacturer or an
93
11
ENGLISH
(Original instructions)
authorised BLACK+DECKER Service
Centre in order to avoid a hazard.
u Electric safety can be further improved
by using a high sensitivity 30 mA
Residual Current Device (RCD).
Features
This appliance includes some or all of the following features.
1. Switch box
2. On/off button
3. Start trigger
4. Upper handle
5. Lower handle
6. Grass collection box
7. Motor cover
8. Carry handle
9. Rear ap
Assembly
Warning! Before assembly, make sure that the appliance is
switched off and unplugged.
Assembling the grass collection box (g. A, B
and C)
The grass box requires assembly before use and comes in 3
pieces.
u Clip the handle (6a) into the lid (6b) of the grass box
(g. B). The handle will only t one way round.
u Align the lid (6b) onto the base of grass collection box
(6c). Ensure that the guides are aligned (g. C)
Note: Take extra care when aligning the 2 clips at the rear of
the grass collection box.
u Push down on the lid to secure all clips. Begin at the back
and ensure that all clips are securely located.
Fitting the grass collection box (g. D)
u Lift the rear ap (9) and place the grass collection box (6)
over the lugs.
Fitting the switchbox (g. E)
u Align the plastic pins on the switchbox (1) with the
holes on the handle (1b) making sure that the switchbox is
on the top edge of the handle.
u Slide the plastic pins on the switchbox (1) all the way
through the holes in the handle.
u Slide the plastic cover (1b) into the thin runners in the
switchbox (1).
u Secure the plastic cover (1b) with the 2 screws provided.
Fitting the lower handle (g. F)
u Insert the ends of the lower handles (5) into the
corresponding holes in the mower.
u Press the handle down as far as it will go.
u Secure the handle using the screws (5a).
Assembling the upper handle (g. G)
u Fit the upper handle (4) to the lower handle (5) using the
knobs (4a), washers (4c) and screws (4b) as shown.
Note: The upper handle can be xed in 2 different height
positions.
Switching on and off (g. H)
Switching on
u Push the on/off button (2).
u Pull the start trigger (3) towards the handle.
Switching off
u Release the start trigger (3).
Warning! Never attempt to lock a switch in the on position.
Adjusting the height of cut (g. I)
Warning! Ensure the blade has completely stopped and
disconnect the appliance from the mains.
The height of cut is adjusted by altering the height of all the
wheels, there are 3 positions to choose from.
u Remove the grass collection box (6).
u Turn the lawnmower upside down.
u Take hold of a wheel and push/pull the axle from its
current location.
u Move the wheel up/down into the next available location.
Note: Adjust one wheel at a time. Adjust one height position
at a time.
Up to edge cutting (g. J, K)
Up to edge cutting allows you to cut grass right up to the edge
of a wall or fence (g J). Up to edge cutting allows you to
accurately cut grass right up to the edge of your lawn (g K).
u With the lawnmower parallel with the edge of your lawn,
push the lawnmower along the edge of the lawn. Ensure
that the edge of the mower is slightly over the edge of
your lawn (g.K).
Replacing the blade (g. L)
Warning! Ensure the blade has completely stopped and
disconnect the appliance from the mains.
Warning! Only use the specied replacement blade.
Warning! Use heavy-duty gloves to grip the blade.
To remove the blade:
u Turn the appliance onto its side.
u Using heavy-duty gloves, grip the blade.
12
ENGLISH
(Original instructions)
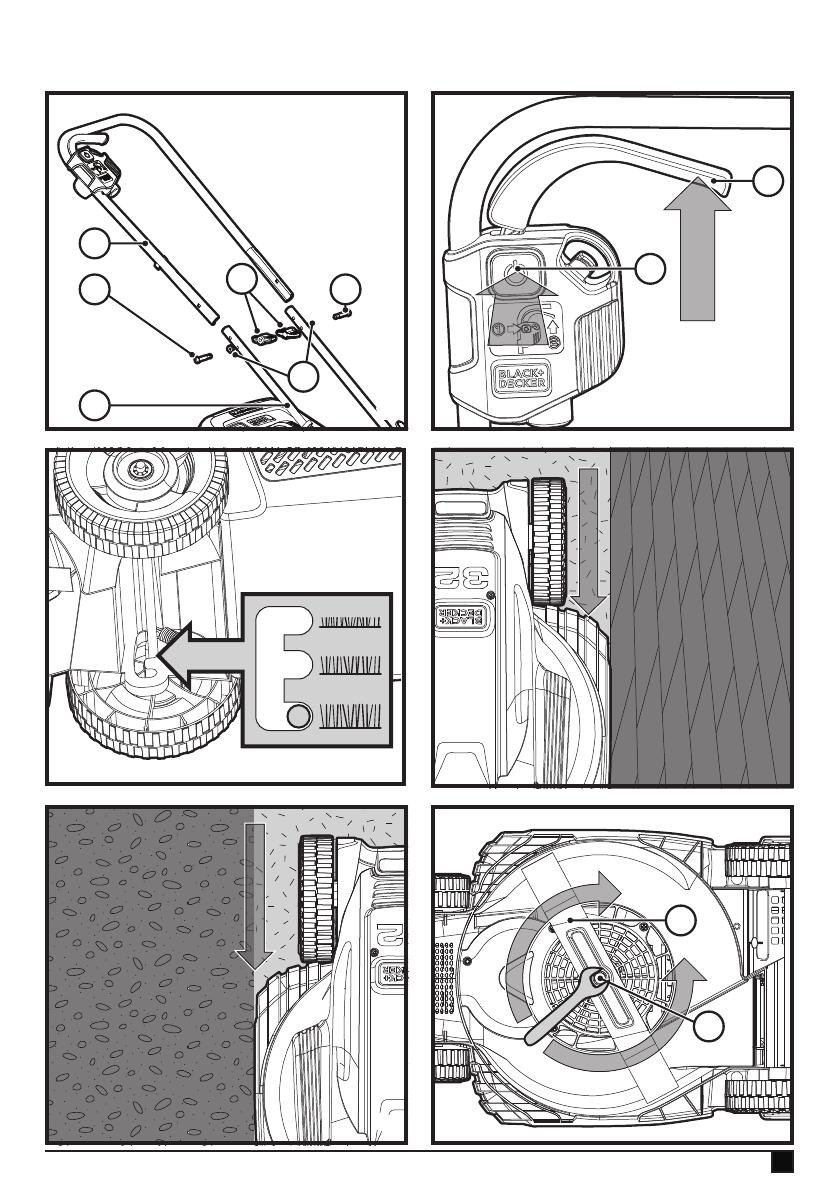
u Use a 13 mm spanner to loosen and remove the blade
bolt (11) by turning the spanner anti-clockwise.
u Remove the blade (10) and blade bolt (11).
To replace the blade:
u Offer the blade up to bolt shaft and locate the blade bolt
(11) into the bolt shaft.
Note: When tting a blade, the text on the blade must be
facing the user.
u Tighten the blade bolt (11) as rmly as possible by hand.
u Using heavy-duty gloves, grip the blade.
u Use a 13 mm spanner to securely tighten the blade bolt
(11) by turning the spanner clockwise.
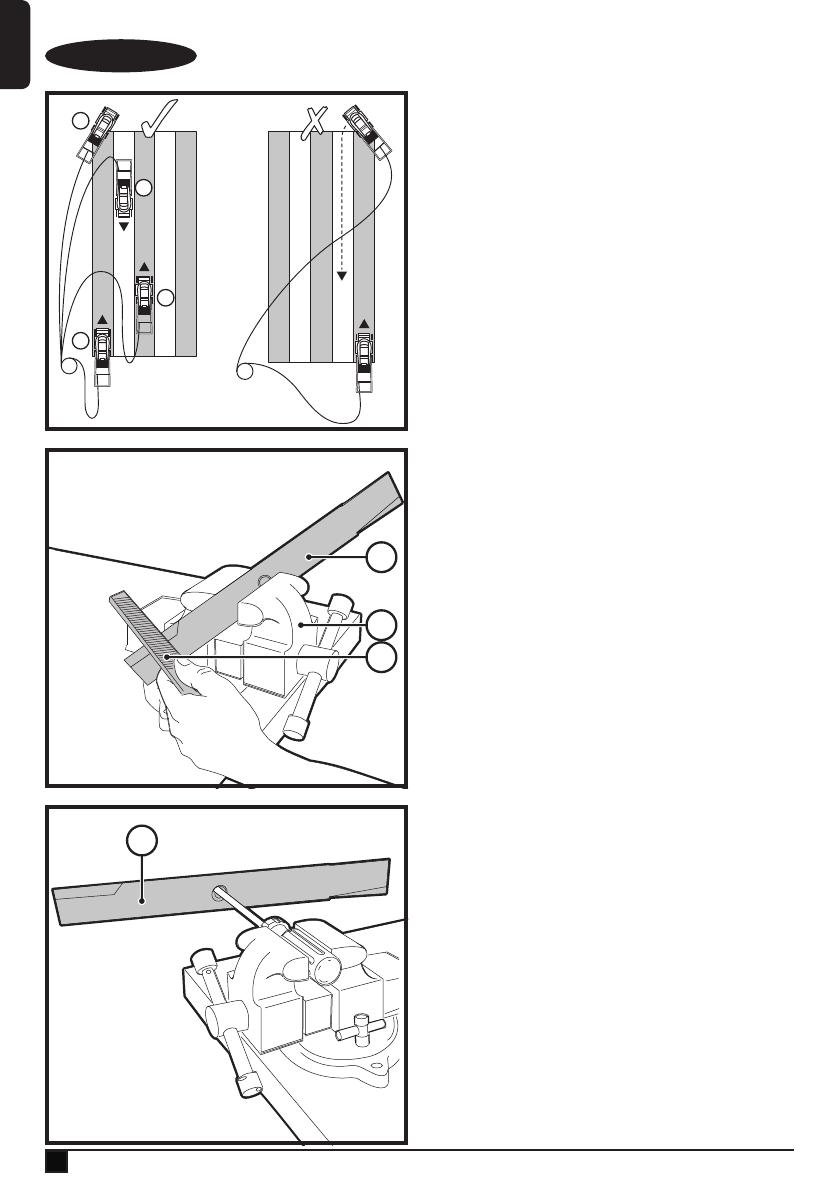
Mowing (g. M1 & M2)
We recommend to use your mower as outlined in this section
in order to achieve optimum results and to reduce the risk of
cutting the mains cable.
u Place the bulk of the mains cable on the lawn, close to the
starting point (position 1 in g. M1).
u Switch the appliance on as described above.
u Proceed as shown in g. M1
u Move from position 1 to position 2.
u Turn right and proceed towards position 3.
u Turn left and move towards position 4.
u Repeat the above procedure as required.
Warning! Do not work towards the cable as shown in g. M2.
Blade sharpening
Note: The BEMW351 uses the BLACK+DECKER blade (Cat #
A6323). Keep blade sharp for best mower performance. A dull
blade does not cut grass cleanly. Use proper eye protection
while removing, sharpening, and installing blade. Sharpening
the blade twice during a mowing season is usually sufcient
under normal circumstances.
Sand causes the blade to dull quickly. If your lawn has sandy
soil, more frequent sharpening may be required.
Note: Replace bent or damaged blade immediately.
When sharpening the blade:
u Make sure blade remains balanced.
u Sharpen blade at the original cutting angle.
u Sharpen cutting edges on both ends of blade, removing
equal amounts of material from both ends.
To sharpen blade in a vice (g.N)
u Be sure the blade has stopped and the mower is
unplugged before removing the blade.
u Remove blade from mower. See instructions for removing
and installing blade.
u Secure blade (10) in a vice (12).
u Wear proper eye protection and gloves and be careful not
to cut yourself. Carefully le the cutting edges of the blade
with a ne tooth le (13) or sharpening stone, maintaining
the angle of the original cutting edge. Check balance of
blade. See instructions for blade balancing.
u Replace blade on mower and tighten securely.
Blade balancing (g. O)
Check balance of the blade (10) by placing centre hole in
the blade over a nail or round shank screwdriver, clamped
horizontally in a vice. If either end of the blade rotates
downward, le along the sharp edge of that dropping end.
Blade is properly balanced when neither end drops.
Lubrication
No lubrication is necessary. Do not oil the wheels. They have
plastic bearing surfaces which require no lubrication.
Cleaning
Turn the mower off and let the blade come to a stop. Use only
mild soap and a damp cloth to clean the mower. Clean out any
clippings which may have accumulated on the underside of
the deck. After several uses, check all exposed fasteners for
tightness.
Preventing corrosion
Fertilizers and other garden chemicals contain agents which
greatly accelerate the corrosion of metals. If you mow in areas
where fertilizers or chemicals have been used, the mower
should be cleaned immediately afterward as follows:
Turn the mower off and unplug mower. Wipe all exposed parts
with a damp cloth.
Maintenance
Your BLACK+DECKER corded/cordless appliance/tool has
been designed to operate over a long period of time with a
minimum of maintenance. Continuous satisfactory operation
depends upon proper tool/appliance care and regular
cleaning.
Warning! Before performing any maintenance on corded/
cordless power tools:
u Switch off and unplug the appliance/tool.
u Or run the battery down completely if it is integral and then
switch off.
u Unplug the charger before cleaning it. Your charger does
not require any maintenance apart from regular cleaning.
u Regularly clean the ventilation slots in your tool/appliance
and charger using a soft brush or dry cloth.
u Regularly clean the motor housing using a damp cloth. Do
not use any abrasive or solvent-based cleaner.
u Regularly use a blunt scraper to remove grass and dirt
from the underneath of the guard.
13
ENGLISH
(Original instructions)
Troubleshooting
If your appliance seems not to operate properly, follow the
instructions below. If this does not solve the problem, please
contact your local BLACK+DECKER repair agent.
Warning! Before proceeding, release the bail bar to turn
mower off and wait for the blade to stop.
Problem Possible cause Possible solution
Machine fails to
operate.
Power turned off. Turn power on.
Fuse faulty/blown. Replace fuse.
Grass too long. Increase the height of
cut and move machine to shorter
grass to start.
Thermal cut out
activated.
Allow motor to cool and increase
height of cut.
Machine functions
intermittently.
Thermal cut out
activated.
Allow motor to cool and increase
height of cut.
Machine leaves
ragged nish or
motor labours.
Height of cut too low. Increase height of cut.
Cutting blade blunt. Replace the blade.
Underside of
machine clogged.
Check underneath the machine
and clear out as necessary
(always wear heavy duty gloves)
Blade tted upside
down.
Ret blade correctly.
Protecting the environment
Z
Separate collection. Products and batteries
marked with this symbol must not be disposed of
with normal household waste.
Products and batteries contain materials that can be
recovered or recycled, reducing demand for raw materials.
Please recycle electrical products and batteries according to
local provisions. Further information is available at
www.2helpU.com
Technical data
BEMW351 (Type 1)
Voltage
V
AC
230
Power inpurt
W 1000
No-Load speed
min
-1
3500
Height adjustment
mm 23 - 63
Blade length
mm 320
Weight Kg
7.8
Hand/arm weighted vibration value:
= <2.5 m/s
2
, uncertainty (K) = 1.5 m/s
2
.
Sound pressure level at the operator's ear:
L
PA
: 78.5 dB(A); K= 1.6 dB(A)
Sound power level L
WA
: 91 B(A); K= 1.6 dB(A)
EC declaration of conformity
MACHINERY DIRECTIVE
OUTDOOR NOISE DIRECTIVE
%
BEMW351 lawn mower
Black & Decker declares that these products described under
"technical data" are in compliance with:
EN 60335-1:2012 + A11:2014, EN 60335-2-77:2010
2000/14/EC, Lawn Mower, L < 50cm, Annex VI,
DEKRA Certication B.V. Meander 1051 / P.O. Box 5185
6825 MJ ARNHEM / 6802 ED ARNHEM, Netherlands
Notied Body ID No.: 0344
Level of accoustic power according to
2000/14/EC (Article 12, Annex III, L< 50cm):
measured sound power level L
WA
: 91 dB(A); K= 1.6 dB(A).
guaranteed sound power level L
WA
: 93 dB(A).
These products also comply with directive
2006/42/EC, 2014/30/EU, 2011/65/EU.
For more information, please contact Black & Decker at the
following address or refer to the back of the manual.
The undersigned is responsible for compilation of the technical
le and makes this declaration on behalf of Black & Decker.
R. Laverick
Director of Engineering
Black & Decker Europe, 210 Bath Road, Slough,
Berkshire, SL1 3YD
United Kingdom
11/09/2018
Guarantee
Black & Decker is condent of the quality of its products
and offers consumers a 24 month guarantee from the date
of purchase. This guarantee is in addition to and in no way
prejudices your statutory rights. The guarantee is valid within
the territories of the Member States of the European Union
and the European Free Trade Area.
To claim on the guarantee, the claim must be in accordance
with Black & Decker Terms and Conditions and you will need
to submit proof of purchase to the seller or an authorised
repair agent. Terms and conditions of the Black & Decker 2
year guarantee and the location of your nearest authorised
repair agent can be obtained on the Internet at www.2helpU.
14
15
14
ENGLISH
(Original instructions)
com, or by contacting your local Black & Decker ofce at the
address indicated in this manual.
Please visit our website www.blackanddecker.co.uk to register
your new Black & Decker product and receive updates on new
products and special offers.
14
15
N637926 REV-0
09/2018
Australia Black & Decker (Australia) Pty. Ltd. Tel. 03-8720 5100
20 Fletcher Road, Mooroolbark, Fax 03-9727 5940
Victoria, 3138
New Zealand Black & Decker Tel. +64 9 259 1133
5 Te Apunga Place Fax +64 9 259 1122
Mt Wellington
Aukland 1060
United Kingdom & Black & Decker Tel. 01753 511234
Republic Of Ireland 210 Bath Road Fax 01753 512365
www.blackanddecker.co.uk Slough, Berkshire SL1 3YD
  • Page 1 1
  • Page 2 2
  • Page 3 3
  • Page 4 4
  • Page 5 5
  • Page 6 6
  • Page 7 7
  • Page 8 8
  • Page 9 9
  • Page 10 10
  • Page 11 11
  • Page 12 12
  • Page 13 13
  • Page 14 14
  • Page 15 15
  • Page 16 16

Black & Decker BEMW351 User manual

Category
Lawnmowers
Type
User manual

Black & Decker BEMW351 is a reliable lawnmower designed for efficient grass cutting in your garden. It offers a powerful performance with its electric motor, making lawn care effortless. The BEMW351 features a sturdy blade that ensures a precise and even cut, leaving your lawn looking neat and well-maintained.

Ask a question and I''ll find the answer in the document

Finding information in a document is now easier with AI