
SP-628
6” 2-Way Ceiling Speaker
Rev(002).20191031
TeachLogic LLC | [email protected] | teachlogic.com | 760-631-7800
Installation Manual
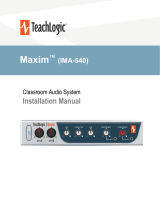
Ensure there is a sufficient mounting depth for the speaker. Minimum 5.1" mounting depth is
required.
Confirm there is sufficient mounting surface thickness for the speaker. Minimum 0.35",
maximum 1".
Min. 0.35”
Max. 1.0”
mounting surface thickness
7.1”
5.1”
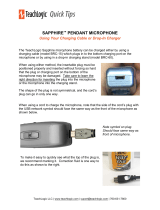
STEP 2. Find the center of the ceiling tile by measuring the length
and width, marking the 1/2 way point for each measurement. Place
Tile Bridge across the ceiling tile and center over your marks. Trace
the Tile Bridge cutout circle as a template. Cut along your traced line.
The cut out opening diameter should be 7.1".
STEP 3. Remove front metal mesh speaker grill by arranging
the three tabs outward as shown in the drawing’s Note A. Push
them down, one by one as shown in Note B to push off the
speaker grill.
Note A
Note B
- 7.1" -
STEP 1. Run the wire from the amplifier location to the speaker location(s) prior to installation. Route the wire above ceiling and drop end of
wire down through opening in ceiling where speaker will be placed. Support the wire as required by code or construction standards.
mounting depth
cut out diameter

SP-628 6” 2-Way Ceiling Speaker
2. INSTALLATION
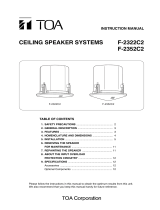
STEP 5. Secure the speaker to the ceiling tile by tightening the
three tabs. THE POSITION OF THE THREE TABS SHOULD BE
LOCATED ON TOP OF THE THREE TUBES as shown at Note C
on the drawing prior to tightening. Tighten the three screws one by
one.
STEP 6. As the screws are tightened, the tabs will turn outward
then begin descending to engage and press against the mounting
surface as in Note D. Take care to see that they turn out and do not
bind before sandwiching the tile bridge and the ceiling tile between
the tabs and the speaker front flange. Do not over tighten. After all
three screws are tightened and the mounting is secure, reinstall the
speaker mesh grill.
ote tile bridge
ceiling tile
STEP 4. When mounting on a suspended ceiling tile, always use a
metal tile bridge such as the TeachLogic TB-6.1 Tile Bridge to
support the weight of the speaker. With the tile bridge held in place,
gently guide the back of the speaker through the front of the ceiling
tile.
STEP 7. Take care to connect the wire on + terminal of amplifier to
+ terminal on speaker and the other wire likewise to - terminals. For
best connection, use spade terminals (18 gauge) on wire ends
connected to speaker. Once connected, replace ceiling tile into
ceiling.
Note D
Amplifier
STEP 8. Where required by code or construction standards,
connect support wire from structure above ceiling to speaker L-bracket
and tile bridge through provided support locations as show in Note E.
Note E
L
L-bracket for
ceiling support
wire
-
 1
1
-
 2
2


Teach Logic IRP-1650/CS4 User manual
- Type
- User manual
- This manual is also suitable for
Ask a question and I''ll find the answer in the document
Finding information in a document is now easier with AI
Related papers
-
 Teach Logic IMA-100 Owner's manual
-
 Teach Logic IMA-820 Owner's manual
-
 Teach Logic IRS-9655 User manual
-
TeachLogic IMA-540 Installation guide
-
 Teach Logic IRM-6120/LS4 Owner's manual
-
 Teach Logic IRP-1650/CS4 User manual
-
 Teach Logic IRF-4150 User guide
-
 Teach Logic IRM-5630/LS4 Owner's manual
-
 Teach Logic IRP-1655R/CS-4 Product information


Other documents
-
-
-
TeachLogic IMA-840 Installation guide
-
-
TOA F-2352CU2 User manual
-
-
 TOA Electronics F-2322C2 User manual
-
-
Vizio F-2852CU2 User manual
-
TOA F-122CU User manual
