Page is loading ...

© 2007 HeathCo LLC 598-1108-05
Features
• Add switched outlet convenience without rewiring.
• Tested and approved for outdoor use.
• Eight selectable channels available, so multiple switches can be used in the
same home.
• Allows remote or dusk-to-dawn operation.
• Car visor clip included for convenience.
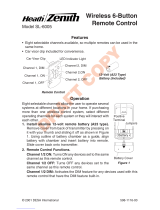
Wireless Outdoor
Power Control
Model 6022
Operation
Eight selectable channels allow the user to
operate several systems at different loca-
tions in your home. If purchasing more than
one wireless control system, select different
operating channels for each system or they
will interact with each other.
1. Remove Tab from Battery Chamber.
Remove cover from back of transmitter
by pressing on it with your thumb and
sliding it off as shown in Figure 1. Gently pull tab out of battery chamber.
Slide cover onto transmitter.
2. Plug in Outdoor Module. Remember, the outdoor module requires a grounded
outlet. If you do not have a grounded outlet, you should contact an electrician
to upgrade your electrical system for your safety. See precautions before
using module (see page 2).
3. Mount Outdoor Module. Hang module with two nails or screws. There are
two keyholes on the back for this purpose (see Figure 2, page 2). DO NOT
allow module to hang by cord.
Manual
Switch
Auto
Switch
ON Switch
OFF Switch
LED Indicator Light
Device
Receptacles
Light Sensor
Cover
Grounded Plug
Remote Control
Outdoor Module
12-Volt (A23 Type)
Battery (Included)
Car Visor
Clip
Figure 1
ON DIP
1 2 3 4
ON DIP
1 2 3 4
Battery
Chamber
(Type A23)
Battery
Cover
Tab
Positive Terminal

2 598-1108-05
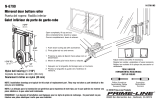
Precautions When Using
Outdoor Module
• The module must be oriented with the
power outlet down to prevent rain from entering the
unit (see Figure 2).
• The module must be located below the wall outlet as
shown. This is to prevent rain from running down the
cord into the wall outlet.
• Note: The National Electrical Code and Canadian
Electrical Code (and most local codes) require that
outside outlets be protected by a Ground Fault Inter-
rupter (GFI).
Car Visor Clip
The remote control is equipped with a removable car visor clip for added con-
venience. The car visor clip may be removed to allow the remote to lie at on
table tops or other horizontal surfaces.
1. Attach car visor clip to car visor as shown in Figure 3.
2. To remove car visor clip. Insert a small at-head screw driver into slot on
back of remote. Gently push portion of clip inside of remote with screwdriver
while pulling clip out of remote from top (see Figure 4).
Power Outlets
Keyholes to
Hang Unit
Figure 2
Figure 3 Figure 4
Car Visor
Remote
Control
Visor Clip
Screwdriver
4. Plug in devices you wish to control.
Caution: Do not exceed the maximum load limits listed in Specications
section (see page 4).
5. Check operation. Place hand over light sensor cover. The unit should switch
on. To check remote operation, toggle left switch to manual. Toggle ON/OFF
switch.
6. Remote Control Functions.
Automatic Mode: Toggle left switch to automatic to allow switched devices
to come on at dusk and turn off at dawn. This is the default mode when rst
powered up or after power outage.
Manual Mode: Toggle left switch to manual to allow operator to manually
switch devices on and off. Use right toggle to switch devices on and off.
Note: LED will light when toggle switches
are pushed.

3598-1108-05
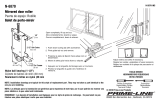
Channel Settings
Note: Most installations will not require you to change any of the dip
switches on your plug-in module or remote control.
The remote control and outdoor
module communicate by using chan-
nels that can be changed by sliding
dip switches into the ON or OFF [on
some switches the numbers 1 (ON)
and/or 0 (OFF) are used] position on
both the remote control and outdoor
module. The channel is factory set;
however, there are 3 switches (8
selectable channels) that allow you
to expand your system and prevent
outside interference. Other wireless
products may cause interference and
the system may not function properly.
Follow the instructions below for set-
ting a new channel.
1. Open the cases and locate dip switches on both the remote control and
outdoor module (see Figure 5).
2. The remote control and outdoor module both have two positions (ON and
OFF) on each of the four dip switches. Dip switches 1 through 3 are used
for setting the channel. Use the table below to set channel 2 after setting
channel 1. Note: The channels must be programmed according to the table
below for all 4 functions of the remote control to work properly. The receiver(s)
must match the code settings for channel 1. Use the table below to set the
corresponding code for channel 2.
3. To change the channel, slide dip switches to ON or OFF as needed. It is
recommended to only change one dip switch at a time and then check to see
if the system is functioning properly. Note: Dip switches in positions 1 through
3 must be in the exact same
conguration on both the remote
control and outdoor module for
this system to function properly.
O
N
1
2
3
4
Access
Door
Dip Switches - Shown
in the OFF Position
(Factory Default)
Keyholes
ON DIP
1 2 3 4
ON DIP
1 2 3 4
Figure 5
ON
1 2 3
4
Channel Setting Codes
Channel 1 Transmitter Channel 2
and Receiver(s) Transmitter
0000 0001
0010 0011
0100 0101
0110 0111
1000 1001
1010 1011
1100 1101
1110 1111
0 = OFF 1 = ON

4 598-1108-05
POSSIBLE CAUSE
1. Circuit breaker or fuse is turned off.
2. Switch on device is turned off.
3. Device is defective. Try remote using different device.
4. Signals from transmitter are being blocked, or transmitter
is out of range. Check for metal objects that could block
the signal, or reposition the transmitter.
5. Weak battery in the transmitter.
6. Dip switches on remote and outdoor module do not
match.
7. Remote set to automatic (Dusk to Dawn) and surrounding
light level is too bright.
1. Same as 4 & 5 above.
2. Remote set to automatic (Dusk to Dawn) and surrounding
light level is too dark.
1. Short term power line failure.
2. Another transmitter on the same channel.
Regulatory Information
This device complies with Part 15 of the FCC Rules and RSS-210 of Industry
Canada. Operation is subject to the following two conditions: (1) this device may
not cause harmful interference, and (2) this device must accept any interference
received, including interference that may cause undesired operation.
The user is cautioned that changes or modications not expressly approved by
the party responsible for regulatory compliance could void the user’s authority
to operate the equipment.
SYMPTOM
Device does
not come on.
Device does
not turn off.
Device comes
on randomly.
WARNING: This product contains chemicals known to the State of California
to cause cancer or birth defects, or other reproductive harm.
Troubleshooting Guide
Technical Service
Please call 1-800-858-8501 (English speaking only) for assistance before returning
product to store.
If you experience a problem, follow this guide. You may also want to visit our
Web site at: www.hzsupport.com. If the problem persists, call* for assistance
at 1-800-858-8501 (English speaking only), 7:30 AM to 4:30 PM CST (M-F).
You may also write* to:
HeathCo LLC
P.O. Box 90004, Bowling Green, KY 42102-9004
ATTN: Technical Service
* If contacting Technical Service, please have the following information available:
Model Number, Date of Purchase, and Place of Purchase.
No Service Parts Available for this Product

5598-1108-05
TWO YEAR LIMITED WARRANTY
This is a “Limited Warranty” which gives you specic legal rights. You may also
have other rights which vary from state to state or province to province.
For a period of two years from the date of purchase, any malfunction
caused by factory defective parts or workmanship will be corrected at no
charge to you.
Not Covered - Repair service, adjustment and calibration due to misuse,
abuse or negligence, light bulbs, batteries, and other expendable items are
not covered by this warranty. Unauthorized service or modication of the
product or of any furnished component will void this warranty in its entirety.
This warranty does not include reimbursement for inconvenience, installation,
setup time, loss of use, unauthorized service, or return shipping charges.
This warranty covers only HeathCo LLC assembled products and is not
extended to other equipment and components that a customer uses in
conjunction with our products.
THIS WARRANTY IS EXPRESSLY IN LIEU OF ALL OTHER WARRAN-
TIES, EXPRESS OR IMPLIED, INCLUDING ANY WARRANTY, REPRE-
SENTATION OR CONDITION OF MERCHANT ABILITY OR THAT THE
PRODUCTS ARE FIT FOR ANY PARTICULAR PURPOSE OR USE, AND
SPECIFICALLY IN LIEU OF ALL SPECIAL, INDIRECT, INCIDENTAL, OR
CONSEQUENTIAL DAMAGES.
REPAIR OR REPLACEMENT SHALL BE THE SOLE REMEDY OF THE
CUSTOMER AND THERE SHALL BE NO LIABILITY ON THE PART
OF HEATHCO LLC FOR ANY SPECIAL, INDIRECT, INCIDENTAL, OR
CONSEQUENTIAL DAMAGES, INCLUDING BUT NOT LIMITED TO ANY
LOSS OF BUSINESS OR PROFITS, WHETHER OR NOT FORESEE-
ABLE. Some states or provinces do not allow the exclusion or limitation of
incidental or consequential damages, so the above limitation or exclusion
may not apply to you. Please keep your dated sales receipt, it is required
for all warranty requests.
HeathCo LLC reserves the right to discontinue products and to change speci-
cations at any time without incurring any obligation to incorporate new features
in products previously sold.
Specications
Range ...........................................................................Up to 100 feet (30.5 m)
Maximum Load ......................................................................13 amps resistive
960 Watts incandescent
960 Watts uorescent
1/3 H.P. motor
Rated Voltage ..........................................................................120 VAC, 60 Hz
Battery .....................................................................12-volt alkaline (A23 type)
/