Page is loading ...
Page is loading ...

AXIS 5500/AXIS 5550 Installation Guide Page 3
AXIS 5500/AXIS 5550 Installation Guide
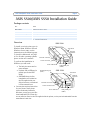
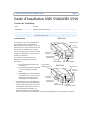
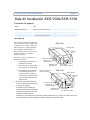
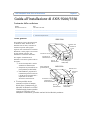
Package contents
Overview
To install your Axis print server in
Windows 2000, Windows XP and
Windows Server 2003, see the
instructions on the following page.
To install on Macintosh, see page
6. For all other operating systems,
please see the user's manual.
To perform the installation in
Windows you will need:
• The Axis print server and its
power adapter.
• A printer with a USB port (or
parallel port for the AXIS
5550).
• AXIS AddPrinter, the free
installation tool included on
the CD supplied with your
Axis print server, or download
it from www.axis.com
• You may also need a printer driver
for your printer. Some printer
drivers are already included in
Windows, or may be on your Win-
dows installation CD. Printer driv-
ers can often be found on the CD supplied with the printer, or they can be downloaded from the
manufacturer's web site.
Item Notes
Network Print Server AXIS 5500 or AXIS 5550.
Power adapter Model PS-H. Country-specific.
USB cable 0.7 meter.
Adhesive holder and clip. Mounting kit.
CD Documentation and installation software.
Printed Materials • AXIS 5500/AXIS 5550 Installation Guide (this document)
•Axis Warranty Document
AXIS 5550
(LPT1)
Parallel printer port
(USB1)
USB printer port
Network connector
Power connector
Test button
Power indicator
Network
indicator
AXIS 5500
(USB1)
USB printer port
Network connector
Power connector
Test button
Power indicator
Network
indicator

Page 4 AXIS 5500/AXIS 5550 Installation Guide
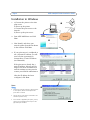
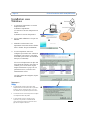
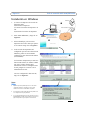
Installation in Windows
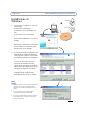
1. a) Connect the printer to the Axis
print server.
b) Power up the printer.
c) Connect the print server to the
network.
d) Power up the print server.
2. Start AXIS AddPrinter and click
Next.
3. Now identify and select your
network printer from the list shown
in the window. Click Next.
4. If your print server is configured to
use a dynamic IP address you will
now have the opportunity to
change this to a static IP address
(recommended).
If the print server already has a
static IP address, this step will be
skipped. For more information on
network settings you may need to
contact your network administrator.
After the IP address has been
configured, click Next.
Notes:
• Some printers may show in the list as "parallel printer"
or “serial printer”, but this will change when the
printer driver is installed.
• The print server’s serial number can be found on the
label on the product’s casing.
• If the function is supported by your printer, pressing
the print server’s Test button once will print a test
page showing the IP address.
❶
❷
❸
❹

AXIS 5500/AXIS 5550 Installation Guide Page 5
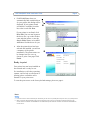
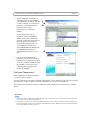
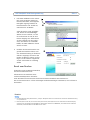
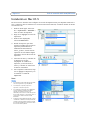
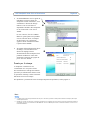
5. If AXIS AddPrinter does not
automatically find a suitable driver
for your printer, this dialog will be
displayed. If your printer brand
and model is available from this
list, select it and click Next.
If your printer is not listed, click
Have Disk. You can now browse to
the driver file, e.g. on the CD that
came with the printer, or use the
Search Folder feature to let AXIS
AddPrinter find the driver for you.
6. After the printer driver has been
selected and installed, you will see
a summary of the printer
installation. The printer name can
be changed and you can e.g.
choose to print a test page. Click
Finish.
Ready to print
Your printer has now been installed on
the network and is ready for use.
For installation on all other operating
systems, and for help on all aspects of
printing, please consult the user’s
manual for your print server.
To reset the print server to the factory default settings, please see page 7.
❺
❻
Notes:
• Printer driver files are often named setup.inf. Alternatively, the file name may include part of the printer name, e.g. mynewprinter.inf
• When inserting the CD provided with your printer into the CD drive, this may start an automatic installation process that will
interfere with the installation via AXIS AddPrinter. Click Cancel to stop the automatic installation and instead let AXIS AddPrinter
find the .inf file.

Page 6 AXIS 5500/AXIS 5550 Installation Guide
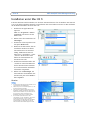
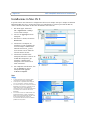
Installation in Mac OS X
This section describes how to set up your Axis print server for printing in Mac OS X 10.2 and
later. For installation on an older Mac OS, refer to the user’s manual on www.axis.com
1. From the Apple menu, select
Go > Applications > Utilities
and start the Print Center.
2. Click Add in the Printer List.
3. From the drop-down list, select
Rendezvous.
4. Highlight the printer you wish
to install. The default print
server name is AXISxxxxxx
Network Print Server_<port>,
where xxxxxx represents the
last six digits of the print
server’s serial number.
5. Select the printer brand and
model from the drop-down list.
If the printer’s PPD is already
installed, the brand and model
are selected automatically.
6. To complete the installation,
click Add. The printer is now
added to the Printer List.
Notes:
• The print server’s serial number can be found on
the label on the product casing.
• To configure printer settings, click Printers >
Configure Printer.
• If the print server using Rendezvous is already
installed and the print server name or service
name is changed, the print server must be
removed from the Printer List and then
re-installed with the new Rendezvous service
name.
• If you change the service name from Setup >
TCP/IP > Rendezvous > Service Name, this name
will then override the Print Server Name setting
as set in the admin tools in the product’s web
interface.

AXIS 5500/AXIS 5550 Installation Guide Page 7
Resetting to the Factory Default Settings
This will reset all the product parameters (including the IP address) to the factory default
settings:
1. Disconnect the power adapter cable.
2. Press and hold the Test button and reconnect power, keeping the button pressed the whole
time.
3. Keep the button pressed until the Network indicator remains constantly lit. This should
take about 20 seconds. Then release the button.
4. Restart the print server again, by disconnecting and reconnecting the power adapter.
Page is loading ...
Page is loading ...
Page is loading ...
Page is loading ...
Page is loading ...
Page is loading ...
Page is loading ...
Page is loading ...
Page is loading ...
Page is loading ...
Page is loading ...
Page is loading ...
Page is loading ...
Page is loading ...
Page is loading ...
Page is loading ...
Page is loading ...
Page is loading ...
Page is loading ...
Page is loading ...
Page is loading ...
Page is loading ...
Page is loading ...
Page is loading ...
Page is loading ...
Page is loading ...

Install Guide AXIS 5500/5550 v1.0 November 2004
Copyright © Axis Communications AB, 2004 Part No. 22908
-
 1
1
-
 2
2
-
 3
3
-
 4
4
-
 5
5
-
 6
6
-
 7
7
-
 8
8
-
 9
9
-
 10
10
-
 11
11
-
 12
12
-
 13
13
-
 14
14
-
 15
15
-
 16
16
-
 17
17
-
 18
18
-
 19
19
-
 20
20
-
 21
21
-
 22
22
-
 23
23
-
 24
24
-
 25
25
-
 26
26
-
 27
27
-
 28
28
-
 29
29
-
 30
30
-
 31
31
-
 32
32
-
 33
33
-
 34
34


Axis Communications AXIS 5550 User manual
- Category
- Print & Scan
- Type
- User manual
Ask a question and I''ll find the answer in the document
Finding information in a document is now easier with AI
in other languages
Related papers
Other documents
-
HP Color LaserJet CP4005 Printer series User guide
-
HP Color LaserJet 4730 Multifunction Printer series User guide
-
HP LASERJET 2300 Owner's manual
-
Axis 5550 User guide
-
HP Color LaserJet 3700 Printer series Installation guide
-
-
-
-
Trendnet TE100-P21 Quick Installation Guide
-