Lexmark Interpret S405 User manual

Category
Multifunctionals
Type
User manual

This manual is also suitable for

Lexmark Interpret S400 Series Quick
Reference Guide
April 2009 www.lexmark.com
Important Message About Cartridge Recycling!
Please Read Before Opening Your Inkjet Cartridge Box
At Lexmark, we take our commitment to the environment seriously, and we encourage our customers to participate in our easy, no-cost method
for returning empty Lexmark cartridges to Lexmark for proper recycling. We will insure that cartridges are properly handled with zero waste to
landfills.
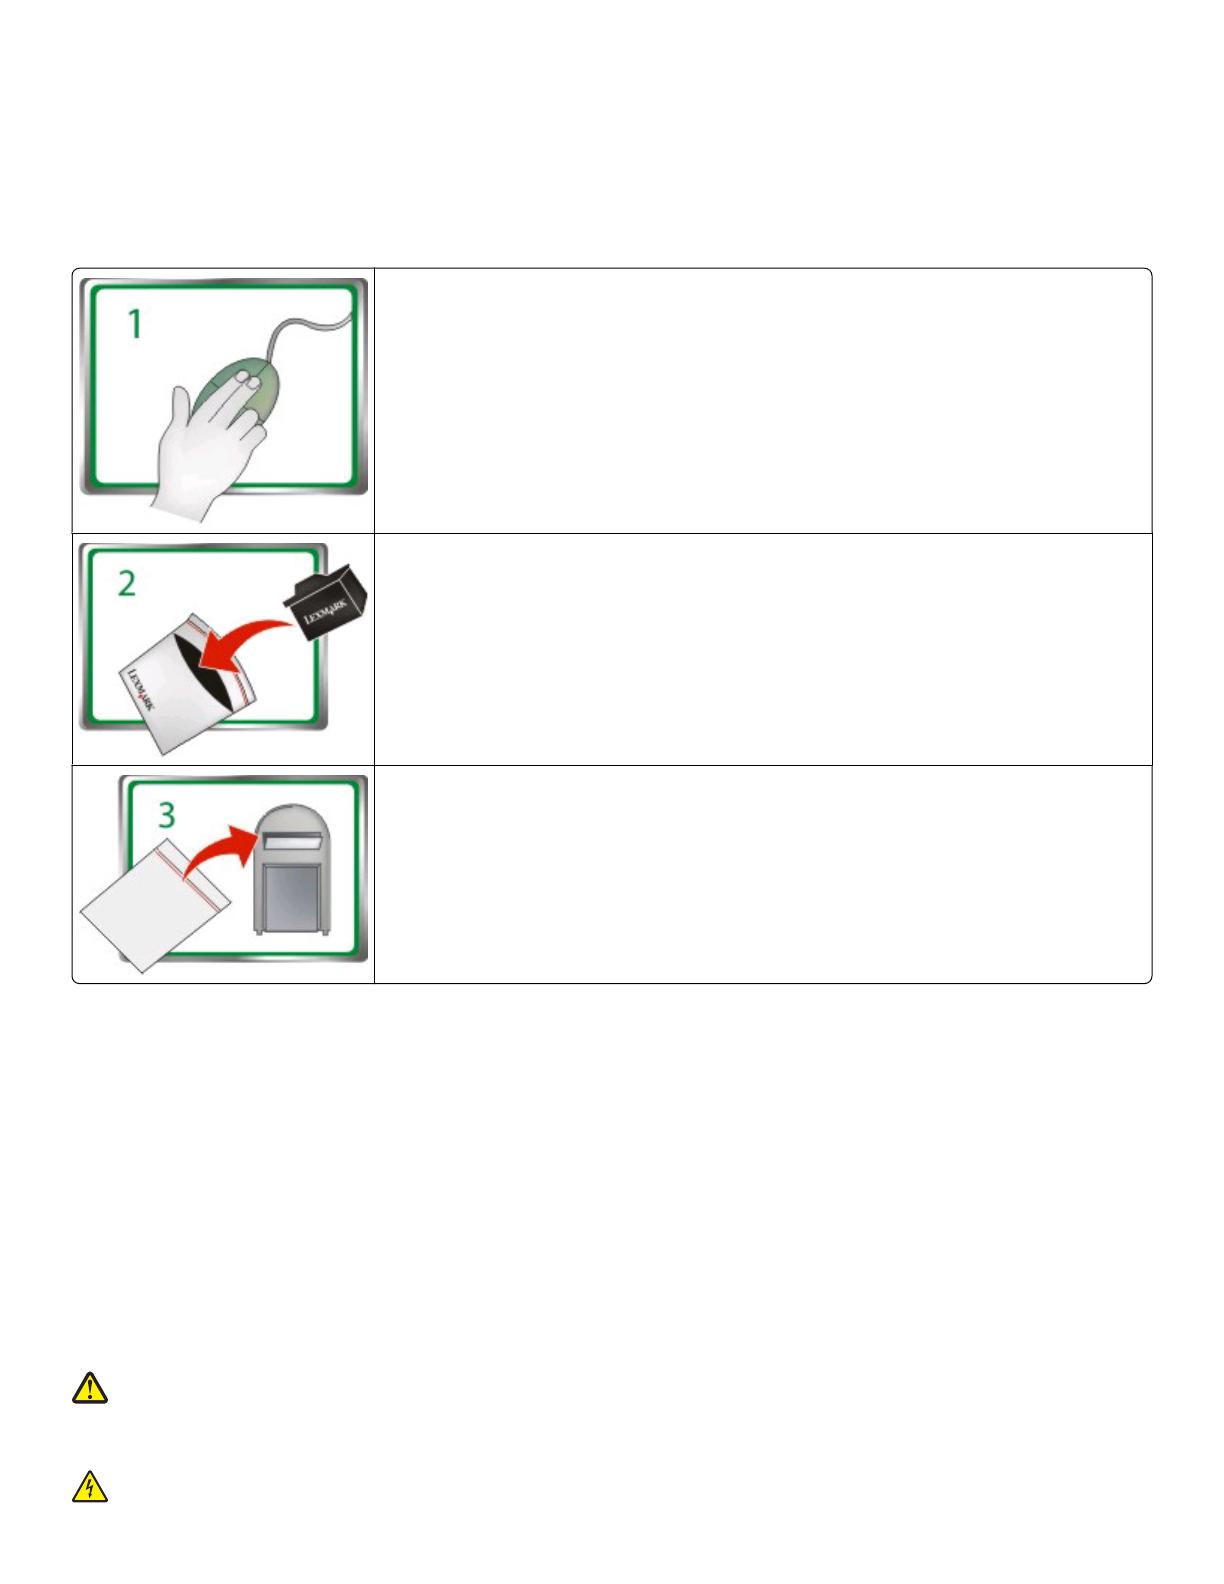
Go to www.lexmark.com/recycle. Follow instructions to request postage-paid bags. Bags usually arrive
within 7–10 days.
Place the empty Lexmark-branded inkjet cartridge(s) in the postage-paid return bag, and then seal the bag.
If you’re sending single-color tanks, we recommend that you send at least two at a time to maximize the
environmental benefits.
Mail the bag to Lexmark’s recycling partner. The bag is pre-addressed.
Visit www.lexmark.com/recycle to learn more about recycling.
Lexmark-branded cartridges are always made with all new parts, though components may contain recycled material. For warranty returns, call
1-800-332-4120.
This patented printer is licensed for, and designed to work with, only genuine Lexmark inkjet cartridges for the life of the patented printer. You
agree to: (1) use only genuine Lexmark inkjet cartridges with this printer except as otherwise provided below, and (2) pass this license/agreement
to any subsequent user of this printer. The patented Lexmark inkjet cartridges and their contents are licensed subject to a restriction that they may
be used only once. After this single use, the license to use the print cartridges and their contents terminates, and you agree to return them only to
Lexmark for recycling. Replacement inkjet cartridge(s) sold without these terms are available through www.lexmark.com and may be refilled by
you, or a third party, as the only cartridge alternative to be used with the licensed printer.
Important safety information
Connect the power cord to a properly grounded electrical outlet that is near the product and easily accessible.
Do not place or use this product near water or wet locations.
Use only the power supply and power cord provided with this product or the manufacturer's authorized replacements.
Use only the telecommunications (RJ-11) cord provided with this product or a 26 AWG or larger replacement when connecting this product to the
public switched telephone network.
CAUTION—POTENTIAL INJURY: Do not cut, twist, bind, crush, or place heavy objects on the power cord. Do not subject the power cord to
abrasion or stress. Do not pinch the power cord between objects such as furniture and walls. If any of these things happen, a risk of fire or
electrical shock results. Inspect the power cord regularly for signs of such problems. Remove the power cord from the electrical outlet before
inspecting it.
CAUTION—SHOCK HAZARD: Do not use the fax feature during a lightning storm. Do not set up this product or make any electrical or cabling
connections, such as the fax feature, power cord, or telephone, during a lightning storm.
Contents
Important safety information.........................................................2
About your printer.............................................................................5
Finding information about the printer...........................................................................................................................5
Minimizing your printer's environmental impact......................................................................................................5
Printer models.........................................................................................................................................................................6
Printer features.......................................................................................................................................................................7
Understanding the parts of the printer..........................................................................................................................7
Using the printer control panel........................................................................................................................................9
Using memory cards and flash drives..........................................................................................................................12
Installing the printhead without the CD.....................................................................................................................14
Ordering and replacing ink cartridges.........................................16
Ordering ink cartridges.....................................................................................................................................................16
Replacing ink cartridges....................................................................................................................................................17
Maintaining ink cartridges...............................................................................................................................................18
Using the printer software.............................................................20
Minimum system requirements.....................................................................................................................................20
Installing the printer software........................................................................................................................................20
Using the Windows printer software............................................................................................................................21
Using the Macintosh printer software.........................................................................................................................23
Printing...............................................................................................24
Printing a document..........................................................................................................................................................24
Printing photos using the printer control panel......................................................................................................24
Printing documents from a memory card or flash drive.......................................................................................25
Canceling print jobs............................................................................................................................................................26
Copying...............................................................................................27
Tips for copying....................................................................................................................................................................27
Making copies.......................................................................................................................................................................27
Copying photos....................................................................................................................................................................27
Canceling copy jobs...........................................................................................................................................................28
Contents
3
Scanning.............................................................................................29
Tips for scanning..................................................................................................................................................................29
Scanning to a local or network computer..................................................................................................................29
Scanning to a flash drive or memory card..................................................................................................................30
Scanning directly to e-mail using the printer software.........................................................................................30
Scanning to a PDF...............................................................................................................................................................31
Canceling scan jobs............................................................................................................................................................31
Troubleshooting...............................................................................32
Notices................................................................................................39
Edition notice........................................................................................................................................................................39
Contents
4
About your printer
Finding information about the printer
The Quick Reference Guide contains basic instructions on how to accomplish common printer tasks like printing,
copying, and scanning. It also includes information on troubleshooting common printer setup problems.
For additional information about the printer, see the following:
What are you looking for? Find it here
Initial setup instructions
Quick Setup Sheet
Hardware Setup Wizard
1
“Installing the printhead without the CD” on page 14 of this
Quick Reference Guide
2
Additional setup and instructions for using the
printer
Comprehensive User's Guide installed automatically with the printer
software.
1
After installing your printer, you can access the User's Guide from
the printer program folder:
For Windows users
1 Click or Start.
2 Click All Programs or Programs, and then select the printer
program folder from the list.
3 Select View User's Guide.
For Macintosh users
1 From the Finder desktop, double-click the printer folder.
2 Double-click User's Guide.
Help using the printer software
Software Help installed automatically with the printer software.
1
Click Help from any printer software program or application.
The latest supplemental information, updates,
online technical support, and telephone support
Support Web site—support.lexmark.com
1
Available on the installation software CD and on the Lexmark Web site at www.lexmark.com/publications/.
2
Refer to this section if you are installing the printhead without the installation software CD.
Minimizing your printer's environmental impact
We are committed to protecting the environment and are continually improving our printers to reduce their
environmental impact. By selecting certain printer settings or tasks, you may be able to reduce your printer's
environmental impact even further.
About your printer
5
Conserving energy
Eco-Mode. This feature sets the screen brightness to low and sets the printer to change to Power Saver mode
after the printer is left idle for 10 minutes. Eco-Mode is enabled by default in your printer.
Select the lowest Power Saver timeout. The Power Saver feature puts the printer in a minimum-power standby
mode after the printer has been idle for a set amount of time (the Power Saver timeout).
Share your printer. Wireless/network printers allow you to share a single printer among multiple computers,
thus conserving energy and other resources.
Conserving paper
Print more than one page image on one side of the paper. The “Pages per sheet” feature allows you to print
multiple pages on one sheet. You can print up to 8 page images on one side of a sheet of paper.
Print on both sides of the paper. Duplexing lets you print on both sides of the paper manually or automatically
(depending on your printer model).
Preview print jobs before printing. Use the preview features found in Toolbars, the Print or Print Preview dialog,
or the printer display (depending on your printer model).
Scan and save. To avoid printing multiple copies, you can scan documents or photographs and save them to a
computer program, application, or flash drive for presentation.
Use recycled paper.
Conserving ink
Use Quick Print or Draft Mode. These modes can be used to print documents using less ink than normal and
are ideal for printing documents that are mostly text.
Use High Yield cartridges. Inks in High-Yield cartridges allow you to print more pages with fewer cartridges.
Clean the printhead. Before replacing and recycling your ink cartridges, try using the “Clean Printhead” and
“Deep Clean Printhead” features. These features clean the printhead nozzles to improve the quality of your prints.
Recycling
Return ink cartridges for reuse or recycling through the Lexmark Cartridge Collection Program. To return
an ink cartridge, go to www.lexmark.com/recycle. Follow the instructions to request a postage-paid bag.
Recycle the product packaging.
Recycle your old printer instead of throwing it away.
Recycle paper from discarded print jobs.
Use recycled paper.
To read the Lexmark Environmental Sustainability Report, see www.lexmark.com/environment.
Printer models
The installation software CD that came with your printer works for the following printer models:
Lexmark S405
Lexmark S408
About your printer
6
Printer features
Your printer comes with full features that will help you manage and accomplish printing and imaging tasks:
Wireless. Print and scan from virtually anywhere in your home or office over a secure wireless network, as well
as share the printer among multiple computers.
Print. Print high quality documents and PDFs faster from a computer, from a USB flash drive, or from a Bluetooth
device.
Copy. Copy documents and photos with one-touch, computer-free black or color copying.
Scan. Scan thick books, reports, and other multiple-page documents easily with the high resolution flatbed
scanner and the Automatic Document Feeder.
Fax. Do multiple-page, standalone black and color faxing at 33.6 Kbps modem speed. Other fax features include
99 speed dials, automatic redial, junk fax blocking, and caller ID.
Photo printing. Print photos directly from digital memory cards, PictBridge-enabled digital cameras, and USB
flash drives. Select photos to print using the proof sheet for computer-free printing.
Eco-Mode. Save energy by using Eco-Mode. It automatically dims the printer display light and puts the printer
into Power Saver mode after 10 minutes of inactivity.
Understanding the parts of the printer
Use the To
1 Paper support Load paper.
2
Paper guide adjustment lever Adjust the paper guides.
3 Wi-Fi indicator Check wireless status.
4
Memory card slots Insert a memory card.
5
PictBridge and USB port Connect a PictBridge-enabled digital camera, USB Bluetooth
adapter or a flash drive to the printer.
About your printer
7
Use the To
6
Card reader light Check card reader status. The light blinks to indicate that a
memory card is being accessed.
7
Paper exit tray Hold paper as it exits.
8
Printer control panel Operate the printer.
9 Automatic Document Feeder (ADF) paper guide Keep paper straight when feeding it into the ADF.
Note: Adjust the paper guide on the ADF tray to the width of
the original document.
10 ADF output tray Hold documents as they exit from the ADF.
11
ADF tray Load original documents in the ADF. Recommended for
scanning, copying, or faxing multiple-page documents.
Note: Do not load postcards, photos, small items, or thin media
(such as magazine clippings) into the ADF. Place these items on
the scanner glass.
12
ADF Scan, copy, or fax multiple-page letter-, legal-, and A4-size
documents.
13
Paper feed guard Prevent items from falling into the paper slot.
14
Paper guides Keep paper straight when feeding.
Use the To
1
Top cover Access the scanner glass.
2
Scanner glass Scan and copy photos and documents.
3
Power supply with port Connect the printer to a power source.
About your printer
8
Use the To
4
EXT Port Connect additional devices (telephone or answering machine) to the printer and the
telephone line. Use this port if you do not have a dedicated fax line for the printer, and
if this connection method is supported in your country or region.
Note: Remove the plug to access the port.
5
LINE Port Connect the printer to an active telephone line (through a standard wall jack, DSL filter,
or VoIP adapter) to send and receive faxes.
6
USB port Connect the printer to a computer using a USB cable.
Warning—Potential Damage: Do not touch the USB port except when plugging in or
removing a USB cable or installation cable.
7 Printhead access Install the printhead.
Note: The carrier moves to the printhead access area when no printhead is installed on
the printer. For more information, see “Installing the printhead without the CD” on
page 14.
8
Ink cartridge access Install, replace, or remove ink cartridges.
9
Scanner unit
Access the ink cartridges and printhead.
Remove paper jams.
Using the printer control panel
The following diagrams explain the sections of the printer control panel:
About your printer
9
Use the: To
1
Power button
Turn the printer on and off.
Switch to Power Saver mode.
Note: When the printer is on, press
to switch to Power
Saver mode. Press and hold
for three seconds to turn
off the printer.
2 Copy button Access the copy menu and make copies.
3 Scan button Access the scan menu and scan documents.
4
Fax button Access the fax menu and send faxes.
5 Photo button Access the photo menu and print photos.
6
Display
Note: The display is turned off in Power Saver mode.
View:
Printer status
Messages
Menus
7
Arrow buttons Choose a menu or submenu item that appears on the
display.
8 Select button
Select menu options.
Save settings.
Feed or eject paper. Press and hold for 3 seconds to feed
or eject paper from the printer.
About your printer
10
Use the: To
9
Back button
Return to the previous screen.
Exit from one menu level to a higher one.
10 Setup button Access the setup menu and change printer settings.
Note: The Copy, Scan, Fax, and Photo button lights are off
when this button is selected.
Use the: To
1 Address Book
Access fax numbers from a saved list of numbers.
2 Redial/Pause
In Fax mode:
Insert a three-second pause in a fax number to wait for an outside line or get through an
automated answering system. Enter a pause only when you have already begun entering the
number.
Display the last number dialed. Press the left or right arrow button to view the last five numbers
dialed.
3 Dialtone Dial the telephone number manually using the keypad before sending the fax.
4 Color/Black
Switch to color mode or black-and-white mode.
5
Start button Start a print, scan, fax, or copy job, depending on which mode is selected.
6 Cancel button
Cancel a print, copy, scan, or fax job in progress.
Exit from a menu level of the Copy, Scan, Fax, Photo, or File Print menu to the top level of a
menu.
Exit from a menu level of the Setup menu to the top level of the previous mode.
Clear current settings or error messages, and return to default settings.
About your printer
11
Use the: To
7 Keypad
In Copy mode or Photo mode: enter the number of copies or prints you want to make.
In Fax mode:
Enter fax numbers.
Navigate an automated answering system.
Select letters when creating a Speed Dial list.
Type numbers to enter or edit the date and time shown on the display.
Using memory cards and flash drives
Using a memory card or flash drive with the printer
Memory cards and flash drives are storage devices frequently used with cameras and computers. You can remove
the memory card from the camera or the flash drive from the computer and insert it directly into the printer.
1 Insert a memory card into the card slot or a flash drive into the USB port.
Inserting a memory card Inserting a flash drive
Notes:
Insert the card with the brand name label facing right.
Make sure any arrows on the card point toward the
printer.
If necessary, connect the memory card to the adapter
that came with it.
Make sure that the memory card inserted is supported
by the printer. For more information, see “Supported
memory cards and file types” on page 13.
Notes:
The flash drive uses the same port that is used for a
PictBridge camera cable.
An adapter may be necessary if your flash drive does
not fit directly into the port.
About your printer
12
Warning—Potential Damage: Do not touch any cables, any network adapter,
any connector, the memory device, or the printer in the areas shown while actively
printing, reading, or writing from the memory device. A loss of data can occur.
2 Look for Memory Card Detected or Storage Device Detected on the display.
Notes:
If the printer does not recognize the memory device, then remove and reinsert it.
If a flash drive or a digital camera set to mass storage mode is inserted into the USB port while a memory card is
in the card slot, then a message appears on the display prompting you to choose which memory device to use.
Supported memory cards and file types
Memory Card File Type
Secure Digital (SD)
Micro Secure Digital (with adapter) (Micro SD)
Mini Secure Digital (with adapter) (Mini SD)
MultiMedia Card (MMC)
Reduced Size MultiMedia Card (with adapter) (RS-MMC)
MultiMedia Card mobile (with adapter) (MMCmobile)
Memory Stick
Memory Stick PRO
Memory Stick Duo (with adapter)
Memory Stick PRO Duo (with adapter)
xD-Picture Card
xD-Picture Card (Type H)
xD-Picture Card (Type M)
Secure Digital High Capacity (SDHC)
Documents:
.doc (Microsoft Word)
.xls (Microsoft Excel)
.ppt (Microsoft PowerPoint)
.pdf (Adobe Portable Document Format)
.rtf (Rich Text Format)
.docx (Microsoft Word Open Document Format)
.xlsx (Microsoft Excel Open Document Format)
.pptx (Microsoft PowerPoint Open Document Format)
.wpd (WordPerfect)
Images:
JPEG
TIFF
About your printer
13
Installing the printhead without the CD
1 Open the printer, and then remove the packaged printhead from the printer.
2 Raise the printer control panel, and then remove the ink cartridges from the paper exit tray.
3 Connect the power cord, and then turn on the printer.
Warning—Potential Damage: Read the safety information included with this product before connecting power
or making any cabling connections.
About your printer
14
4 Open the printer, and then remove any tape from the latch.
5 Lift the latch.
6 Remove the printhead from the disposable container.
7 Insert the printhead, and then close the latch until it clicks.
8 Close the printer.
9 Install the ink cartridges. For more information, see “Replacing ink cartridges” on page 17.
About your printer
15
Ordering and replacing ink cartridges
Ordering ink cartridges
Page yields available at www.lexmark.com/pageyields. For best results, use only Lexmark ink cartridges.
Lexmark S400 Series models (except Lexmark S408)
Item
Return Program Cartridge
1
Regular cartridge
2
Black cartridge 100 100A
High yield black cartridge 100XL 100XLA
Yellow color cartridge 100 100A
High yield yellow color cartridge 100XL 100XLA
Cyan color cartridge 100 100A
High yield cyan color cartridge 100XL 100XLA
Magenta color cartridge 100 100A
High yield magenta color cartridge 100XL 100XLA
1
Licensed for a single use only. After use, return this cartridge to Lexmark for remanufacturing, refilling, or recycling.
2
Available only on the Lexmark Web site at www.lexmark.com.
Lexmark S408 models
Item
Return Program Cartridge
1
Regular cartridge
2
Black cartridge 108 108A
High yield black cartridge 108XL 108XLA
Yellow color cartridge 108 108A
High yield yellow color cartridge 108XL 108XLA
Cyan color cartridge 108 108A
High yield cyan color cartridge 108XL 108XLA
Magenta color cartridge 108 108A
High yield magenta color cartridge 108XL 108XLA
1
Licensed for a single use only. After use, return this cartridge to Lexmark for remanufacturing, refilling, or recycling.
2
Available only on the Lexmark Web site at www.lexmark.com.
Ordering and replacing ink cartridges
16
Replacing ink cartridges
Make sure you have a new ink cartridge or cartridges before you begin. You must install new cartridges immediately
after removing the old ones or the ink remaining in the printhead nozzles may dry out.
1 Turn on your printer.
2 Open the printer.
Note: The printhead moves to the cartridge installation position.
3 Press the release tab, and then remove the used ink cartridge or cartridges.
4 Install each ink cartridge. Use two hands to install the black cartridge.
Note: Install the new ink cartridges immediately after removing the protective cap to avoid exposing the ink to
air.
5 Close the printer.
Ordering and replacing ink cartridges
17
Maintaining ink cartridges
In addition to the following tasks that you can perform, your printer performs an automatic maintenance cycle every
week if it is plugged into an electrical outlet. It will briefly come out of Power Saver mode or will temporarily power
on if it is turned off.
Aligning the printhead
If the characters or lines on your printer image appear jagged or wavy, then you may need to align the printhead.
Using the printer control panel
1 Load plain paper.
2 From the printer control panel, press .
3 Press the arrow buttons to scroll to Maintenance, and then press .
4 Press the arrow buttons to scroll to Align Printer, and then press .
5 Press again.
An alignment page prints.
Note: Do not remove the alignment page until printing is finished.
Using the printer software
For Windows users
1
Load plain paper.
2 Click or Start.
3 Click All Programs or Programs, and then select the printer program folder from the list.
4 Select Printer Home.
5 Choose your printer from the printer drop-down list.
6 From the Maintenance tab, click Align cartridges.
7 Follow the instructions on the computer screen.
For Macintosh users
1
Load plain paper.
2 From the Finder desktop, double-click the printer program folder.
3 Select Printer Utility from the list.
4 From the Maintenance tab of the Printer Utility dialog, click Print Alignment Page.
5 Follow the instructions on the computer screen.
If you aligned the cartridges to improve print quality, then print your document again. If print quality has not
improved, then clean the printhead nozzles.
Ordering and replacing ink cartridges
18
Cleaning the printhead nozzles
Poor print quality is sometimes due to clogged printhead nozzles. Clean the printhead nozzles to improve the quality
of your prints.
Notes:
Cleaning the printhead nozzles uses ink, so clean them only when necessary.
Deep cleaning uses more ink, so try the Clean Printhead option first to save ink.
If the ink levels are too low, you must replace the ink cartridges before you can clean the printhead nozzles.
Using the printer control panel
1 From the printer control panel, press .
2 Press the arrow buttons to scroll to Maintenance, and then press .
3 Press the arrow buttons to scroll to Clean Printhead or Deep Clean Printhead, and then press .
4 Press to clean the printhead nozzles.
A cleaning page prints.
Using the printer software
For Windows users
1
Click or Start.
2 Click All Programs or Programs, and then select the printer program folder from the list.
3 Select Printer Home.
4 From the Maintenance tab, click Clean Cartridges.
For Macintosh users
1
From the Finder desktop, double-click the printer program folder.
2 Select Printer Utility from the list.
3 From the Maintenance tab, select Clean Print Nozzles.
A cleaning page prints.
Ordering and replacing ink cartridges
19
Using the printer software
Minimum system requirements
The printer software requires up to 500 MB of free disk space.
Supported operating systems
Microsoft Windows 7 (Web only)
Microsoft Windows Vista
Microsoft Windows XP
Microsoft Windows 2000 (SP4 or greater)
Macintosh PowerPC OS X v10.3.9 or later
Macintosh Intel OS X v10.4.4 or later
Linux Ubuntu 8.04 LTS and 8.10 (Web only)
Linux OpenSUSE 11.0 and 11.1 (Web only)
Linux Fedora 10 (Web only)
Installing the printer software
Note: If you installed the printer software on this computer before but need to reinstall the software, then uninstall
the current software first.
For Windows users
1 Close all open software programs.
2 Insert the installation software CD.
If the Welcome screen does not appear after a minute, then launch the CD manually:
a Click , or click Start and then click Run.
b In the Start Search or Run box, type D:\setup.exe, where D is the letter of your CD or DVD drive.
3 Follow the instructions on the Welcome screen.
For Macintosh users
1 Close all open software applications.
2 Insert the installation software CD.
If the installation dialog does not appear after a minute, then click the CD icon on the desktop.
3 Double-click Install.
4 Follow the instructions on the installation dialog.
Using the printer software
20
  • Page 1 1
  • Page 2 2
  • Page 3 3
  • Page 4 4
  • Page 5 5
  • Page 6 6
  • Page 7 7
  • Page 8 8
  • Page 9 9
  • Page 10 10
  • Page 11 11
  • Page 12 12
  • Page 13 13
  • Page 14 14
  • Page 15 15
  • Page 16 16
  • Page 17 17
  • Page 18 18
  • Page 19 19
  • Page 20 20
  • Page 21 21
  • Page 22 22
  • Page 23 23
  • Page 24 24
  • Page 25 25
  • Page 26 26
  • Page 27 27
  • Page 28 28
  • Page 29 29
  • Page 30 30
  • Page 31 31
  • Page 32 32
  • Page 33 33
  • Page 34 34
  • Page 35 35
  • Page 36 36
  • Page 37 37
  • Page 38 38
  • Page 39 39
  • Page 40 40

Lexmark Interpret S405 User manual

Category
Multifunctionals
Type
User manual
This manual is also suitable for

Ask a question and I''ll find the answer in the document

Finding information in a document is now easier with AI