HP TouchSmart 620-1000 3D Edition Desktop PC series User guide
- Category
- PC/workstation barebones
- Type
- User guide
This manual is also suitable for

Wall-Mounting your HP TouchSmart
User Guide

The only warranties for Hewlett-Packard
products and services are set forth in the
express statements accompanying such
products and services. Nothing herein
should be construed as constituting an
additional warranty. HP shall not be liable
for technical or editorial errors or omissions
contained herein.
HP assumes no responsibility for the use or
reliability of its software on equipment that is
not furnished by HP.
This document contains proprietary
information that is protected by copyright.
No part of this document may be
photocopied, reproduced, or translated to
another language without the prior written
consent of HP.
Hewlett-Packard Company
P.O. Box 4010
Cupertino, CA 95015–4010
USA
Copyright ©2010 Hewlett-Packard
Development Company, L.P.
This product incorporates copyright
protection technology that is protected by
U.S. patents and other intellectual property
rights. Use of this copyright protection must
be authorized by Macrovision, and is
intended for home and other limited viewing
uses only unless otherwise authorized by
Macrovision. Reverse engineering or
disassembly is prohibited.
Microsoft, the Windows logo, and Windows
are trademarks or registered trademarks of
the Microsoft group of companies in the
United States and/or other countries/
regions.
Wi-Fi CERTIFIED 802.11n WLAN (wireless
local area network) are draft specification
and not final. If the final specifications differ
from the draft specifications, it may affect
the ability of this device to communicate with
other 802.11n WLAN devices.
HP supports lawful use of technology and
does not endorse or encourage the use of
our products for purposes other than those
permitted by copyright law. The information
in this document is subject to change without
notice.

Table of contents
1 Preparing your HP TouchSmart PC for wall-mounting ....................................................... 1
What you need ....................................................................................................................... 1
Safety information .................................................................................................................... 1
Before removing the stand ......................................................................................................... 2
Removing the computer stand .................................................................................................... 2
Installing the VESA adapter plate ............................................................................................... 7
2 Reinstalling the stand on your HP TouchSmart PC ........................................................... 10
What you need ..................................................................................................................... 10
Safety information .................................................................................................................. 10
Removing the wall-mounting hardware ...................................................................................... 11
Replacing the computer stand .................................................................................................. 12
Wall-Mounting your HP TouchSmart iii

iv Wall-Mounting your HP TouchSmart

1 Preparing your HP TouchSmart PC
for wall-mounting
This document provides instructions for computer wall-mounting preparation. The VESA adapter plate is
attached to bottom of the stand on the HP TouchSmart PC. This adapter assembly attaches to a wall-
mounting device (sold separately).
Should you decide to switch your computer back from a wall-mounted unit to desktop unit, instructions
are also included for reinstalling the stand on the computer. It is very important that you follow all the
steps to reinstall the computer stand.
What you need
●
A Phillips screwdriver and a flathead screwdriver (magnetic-tipped recommended)
●
A stable flat surface covered with a soft, clean cloth (such as a clean, large towel) to protect the
computer when you place it face down.
●
Another person (it might require two people to lift and move the computer)
●
Antistatic wrist strap and a conductive foam pad to stand on while working on the computer
(recommended)
●
Wall-mounting device (sold separately) with the following specifications:
◦
VESA standard 100 mm x 100 mm (3.9 in x 3.9 in) hole pattern
or
◦
VESA standard 100 mm x 200 mm (3.9 in x 7.8 in) hole pattern
◦
Designed for flat-panel displays ranging in size from 508 mm to 582 mm (20 inches to 22.9
inches) diagonal, and weighing up to 22.7 kg (50 lb)
Safety information
This product has not been evaluated for connection to an “IT” power system (an AC distribution system
with no direct connection to the earth, according to IEC 60950).
WARNING! Please read “Additional Safety Information” in the Limited Warranty and Support
Guide before installing and connecting your system to the electrical power system.
WARNING! The computer is heavy. Take proper precautions when lifting or moving your computer.
WARNING! Always disconnect the HP TouchSmart PC from the power source before removing the
computer stand. Failure to do so before you perform any procedures can result in personal injury or
equipment damage.
WARNING! Avoid touching sharp edges inside the computer.
Wall-Mounting your HP TouchSmart
What you need
1

Before removing the stand
To avoid injury and equipment damage when opening the HP TouchSmart PC, always complete the
following steps in order:
1. Remove any media and external devices (such as any CD, DVD, memory cards, USB devices, or
external hard disk drives) from the HP TouchSmart PC.
CAUTION: Static electricity can damage the electronic components of the HP TouchSmart PC or
optional equipment. Ensure that you are discharged of static electricity by briefly touching a
grounded metal object.
2. Tap the Windows Start button and then tap Shut Down.
WARNING! To reduce the risk of personal injury from electrical shock or hot surfaces,
disconnect the power cord from the wall outlet, and allow the internal system components to cool
before touching them.
3. After the system has completely shut down, disconnect the power adapter from the back of the
HP TouchSmart PC.
4. Disconnect all other attached cables from the back and side of the HP TouchSmart PC.
Removing the computer stand
After completing the preceding steps, and before mounting the VESA adapter plate to the back of the
computer, remove the computer stand.
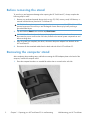
1. Place the computer facedown on a stable flat surface that is covered with a soft cloth.
2 Chapter 1 Preparing your HP TouchSmart PC for wall-mounting Wall-Mounting your HP TouchSmart

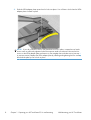
2. Insert your finger, or a flathead screwdriver, into the slot on the stand cover to pry it off of the
computer stand.
3. Remove the stand cover from the computer stand.
Wall-Mounting your HP TouchSmart
Removing the computer stand
3

4. Use a Phillips screwdriver to tighten the recessed two brake screws (for the rails) on the computer.
It should take about 5–10 turns of the screwdriver to secure the screws. Take care not to
overtighten the screws.
NOTE: The tightened brake screws will hold the VESA adapter plate in the locked position, so
that the computer does not slide down once it is mounted on a wall. These screws must be tighten
before placing the VESA adapter plate on the back of the computer.
5. While the stand is still on the computer, use a Phillips screwdriver to remove the four screws
attaching the VESA adapter plate to the bottom of the computer stand. Save the screws.
4 Chapter 1 Preparing your HP TouchSmart PC for wall-mounting Wall-Mounting your HP TouchSmart

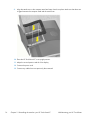
6. Remove the VESA adapter plate from the bottom of the computer stand.
7. Use a flathead screwdriver to remove the four screws attaching the computer stand to the back of
the computer.
Wall-Mounting your HP TouchSmart
Removing the computer stand
5

8. Lift the computer stand away from the computer.
9. Save the computer stand, stand cover, and four screws, so that you can convert your
HP TouchSmart PC back to a desktop unit in the future.
NOTE: If the computer stand is ever replaced on the computer, the VESA adapter plate must be
replaced on the bottom of the computer stand in order to properly support the computer. Follow all
the steps in Reinstalling the stand on your HP TouchSmart PC on page 10.
6 Chapter 1 Preparing your HP TouchSmart PC for wall-mounting Wall-Mounting your HP TouchSmart

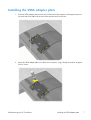
Installing the VESA adapter plate
1. Place the VESA adapter plate over the rails on the back of the computer, matching the cutouts on
the each side of the plate with the screw holes and the hooks on the rails.
2. Attach the VESA adapter plate to the back of the computer, using a Phillips screwdriver to tighten
the four screws.
Wall-Mounting your HP TouchSmart
Installing the VESA adapter plate
7

3. Slide the VESA adapter plate upward until it locks into place. You will hear a click when the VESA
adapter plate is locked in place.
NOTE: If you do not hear the click or the plate does not lock in place, it means the two brake
screws were not sufficiently tightened when the computer stand was removed. Unscrew the four
screws on the VESA adapter plate and remove it, then retighten the two brake screws (see step
4
in previous section). Replace the VESA adapter plate by installing and tightening the four screws,
then slide the plate up until it locks in place.
8 Chapter 1 Preparing your HP TouchSmart PC for wall-mounting Wall-Mounting your HP TouchSmart

4. Attach the wall-mounting hardware (purchased separately) to the VESA adapter plate, according
to the manufacturer's instructions, using either the 100 mm x 100 mm screw holes or the
100 mm x 200 mm screw holes.
5. Mount the computer on the wall.
CAUTION: The computer is heavy and may require two people to mount it to the wall.
NOTE: The computer can be mounted in either landscape or portrait orientation. If mounted in
portrait orientation make sure the CD/DVD drive is at the top. For landscape orientation, keep the
same orientation as when the computer is on the stand.
Wall-Mounting your HP TouchSmart
Installing the VESA adapter plate
9

2 Reinstalling the stand on your
HP TouchSmart PC
You may decide to convert your HP TouchSmart PC from a wall-mounted unit back to a desktop unit.
You will need to install the computer stand back on to your HP TouchSmart PC. The VESA adapter plate
must be replaced on the bottom of the computer stand, in order to properly support the computer.
What you need
●
A Phillips screwdriver and flathead screwdriver (magnetic-tipped recommended)
●
A stable flat surface covered with a soft, clean cloth (such as a large towel) to protect the
computer when you place it face down.
●
Another person (it might require two people to lift and move the computer)
●
Antistatic wrist strap and conductive foam pad to stand on while working on the computer
(recommended)
Safety information
This product has not been evaluated for connection to an “IT” power system (an AC distribution system
with no direct connection to the earth, according to IEC 60950).
WARNING! Please read “Additional Safety Information” in the Limited Warranty and Support
Guide before installing and connecting your system to the electrical power system.
WARNING! The computer is heavy. Take proper precautions when lifting or moving your computer.
WARNING! Always disconnect the HP TouchSmart PC from the power source before removing the
computer stand. Failure to do so before you perform any procedures can result in personal injury or
equipment damage.
WARNING! Avoid touching sharp edges inside the computer.
10 Chapter 2 Reinstalling the stand on your HP TouchSmart PC Wall-Mounting your HP TouchSmart

Removing the wall-mounting hardware
Prepare your HP TouchSmart PC for removal from the wall-mounting device.
1. Remove any media and external devices (such as any CD, DVD, memory cards, USB devices, or
external hard disk drives) from the HP TouchSmart PC.
CAUTION: Static electricity can damage the electronic components of the HP TouchSmart PC or
optional equipment. Ensure that you are discharged of static electricity by briefly touching a
grounded metal object.
2. Tap the Windows Start button and then tap Shut Down.
WARNING! To reduce the risk of personal injury from electrical shock or hot surfaces,
disconnect the power cord from the wall outlet, and allow the internal system components to cool
before touching them.
3. After the system has completely shut down, disconnect the power adapter from the back of the
HP TouchSmart PC.
4. Disconnect all other attached cables from the back and side of the HP TouchSmart PC.
5. Carefully remove the HP TouchSmart PC from the wall and place facedown on a stable flat surface
covered with a clean soft cloth.
CAUTION: The computer is heavy and may require two people to remove it from the wall.
6. Following the manufacturer's instructions, remove the wall-mounting hardware from the VESA
adapter plate on the HP TouchSmart PC.
Wall-Mounting your HP TouchSmart
Removing the wall-mounting hardware
11

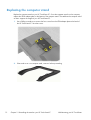
Replacing the computer stand
Replace the computer stand on your HP TouchSmart PC. Once the computer stand is on the computer,
replace the VESA adapter plate on the bottom of the computer stand. This stabilizes the computer stand
so that it supports the weight of your HP TouchSmart PC.
1. Use a Phillips screwdriver to remove the four screws from the VESA adapter plate at the back of
the HP TouchSmart PC. Save the screws.
2. If the stand cover is on computer stand, remove it before proceeding.
12 Chapter 2 Reinstalling the stand on your HP TouchSmart PC Wall-Mounting your HP TouchSmart

3. Tilt the base of the computer stand so that you can position it over the rails on the back of the
computer, and align the four screw holes.
4. Use a flathead screwdriver to replace the four screws attaching the computer stand to the
computer.
Wall-Mounting your HP TouchSmart
Replacing the computer stand
13

5. Use a Phillips screwdriver to loosen the brake screws, turning to the left 5–6 times.
NOTE: The brake screws are not removable and only need to be loosened to move the
computer stand.
6. Grasp the computer stand and move it slightly upward to release the lock. You will hear a click.
Then slowly move the computer stand down to the bottom of the computer.
14 Chapter 2 Reinstalling the stand on your HP TouchSmart PC Wall-Mounting your HP TouchSmart

7. Position the VESA adapter plate over the bottom of the computer stand, aligning the round cutout
with the raised circle, and align the four screw holes.
8. Use a Phillips screwdriver to tighten all four screws attaching the VESA adapter plate to the bottom
of the computer stand.
CAUTION: Do not skip steps 7 and 8 when replacing the computer stand. The VESA adapter
plate is required on the computer stand to support the weight of the computer.
Wall-Mounting your HP TouchSmart
Replacing the computer stand
15

9. Align the stand cover to the computer stand and snap it back into place. Make sure that there are
no gaps between the computer stand and the stand cover.
10. Place the HP TouchSmart PC in an upright position.
11. Adjust the vertical position and tilt of the display.
12. Connect the power cord.
13. Connect any cables that were previously disconnected.
16 Chapter 2 Reinstalling the stand on your HP TouchSmart PC Wall-Mounting your HP TouchSmart
-
 1
1
-
 2
2
-
 3
3
-
 4
4
-
 5
5
-
 6
6
-
 7
7
-
 8
8
-
 9
9
-
 10
10
-
 11
11
-
 12
12
-
 13
13
-
 14
14
-
 15
15
-
 16
16
-
 17
17
-
 18
18
-
 19
19
-
 20
20


HP TouchSmart 620-1000 3D Edition Desktop PC series User guide
- Category
- PC/workstation barebones
- Type
- User guide
- This manual is also suitable for
Ask a question and I''ll find the answer in the document
Finding information in a document is now easier with AI
Related papers
-
HP TouchSmart 520-1100 Desktop PC series User guide
-
HP Omni 220-1128l Desktop PC User guide
-
HP Omni 27-1170d Desktop PC User guide
-
HP NY539AA User manual
-
HP AY581AA User manual
-
HP TOUCHSMART 9100 User guide
-
-
-
HP TouchSmart 310-1100 Desktop PC series User manual
-