Page is loading ...

1
Made in China
FL1579 rev081122EFS ME1A
Save these instructions
CARE INSTRUCTIONS:
• Unplug lamp before cleaning.
• Wipe clean with a soft, dry cloth or static duster.
• Always avoid the use of harsh chemicals or abrasive cleaners as they may
causedamagetothexture’snish
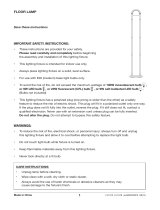
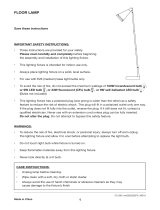
FLOOR LAMP
IMPORTANT SAFETY INSTRUCTIONS:
• These instructions are provided for your safety.
Please read carefully and completely before beginning
theassemblyandinstallationofthislightingxture.
• Thislightingxtureisintendedforindooruseonly.
• Alwaysplacelightingxtureonasolid,levelsurface.
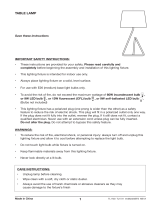
• For use with E26 (medium) base light bulbs only.
• Toavoidtheriskofre,donotexceedthemaximumwattageof100W incandescent bulb ,
or 9W LED bulb , or 23W uorescent (CFL) bulb , or 9W self-ballasted LED bulb .
(Bulbs not included)
• Thislightingxturehasapolarizedplug(oneprongiswiderthantheother)asasafety
featuretoreducetheriskofelectricshock.Thisplugwilltinapolarizedoutletonlyoneway.
Iftheplugdoesnottfullyintotheoutlet,reversetheplug.Ifitstilldoesnott,contacta
qualiedelectrician.Neverusewithanextensioncordunlessplugcanbefullyinserted.
Do not alter the plug. Do not attempt to bypass this safety feature.
WARNINGS:
• Toreducetheriskofre,electricalshock,orpersonalinjury:alwaysturnoandunplug
thislightingxtureandallowittocoolbeforeattemptingtoreplacethelightbulb.
• Donottouchlightbulbwhilextureisturnedon.
• Keepammablematerialsawayfromthislightingxture.
• Neverlookdirectlyatalitbulb.

2
Made in China
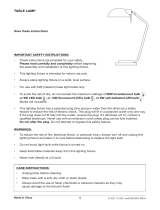
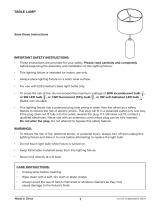
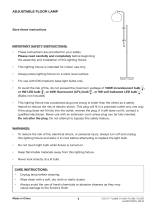
PARTS INCLUDED:
(A*) Finial
(B) Lampshade
(C) Harp Top
(D) Middle Posts
(E) Bottom Posts
(F) Base
(G) Attachment Screws
(H) Tool
(J) Cover
(K)On/OSwitch
PRE-ASSEMBLY:
Carefully remove all parts and hardware from carton, along with any protective plastic
packaging. The lampshade may be covered with a plastic lm that should be removed
before use.
Do not discard any contents until after assembly is complete to avoid accidentally
discarding small parts or hardware.
* Part A (Finial) may come pre-installed to
Part C (Harp Top). Unscrew Part A before installing
Part B (Lampshade), then reinstall Part A to secure.
DO NOT EXCEED THE
SPECIFIED WATTAGE.
For use with light bulbs with
a E26 (medium) base.
BEGIN ASSEMBLY AT THE TOP
AND WORK DOWN.
BE CAREFUL NOT TO STRIP
THREADS.
INSTALL LAMPSHADE LAST.
Carefully pull the power cord out from the
Base (F) to remove slack.
F
E
G
H
J
D
B
K
A*
C
MAKE SURE THE ASSEMBLY IS DONE ON A LEVEL AND SOFT SURFACE (SUCH AS BLANKETS)
TO PREVENT DAMAGING THE PARTS DURING ASSEMBLY.

Conservez ces instructions
INSTRUCTIONS D’ENTRETIEN :
• Déconnectezleluminaireavantdelenettoyer.
• Essuyez-leproprementàl’aided’unchiondouxetsecoud’unessuie-meublestatique.
• Éviteztoujoursd’utiliserdesproduitschimiquesfortsouagentsnettoyantsabrasifs,
carilspourrontendommagerlanitionduluminaire.
3
Fabriqué en Chine
LAMPADAIRE
CONSIGNES DE SÉCURITÉ ESSENTIELLES :
• Cesconsignessontfourniesauxnsdevotresécurité.
Veuillez les lire attentivement et au complet avant de commencer
l’assemblageetlamiseenplacedeceluminaire.
• Celuminaireestdestinéàutilisationàl’intérieurseulement.
• Poseztoujoursceluminairesurunesurfacesolideetdeniveau.
• Pour utilisation uniquement avec les ampoules avec base de E26 (moyenne).
• Pouréliminertoutrisqued’incendie,évitezdedépasserlapuissancemaximaleprescrited’une
ampoule à incandescence de 100 W , ou d’une ampoule DÉL de 9 W , ou d’une ampoule
uorescente (CFL) de 23 W , ou d’une ampoule DÉL à ballast intégré de 9 W .
(Ampoules non incluses)
• Celuminaireprésenteunechepolarisée(avecunebrochepluslargequel’autre)àtitrededispositif
desécuritévisantàamoindrirlerisquedechocélectrique.Cetteches’insèredansuneprisepolarisée
d’uneseulemanière.Silachenes’insèrepasaucompletdanslaprise,inversezlache.Siellenes’y
insèretoujourspasadéquatement,communiquezavecun(e)électricien(ne)qualié(e).N’utilisezjamais
decordonprolongateuravecceluminaireàmoinsquesachepuisses’insérercorrectement.
Évitez d’altérer la che.Évitezdecontournercettecaractéristiquedesécurité.
AVERTISSEMENTS :
• Pouramoindrirlerisqued’incendie,dechocélectriqueoudeblessurecorporelle,veuilleztoujours
mettre hors tension et déconnecter ce luminaire et le laisser se refroidir avant de tenter de remplacer
l’ampoule.
• Évitezdetoucherl’ampoulependantqueleluminaireestsoustension.
• Gardeztoutematièreinammableéloignéedeceluminaire.
• Éviteztoujoursderegarderdirectementuneampouleallumée.

4
Fabriqué en Chine
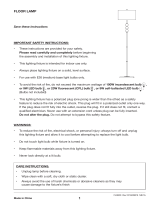
PIÈCES COMPRISES :
(A*) Faîteau
(B)Abat-jour
(C) Haut de la lyre
(D)Poteau-lampecentrales
(E) Poteau-lampeinférieures
(F) Base
(G)Visdexation
(H)Outilhexagonal
(J) Couverture
(K) Interrupteur marche / arrêt
Pour utilisation uniquement
avec les ampoules avec
base de E26 (moyenne)
ÉVITEZ DE DÉPASSER
LA PUISSANCE
MAXIMALE SPÉCIFIÉE
PRÉASSEMBLAGE :
Retirez soigneusement de la boîte toutes les pièces, toute la quincaillerie, et tout
emballage de plastique protecteur. L’abat-jour peut être recouvert d’un lm plastique qui doit
être retiré avant utilisation.
Ne mettez aucun élément de contenu au rebut avant de terminer l’assemblage au complet,
an d’éviter de jeter accidentellement de petites pièces ou un élément de quincaillerie.
COMMENCEZ LE MONTAGE EN HAUT
ET TRAVAILLEZ VERS LE BAS. PRENEZ
GRAND SOIN D’ÉVITER D’ARRACHER
LES FILETS. INSTALLEZ L’ABAT-JOUR
EN DERNIER.
Tirez soigneusement le cordon d’alimentation hors
du base (F) an de le détendre.
ASSUREZ-VOUS QUE L’ASSEMBLAGE EST EFFECTUÉ SUR UNE SURFACE PLANE ET DOUCE
(COMME DES COUVERTURES) POUR ÉVITER D’ENDOMMAGER LES PIÈCES L’ASSEMBLAGE.
* La pièce A (Faîteau) peut être préinstallée à
la pièce C (Haut de la lyre). Dévissez la pièce A
avant d’installer la pièce B (Abat-jour), puis
réinstallez la pièce A pour la xer.
F
E
G
H
J
D
B
K
A*
C

LÁMPARA DE PISO
Guarde estas instrucciones
INSTRUCCIONES DE CUIDADO:
• Desenchufe la lámpara antes de limpiarla.
• Limpie con un paño suave y seco o con un paño para estática.
• Evite siempre el uso de limpiadores químicos ásperos o abrasivos, ya que pueden dañar
el acabado del accesorio.
Hecho en China 5
INSTRUCCIONES IMPORTANTES DE SEGURIDAD:
• Estas instrucciones se proporcionan para su seguridad.
Léalas cuidadosamente y por completo antes de
comenzaraensamblareinstalarestalámpara.
• Estalámparaestádestinadaaserutilizadasoloeninteriores.
• Coloquesiemprelalámparasobreunabasermeynivelada.
• ParautilizarconbombillasconunabaseE26(mediano)solo.
• Paraevitarelriesgodeincendios,noexcedaelvatajemáximo de una bombilla de
100W incandescente
, LED de 9W , uorescente (CFL) de 23W , o LED balasto
incorporado de 9W . (Bombillas no incluidas)
• Estalámparatieneunenchufepolarizado(unapatillasesmásanchaquelaotra)como
característica de seguridad para reducir el riesgo de un electrochoque. Este enchufe solo
entraráenuntomacorrientepolarizadodeunasolamanera.Sinoentracompletamenteen
el tomacorriente, invierta el enchufe. Si aún así no entra, comuníquese con un electricista
calicado.Noutilicenuncauncableprolongador,amenosqueelenchufesepuedainsertar
porcompleto.Nomodiqueelenchufe.Nointenteeludirestacaracterísticadeseguridad.
ADVERTENCIAS:
• Parareducirelriesgodeincendio,electrochoqueolesionespersonales:siempreapaguey
desenchufeestalámparaydéjelaenfriarantesdeintentarreemplazarlabombilla.
• Notoquelabombillamientraslalámparaestáencendida.
• Mantengalosmaterialesinamableslejosdelalámpara.
• Nuncamiredirectamenteaunabombillaencendida.

6
Hecho en China
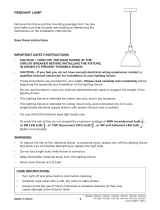
PARTES INCLUIDAS:
(A*) Terminación superior
(B) Pantalla
(C) Arpa superior
(D) Postes centrales
(E) Postes inferiores
(F) Base
(G)Tornillosdejación
(H) Herramienta
(J) Tapa
(K) Interruptor
encendido / apagado
Para utilizar con bombillas con una
base E26 (mediano) solo
NO EXCEDA EL VATAJE ESPECIFICADO
ANTES DEL ENSAMBLADO:
Retire con cuidado todas las piezas y herramientas de la caja, junto con todo el
envoltorio plástico protector. La pantalla de la lámpara puede estar cubierta con una película
de plástico que debe quitarse antes de su uso.
No deseche nada hasta después de haber terminado de ensamblar para evitar botar por
accidente piezas pequeñas o herramientas.
COMIENCE EL MONTAJE EN LA PARTE
SUPERIOR Y TRABAJE HACIA ABAJO.
TENGA MUCHO CUIDADO DE NO RASGAR
LOS HILOS. INSTALE LA PANTALLA
EN ÚLTIMO LUGAR.
Extraiga con cuidado el cable eléctrico de
la base (F) para eliminar la holgura
* La parte A (Terminación superior) puede venir preinstalada
a la parte C (Arpa superior). Desatornille la parte A antes de
instalar la parte B (Pantalla), luego vuelva a instalar la parte A
para asegurar.
ASEGÚRESE DE QUE EL MONTAJE SE REALICE EN UNA SUPERFICIE NIVELADA
Y SUAVE (COMO MANTAS) PARA EVITAR DAÑAR LAS PIEZAS DURANTE EL MONTAJE.
F
E
G
H
J
D
B
K
A*
C
/