Panasonic WX-SR202 User manual

Category
Microphones
Type
User manual

Panasonic WX-SR202: Unleash Seamless Wireless Microphone Communication for Your Events

The Panasonic WX-SR202 offers exceptional wireless microphone capabilities, making it an ideal choice for various applications. With its ability to support up to 8 wireless microphones simultaneously, this receiver provides ample flexibility for conferences, presentations, and other events that require multiple speakers or panelists.

Easy to pair and operate, the WX-SR202 ensures smooth and reliable audio transmission, allowing you to focus on delivering your message without technical glitches. Experience crystal-clear sound quality and the freedom of movement, as the wireless microphones eliminate the constraints of cables.

Operating Instructions
1.9 GHz Digital Wireless Microphone System
Operations Support Software (Conference mode)
2
Introduction
About this manual
Operations Support Software (hereinafter referred to as “this software”) is software for configuring various settings and acquiring
statuses of the following devices from a PC via a network connection.
Wireless receiver: WX-SR202P, WX-SR204P, WX-SR202DNP, WX-SR204DNP (hereinafter referred to as “receiver”)
Extension Receiver: WX-SE200P, WX-SE200DNP
Wireless antenna: WX-SA250P
Wireless microphone: WX-ST200P, WX-ST400P, WX-ST700P
Wireless Transmitter: WX-ST600P
This manual describes how to operate Operations Support Software for use of Conference mode in 1.9 GHz digital wireless
systems. For information other than Conference mode, such as installation and initial setup of Operations Support Software,
refer to the operating instructions of Operations Support Software. For information on the functions of the related equipment,
refer to the operating instructions supplied with the products.
The instructions in this manual are explained with the example of using Microsoft Windows 10 Pro. Screen display may differ
when using another operating system or depending on the settings of the operating system. When using another operating
system, refer to the instruction manual for the corresponding operating system.
The software version information and other screen images shown in this manual are display examples and may differ from the
actual screens.
Abbreviations
This manual uses the following abbreviations.
“Microsoft Windows” is referred to as “Windows”.
“Wireless Receiver (WX-SR202P/WX-SR204P/WX-SR202DNP/WX-SR204DNP)” is referred to as “receiver”.
“Extension Receiver (WX-SE200P/WX-SE200DNP)” is referred to as “extension receiver”.
“Wireless Antenna (WX-SA250P)” is referred to as “antenna”.
“Gooseneck Microphone (WM-KG645)” that is connected to “Wireless Transmitter (WX-ST600P)” are referred to as
“gooseneck microphone”.
“Wireless Microphone (WX-ST200P/WX-ST400P/WX-ST700P)” is referred to as “microphone”.
“Personal computer” is referred to as “PC”.
All information on separately-sold products contained in this manual is up-to-date as of Oct. 2022. Contact a retailer for the
latest information.
3
Introduction
System overview
The 1.9 GHz digital wireless microphone system series WX-SR200P conforms to the DECT standard*. The WX-SR200P series
is comprised of the devices described on page 4, and can receive audio from up to 8 wireless microphones per system.
* DECT (Digital Enhanced Cordless Telecommunications) is a digital cordless communication standard.


Charger (WX-SZ200P)
2 microphones per charger
Up to 8 wireless antenna (WX-SA250P)
Up to 8 audio output channels
Extension Receiver (WX-SE200P)
Wireless receiver
(WX-SR204P)
Up to 8 wireless microphones
WX-ST200P, WX-ST400P, WX-ST700P
gooseneck microphones
(WX-ST600P+WM-KG645)
Charger (WX-SZ600P)
4 microphones per charger
*Up to 2 WX-ST600P/700P
when placed horizontally
Introduction
4
Related devices
The related products of the1.9 GHz digital wireless microphone system series are as follows:
Wireless receiver
WX-SR202P
Wireless receiver
WX-SR204P
Extension Receiver
WX-SE200P
Wireless microphone
(handheld)
WX-ST200P
Wireless microphone
(tie pin type)
WX-ST400P
Wireless antenna
WX-SA250P
Wireless microphone
WX-ST700P
Wireless Transmitter
WX-ST600P
Charger
WX-SZ200P
Charger
WX-SZ600P
Gooseneck microphone
WM-KG645
5
Introduction
What is Conference mode?
This function enables flexible wireless microphone operation by assigning wireless microphones to multiple channels on
wireless receivers and extension wireless receivers.
Features of Conference mode
By turning on Conference mode, you can share 2 channels on a receiver with 8 microphones, for example (which channel a
microphone uses depends on the availability of the channel at that time).
Association of shared channels and microphones can be freely set in the matrix using the Operations Support Software. This
allows for flexible microphone operation in various situations, such as setting microphones dedicated to one channel or
grouping microphones for each channel.
Associations can be switched all at once based on the use case because association between shared channels and
microphones can be saved and loaded as a settings file with the Operations Support Software.
You can turn communication on and off remotely by using the Wireless Transmitter (WX-ST600P) and Wireless Microphone
(WX-ST700P). Also, if the microphones registered in the same channel consist only of Wireless Transmitters (WX-ST600P)
and Wireless Microphones (WX-ST700P), you can set the operation priority setting to interruptible to interrupt a channel that
is already in use with another microphone.
memo
Important
To use Conference mode, the following Conference mode-supported wireless receivers, extension wireless
receivers, wireless antennas, and Operations Support Software are required.
Wireless Receiver (2ch) (WX-SR202DNP)
Wireless Receiver (4ch) (WX-SR204P, WX-SR204DNP)
V6.00 or later
Extension Wireless Receiver (WX-SE200P, WX-SE200DNP) V6.00 or later
Wireless Antenna (WX-SA250P) V6.00 or later
Operations Support Software V4.0.0.0 or later
*To check the version, please refer to the manuals of the Operations Support Software and Settings Support
Software.
To use Conference mode with wireless receivers, extension wireless receivers, and wireless antennas earlier
than V6.00, update all the firmware to V6.00 or later. To update, please refer to the manual of the Operations
Support Software.
Do not downgrade a V6.00 device to a version earlier than V6.00. Operation is not guaranteed.
Introduction
6
Maximum number of registered microphones
When Conference mode is on, 7 or more wireless microphones can be paired with each channel of a receiver or extension
receiver. The maximum number of registrations is as follows.
Maximum number of registered microphones (receivers, extension receivers)
Model Conference mode off Conference mode on*
WX-SR202P, WX-SR202DNP 6 per channel 12 per channel
WX-SR204P, WX-SR204DNP 6 per channel 24 per channel
WX-SE200P, WX-SE200DNP 6 per channel 24 per channel
* WX-SR202P does not support Conference mode, so you cannot turn on Conference mode from the Operations Support
Software.
Maximum number of registered microphones (system)
System configuration Conference mode off Conference mode on
Receiver (2ch) 12 12
Receiver (2ch) + 1 extension receiver 36 36
Receiver (4ch) 24 24
Receiver (4ch) + 1 extension receiver 48 48
The behavior when trying to register more than the maximum number of registered microphones is as follows.
Conference mode off Conference mode on
Microphones are overwritten starting from the earliest
registered in the channel.
Cannot overwrite. Delete first with the Operations
Support Software before registering.
7
Introduction
Number of microphones that can be used simultaneously
Regardless of whether Conference mode is on or off, the number of microphones that can be used simultaneously is as follows.
Number of microphones that can be used simultaneously (receivers, extension receivers)
Model Conference mode off Conference mode on*
WX-SR202P, WX-SR202DNP 2 per receiver 2 per receiver
WX-SR204P, WX-SR204DNP 4 per receiver 4 per receiver
WX-SE200P, WX-SE200DNP 4 per receiver 4 per receiver
* WX-SR202P does not support Conference mode, so you cannot turn on Conference mode from the Operations Support
Software.
Number of microphones that can be used simultaneously (system)
System configuration Conference mode off Conference mode on
Receiver (2ch) 2 2
Receiver (2ch) + 1 extension receiver 6 6
Receiver (4ch) 4 4
Receiver (4ch) + 1 extension receiver 8 8
Introduction
8
Example of using Conference mode (when participant microphones are
not grouped)
6 microphones can
communicate on any channel
from 5 to 8 (up to 4 lines)
You can use as a dedicated
microphone by registering
only one microphone in one
channel.
Example of using Conference mode (when participant microphones are
grouped)
5 microphones can
communicate on any channel
from 6 to 8 (up to 3 lines in
Group B)
4 microphones can
communicate on any channel
from 3 to 5 (up to 3 lines in
Group A)
You can use as a dedicated
microphone by registering
only one microphone in one
channel.
9
Introduction
Capabilities when Conference mode is on
This section describes the list of functions that can be used with Conference mode. Functions that are only available from this
software are indicated by a black circle.
Item Description
Function only
available with
Operations
Support
Software
Description
page
Conference mode on/off Check and switch the on/off status of Conference mode. 13
Edit the extended channel
registration table
When Conference mode is on, set channels that allow
communication to microphones aside from registered
channels.
17
Save/load Conference mode settings By saving the set Conference mode data, you can load
the saved setting data for different use cases. 24
Operation priority setting
Set the operation priority of microphones that are paired
on the same channel.
* Enabled only when only WX-ST600P/WX-ST700P is
set as a registered or extended channel for the same
channel.
22
Microphone gain adjustment
Used when the level difference of the input audio
between microphones is large. You can configure
settings for each paired microphone. When a
microphone communicates on a channel of a receiver or
extension receiver, the volume can be adjusted in 5
levels (–6, –3, 0, +3, +6 dB) with respect to the volume
of the volume control knob of that channel. The volume
control knob cannot be adjusted above the upper limit or
below the lower limit.
28
Communication on/off control
Control communication on/off for paired microphones
from Operations Support Software.
*Supports only WX-ST600P/700P
22
Pairing confirmation When Conference mode is on, it operates for channels
actually communicating, not registered channels. 19
Pairing mode Puts a receiver or extension receiver in pairing mode. 14
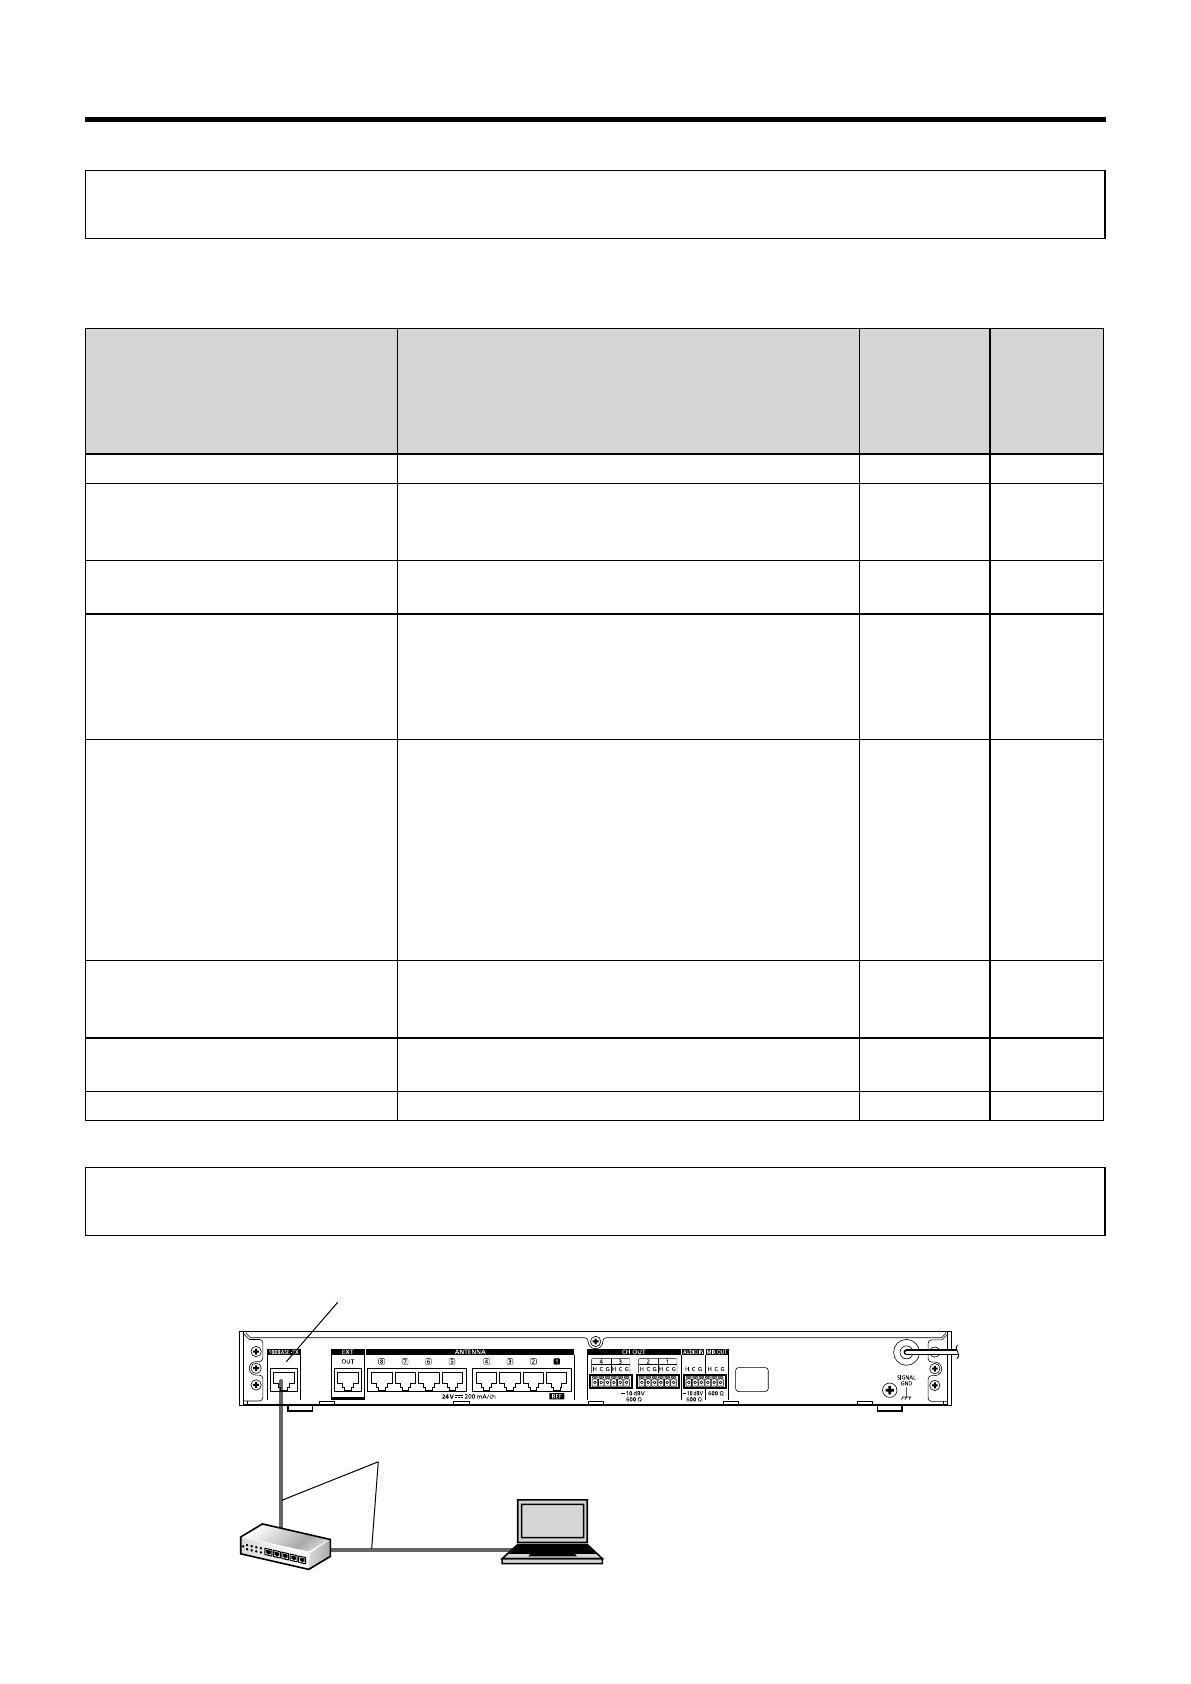
Connections
This software can be connected with a receiver.
PC with Operations Support
Software installed
LAN cable
(locally procured)
Network connector
Network switch
This illustration shows the WX-SR204P.
Introduction
10
Terms
Microphone sensitivity
Output sound sensitivity for sound captured by a microphone.
The microphone sensitivity can be set with the tie-pin type Wireless Microphone (WX-ST400P) and boundary type Wireless
Microphone (WX-ST700P).
Low cut setting
Setting to reduce low-frequency noise during microphone use.
The low-cut filter setting can be set on a handheld wireless microphone (WX-ST200P).
Push-to-talk (PTT) setting
Setting to switch between communication start/end modes.
This can be set on a Wireless Transmitter (WX-ST600P) and Wireless Microphone (WX-ST700P).
Communication standby
Refers to the state in which a Wireless Transmitter (WX-ST600P) and Wireless Microphone (WX-ST700P) are turned on and not
communicating.
Registered channel
Refers to a channel for which a microphone is paired (wireless or wired) to a receiver or extension receiver in Conference mode.
Extended channel
Refers to a channel that allows microphone communication other than registered channels in Conference mode. It can be edited
only from Operations Support Software.
Extended channel registration table
A table that indicates registered channels with ● and extended channels with ○, and sets extended channels for each
microphone.
Symbols
This manual uses the following symbols in explanations.
memo
Important
: Indicates a limitation or precaution regarding use of the corresponding function.
memo
Important
: Indicates a hint on use.
11
Table of contents
Introduction …………………………………………………………………………… 2
About this manual …………………………………………………………………………………………………… 2
Abbreviations ……………………………………………………………………………………………………… 2
System overview …………………………………………………………………………………………………… 3
Related devices …………………………………………………………………………………………………… 4
What is Conference mode? ……………………………………………………………………………………… 5
Capabilities when Conference mode is on ……………………………………………………………………… 9
Connections ………………………………………………………………………………………………………… 9
Terms ……………………………………………………………………………………………………………… 10
Symbols …………………………………………………………………………………………………………… 10
Flow for setting Conference mode ……………………………………………… 12
STEP 1: Turn on Conference mode …………………………………………………………………………… 13
STEP 2: Pair ……………………………………………………………………………………………………… 14
STEP 3: Edit the extended channel registration table ……………………………………………………… 17
STEP 4: Communicate ………………………………………………………………………………………… 18
Confirming the operation status ………………………………………………… 19
Confirming the operation status from a microphone ………………………………………………………… 19
Confirming the operation status from a receiver ……………………………………………………………… 20
Confirming the operation status from the Operations Support Software …………………………………… 21
Operation priority setting…………………………………………………………… 22
Setting the operation priority …………………………………………………………………………………… 22
Communication on/off control …………………………………………………… 23
Communication on/off control …………………………………………………………………………………… 23
Saving the Conference mode settings data …………………………………… 24
Exporting the settings data ……………………………………………………………………………………… 24
Importing the settings data ……………………………………………………………………………………… 25
Screen explanation ………………………………………………………………… 26
Troubleshooting ……………………………………………………………………… 29
12
Flow for setting Conference mode
STEP 1: Turn on Conference mode (page 13)
Configure settings to use Conference mode.
STEP 2: Pair (page 14)
Pair the microphone to be used in Conference mode.
STEP 3: Edit the extended channel registration table (page 17)
Set the extended channel settings for the microphone used in Conference mode.
STEP 4: Communicate (page 18)
Start communication.
13
Flow for setting Conference mode
STEP 1: Turn on Conference mode
To use Conference mode, first turn it on.
To switch Conference mode on/off, this software and the receiver must be connected to a network.
memo
Important
For network connections, please refer to “Network settings” in the manual of the Operations Support Software.
1 Log in to this software.
memo
Important
To log in, please refer to “Login screen” in the manual of the Operations Support Software.
2 The [List] screen appears. Click the [Set] button of the receiver for which you wish to
turn on Conference mode.
[Settings] button
3 Change Conference mode to [ON] in the mic settings on the [Settings] screen.
[Update] button
Turn Conference mode on/off
4 Click the [Update] button.
A restart confirmation message will be displayed when switching. Click [Yes] to restart the receiver.
When Conference mode is on, the [Microphone] tab on the setting screen switches to the screen for Conference mode.
Also, “Conference” is displayed for the target receiver on the status details display screen.
memo
Important
Switching Conference mode on/off restarts the receiver, which makes switching take up to about 1 minute.
Flow for setting Conference mode
14
STEP 2: Pair
A microphone and receiver must be paired with each other in order to establish a connection.
The receiver uses different microphone pairing information when Conference mode is on and off. Therefore, to use Conference
mode, you must pair separately for Conference mode.
Pairing can be performed from the receiver or the Conference mode setting screen of the Operations Support Software.
This manual describes the procedure using the Operations Support Software and wireless microphone (WX-ST700P) as an
example.
Pairing
1 In the mic settings on the [Settings] screen, click the channel number button you
wish to register from the [Channel number] buttons.
Channel number buttons
memo
Important
Instead of step 1, you can also enter pairing mode by pressing the registration button of the target channel of the
receiver for 2 seconds or longer. For details, please refer to the manual of the receiver.
2 The registration indicator for the corresponding channel on the receiver blinks
orange. The pairing mode lasts for 30 seconds.
[Register] indicator
Front of receiver (WX-SR204P)
3 When the power switch of the microphone to be paired is [ON] and the [Register]
button on the microphone is pressed for at least 2 seconds, the status indicator of
the microphone blinks orange and pairing starts.
If pairing completes successfully, the status indicator on the microphone lights green, and the [Register] indicator for the
paired channel on the receiver lights green for 1 second and then turns off.
15
Flow for setting Conference mode
Microphone
(WX-ST200P)
Microphone
(WX-ST400P)
[Power]
indicator
[Register]
button
[Power] indicator
SENS L/H
SET
REG
PTT OFF/ON
INPUT LEVEL METER OFF/ON
N/A
1
2
3
4
SENS L/H
SET
REG
PTT OFF/ON
INPUT LEVEL METER OFF/ON
N/A
1
2
3
4
SENS L/H
SET
REG
PTT OFF/ON
INPUT LEVEL METER OFF/ON
N/A
1
2
3
4
SENS L/H
SET
REG
PTT OFF/ON
INPUT LEVEL METER OFF/ON
N/A
1
2
3
4
Wireless transmitter
(WX-ST600P)
Status indicator Status indicator
[Register] button [Register] button
Wireless microphone
(WX-ST700P)
4 When pairing completes successfully, the information of the paired microphone is
displayed in the [mic settings] screen of this software.
memo
Important
Successfully registered microphones will be assigned to the lowest available microphone number (page 27).
Immediately after registration, the initial values are displayed as model name: ST600, sensitivity: low, and PTT:
OFF. The correct information is updated by starting communication.
Flow for setting Conference mode
16
5 Pairing is now complete.
To check the pairing status, refer to “Confirming the operation status (page 19)”.
memo
Important
If you change the antenna connection settings of the receiver after pairing microphones, pair all of the
microphones again.
memo
Important
For the maximum number of registered microphones and precautions when registering more than the maximum,
refer to page 6.
The correspondence relations between the microphone and channel paired here is displayed as “●” in the
extended channel registration table. The position of “●” cannot be changed with the Operations Support Software.
If you pair a paired microphone to another channel, the pairing information of the original channel will be deleted.
After pairing is complete, “Mic*” (where * is a number) is set automatically for the name. Change the name if
necessary and click the [Update] button.
17
Flow for setting Conference mode
STEP 3: Edit the extended channel registration table
With Conference mode, you can set extended channels that allow communication on channels other than paired channels.
Extended channel registration table
1 Click the intersection of the paired microphone and the channel you wish to allow
communication with that microphone.
2 “○”indicatingtheextendedchannelisdisplayed.
To cancel the extended channel, click “○” again.
3 Click the [Update] button.
In the extended channel registration table, you can select extended channels at once by dragging the table while clicking.
memo
Important
The table information is saved even if Conference mode is switched on/off.
If the receiver is WX-SR202DNP, channel numbers 3 and 4 will be disabled and grayed out.
Flow for setting Conference mode
18
STEP 4: Communicate
Start communication by turning on the microphone (WX-ST200P/400P) or pressing the talk button (WX-ST600P/700P).
When the power is [On], the audio collected by the microphone will be amplified.
Squares on the extended channel registration table are displayed in green for channels being used.
memo
Important
Of the registered and extended channels, the channel with the smallest channel number has use priority for
communication.
19
Confirming the operation status
The current status of each device can be confirmed from the microphones, receivers, and Operations Support Software.
Confirming the operation status from a microphone
You can confirm the paired channel by pressing the microphone registration button.
1 With the receiver and microphone paired, put the microphone into pairing
confirmation mode.
With the microphone [On], press the registration button once briefly to go into pairing confirmation mode. The power
indicator turns orange and green alternately for 5 seconds.
memo
Important
For details, please refer to the manual of the microphone.
Microphone
(WX-ST200P)
Microphone
(WX-ST400P)
[Power]
indicator
[Register]
button
[Power] indicator
SENS L/H
SET
REG
PTT OFF/ON
INPUT LEVEL METER OFF/ON
N/A
1
2
3
4
SENS L/H
SET
REG
PTT OFF/ON
INPUT LEVEL METER OFF/ON
N/A
1
2
3
4
SENS L/H
SET
REG
PTT OFF/ON
INPUT LEVEL METER OFF/ON
N/A
1
2
3
4
SENS L/H
SET
REG
PTT OFF/ON
INPUT LEVEL METER OFF/ON
N/A
1
2
3
4
Wireless transmitter
(WX-ST600P)
Status indicator Status indicator
[Register] button [Register] button
Wireless microphone
(WX-ST700P)
2 Check the [Register] indicator of the receiver.
While the microphone is in pairing confirmation mode, the [Register] indicator of the channel registered in the receiver turns
orange and green alternately, and registration can be confirmed.
The pairing confirmation mode lasts for 5 seconds and then returns to the normal state. If you press the registration button
again briefly during pairing confirmation mode, it will return to the normal state.
[Register] indicator
*The illustration uses WX-SR204P.
Confirming the operation status
20
Confirming the operation status from a receiver
You can confirm the communicating microphone by pressing the registration button for each channel of the receiver. The
following are differences between Conference mode off/on.
Conference mode off: You can confirm the microphones paired on the channel by pressing the registration button on the
receiver.
Conference mode on: You can confirm the microphones that are actually communicating from the channels set in the
extended channel registration table by pressing the registration button on the receiver.
1 With the receiver and microphone paired, put the receiver into pairing confirmation
mode.
Of the channels during microphone communication, press the registration button of the channel you wish to confirm once
briefly to go into pairing confirmation mode. The [Register] indicator turns orange and green alternately for 5 seconds.
memo
Important
For details, please refer to the manual of the receiver.
2 Check the [Power] indicator of the microphone.
While the receiver is in pairing confirmation mode, the target channel of the receiver and the power indicator of the
communicating microphone light up alternately (orange/green) for confirmation of registration.
The pairing confirmation mode lasts for 5 seconds and then returns to the normal state.
  • Page 1 1
  • Page 2 2
  • Page 3 3
  • Page 4 4
  • Page 5 5
  • Page 6 6
  • Page 7 7
  • Page 8 8
  • Page 9 9
  • Page 10 10
  • Page 11 11
  • Page 12 12
  • Page 13 13
  • Page 14 14
  • Page 15 15
  • Page 16 16
  • Page 17 17
  • Page 18 18
  • Page 19 19
  • Page 20 20
  • Page 21 21
  • Page 22 22
  • Page 23 23
  • Page 24 24
  • Page 25 25
  • Page 26 26
  • Page 27 27
  • Page 28 28
  • Page 29 29
  • Page 30 30

Panasonic WX-SR202 User manual

Category
Microphones
Type
User manual

Panasonic WX-SR202: Unleash Seamless Wireless Microphone Communication for Your Events

The Panasonic WX-SR202 offers exceptional wireless microphone capabilities, making it an ideal choice for various applications. With its ability to support up to 8 wireless microphones simultaneously, this receiver provides ample flexibility for conferences, presentations, and other events that require multiple speakers or panelists.

Easy to pair and operate, the WX-SR202 ensures smooth and reliable audio transmission, allowing you to focus on delivering your message without technical glitches. Experience crystal-clear sound quality and the freedom of movement, as the wireless microphones eliminate the constraints of cables.

Ask a question and I''ll find the answer in the document

Finding information in a document is now easier with AI