Martec MMDC133MMR Installation guide

Type
Installation guide

Martec MMDC133MMR is a 1320mm 3-blade ceiling fan with a matt black finish and remote control. It's suitable for flat, sloped, corrugated, and apex ceilings and can be installed on both flat surfaces and angled ceilings up to 15 degrees. The fan features a powerful motor that delivers a strong airflow, and the blades are designed to minimize noise and wobble. The remote control allows you to adjust the fan speed, set a timer, and reverse the direction of the fan. The MMDC133MMR is also compatible with a 15W tri-color LED light, which can be purchased separately.

Martec MMDC133MMR is a 1320mm 3-blade ceiling fan with a matt black finish and remote control. It's suitable for flat, sloped, corrugated, and apex ceilings and can be installed on both flat surfaces and angled ceilings up to 15 degrees. The fan features a powerful motor that delivers a strong airflow, and the blades are designed to minimize noise and wobble. The remote control allows you to adjust the fan speed, set a timer, and reverse the direction of the fan. The MMDC133MMR is also compatible with a 15W tri-color LED light, which can be purchased separately.

E: [email protected] | P: 02 8778 7500
www.martecaustralia.com.au
METRO DC Series Installation Guide
Models Parameters (Fan Only):-
MMDC133MMR 1320mm 3 Blade Ceiling Fan Matt Black with remote control
MMDC133WSR 1320mm 3 Blade Ceiling Fan White Satin with remote control
MMDC133WOR 1320mm 3 Blade Ceiling Fan White Satin/Oak with remote control
Models Parameters (Fan and Light):-
MMDC1333MMR 1320mm 3 Blade Ceiling Fan Matt Black, 15W Tricolour LED Light with remote control
MMDC1333WSR 1320mm 3 Blade Ceiling Fan White Satin, 15W Tricolour LED Light with remote control
MMDC1333WOR 1320mm 3 Blade Ceiling Fan White Satin/Oak, 15W Tricolour LED Light with remote control
Part List:
Qty 1x motor assembly Qty 1x instruction manual Qty 1x screw kit Qty 3x blades
Qty 1x balancing kit Qty 1x hanging plate Qty 1x remote control kit
How to Assemble
Secure the ceiling fan
mounting plate to the
ceiling using screws and
washers provided. Ensure
screws are tightened on the
mounting plate.
Align hole in the motor
housing with the hook on
the mounting plate.
Connect wires between
the motor housing and the
receiver of remote control.
Before installing the motor
housing into the mounting plate.
Put 2 screws half way into two
opposite screw holes.
Carefully install the motor
housing into the mounting
plate by pushing the 2 screws
into the opening slot. Insert
the remaining 2 screws then
tightened all screws.
Fg.1 Fg.2 Fg.3 Fg.4
Thanks for choosing our Metro DC Series ceiling fan.
We strongly recommend that you read this manual carefully before installation.
Application
Flat Surface / Ceiling Slope Ceiling up to 15° Corrugated Ceiling Apex Ceiling
E: [email protected] | P: 02 8778 7500
www.martecaustralia.com.au
WARNING Installation MUST carry out by a qualied and licensed electrician.
How to Install Blades
How to Install / Remove the Cover
Fg.6
CCT (Colour Changeable Temperature)
Fg.8
NB: Ensure the blades do not get damaged or bent during the
installation process while the fan maybe on the ground, this will aect
the performance and balance of the fan and this is NOT covered under
warranty.
Attach the blade to the top of the motor. Tighten and secure blade
with screws and washers provided. Repeat this procedure until all
blades are installed.
Fg.5
Install the shade cover into
the light kit.
Fg.7
Connect the 2-pin
connectors from motor
housing with the light kit
plate.
Install the light kit plate
to the motor using screw
provided.
Slot the shade cover into the
light kit.
Fan LED Light Model
Fan Only Model
Choose colour temperature by icking the switch in the LED
C = 5000K cool white
N = 4000K neutral white
W = 3000K warm white
Dimming
The Metro ceiling fan has a smart 3 step dimming LED light module which doesn’t require a dimmable remote control or a wall dimmer.
It only requires a remote control kit supplied with the product.
Turn the switch on and the light will turn on. Flick the switch on/o within 1 second and the light output will dim down to approx. 50%.
Flick the switch on/o again and the light output will dim down to approximately 15%. The light kit has no memory function, It will turn
on 100% initially.
E: [email protected] | P: 02 8778 7500
www.martecaustralia.com.au
WARNING Installation MUST carry out by a qualied and licensed electrician.
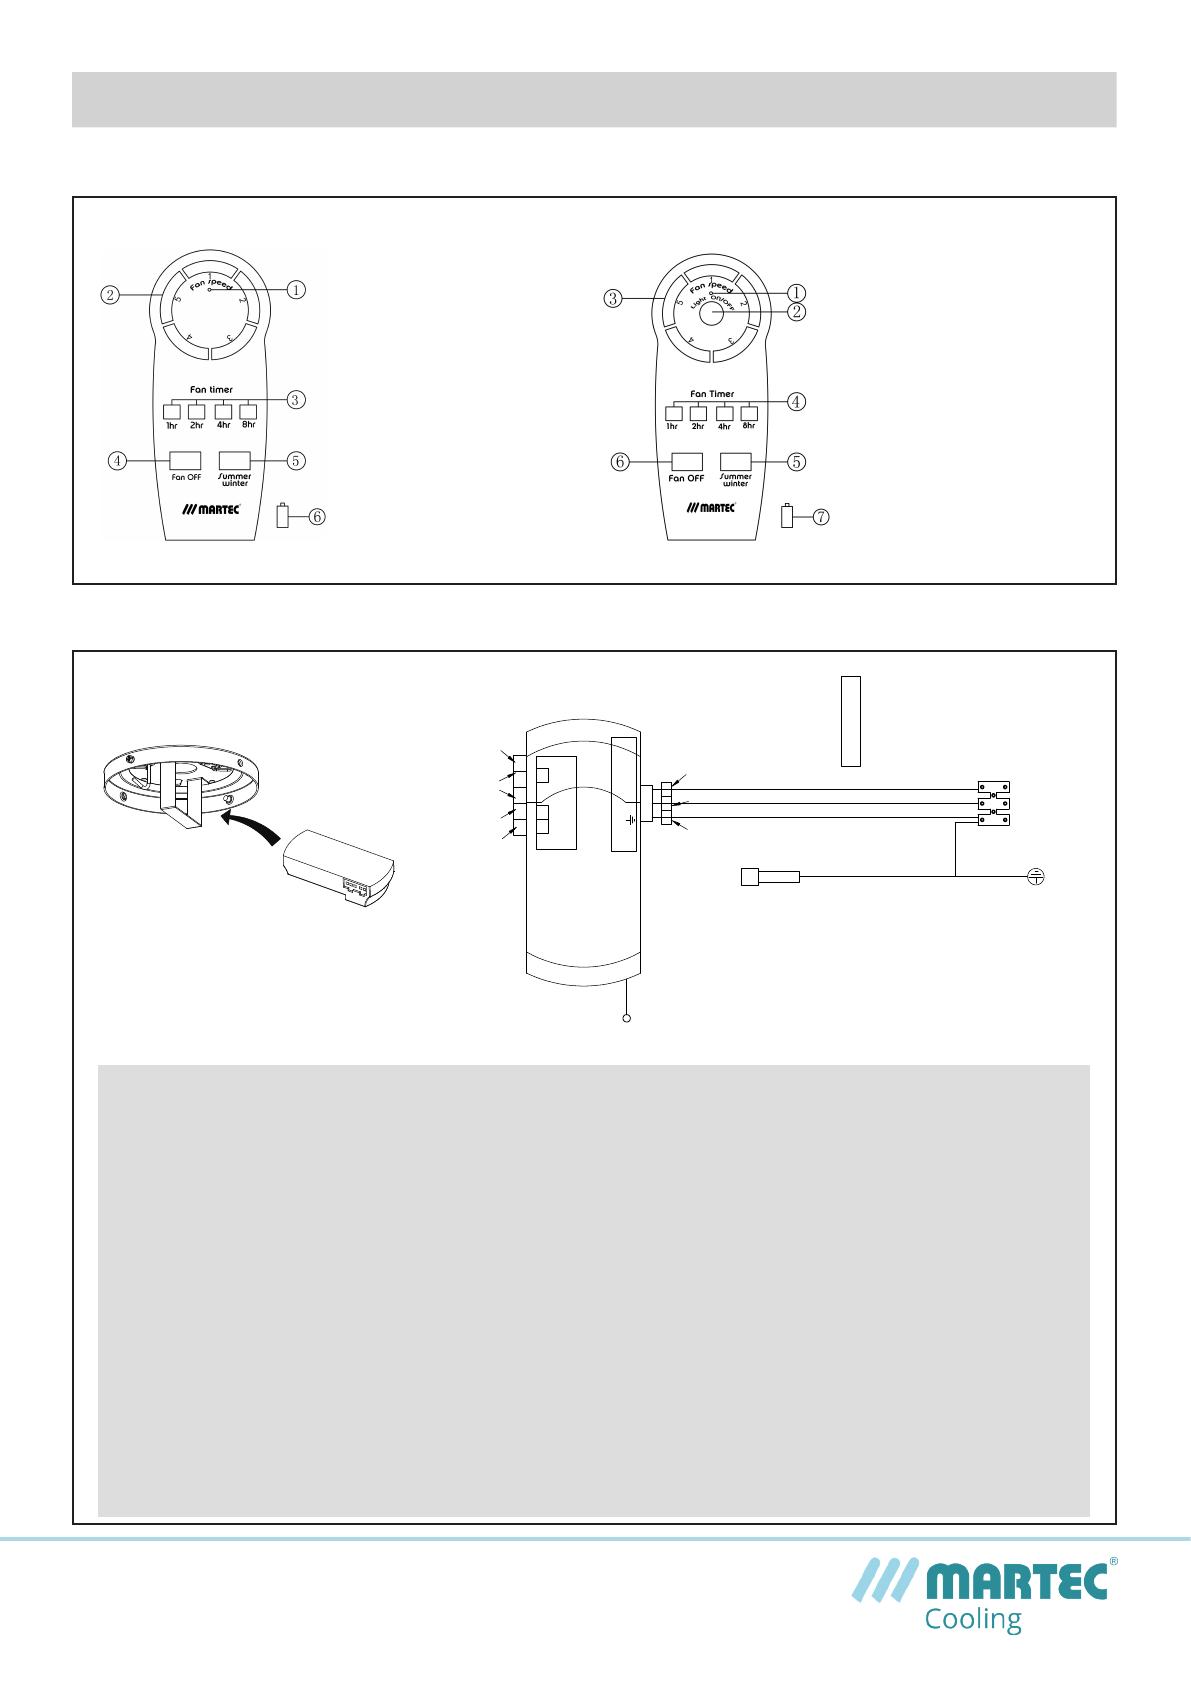
Instructions and Functions of Transmitter
Installing Receiver Remote Control
Pairing Instructions
Turn “ON” the power supply and within 30 seconds
Press and hold the transmitters “FAN ON/OFF” button for 5 seconds and a “beep” will be heard
Pairing initial step must be performed within 30 seconds of power being turned on
i) ensure the isolation switch or power supply to the rst installed fan is turned o prior to pairing futher fans
ie. pair one fan at a time
ii) ensure isolation switch is kept to the ON position, the isolation switch is not to be used as a light switch as
this will damage and make the remote recevier inoperable
Important Reminders
Receiver must be correctly installed in the mounting bracket
When the transmitter cannot control the receiver, please check
i) has sucient battery in the transmitter
ii) any existence of similar remote controlled products nearby that cause interference
Replace battery if getting low as this will aect sensitivity of the transmitter
Take the battery out from the transmitter when leaving used for a long time to avoid battery leaks
Support up to 200W lighting power
Isolation switch MUST be connected in the line
Dimming switch on the light models is operated by tuning the light ON/OFF button within 1s. Light output will dim in
stages from 15W to 8W to 2W approximately
Receiver
NB: Remote shown fan and light
Fan LED Light Model
NB: Remote shown fan only
Fan Only Model
1. LED indicator light
2. Light ON/OFF
(Use to dim light within 1s)
3. Speed of the fan
(1 high speed - 5 low speed)
4. Timing control of the fan
5. Direction of the fan (reverse
switch)
6. Fan ON/OFF
7. 12v battery to be used
in transmitter
1. LED indicator light
2. Speed of the fan
(1 high speed - 5 low speed)
3. Timing control of the fan
4. Direction of the fan (reverse
switch)
5. Fan ON/OFF
6. 12v battery to be used in
transmitter
Black Blue Brown Black
Black Blue Green
AC POWER INPUT
N L
TO AC POWER
TO FAN WIRES
LIGHT MOTOR
L N
3P
1P
3P Plug
Yellow/Green
AC IN L Brown
AC IN N Blue
Yellow/Green
Yellow/Green
E: [email protected] | P: 02 8778 7500
www.martecaustralia.com.au
WARNING Installation MUST carry out by a qualied and licensed electrician.
Wire Connections
WARNING
Installation of fans MUST follow SAA standards and meet local authority regulations.
Installation MUST be carried out by a qualied and licensed electrician.
Fan and light MUST be earthed.
Bracket MUST be rmly attached to a at solid structure or timber frame.
DO NOT mix blades from one model to another, all blades MUST be replaced if damaged.
The warranty is VOID if product is not installed according to this installation guide.
6* Year Warranty
Visit our website for details https://www.martecaustralia.com.au/warranty-statement/
Fan Only Model Fan LED Light Model
Motor
For Light Black
To Motor Blrown
To Motor Black
Yellow/Green
Yellow/Green
Black Blue Brown Black
Black Blue Green
Receiver of
remote control
Yellow/Green
Yellow/Green
To Motor Blue
For Light Blue
For Light Black
To Motor Blrown
Blrown
240 Vac SUPPLY
AC L
AC N
Blue
To Motor Black
To Motor Blue
To The Fan Motor
AC POWER INPUT
N L
TO AC POWER
3P
3P
1P
2P
To The Fan Light
For Light Blue
TO FAN WIRES
LIGHT MOTOR
L N
Motor
To Motor Blrown
To Motor Black
Yellow/Green
Yellow/Green
Blue Brown Black
Black Blue Green
Receiver of
remote control
Yellow/Green
Yellow/Green
To Motor Blue
To Motor Blrown
Blrown
240 Vac SUPPLY
AC L
AC N
Blue
To Motor Black
To Motor Blue
To The Fan Motor
AC POWER INPUT
N L
TO AC POWER
3P
3P
1P
TO FAN WIRES
LIGHT MOTOR
L N
  • Page 1 1
  • Page 2 2
  • Page 3 3
  • Page 4 4

Martec MMDC133MMR Installation guide

Type
Installation guide

Martec MMDC133MMR is a 1320mm 3-blade ceiling fan with a matt black finish and remote control. It's suitable for flat, sloped, corrugated, and apex ceilings and can be installed on both flat surfaces and angled ceilings up to 15 degrees. The fan features a powerful motor that delivers a strong airflow, and the blades are designed to minimize noise and wobble. The remote control allows you to adjust the fan speed, set a timer, and reverse the direction of the fan. The MMDC133MMR is also compatible with a 15W tri-color LED light, which can be purchased separately.

Ask a question and I''ll find the answer in the document

Finding information in a document is now easier with AI