SEIKAKU TECHNICAL GROUP NF05628 User manual

Type
User manual

The SEIKAKU TECHNICAL GROUP NF05628 is a versatile and feature-packed active PA system designed for a wide range of applications, from personal entertainment to professional use. With its 6.5-inch woofer and neodymium driver, it delivers powerful and clear audio with a frequency response of 70Hz to 16KHz. The built-in 3-channel mixer, reverb effect, and 2-band EQ provide precise control over your sound, while the Bluetooth receiver and MP3 player allow you to stream music wirelessly or play audio files directly from a USB drive or SD card.

The SEIKAKU TECHNICAL GROUP NF05628 is a versatile and feature-packed active PA system designed for a wide range of applications, from personal entertainment to professional use. With its 6.5-inch woofer and neodymium driver, it delivers powerful and clear audio with a frequency response of 70Hz to 16KHz. The built-in 3-channel mixer, reverb effect, and 2-band EQ provide precise control over your sound, while the Bluetooth receiver and MP3 player allow you to stream music wirelessly or play audio files directly from a USB drive or SD card.

NF05628-1.2
NOTE: This equipment has been tested and found to comply with the limits for a Class B
digital device, pursuant to Part 15 of the FCC Rules. These limits are designed to provide
reasonable protection against harmful interference in a residential installation. This
equipment generates, uses and can radiate radio frequency energy and, if not installed
and used in accordance with the instructions, may cause harmful interference to radio
communications. However, there is no guarantee that interference will not occur in a
particular installation. If this equipment does cause harmful interference to radio or television
reception, which can be determined by turning the equipment off and on, the user is
encouraged to try to correct the interference by one or more of the following measures:
- Reorient or relocate the receiving antenna.
- Increase the separation between the equipment and receiver.
- Connect the equipment into an outlet on a circuit different from that to which the receiver is
connected.
- Consult the dealer or an experienced radio/TV technician for help.
FCC STATEMENT
1. This device complies with Part 15 of the FCC Rules. Operation is subject to the following
two conditions:
(1) This device may not cause harmful interference, and
(2) This device must accept any interference received, including interference that may
cause undesired operation.
2. Changes or modifications not expressly approved by the party responsible for compliance
could void the user's authority to operate the equipment.
Radiation Exposure Statement
This equipment complies with FCC radiation exposure limits set forth for an uncontrolled
environment. This equipment should be installed and operated with minimum distance 20cm
between the radiator & your body.
11. ACCESORIES
12. CAUTION
CAUTION: RISK OF EXPLOSION IF THE
BATTERY IS REPLACED BY AN INCORRECT
TYPE. BATTERY INSTALLATION AND
REPLACEMENT MUST BE CARRIED OUT BY
PERSONNEL IN POSSESSION OF ENOUGH TECHNICAL
KNOWLEDGE, EXPERIENCE OR INSTRUCTIONS TO BE
ABLE TO PROPERLY PERFORM THE CONNECTIONS.
DONOT USE THIS PRODUCT IN CLOSE PROXIMITY TO WATER. DO NOT
USE THIS PRODUCT NEAR ANY HEAT SOURCE AND KEEP IT AWAY FROM
NAKED FLAMES.
19
1. IMPORTANT SAFETY INFORMATION
2. FEATURES
3. CONTROL ELEMENTS
4. RECEIVER (RX) OPTIONAL
5. TRANSMITTER (TX)
6. CABINET POSITIONS
7. CONNECTING DIAGRAM
8. WIRE CONNECTIONS
9. TECHNICAL SPECIFICATIONS
10. BLOCK DIAGRAM
11. ACCESSORIES
12. CAUTION
1
2
3
7
9
13
14
16
17
18
19
19
xxx xxx-xxxxxx
10. BLOCK DIAGRAM
18
Portable multifunctional active speaker
Multi-position PA system support flat placement with multiple purposes; Monitor, Tilt
and bracket can be applied to personal entertainment, teaching system, DJ, etc.;
light weight, easy to carry
Bluetooth receiving function / MP3 player
Rechargeable battery, can play continuously for 6 hours
3CH mixer, reverb, 2bands EQ
1CH / 2CH can be equipped with UHF wireless system (optional)
9. TECHNICAL SPECIFICATIONS
100V/110-240V, DC25.9V
17
1.85CFT
5.8(KG)
AC:100V/110-240V/ Battery:25.9V(lithium)
UHF(470~494),(542~566),(863~865)MHZ
Dependent on applicable country regulations
2-Way Active All-in-one PA system
70Hz-16KHz
1.9KHz
116dB Max
CH2 LINE:0dBu( 1dBu)
CH2 Hi-Z:-35dBu( 1dBu)
AUX each Volume Controls; Volcepriority Switch;Power lndicators;Recharged
lndicators; BatteryLevel Indicators; Reverb Level Volume;
0
Hi-Z&LINE Switch;
6
6.5 Woofer
Dimensions(LxWxH) 265(L)x240(W)x322.8(H)mm
Connectors
1x XLR/6.3 mm jack combo line/Mic input with 2 bands EQ
1x 6.3 mm jack line/Hi-Z input with 2 bands EQ
1x 3.5mm stereo jack input
1x 6.3 mm jack line mix output
Plastic cabinet, Trapezoidal,Metal grille, plastic handle.
MP3 and Bluetooth
35MM standard pole-mount
6.5” All-In One PA system
Frequency
Bands
Power Supply
System Type
Transducer Low
Transducer High
Frequency Response(-6dB)
Crossover Frequency
Max SPL
AMP Power Output
External Controls
1 Neodymium driver
When there is no signal input or the input signal is all turned off, that is, the SIGNAL
LED does not flash and stays for about 10 minutes, the power amplifier automatically
enters the standby state, reducing standby power consumption and extending battery
life;
Enter the working state automatically from the standby: the main volume and the
corresponding channel volume are not completely turned off, and the input signal
can trigger the SIGNAL LED to flash, then the AMP immediately starts to enter the
working state;
AUTO standby function
At least 4 hours
BASS:±10dB(at 100Hz)/HIGH:±10dBu(at 10KHz)
Bi-amp, Class D 100W RMS total(LF 90W/HF 10W)
FEATURES
8.WIRE CONNECTIONS
16
As to these circumstances, audio connections is mostly intended for the signal flow,
so, determine the wire configuration according to your real application system and its
connecting facility. Normally, you have the following choices:
USB
MP3
USB/SD/BT PLAYER
CONTROL ELEMENTS
Both connectors,1/4” XLR or TRS, can be wired in balanced or unbalanced way,
depending on the work necessity. The following ones are examples of how these
connectors can bewired:
Volume control
Channel 1 Volume Control
Channel 2 Volume Control
Treble Control
Bass Control
Master Control
Battery Status Bar
Recharge Indicator
Power Indicator
Line/Microphone Selector Channel 1
Channel 1 Input Connector
Microphone Receiver
Mixer
Adjusts the level of the microphone signal.
Controls the input signal level of channel 1.
Controls the input signal level of channel 2.
This knob adjusts the gain or attenuation of the channel’s high section at ±10dB.
This knob adjusts the gain or attenuation of the bass section of the channel at ±10dB.
This control adjusts the overall volume of the mixer and affects ALL channels.
This bar of leds indicates the level of the battery charge.
This light turns red when the battery needs to be recharged and green when the
battery is fully charged.
This light will illuminate when the unit has been turned on.
This switch changes the impedance of the Line level channel or Microphone level.
This combo jack has XLR and TRS configuration(Balanced and unbalanced).
Press this key to search for a channel number.
Press this key to adjust parameters inside the receiver.
Press this key to search for a channel number.
Here displayed channel and signal information for radio frequency(RF) and
audio level(AF).
Battery Level
LOWx1
3x4 75%
50%-75%
25%-49%
10%
2x3
1x2
4
Aux input
This 1/8”(3.5mm)connector is the auxiliary channel input connector.
16
Mix Output(Link)
This TRS jack is the mixer output connector that is used to send signal to another
active cabinet or to add a sub-bass.
17
15
F-3 Floor Stand
Display
MP3 and Bluetooth Player
Pressing this selector will give output priority to the microphone connected on channel
1 over all other channels.
Line Selector/Hi-Z Channel 2
Channel 2 Input Connector
Priority Selector
Aux/MP3/Bluetooth Volume Control
This switch changes the impedance of the Line level channel or High lmpedance level.
This TRS jack receives the input signal, either in high impedance or line level
(Balanced/Unbalanced).
MP3/Bluetooth Module
This is the music player control module.
18
19
20
21
22
23
This control adjusts the signal level coming from the Aux channel or MP3 music player
or Bluetooth.
Signal/Clip Indicator
This light will illuminate when there is a signal on any channel in green. When the
signal is very high and saturates the input,the color changes to red(Clip).
NOTE:Reduce the input level of the corresponding channel, when this led lights up red
to avoid the “clip”
Reverb Control
This is the overall reverb effect control that applies to both the microphone and musical
instruments.
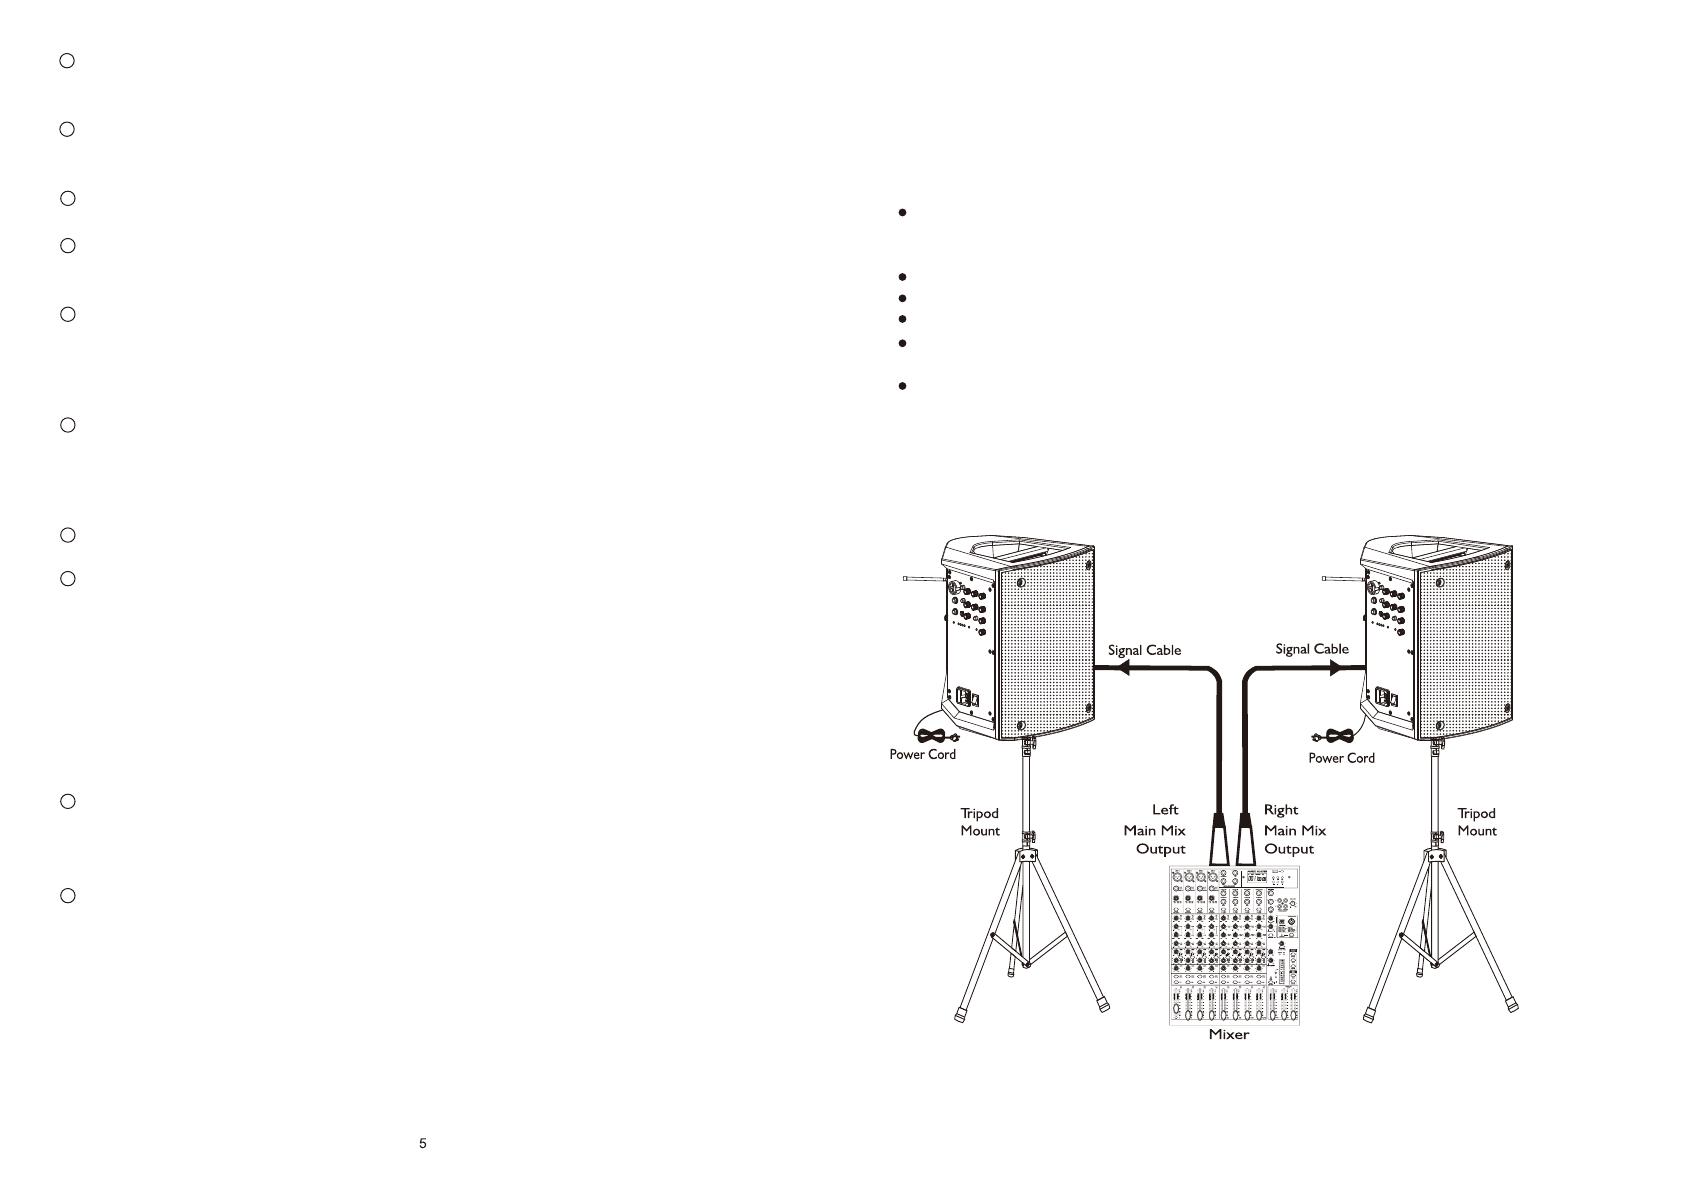
7.CONNECTING DIAGRAM
Active, Full-range, two speakers. It is similar to the passive example but you do not need a
power amplifier between the mixer and the two 6.5” speakers. Make all initial connections
with all the equipments powered off, and ensure that all the main volume controls are turned
down completely.
Connect one side of the signal cable at your mixer into the Output Left/Right(with
Stereo Jack or XLR) and the other side of the cable into the Line Input(COMBO) of your
active speaker cabinet (with Stereo Jack or XLR).
Connect the power cord to main.
Turn ON your mixer first, then the active speaker cabinets.
Turn up the volume control of the cabinets.
Use PEL function to get the proper input level for the mixer, and adjust the Main Mix
Level control to reach the desired output level.
After use, turn off your active speaker cabinets first, then the mixer.
Mode Button
Short press this button to select between USB/TF card/Aux and Bluetooth.USB/TF and
auxiliary functions are automatically selected when inserting the device or if several
devices are connected at the same time, one of them, must be selected manually.
For BT mode, search in your mobile phone, computer and other devices for “VIRE BT
network, and then click, after connecting successfully, you can play music.
After the Bluetooth connection, the battery level displayed by the device is not used as
a reference, please refer to the actual battery level displayed by the speaker.
Please note that the above modes can only use one mode at a time, and it is impossible
to use more than two modes at the same time.
24
25
26
27
14
In MP3 mode, press this button to start playing the song, press again to pause the song.
In Auxiliary mode, press the button to enter “MUTE” mode.
In BT mode, press this button to start playing the song, press again to pause the song.
When you receive a call, press this button to answer and when you finish talking, press
again to end the call.
Volume Button(VOL+)
In MP3 or Bluetooth mode, if this button is pressed quickly it will change to the next song
and if it is kept pressed it will increase the volume of the player
In Auxiliary mode it only works as a volume control, press and hold to increase.
Play/Pause
Check the voltage available in your country and how the voltage of your unit is
configured, before trying to connect it to the main AC.100V/50-60Hz,
110-240V/50-60Hz.
Elevated Surface
Place the speaker on a raised surface or on a speaker stand.
This position allows greater projection of sound in full range to
the audience.
6.CABINET POSITIONS
Inclined
This position is especially used when both the artist and the
audience are standing and in a close-up shot or when the
audience is sitting in a shot in which the cabinet radiates
sound directly to them. In addition,the artist will also have
a good reference of what he is playing and singing.
Monitor
this cabinet has the option of being used as a floor monitor
or for a DJ, by tilting it sideways.
This multifunctional and portable cabinet has three modes of operation and sound projection
depending on the application and the place where you work. Thanks to internal switches and
equalizers, the system changes the response curve automatically to maintain optimum
balance in each position.
28
29
Main AC Input
30
613
Power Switch
If this switch is set to the ON position, both the AC and DC will be connected, although
the AC will take priority over the DC. When AC is not present at the power input, the DC
power source will automatically switch to keep the unit working. If this switch is in the
OFF position, the entire unit will stop working. If the switch is in the recharge position,
the internal battery will recharge, but the unit will not work.
Volume Button(VOL-)
In MP3 or Bluetooth mode, if this button is pressed quickly, it will change to the previous
song and if it is kept pressed it will decrease the volume of the player.
In Auxiliary mode it only works as a volume control, press and hold to decrease it.
4. RECEIVER(RX)OPTIONAL
CHA/CHB
Frequency code
Frequency display
AF power indicator
RF power indicator
12
HOW TO PAIR YOUR RECEIVER AND TRANSMITTER
Single channel
Double channel
Display interface Power on your receiver, Then select the channel you like or scan the cleanest channel
automatically according to above steps. Then quick the “SET” button and release it to
enter pair mode. Power on your transmitter, Then place the IR port of receiver to face
towards the IR lens of transmitter within 20cm distance. Once TX and RX are paired
successfully. The RF/AF indicator on receiver will light solid.
1.Press the“ ”or“ ”button on the front of the receiver to choose an available channel.
2.The channel number will increase from 0 to F (16 Channels).
3.If you hold press the“ ”button, the displayed channel will fast forward.
4.If you hold press the“ ”button, the displayed channel will fast reverse.
5.Briefly press the “ SET ” button, to select channels, ATN A and ATN B (CHA and CHB
separately).(If your unit comes with a single channel, this function is not available to
change the channel).
6.After selecting the channel (ATN A and ATN B), press and hold the“ ”button for 3
seconds, then the unit scans the full frequency and finally automatically picks the cleanest
channel to pair between RX and TX.
7.Or after selecting the channel (ATN A and ATN B), press and hold the“ ”button for 3
seconds to enter the infrared pairing mode. Select the frequency by briefly pressing
the“ ”or“ ” button and then continue the pairing between RX and TX by infrared
transmission
8.Depending on the current selected channnel(CHA or CHB), if the pairing between RX and
TX is successful, the AF/RF indicator will show activity on the display.
9.This unit has an independent volume control for this receiver.
Pin 2:
“Phantom Power” for condenser microphones
Pin 3:Designed for musical instruments(When used with cable)
Pin 4:Desugbed for use with dynamic or condenser microphones
Infrared(IR)
Screwdriver
Gain Control
This window is used to capture the infrared signal sent from the receiver. During IR
adjustment to pair the transmitter with the receiver, the IR lens must face the
receiever to load the selected channel.
This control adjusts the input sensitivity for working with microphones or musical
instruments. to achieve a higher efficiency, adjust this gain where you can see the
audio frequency bar (AF) on the receiver at 75%
This unit includes a special tool to adjust the gain.
With the transmitter turned off, insert two standard AA(1.5V) batteries, making sure
that the positive and negative polarity markings are oriented correctly. Although NI-CAD
rechargeable batteries can be used, this transmitter cannot be recharged. Warning:
do not insert the battery upside down or it may cause serious damage to your
transmitter and will void the warranty.
Pin 1:Ground(GND)
Press and hold to turn the unit on or off.
Press and release to mute or unmute the transmitter.
9
Option#3
BODY-PACK TRANSMITTER
Mini 4P connector
5.TRANSMITTER(TX)
There are three types of transmitters dedicated to our customer. Customer can select the
transmitters according to their preferences.
Insert two standard AA(1.5V) batteries here, making sure that the positive and negative
polarity marks are oriented correctly, Although NI-CAD rechargeable batteries can be
use, this transmitter cannot recharge them.
Warning: do not insert the battery upside down or it may cause serious damage to your
transmitter and will void the warranty.
This light shows the operation mode:
To turn on or off, keep this button pressed.
To enter “MUTE”mode press and release this button.
This window is used to capture the infrared signal sent from the receiver. During IR
adjustement to pair the transmitter with the receiver, the IR lens must face the receiver
to load the selected channel.
Option#1
HANDHOLD TRANSMITTER
Power/Mute button
Press and hold for 3 seconds to turn the unit on or off, the indicator will light red firstly
and change to light green after about 5 seconds. It enters normal operation mode.
Status indicator
A quick press and release will mute or un-mute the transmitter when the transmitter
turns on. It will light red for mute and green for un-mute.
IR LENS
The window is used to capture the infrared signal sent from receiver. During the IR
SET to channelize the transmitter, the IR lens must face towards the receiver to load
the selected channel.
Battery cover
Insert one standard AA(1.5V) battery here, Being sure the plus and minus polarity
marking of battery are facing correctly. Although rechargeable NI-CAD battery can be
used too, but the unit can’t obtain adequate power to keep working for more than 4
hours. Warning: don’t insert the battery backwards, Or it maybe cause severe damage
to your transmitter and will void your warranty.
Option#2
PEN-SHAPE TRANSMITTER
Protecton Grid
Microphone Body
Battery Cover
Power/Mute Switch
Infrared(IR)
Status lndicator
  • Page 1 1
  • Page 2 2
  • Page 3 3
  • Page 4 4
  • Page 5 5
  • Page 6 6
  • Page 7 7
  • Page 8 8
  • Page 9 9
  • Page 10 10
  • Page 11 11
  • Page 12 12

SEIKAKU TECHNICAL GROUP NF05628 User manual

Type
User manual

The SEIKAKU TECHNICAL GROUP NF05628 is a versatile and feature-packed active PA system designed for a wide range of applications, from personal entertainment to professional use. With its 6.5-inch woofer and neodymium driver, it delivers powerful and clear audio with a frequency response of 70Hz to 16KHz. The built-in 3-channel mixer, reverb effect, and 2-band EQ provide precise control over your sound, while the Bluetooth receiver and MP3 player allow you to stream music wirelessly or play audio files directly from a USB drive or SD card.

Ask a question and I''ll find the answer in the document

Finding information in a document is now easier with AI