Grandstream WP820 User guide

Category
IP phones
Type
User guide
Grandstream Networks, Inc.
WP820
User Guide
WP820 – User Guide
WELCOME
Thank you for purchasing Grandstream WP820. This powerful Enterprise Portable Wi-Fi Phone features dual-band
802.11a/b/g/n Wi-Fi, supports Wi-Fi roaming, and integrated Bluetooth. The combination of advanced telephony features and
durability make it ideal for mobilizing your VoIP network in residences, warehouses, retail stores, hotels and many more
environments. Due to a durable design, this sleek phone is drop safe from 1.2 meters, with 150 hours standby time and 7.5
hours talk time making it an ideal addition for homes and businesses alike.
PRODUCT OVERVIEW
Feature Highlights
The following table contains the major features of the WP820:
WP820 Features at a Glance
Technical Specifications
The following table resumes all the technical specifications including the protocols/standards supported, voice codecs,
telephony features, languages, and upgrade/provisioning settings for the Base station WP820.
2 SIP accounts and 2 lines.
3-way audio conference calls.
Dual-band 802.11a/b/g/n Wi-Fi.
Wi-Fi roaming and integrated Bluetooth.
150 hours standby time.
7.5 hours talk time.
Protocols/Standards SIP RFC3261, TCP/IP/UDP, RTP/RTCP, HTTP/HTTPS, ARP, ICMP, DNS (A record, SRV,NAPTR),
DHCP, SSH, TFTP, NTP, STUN, SIMPLE, LDAP, TR-069, 802.1x, TLS, SRTP, IPv6
Voice Codecs and Capabilities Support for G.711μ/a, G.729A/B, G.722 (wide-band), iLBC, Opus, in-band, and out-of-band DTMF
(In audio, RFC2833, SIP INFO), VAD, CNG, AEC, PLC, AJB, AGC, ANS
Wi-Fi Yes, integrated dual-band Wi-Fi 802.11 a/b/g/n (2.4GHz & 5GHz)
Wi-Fi Encryption WEP, WPA/WPA2, WPA Enterprise
WP820 Technical Specifications
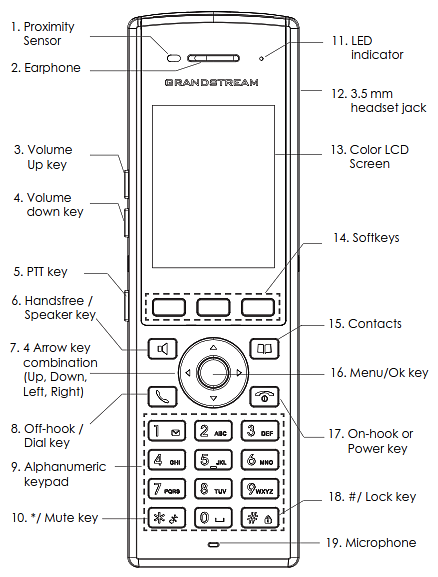
Graphic Display 2.4-inch (240×320) TFT color LCD
Peripherals 3 soft keys, dial, hang up, speakerphone, phonebook, backlit keypad, proximity sensor, accelerator,
vibration motor, volume button and navigation keys
Push-to-Talk Customizable button for push-to-talk, panic call and other related functions
Bluetooth Yes, Bluetooth v4.2
Auxiliary Ports 3.5 mm headset jack, Micro-USB port for charging, dual-MIC, dual-color LED.
Telephony Features
Hold, transfer, forward, 3-way audio conference, downloadable phonebook (XML, up to 1000
items), call waiting, call log (up to 100 records), off-hook auto dial, auto answer, click-to-dial,
flexible dial plan, hot desking, personalized music ringtones and music on hold, server redundancy
and fail-over, push to talk
Security User and administrator level passwords, MD5 and MD5-sess based authentication, 256-bit AES
based secure configuration file, SRTP, TLS, 802.1x media access control
HD Audio Yes, both on handset and speakerphone with support for wideband audio, HAC supported
QoS 802.11e (WMM) and Layer 3 (ToS, DiffServ, MPLS) QoS
Multi-language English, Arabic, Chinese, Czech, Dutch, German, French, Hebrew, Italian, Japanese, Polish,
Portuguese, Russian, Spanish, Turkish, and Hungarian.
Upgrade/ Provisioning Firmware upgrade via TFTP/HTTP/HTTPS, manual upload, mass provisioning using TR-069 or
encrypted XML configuration file, manual upload, USB upgrade
Power & Green Energy
Efficiency
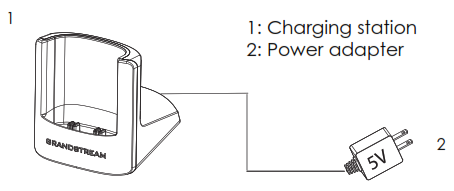
Universal power adapter included
Input: 100-240VAC; Output: +5VDC, 1A (5W)
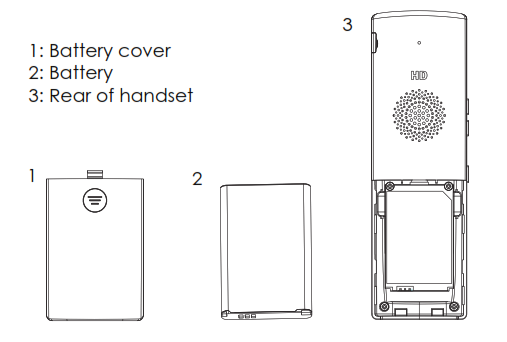
1500mA Li-ion battery, 150h standby time and 7.5h talk time
Physical
Handset dimensions: 168.5 x 52.5 x 21.8mm
Charger cradle dimensions : 76 x 73 x 81mm
Handset weight: 161g
Handset package weight (not including QIG): 456g
Temperature and Humidity
Operating Temperature: 0~45°C; Operating Humidity: 10~90%(non-condensing)
Storage Temperature: -20~60°C; Storage Temperature:10~90%(non-condensing)
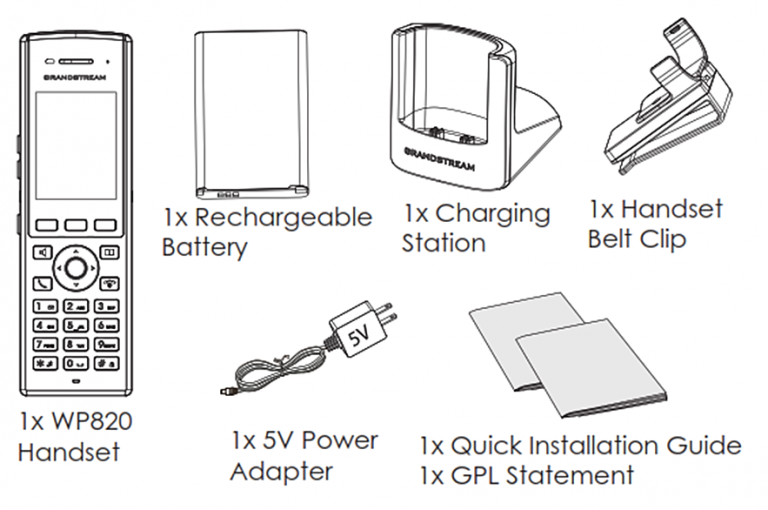
Package Contents
Handset unit, universal power supply, charger cradle, belt clip, 1 Li-ion battery.
Quick Installation Guide.
Durability Drop-safe from 1.2 meters height
Compliance FCC, CE, RCM, IC
GETTING STARTED
This chapter provides basic installation instructions including the list of the packaging contents and also information for
obtaining best performance with the WP820.
Equipment Packaging
Equipment Packaging
WP820 Package Content
Setting up the WP820
Charging Station
Plug the power adapter into a power source socket to start using the charging station.
WP820
1x Handset unit
1x Universal power supply 5V
1x Charger cradle
1x Belt clip
1x Rechargeable battery
1x Quick Installation Guide
1x GPL Statement
Important
Check the package before installation. If you find anything missing, contact your system administrator.
Charging Station
Handset
Please refer to the following steps in order to setup your WP820:
1. Open the battery cover.
2. Insert the battery with the electrodes in the bottom left corner.
3. Close the battery cover.
WP820 Handset Setup
Battery Information
Technology: Rechargeable Li-ion Battery
Voltage: 3.8V (Nominal Voltage 3.8V / Limited charge Voltage: 4.35 V)
Capacity: 1500mAh
Standby time: up to 150 hours
Talk time: up to 7.5 hours’ active talk time
In order to get the best performance of your WP820, we recommend using original battery provided in the package. The
specifications may differ depending on the age and capacity of the battery used.
Note
Please charge the battery fully before using the handset for the first time. (For more information about the battery, please refer
to Battery Information.
Notes
WP820 Wi-Fi phone generates a warning tone when device’s battery level becomes 15% and 5%.
WP820 auto boots up once placed on charger when device was powered off abnormally (Battery too low, battery removed
suddenly, etc..).
WP820 Handset Keys Description
The WP820 enhances communication and combines usability and scalability in industries such as warehousing, catering, and
retail as well as in factory settings. The following screenshot describe the WP820 LCD screen and the main hardware
components.
WP820 Description
The following table describes the WP820 keypad keys.
Important
Be careful when inserting the battery into your handset to avoid any risk of short-circuit, which lead to damage your battery
and/or the handset itself. Do not use damaged batteries which can increase the risk of serious harm.
Key Description
1Proximity sensor
The proximity senor can detect the presence of a human ear.
This sensing is done for two purposes: Reduce display power
consumption by turning off the LCD backlight and to avoid
inadvertent touches.
2Earphone Delivers audio output.
3,4 Volume up / Down Keys Configure the handset and ringtone volume.
5PTT Key
PTT (Push-to-Talk) button to initiate PTT call.
Note: PTT button can also be configured from Web GUI to
have other functions such as: SAFE/Panic Call &
Mute/Unmute during calls.
6Hands-free / Speaker key Switches between Handset and Hands-free / Speaker modes.
WP820 Icons Description
Following table contains description of each icon that might be displayed on the screen of the WP820.
7Arrow key combination (Up, Down, Left, Right) Allows navigation of the cursor through the displayed menu
options.
8Off-hook / Dial key Enters dialing mode, or dials number entered.
9Alphanumeric Keypad Provides the digits, letters, and special characters in context-
sensitive applications. For + sign, press and hold key 0.
10 * / Mute key Activates or deactivates the mute feature when keep pressing
on * in idle screen.
11 LED indicator 1dual-color LED indicator indicating: power, call, battery,
message waiting …
12 3.5 mm headset jack Phone connector for the headphones/headsets.
13 Color LCD Screen 2.4-inch (240×320) TFT color LCD
14 Softkeys
Correspond to functions displayed on the LCD. These
functions change depending on the current context, and they
can be customized on Home screen and Call screen from the
Web GUI.
15 Contacts Access to contacts list.
16 Menu/OK key Selects the option chosen by the cursor or enters the main
menu from the home screen.
17 On-hook or Power key Terminates calls or turns the handset on / off.
18 # / Lock key
Locks keypad against unintentional entries when keep
pressing #.
Press and hold # key for approximately 2 seconds to lock the
keys.
Press Unlock softkey and then # to unlock the keys.
19 Microphone Picks up audio earpiece and hands-free calls.
Battery status
Charging
Wi-Fi not enabled/configured
Wi-Fi signal status
Outgoing Call notification
WP820 Icons Description
Missed Call notification
Incoming Call notification
Voicemail notification (Urgent)
Voicemail notification (Normal)
Mute enabled icon
DND enabled icon
Bluetooth enabled icon
Bluetooth connected icon
SRTP & TLS enabled icon
Contacts
SMS
Call History
Voice Mail
Diagnosis
Settings
Applications
Status
Broadsoft XSI
Note
WP820 LED Status
WP820 LED Status
WP820 Handset Menu
The handset has an easy-to-use menu structure. Every menu opens a list of options. To open the main menu, unlock first the
handset and press “Menu” (softkey in the middle). Press Arrow keys to navigate to the menu option you require. Then press
“Select” (left softkey) or OK/Selection key to access further options or confirm the setting displayed.
To go to the previous menu item, press “Back” (right softkey). You can press Power key at any time to cancel and return to
standby mode.
SRTP & TLS enabled icon will be displayed only in case signaling and media are both encrypted.
Red Fast Flashing Upgrading
Green Slow Flashing Incoming call
Green Blinking Charging but not full
Green Solid Charging (full)
Red Slow Flashing
Missed call (s)
New voicemail (s)
New SIP Message (s)
Red Solid Network disconnected
LED OFF Normal
Contacts
Display the list of the registered contacts and also the groups contacts with the ability of
searching, adding, or editing the entries and also deleting the selected contacts. The maximum
number of contacts is 1000.
Call History Display the call history: Missed Calls, Accepted Calls, Outgoing Calls or All Calls. You can
add contacts to Shared Contacts directly from call logs.
SMS
SMS stands for Short Message Service and referred to as a “text message”. With a SMS, you
can send a message by pressing “New” of up to 160 characters to another device or check the
received ones.
Voice Mail Play Message: Play voice mail messages received.
Set Voice Mail: Configure voice mail parameters.
Diagnostics
LCD diagnosis
LCD off
LED diagnosis
Keypad diagnosis
Audio loopback
Acceleration sensor
Sensor calibration
Proximity sensor
Vibrator
Certificate Verification
Traceroute
Ping
NSLookup
One-click Debugging
WP820 Keypad
The WP820 keypad can be used by tapping on an input field. WP820 keypad has 4 modes “ABCabc2”, “ABC”, “abc” and “123”.
Default mode is “ABCabc2”. Note: If the input field is accepting only digits, only “123” mode will be available.
WP820 Keypad Modes
ABCabc2” Mode:
This mode allows to enter capital letters, small letters, digits, and symbolic characters.
Following table describes allowed characters for each key.
Settings
Account
Configure/View SIP accounts settings and account ringtone.
Call settings
Configure the account auto answer, call forward, DND and speed dial settings.
Network Settings
Configure the networks settings including Wi-Fi settings and additional networks settings.
Bluetooth Settings
Configure the Bluetooth settings including discovery, pairing and connection actions.
Basic Settings
Configure the basic settings including voice settings, display settings, Gestures and button
customization, language settings and date/time settings.
Advanced Settings
Configure the advanced settings including system upgrade, PTT/Paging settings, system
security settings, syslog settings and factory reset / reboot.
Applications Alarm Clock: Configures the alarm clock settings
Calculator: performs arithmetic operations on numbers.
Broadsoft XSI Broadsoft account.
Status
Displays account status, system info, Network status and network statistics
Account status.
Network status:
Press to enter the sub menu for MAC address, IP setting information (DHCP/Static IP), IPv4
address, IPv6 address, Subnet Mask, Gateway; DNS server and VPN.
System Info:
Press to enter the sub menu for Running memory, Storage status, MAC address, System
version, Recovery version, U-boot version, Kernel version, Hardware version, PN number,
Country code and Running time.
Network Statistics:
Press to enter the sub menu for Network SSID, BSSID, IP address, Signal strength, Connection
speed, Channel, Frequency, Tx packets, Tx error packets, Tx error rate, Tx drop packets, Tx
drop rate, Rx packets, Rx error packets, Rx error rate, Rx drop packets, Rx drop rate.
Battery:
Displays the battery status and the battery usage details.
ABC” Mode:
This mode allows to enter capital letters, digits, and symbolic characters.
Following table describes allowed characters for each key.
“abc” Mode:
This mode allows to enter small letters, digits, and symbolic characters.
Following table describes allowed characters for each key.
“123” Mode: This mode allows to enter digits and . only.
Following table describes allowed characters for each key.
Key Description Key Description Key Description
1 . , ’ ? ! ” – 1 2 A B C a b c 2 3 D E F d e f 3
4 G H I g h i 4 5 J K L j k l 5 6 M N O m n o 6
7 P Q R S p q r s 7 8 T U V t u v 8 9 W X Y Z w x y z 9
* . , ‘ ? ! “ – ( ) @ / : _ ; + % *
= < > $ [ ] { } ~ ^ # | ` & 0 Space # Switch mode
Key Description Key Description Key Description
1. , ’ ? ! ” – 1 2 A B C 2 3 D E F 3
4 G H I 4 5 J K L 5 6 M N O 6
7 P Q R S 7 8 T U V 8 9 W X Y Z 9
*
. , ‘ ? ! “ – ( ) @ / :
_ ; + % * = < > $ [
] { } ~ ^ # | ` &
0 Space # Switch mode
Key Description Key Description Key Description
1 . , ’ ? ! ” – 1 2 a b c 2 3 d e f 3
4 g h i 4 5 j k l 5 6 m n o 6
7 p q r s 7 8 t u v 8 9 w x y z 9
*
. , ‘ ? ! “ – ( ) @ / : _ ; +
% * = < > $ [ ] { } ~ ^ #
| ` &
0 Space # Switch mode
Key Description Key Description Key Description
Tips using the keypad:
To switch between the modes, users could press the middle softkey or # key.
Press multiple times on same key to move forward between the allowed characters.
Use Right/Left arrow keys to change the cursor’s position on the text entered.
QUICK SETUP WIZARD
The WP820 offers a Setup Wizard tool to help users to quickly configure basic settings on the device such as language, time
zone, Wi-Fi, and SIP account. The setup wizard appears automatically upon initial boot up of a factory default device.
Setup wizard
WP820 WEB GUI ACCESS CONFIGURATION
The WP820 can be configured using:
Web GUI embedded on the WP820 using PC’s web browser.
LCD Configuration Menu using the WP820 keypad.
Configuration via Web Browser
The WP820 embedded Web server responds to HTTP/HTTPS GET/POST requests. Embedded HTML pages allow a user to
configure the WP820 through a Web browser such as Google Chrome, Mozilla Firefox.
1 1 2 2 3 3
4 4 5 5 6 6
7 7 8 8 9 9
* . 0 0 # Switch mode
Note
From the Web GUI, you can configure all the functions supported by the WP820; while via keypad menu, you can access limited
configuration.
Note
Accessing the Web UI
1. Connect the computer to the same network as WP820.
2. Make sure the WP820 is booted up and powered correctly.
3. You may check WP820 IP address via a subscribed WP820 on its LCD menu Settings 🡪 Network Status. Please see
[WP820 Network Status]
4. Open Web browser on your computer and enter the WP820 IP address in the address bar of the browser.
5. Enter the administrator’s username and password to access the Web Configuration Menu.
Web GUI Languages
Currently the WP820 web GUI supports English, Chinese languages.
Users can select the displayed language in web GUI login page, or at the upper right of the web GUI after logging in
WP820 Web GUI Language
Saving the Configuration Changes
When changing any settings, always submit them by pressing Save and Apply buttons. If using the Save button, after making
all the changes, click on the Apply button on top of the page to submit.
Web UI Access Level Management
There are two default passwords for the login page:
Please note that Microsoft’s IE 9 and below are not supported, also the records from the web cannot be played with IE10, Edge
and Safari. We highly recommend using Google Chrome or Mozilla Firefox.
Note
The computer must be connected to the same sub-network as the WP820. This can be easily done by connecting the
computer to the same hub or switch as the WP820.
The default administrator username and password are “admin”; the default end-user username is “user“ and the password
is “123”.
If ‘Disable web UI access’ parameter is enabled under Advanced settings 🡪 System security; web UI access will be
disabled.
User Level Username Password Web Pages Allowed
End User Level user 123
Only Status, Phone Settings,
System Settings, Maintenance
and System Application with
limited options.
Changing User Level Password
1. Access the Web GUI of your WP820 using the admin’s username and password. (Default username and password are:
admin/admin).
2. Press Login to access your settings.
3. Go to System Settings 🡪 Security Settings.
4. In User Info Management, locate user password section:
Type in the admin password in the Current Admin Password field.
Type in your new user password in New User Password field.
Type in again same entered password in Confirm New User Password field.
5. Press Save and Apply buttons to save your new settings.
User Level Password
Changing Admin Level Password
1. Access the Web GUI of your WP820 using the admin’s username and password. (Default username and password is:
admin/admin).
2. Press Login to access your settings.
3. Go to System Settings 🡪 Security Settings.
4. In User Info Management, locate admin password section:
Type in the admin password in the Current Admin Password field
Type in your new user password in New Admin Password field.
Type in again same entered password in Confirm New Admin Password field.
5. Press Save and Apply buttons to save your new settings.
Administrator Level admin admin All pages
Note
DO NOT USE same password for both user and admin accounts.
The password is case sensitive with maximum length of 25 characters.
Admin Level Password
Changing HTTP / HTTPS Web Access Port
1. Access the Web GUI of your WP820 using the admin’s username and password. (Default username and password are:
admin/admin).
2. Press Login to access your settings.
3. Go to System Settings 🡪 Security Settings.
4. In Web/SSH Access page, select the access method depending on desired protocol (HTTP or HTTPS)
5. Locate HTTP / HTTPS Web Port field and change it to your desired/new HTTP / HTTPS port.
Note: By default, the HTTP port is 80 and HTTPS is 443.
6. Press Save and Apply buttons to save your new settings.
Note
DO NOT USE same password for both user and admin accounts.
The password is case sensitive with maximum length of 25 characters.
Note
After modifying the connection method or port, the web GUI will be automatically logged out and redirected to the new address
Web/SSH access
BASIC OPERATIONS
WP820 Home Screen
The WP820 Home screen comprises three pages that make it easy for the customer to access some settings, parameters, or
notifications. Please refer to the following screenshots:
Home screen pages
Left Home Screen Page:
This page lists all the notifications that users need to check: Missed calls, unread SMS, unread Voice mails, etc …
Users can access the notification by tapping on OK button, delete the notification by tapping on the left softkey or clear
all the notifications by tapping on the middle softkey.
Middle Home Screen Page:
The middle page of Home screen shows date/time and the registered SIP account(s) on the WP820.
Users can access by default to History, Menu or Setting by using softkeys, and Administrator is able to change the
functions of softkeys on Home screen from the Web GUI.
Right Home Screen Page:
The right page is providing the users quick access to Wi-Fi, Bluetooth and DND option and configuration.
Users can turn on/off the option using the middle softkey, while they also can access to the settings of each option by
tapping on the left softkey.
Turning the Handset ON/OFF
To turn ON the handset: Long press on Power key until the LCD screen lights up.
To turn OFF the handset: Long press on Power key again when the handset is idle and press the softkey to choose to
power off or reboot.
Connecting WP820 to Wi-Fi Network
Auto Connection
For easy deployment, WP820 out of the box is preconfigured to connect to a default SSID named wp_master with a password
(WPA/WPA2 PSK) equal to wp!987@dmin, users can adapt these settings from the web UI as well to make it easier for
deployment on customer site.
Go under the web interface of the “Network Settings 🡪 Wi-Fi Settings 🡪 Wi-Fi Security”.
Default Wi-Fi Network
For example, the user can pre-configure the WP to automatically connect to the Wi-Fi network at the client site, making it
easier for the client to use the phone without going through the setting up manually the Wi-Fi network. Also, the client could
have the SSID hidden by default, and the WP820 handset would still be able to connect to the Wi-Fi network since they have
SSID and password information configured.
Manual connection
The WP820 supports dual-band 802.11a/b/g/n Wi-Fi, please refer to the following steps in order to connect your WP820 to
the Wi-Fi networks:
1. On LCD menu, press Menu key and navigate to SettingsNetwork SettingsWiFi.
2. Set Wi-Fi to “On “ and navigate to “Wi-Fi Settings “. A list of Wi-Fi networks will be displayed.
3. Select the desired network to connect to. (Enter the correct password to connect if requested)
WP820 will display Wi-Fi icon on the main LCD menu if the con nection to the Wi-Fi network is successful.
Connecting WP820 to Wi-Fi Network
Wi-Fi Band Configuration
If 5GHz and 2.4Ghz are both available, the WP820 will use 5GHz, but it may switch to 2.4GHz if the signal of 5GHz is poor.
Users may also specify the Wi-Fi Band in order to fix it or to keep it Dual Band under Settings🡪Network Settings🡪Wi-Fi
Band.
Wi-Fi Band configuration
Wi-Fi Signal Warning Configuration
Users Can configure Wi-Fi signal warning sensitivity or disable it under Settings🡪Network Settings🡪Wi-Fi signal warning.
Five sensitivity levels are available: Level 1 is the lowest and level 5 is the highest.
Wi-Fi Signal Warning Sensitivity
Note
WP820 supports connection to Wi-Fi with captive portal enabled that requires additional credentials to sign up or login before it
is allowed to use Wi-Fi.
Note
If you receive a Wi-Fi association reject message from AP, it will show Disabled on available WI-FI networks, and this is not set
or configured at WP820 side, the possible reasons are: blacklisted by AP, open band steering or load balance on AP, reach max
connection limit of AP, etc…
Note
Wi-Fi will restart after changing Wi-Fi frequency.
Note
Wi-Fi Roaming Mode Configuration
Wi-Fi Roaming settings configuration can also be done by users under Settings🡪Network Settings🡪Wi-Fi Roaming Mode.
Wi-Fi Roaming Mode
The options that can be configured under “Wi-Fi Roaming Mode” are the following:
Signal Threshold: When the Wi-Fi signal strength of the device drops below this value, the device will scan for a hotspot
above the threshold value and connect to it. The default setting is -70.
Good Signal Scan Interval: The time interval for signal scanning when the Wi-Fi signal strength is higher than the signal
threshold. The default setting is 600s.
Poor Signal Scan Interval: The time interval for signal scanning when the Wi-Fi signal strength is lower than the signal
threshold and there is no hotspot which is higher than the current signal strength. The default setting is 5s.
Connecting WP820 to Bluetooth Devices
Bluetooth is a proprietary, open wireless technology standard for exchanging data over short distances from fixed and mobile
devices, creating personal area networks with high levels of security. The WP820 supports Bluetooth version 4.2.
To connect to a Bluetooth device, turn on the WP820’s Bluetooth radio first. The first time when using a new Bluetooth device
with the WP820, “pair” the device with WP820 so that both devices know how to connect securely to each other. After that,
users could simply connect to a paired device. Turn off Bluetooth if it is not used.
Bluetooth settings are under WP820’s Settings🡪Network Settings🡪Bluetooth Settings.
Turn On/Off Bluetooth
1. Go to WP820’s Settings🡪Network Settings🡪Bluetooth.
2. Turn On or Off the Bluetooth option.
Change Bluetooth Device Name
The WP820 uses “WP820_XXXXXX” as Bluetooth device name by default where “XXXXXX” are the last 6 digits of the phone’s
Bluetooth MAC address plus 1. The device name will be visible to other devices when connecting them. Follow the steps
below to change the name:
1. Go to WP820’s Settings🡪Network Settings🡪Bluetooth
2. Turn on Bluetooth.
3. Go to WP820’s Settings🡪Network Settings🡪Bluetooth Settings.
4. Press “Device name”.
5. Enter a name and tap on “Save”
A message prompt also appears to notify users about poor Wi-Fi signal. While during the call, a beep tone will be played to
notify users that Wi-Fi connection is lost.
  • Page 1 1
  • Page 2 2
  • Page 3 3
  • Page 4 4
  • Page 5 5
  • Page 6 6
  • Page 7 7
  • Page 8 8
  • Page 9 9
  • Page 10 10
  • Page 11 11
  • Page 12 12
  • Page 13 13
  • Page 14 14
  • Page 15 15
  • Page 16 16
  • Page 17 17
  • Page 18 18
  • Page 19 19
  • Page 20 20
  • Page 21 21
  • Page 22 22
  • Page 23 23
  • Page 24 24
  • Page 25 25
  • Page 26 26
  • Page 27 27
  • Page 28 28
  • Page 29 29
  • Page 30 30
  • Page 31 31
  • Page 32 32
  • Page 33 33
  • Page 34 34
  • Page 35 35
  • Page 36 36
  • Page 37 37
  • Page 38 38
  • Page 39 39
  • Page 40 40
  • Page 41 41
  • Page 42 42
  • Page 43 43
  • Page 44 44
  • Page 45 45
  • Page 46 46
  • Page 47 47
  • Page 48 48
  • Page 49 49
  • Page 50 50
  • Page 51 51
  • Page 52 52
  • Page 53 53
  • Page 54 54
  • Page 55 55
  • Page 56 56
  • Page 57 57
  • Page 58 58
  • Page 59 59
  • Page 60 60
  • Page 61 61
  • Page 62 62
  • Page 63 63
  • Page 64 64
  • Page 65 65
  • Page 66 66
  • Page 67 67
  • Page 68 68
  • Page 69 69
  • Page 70 70
  • Page 71 71
  • Page 72 72
  • Page 73 73
  • Page 74 74
  • Page 75 75
  • Page 76 76
  • Page 77 77
  • Page 78 78
  • Page 79 79
  • Page 80 80
  • Page 81 81
  • Page 82 82
  • Page 83 83

Grandstream WP820 User guide

Category
IP phones
Type
User guide

Ask a question and I''ll find the answer in the document

Finding information in a document is now easier with AI