Page is loading ...


2
3
Models Features
TP-9200 Auto Feed Card Printer
TP-9000 Manual Feed Card Printer
Contents
Caution
1 Getting Started
1.1 Introduction
1.2 Contents in Package
1.3 Printer Features
1.4 Loading Cleaning Roller
1.5 Loading Ribbon
1.6 Single Card Feeding
1.7 Loading Cards
1.8 Using Magnetic Stripe Cards.
1.9 Card Output Stacker For the TP-9200
1.10 Power Device, Power Cable, Communication Cable
2. Driver/Software Installation
2.1 PC Systems requirement
2.2 Installing Driver
3. Printer with Card Printer
3.1 Setting up as the default printer
3.2 Changing the printer port (for Driver printing)
3.3 Printing a Card
3.4 Canceling Print
4. Printer Driver Settings
4.1 Opening in printer folder
4.2 Opening in printing Preferences on application software
4.3 Network Conguration Settings (Option)
04
07~17
07
07
08
12
13
14
15
16
16
17
18~22
18
18
23~26
23
24
26
26
27~44
27
27
36
45~49
45
45
46
46
48
49
50~62
50
50
50
54
55
56
61
63~69
63
64
68
69
70~72
70
72
73
73
73
74~75
74
74
76~77
5. Printer Operation
5.1 Printing a Card
5.2 Setting printer properties
5.3 Printing a sample Card
5.4 Printing a self-test card
5.5 Printing via a PC Connection
5.6 Printing One Card at a Time
6. Software Operation
6.1 Getting Started
6.2 Description on Features
6.3 Designing Card
6.4 Tools
6.5 Conguration
6.6 Data Synchronizing
6.7 Card Printing
7. Instructions on Maintenance
7.1 Maintenance of Product
7.2 How to Clean the Printer
7.3 Thermal Print Head Cleaning Pen and Alcohol Swab
7.4 Washing the Blue Cleaning Roller
8. Troubleshooting
8.1 In case front LED keeps on ashing or always on all the time.
8.2 Other Troubles
9. Other Issues
9.1 Color Ribbons
9.2 Monochrome Ribbons
10. POINTMAN Card Printer Specications
10.1 Main Features
10.2 Specications
11. Regulatory
Contents Contents

4
5
CAUTION
User should read caution information and keep in mind before use.
Dierent icons remind important information as to safety. T.I.T. Eng Co., Ltd is not responsible
for physical harm to body or physical damage to the product occurred by user’s careless use.
DANGER
Warns user of risk of losing life or being seriously injured.
DANGER
Warns user of risk of losing life or being seriously injured.
WARNING
Warns user of risk of being seriously or slightly injured, or
damage to product.
CAUTION
Warns user of slight damage to body.
NOTE
Indicates information that supplements detailed information.
The information in this user manual is subject to change without notice.
POWER
- Do not use damaged power cord, plug or socket.
- Do not pull plug with power cord.
- Do not touch power plug with wet bare hand.
- Do not bend power cord or put heavy things on the power cord.
- Unplug during thunder and lightning or storage
INSTALLATION
- Do not place the printer in wet. dirty place.
- Do not put lightings on the printer. Put the printer away from heat source.
- Unplug while moving the printer.
- Put the printer away from ammable source.
CLEANING
- Keep the plug dry and clean
- Unplug the printer before cleaning. Do not use water or chemical cleanser.
MISCELLANEOUS
- Take care not to spill any liquid on the printer
- In case of abnormal situation in the printer.
Unplug the printer immediately and contact your dealer.
- Make sure that you use the adequate power adaptor.
CAUTION CAUTION

6
7
INSTALLATION
- Do not put the printer on unstable place.
- Avoid direct sunlight.
1.1 Introduction
Thank you for choosing the POINTMAN TP-9200 and TP-9000 for your valuable card printer.
Before you set up the printer, please read this user manual for your secure and enjoyable use
of Pointman card printer.
This card printer enables user to create cards easily and shortly in accordance with the card
specications you wish to get.
You can get high quality color image with the card printer of dye sublimation printing.
In order to meet customers’ requirements, it provides options such as magnetic stripe,
IC(Contact), RF(Contactless) encoding, automatic duplex as well as bar code, diagram, picture
printing.
It is useful for creating bank cards, membership cards, loyalty cards and identication cards
on PVC card.
1.2 Contents in Package
MISCELLANEOUS
- Do not disassemble cover or protection parts.
- When you put hand inside the printer, do not operate it.
- Make sure that you perform cleaning and maintaining according to the instructions.
- Do not disassemble, repair, modify.
- Do not put heavy things on the printer.
CLEANING
- Do not disassem ble cover or protective parts.
- Do not operate printer with your hand inside.
- Make sure that you perf orm cleaning and maintenance according to the instructions
1
Getting Started
TP-9000
TP-9200
BLUE
CEANING ROLLER POWER ADAPTOR
POWER CABLE
STACKER
(TP-9200only) USER MANUAL
DRIVERS,
SOFTWARE AND
DOCUMENTATION CD
USB PRINTER CABLE
Please make sure that printer and all the accessories are in good order.
If any items are missing, please contact your dealer.
CAUTION Getting Started
CAUTION
Warns user of slight damage to body.

8
9
1.3 Printer Features
TP-9000 (Manual Feeding, Single-side Printing)
TP-9000 (Manual Feeding, Dual-side Printing)
Even though we have three dierent models of TP-9xxx series, since there is no big
dierence in operating them, user manual is designed for TP-9200 Dual Sided as
main reference.
Even though we have three dierent models of TP-9xxx series, since there is no big
dierence in operating them, user manual is designed for TP-9200 Dual Sided as
main reference.
Front
Front
Rear
Rear
Side
Side
Features Description
Features Description
No Name Description
1
2
3
4
5
6
7
8
9
10
11
12
13
14
15
LED Display
LCD Display
Card Eject Button
Ribbon Set Button
Single Feed Slot
Mobile Chip Slot
Power Button
Printer Lid
Flipper
USB Socket
USB Port
Ethernet Port
RS232C Port
Power Socket
External RF
LED shows the status of printer
LCD panel displays the status of printer
Button for card eject from printer inside
Button for replacing or repositioning ribbon
One by one manual feed and Cleaning card slot
Mobile chip socket (Optional)
Power on and o
Open the lid to load a cleaning roller and a ribbon
Automatic Dual Side Printing (Optional)
Used for memory stick HUB
Used for connecting USB cable between a PC and Card Printer
Used for connecting USB cable between a PC and Card Printer
Used for connecting USB cable between a PC and Card Printer
Used for supplying power
External RF Card Read/Write Station (Optional)
Getting Started Getting Started

10
11
TP-9200 (Automatic Feeding, Single-side Printing) TP-9200 (Automatic Feeding, Dual-side Printing)
Even though we have three dierent models of TP-9xxx series, since there is no big
dierence in operating them, user manual is designed for TP-9200 Dual Sided as
main reference.
Even though we have three dierent models of TP-9xxx series, since there is no big
dierence in operating them, user manual is designed for TP-9200 Dual Sided as
main reference.
Front Front
Rear Rear
Side Side
Features Description Features Description
No Name Description
1
2
3
4
5
6
7
8
9
10
11
12
13
14
15
16
17
Input Hopper
LED Display
LCD Display
Card Eject Button
Ribbon Set Button
Single Feed Slot
Mobile Chip Slot
Power Button
Output Stacker
Printer Lid
Flipper
USB Socket
USB Port
Ethernet Port
RS232C Port
Power Socket
External RF
Loads card to print up to 100 cards
LED shows the status of printer
LCD panel displays the status of printer
Button for card eject from printer inside
Button for replacing or repositioning ribbon
One by one manual feed and Cleaning card slot
Mobile chip socket (Optional)
Power on and o
Printed cards stacker up to 75 cards
Open the lid to load a cleaning roller and a ribbon
Automatic Dual Side Printing (Optional)
Used for memory stick HUB
Used for connecting USB cable between a PC and Card Printer
Used for connecting USB cable between a PC and Card Printer
Used for connecting USB cable between a PC and Card Printer
Used for supplying power
External RF Card Read/Write Station (Optional)
Getting Started Getting Started

12
13
1.4 Loading Cleaning Roller 1.5 Loading Ribbon
Open the printer`s lid by pressing
cover “OPEN” button and raise it
fully.
1Open the printer`s lid by pressing
cover “OPEN” button and raise
it fully..
1
Slid the cleaning roller into the
loading part and insert roller bar
into “U-shaped slots” until it locks
in place.
Blue Cleaning Roller
2
Place the supply spool into the
front slots and the take-up spool
into the rear slot.
Firmly close the printer lid.
2
Load a new cleaning roller or wash a used cleaning roller with each roll of printer ribbon.
U-Shaped Slot
Blue Cleaning Roller
Please note: Incorrect lid closure may result in poor quality print.
Getting Started Getting Started

14
15
1.6 Single Card Feeding 1.7 Loading Cards
Inserting Cards
Cards are inserted one at a time into the slot at the front of the printer. The card is printed on
the top surface and is ejected through the same slot.
Open the card feeding lid.
Note: Handle the cards only by the edges
This gure shows the encoding orientation for contact smart-cards and cards with a magnetic
stripe, on a TP-9000 printer.
If printing is desired on the side of the magnetic-stripe, the card should be inserted with the
stripe on the top surface and to the right.
For contactless smart-cards, orientation is not important.
Insert card, one at a time, into slot at front of
printer. In the case of magnetic stripe card, the
stripe should be on bottom and to the right.
1
Card will be ejected through the same slot after
printing.
2
Open the card feeding lid.
1
Load new cards to print at the
input hopper well as shown in
the picture.
2
Please be sure to stack cards in hop-
per as per pictures.
3
Wrong Card Stacking could be a cause of card feeding error.
Getting Started Getting Started

16
17
1.8 Using Magnetic Stripe Cards. 1.10 Power Device, Power Cable, Communication
Cable
1.9 Card Output Stacker for the TP-9200
If your printer has the option of magnetic stripe encoding, you can print and encode the
magnetic stripe (ISO 7811 track 1,2,3, Hi-Co/Lo-Co)
When you load magnetic stripe cards into card input hopper, please make sure the magnetic
stripe should be on the bottom and to the right.
ISO 7811
Track
Recording Density
Capacity
Start/End code
Track 1
210 BPI
79 characters
(7 bit code)
%/?
Track 2
75 BPI
40 characters
(5bit code)
;/?
Track 3
210 BPI
107 characters
(5 bit code)
;/?
Magnetic Card Standard : ISO 7811
Lock the card output stacker into
slots of the front side.
1
Use only USB cable provided by Pointman and PC having authentic
USB 2.0.
PC
Power cable
Communication
cable
TP-9000/9200
(Single-side)
TP-9000/9200
(Dual-side)
Power adaptor
Getting Started Getting Started
Magnetic

18
19
2.1 PC Systems requirement
The following operation systems are supported:
- Windows 2000
- Windows XP (32/64bit)
- Windows Vista (32/64bit)
- Windows 7 (32/64bit)
- Windows 8 (32/64bit)
Computer:
- CPU : Pentium Ill 1Ghz above (Pentium IV 1.5Ghz recommended)
- Memory : 128MB above (512 MB recommended)
- HDD : 1 GB above (5GB recommended)
- Internet Explorer 5.5 above (6.0 recommended)
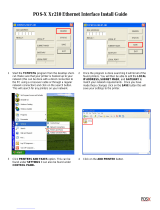
2.2 Installing Driver
2
Driver Software install
Close all windows in operation (Recommended)
To install/remove the driver/software on Windows 2000/XP/Vista/7, 8, you must be logged
in as the administrator.
Putting the POINTMAN Driver/Software CD into the CD-ROM Drive of the computer,
the installation window will “Open automatically or click Install .exe”.
1
The initial window of Card Printer installation program like the following will
automatically open.
“Click Start” to begin installation process.
2
Select the software you wish to install. “Click Next”.
3
Driver Software install Driver Software install
NOTE:
When installing the printer onto a network, connect Ethernet cable to printers
Ethernet port. Select “Network Software & Card Printer Driver”
Printer Driver before clicking “Next”. Switch Printer on (Ethernet install only) and
when ready press Set ribbon prior to printing

20
21
After reading license agreement for the software installation, “Select Agree” and then
“Click Next”.
4If Network Software is selected. This window will be shown and it will display an IP
address by automatically searching the Network to which the printer is connected.
6
- [Search] button : This searches Network Board.
- [Cong] button : This congures Network architecture.
- [Input by User] : If an IP address is not searched automatically, you can create a port
by inputting an IP address directly. You should use this feature in case that you
can’t search an IP address even though Network Setting is done.
- If an IP address on the right-hand box next to Network Printer is not searched.
you may congure it by clicking Cong button. Please refer to the Network
Conguration Settings section.
- If an IP address is “192.168.0.31”.
network printer port will be address as “IP 192.168.0.31”.
Select the port type you wish to install. “Click Next”.
5
Driver Software install Driver Software install
Caution:
If you stop the document printing, the le in printing can be mixed up with other
spooled le.

22
23
When installation is completed, please “Click Exit”.
7
Check out the selected software is installed.
8
(1) Check out Card Designer Software installation.
- Go to “Start -> All Programs -> POINTMAN -> Card Designer”
(2) Check out “Card Printer Driver” installation
- Go to “Start -> All Programs -> POINTMAN -> Printer”
- Go to Card Printer in Printers folder
(3) Check out “Network software” installation (Option)
- Go to “Start -> All Programs -> POINTMAN -> Network”
3.1 Setting up as the default printer
3
Printer with Card Printer
G o “Start -> Devices and Printers”
1
“Right - Click Card Printer Driver“ and set as default printer
2
Driver Software install Printer with Card Printer

24
25
3.2 Changing the printer port (for Driver printing)
G o “Start -> Devices and Printers”
1
Select the Ports (or Detaii)Tab.
3
Click the required port in order to print through either USB or Network
4
“Right-Click Card Printer Driver and select Printing Preferences” (or Printer
Properties)
2
- Printing to Network Port : IP_192.168.0.34 (For example-Ref er to Network
Conguration Settings section on Page 36 and choose the port (IP address) you
want to use
If the driver is installed successfully, “Enable bidirectional support” is selected
automatically. If you meet a problem when you print through the network port, please
unselect “Enable bidirectional support” and proceed with printing.
Printer with Card Printer Printer with Card Printer

26
27
Select the Print in the File menu.
- Make sure that you choose Card Printer .
Select the printer settings you wish to print. Click Print or OK
- Ensur e that the printing image is oriented in same direction (Landscape or Portrait)
as that of the card.
The preview function of the software will help you check it out.
3.3 Printing a Card
3.4 Canceling Print
Open le of the Window application software you wish to print
You can modify the printer settings for all applications.
The values input in printing program will get back to previous one when current operating
program terminates.
There are two ways to cancel printing
1)Canceling in an application software
2)Canceling the printing jobs at printing job window.
If a card jams whilst being printed, press the EJECT button at the front of the printer.
Please do not open the printer cover by pressing “Open” button during the operation,
If the printer cover is opened during the operation the printer would be stopped
automatically.
Keeping your printer operating with printer cover open, you can have the risk of injuries.
If you have any trouble, Please contact your dealer or the manufacturer.
4.1 Opening in printer folder
4.2 Opening Printing Prefernces on application
software
4
Printer Driver Settings
“Click Start”, point to “Settings”, and “Click Printers and Faxes.”
1
Execute printing order in application program.
1
“Right-Click Card Printer, select Properties” (or Printing Preferences) and make the
desired modications.
2
“Click Printing Preferences”.
2
Click each tab and window will open.
3
Click each tab and windows will open.
3
Upon completing settings. “Click OK”.
4
Upon completing settings. “Click OK”.
4
User can set up own printing environment with various functions the printer provides.
NOTE:
You can nd out the detail description for the printing preference at the
next page.
Printer with Card Printer Printer Driver Settings

28
29
Items Description
Items Description
The values input in printing program revert the previous
Card Tab Output Tab
Opening Printing Preferences on Application Software
NOTE:
Please refer to card specication of page 63 if unsure.
NOTE:
For all Monochrome and Black/Overlay (KO) ribbons, you will need to set the rib-
bon manually.
- Copies Sets the number of copies : 1 to 999.
- Orientation Sets the card orientation.
- Hopper Source Sets the source of the card supply in printer.
- Card Size Sets the size of card.
- Ribbon Type Sets the type of ribbon to be used
- Duplex Print prints the contents of a document on both sides of the card
- Black Panel, Select the K panel for printing black text and black images included
in the design
-180 Rotation will print the contents of the output data upside down on the card
- Overlay Panel option sets up the overlay panel for protecting the printed card.
Options include : Full Overlay/No Overlay/Selected Area/Use Image File/Smart card
ISO/Smart card AFNOR/Magnetic card
Printer Driver Settings Printer Driver Settings

30
31
Items Description
Items Description
More Options Image Tab
- Using the Spooler, Sets the method of transmitting data to the printer
- Printing Process Display on LCD, Displays printing process on LCD
- Display the information of the ribbon, Displays residual counts of ribbons.
The information can be displayed if the ribbon has an RFID tag and the count is
below 40
- Color Level, when printing this sets the number of colors
- Printing method, During Printing, the print mode for color ribbon movement cab
be set.
1 Pass, Transfer all data for YMCKO then prints
3 Pass, Transfer data for each panel then prints
- Dithering, this is applied to the data transmitted to the black panel of the
ribbon (YMCKO)
- Reverse print, Reverses RGB and prints
- Mirror print, Mirrors the printing data and print.
- Printing the color text to the black panel, if color text is required in black
- Brightness - Sets the whole brightness of the printed card.
- Contrast - Sets dark areas as darker and bright areas as brighter
- RGB control
The default RGB setting value is 50 and the controllable value step is 1-100
Because the actual value steps of RGB (RED/GREEN/BLUE) is 0-255,
1 step on this control section means 2-3 level
You can see how the printing color will be changed with the control of RGB on the
pictures left, balloons, but you can’t see any change on the application S/W.
- Sharpening - The adjustable value steps of Sharpening is 1-10, and1 step on this
control section means 1 .5 level.
- Diusion - Mixes the pixels of an image and makes it blurred
- Use Color Prole - Sets the color adjustment
Printer Driver Settings Printer Driver Settings

32
33
Items Description
Items Description
Magnetic Tab Control Tab
- Format, Sets the encoder format of the magnetic stripe
- Coercivity, Sets the coercivity type of magnetic stripe
- Enable macro processing, Send data to the magnetic stripe,
when this option is set it detects the start and end of the encoding data from
text format and processes it with Magnetic Stripe Encoding data.
- Encoding, Writes the data of selected track to the magnetic stripe
- Decoding, Reads the data of selected track from the magnetic stipe
- Card Eject, Ejects a card when the card remains inside the printer
- Get, Retrieves the information from the printer and displays
- Card Eject, Ejects card from printer
- Card Input, Inserts a card that is ready at feeder
- Self-printing, Prints a self-test card
- Self-Cleaning, Initializes the clean cycle.
- Ribbon Sync, Synchronizes the ribbon.
- Initialize Errors, Removes the error state of the printer .
You write or read track information in the magnetic strip.
Printer Driver Settings Printer Driver Settings

34
35
General Setting Tab Advanced Setting Tab
- Printing Speed - Mono
- Auto ribbon Sync - Color ribbon will be synchronized whenever lid is closed
- Card Ready Position -On initializing card can be situated inside printer or in feed
hopper
- Card input option - For TP-9000 only, On initializing card can be situated inside
printer or in feed slot.
- Card Eject time - For the TP-9000, Card eject time for batch printing.
- Card Insert time - For the TP-9000, Card insert time for batch printing.
- Card Ejection Option
1) General : from hopper to stacker (TP-9200) form manual slot to manual slot
(TP-9200 and TP-9000)
2) Manual Slot : Always out to manual slot (TP-9200)
3) Stacker : Always out to Stacker (TP-9200)
4) Rear : Always out to Rear (TP-9200 and TP-9000)
- TPH Resistance, Change the printhead resistance here
- Card Margin Setting, Osets, default as above.
(Note : Do not adjust these settings, they are critical to the printer operation)
- Intensity, Adjusts the darkness of the printed card.
- The “About” tab shows information about the driver, If you click on the picture,
Card Printer website will open via your internet browser .
Printer Driver Settings Printer Driver Settings

36
37
How to install a printer on a Network
4.3 Network Conguration Setting (Option)
Install Network driver “automatically or by manually clicking Install.exe” le.
1
“Tick Card Printer Driver box”
2
“Tick Network Software” box then “Click Next” button.
3
“Click the Agree option then click the Next button”.
4
If you get a Windows Security Warning Message pop-up, “Click Allow Access” button.
5
“Click Network Printer”.
6
If the printer is connected to your network and you are using DHCP mode, the IP address
will automatically appear in the drop down box. If the IP address is correct, “Click the
Next” button.
6-1
If IP address is not shown in the drop down box, tick input by user and then click Cong
button. The Conguration window will pop up and you can select the right MAC address
on the board list on the left side. You can also check the information for the Network
Setting, which is automatically assigned from your DHCP server. If the information is
correct, please “Click the Setting” button at the bottom. If the setting is ok, the printer
will “Re-boot automatically and Network setting complete” will pop up.
If the addresses are not correct, you can edit and then click setting to save.
6-2
<Network Conguration Window>
Printer Driver Settings Printer Driver Settings

38
39
If you want to connect to the Network using USB, manually input the IP address, Subnet
Mask, and Gateway and set DHCP mode.
6-3
Card Printer S/W and Printer Driver Install window.
7
Please “Click Finish” for the completion of the Printer Driver Install.
8
Network Conguration (Congure.exe)
Network Setting–Auto Setting (DHCP supported)
If you want to set up the Network after printer installation, set up with Network
Conguration.
Info) TP-9200, 9100 and 9000 - Any networks that have a TCP/IP network connection, can be
congured in DHCP mode and the IP Address will be supplied by the network.
Search the connected Network Board by “Clicking Search”.
1
Go to “Start -> All Programs -> POINTMAN -> Network -> Network Setting”
1
Printer Driver Settings Printer Driver Settings
Items Description
Board List – lists the searched network printers
F/W Version – show F/W version of the selected network board
IP Address – shows IP address of the selected network board
Gateway – shows gateway address of the selected network board
Local Port – sets a printing port through network printer. Please select 9200
/