Gorenje BCS547ORAW Owner's manual
- Category
- Ovens
- Type
- Owner's manual
This manual is also suitable for

www.gorenje.com
GB
DETAILED
INSTRUCTIONS FOR USE
OF A COMBI STEAM
OVEN
IE MT
www.gorenje.com

We thank you for your
trust and the purchase of our
appliance.
This detailed instruction manual is
supplied to make the use of this
product easier. The instructions
should allow you to learn about your
new appliance as quickly as possible.
Make sure you have received an
undamaged appliance. If you do find
transport damage, please contact the
seller from which you purchased the
appliance, or the regional warehouse
from which it was supplied. The
telephone number can be found on
the invoice or on the delivery note.
Instructions for installation and
connection are supplied on a
separate sheet.
Instructions for use are also available
at our website:
www.gorenje.com
Important information
Tip, note

3
CONTENTS
602220
INTRODUCTION
PREPARING
THE APPLIANCE
FOR THE FIRST
USE
COOKING
STEPS
MAINTENANCE
& CLEANING
TROUBLE-
SHOOTING
4 IMPORTANT SAFETY INSTRUCTIONS
6 Before connecting the appliance:
7 Technical specifications
8 COMBI STEAM OVEN
12 Control unit (depending on the model)
14 BEFORE USING THE APPLIANCE FOR THE FIRST TIME
14 Steam cooking
15 Filling the water tank
16 STEPS OF THE COOKING PROCESS (1–6)
16 Step 1: SWITCHING ON AND SETTINGS
20 Step 2: CHOOSING THE COOKING SYSTEM
22 Step 3: CHOOSING THE SETTINGS
26 Step 4: SELECTING ADDITIONAL FUNCTIONS
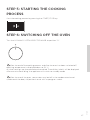
27 Step 5: STARTING THE COOKING PROCESS
27 Step 6: SWITCHING OFF THE OVEN
28 DESCRIPTIONS OF SYSTEMS (COOKING MODES) AND COOKING
TABLES
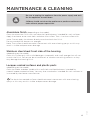
49 MAINTENANCE & CLEANING
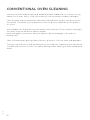
50 Conventional oven cleaning
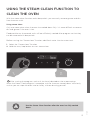
51 Using the steam clean function to clean the oven
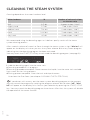
52 Cleaning the steam system
53 Cleaning the filter foam
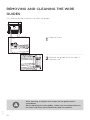
54 Removing and cleaning the wire guides
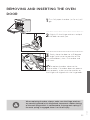
55 Removing and inserting the oven door
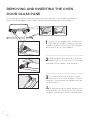
58 Removing and inserting the oven door glass pane
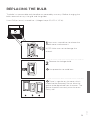
59 Replacing the bulb
60 TROUBLESHOOTING TABLE
61 DISPOSAL
OTHER

4
602220
IMPORTANT SAFETY
INSTRUCTIONS
CAREFULLY READ THE INSTRUCTIONS AND SAVE THEM
FOR FUTURE REFERENCE.
This appliance can be used by children aged from 8 years
and above and persons with reduced physical, sensory or
mental capabilities or lack of experience and knowledge if
they have been given supervision or instruction concerning
use of the appliance in a safe way and understand the
hazards involved. Children shall not play with the appliance.
Cleaning and user maintenance shall not be made by
children without supervision.
WARNING: The appliance and its accessible parts become
hot during use. Care should be taken to avoid touching
heating elements. Children less than 8 years of age shall be
kept away unless continuously supervised.
WARNING: Accessible parts may become hot during use.
Young children should be kept away.
During use the appliance becomes hot. Care should be
taken to avoid touching heating elements inside the oven.
Only use the temperature probe recommended for use in
this oven.
WARNING: Ensure that the appliance is switched off before
replacing the lamp to avoid the possibility of electric shock.
Do not use harsh abrasive cleaners or sharp metal scrapers to
clean the oven door glass/ the glass of hinged lids of the hob
(as appropriate), since they can scratch the surface, which may
result in shattering of the glass.

5
602220
Do not use steam cleaners or high pressure cleaners to clean the
appliance as this may result in an electric shock.
Means for disconnection must be incorporated in the fixed wiring
in accordance with the wiring rules.
If the supply cord is damaged, it must be replaced by the
manufacturer, its service agent or similarly qualified persons
in order to avoid a hazard (only for appliances supplied with
connection cord) .
The appliance must not be installed behind a decorative
door in order to avoid overheating.
The appliance is intended for household
use. Do not use it for any other purpose,
such as room heating, drying of pets or
other animals, paper, fabrics, herbs etc. As
this may lead to injury or fire hazard.
The appliance may only be connected to
the power mains by an authorized service
technician or expert. Tampering with
the appliance or nonprofessional repair
thereof may result in risk of severe injury or
damage to the product.
If the power cords of other appliances
located near this appliance are caught
in the oven door, they may be damaged,
which may in turn result in a short circuit.
Therefore, keep the power cords of other
appliances at a safe distance.
Do not line the oven walls with aluminium
foil and do not place baking trays or other
cookware on the oven bottom. Aluminium
foil would prevent air circulation in the
oven, hinder the cooking process, and ruin
the enamel coating.
Oven door become very hot during
operation. A fourth glass is installed for extra
protection, reducing the temperature of the
outside surface (only with some models).
Oven door become very hot
duringoperation. A third glass is installed
for extra protection, reducing the
temperature of the outside surface (only
with some models).
Oven door hinges may be damaged when
under excessive load. Do not place heavy
pans on open oven door and do not lean
against open oven door when cleaning the
oven cavity. Never stand on the open oven
door and do not let children to sit on it.
Do not lift the appliance by holding it by
the door handle.
Appliance operation is safe with and
without tray guides.
Make sure the vents are never covered or
obstructed in any other way.
Eventual mismatches in colour
shades between different appliances
or components within a single design
line may occur due to various factors,
such as different angles under which
the appliances are observed, different
coloured backgrounds, materials, and room
illumination.

6
Safe and correct use of the steam oven
Leave the appliance at room temperature for
some time before connecting it to the power
mains to allow all components to adapt to
room temperature. If the oven is stored at a
temperature near or below freezing point,
there is a danger for some components,
especially the pumps.
The appliance should not operate in an
environment with a temperature below 5
°C. Below this temperature, the appliance
may not operate correctly. If the appliance
is switched on in such conditions, the pump
could be damaged.
If the appliance does not work correctly,
disconnect it from the power mains.
Do not store items in the oven, which could
cause danger when the oven is switched on.
Do not use distilled water that is not suitable
for ingestion (e.g. distilled water for batteries,
to which acid is added).
When you open the oven door (with steam
systems) after the end or during steam
cooking, make sure to open the door to the
fully open position; otherwise, the steam from
the oven cavity could negatively affect the
control panel operation.
After the steam cooking is completed, there
is some residual steam in the oven. Open
the oven door carefully, as there is danger of
scalding with steam. Clean the oven once it
has cooled down to room temperature.
After the cooking process, the remaining
water in the steam system is pumped back
into the water tank. Therefore, the water
there could be hot. Be careful when emptying
the water tank.
To prevent the build-up of limescale, leave
the oven door open after cooking to allow
the oven cavity to cool down to room
temperature.
It is inadvisable to open the door during
the steam cycle, as this will increase power
consumption and formation of water
condensate.
602220
WARNING!
Risk of burns and damage to the appliance.
• Released Steam can cause burns: Be careful when you open the appliance
door when the function is activated. Steam can release.
WARNING!
Use only water as the liquid. Do not use filtered (demineralised) or distilled water.
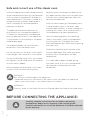
BEFORE CONNECTING THE APPLIANCE:
Carefully read the instructions for use before connecting
theappliance. Repair or any warranty claim resulting from
incorrect connection or use of the appliance shall not be covered
by the warranty.

7
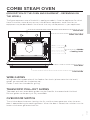
COMBI STEAM OVEN
(DESCRIPTION OF THE OVEN AND EQUIPMENT – DEPENDING ON
THE MODEL)
Control unit
WIRE GUIDES
Wire guides allow preparation of the food on four levels (please note that the levels/
guides are counted from the bottom up).
Guides 3 and 4 are intended for grilling.
TELESCOPIC PULL-OUT GUIDES
Telescopic pull-out (extendible) guides may be fitted for the second and third level.
Pull-out guides can be partly or fully extendible.
OVEN DOOR SWITCH
The switches deactivate oven heating, the fan, and the steam generator when the oven
door is opened during the cooking process. When the door is closed, the switches turn the
heaters and steam generator back on.
Oven door
Oven handle
Guides
- Cooking levels
4
3
2
1
602220
The figure represents one of the built-in appliance models. Since the appliances for which
these instructions were drawn up may have different equipment, some functions or
equipment may be described in the manual that may not be present in your appliances.
Water tank door

8
COOLING FAN
The appliance is fitted with a cooling fan that cools the housing and the appliance control
panel.
EXTENDED OPERATION OF THE COOLING FAN
After the oven is switched off, the cooling fan continues to operate for a short while in
order to provide additional cooling for the oven. (Extended cooling fan operation depends
on the temperature in the center of the oven.)
602220
OVEN EQUIPMENT AND ACCESSORIES (depending on the model)
GLASS BAKING DISH is used for cooking
with all oven systems and for cooking with
microwaves. It can also be used as a serving
tray.
The GRID is used for grilling or as support
for a pan, baking tray or baking dish with
the food.
There is a safety latch on the grid.
Therefore, the grid has to be lifted slightly at
the front when pulling it out from the oven.
The SHALLOW BAKING SHEET is used for
baking pastry and cakes.
The DEEP BAKING TRAY is used for
roasting meat and baking moist pastry. It
can also be used as a drip tray.
Never place the deep baking tray in the
first guide during the cooking process, except
when grilling food or using the roasting spit and
you are only using the deep tray as a drip tray.
As baking accessories heat up, their
form may change. This does not affect
their functionality and their original form
will be restored when they cool down.

9
602220
STEAM SET (INOX) is used for steam
cooking. Place the perforated tray in the
middle level and the drip tray one level below.
The grid or the tray should always be
inserted into the groove between the two
wire profiles.
With telescopic extendible guides, first pull
out the guides of one level and place the
grid or the baking tray onto them. Then,
push them in with your hand as far as they
will go.
Close the oven door when the
telescopic guides are retracted all the way
into the oven.
SYNCHRONIZATION BAR
The bar can be installed or removed on the
fully retractable telescopic guides. First,
completely pull out both guides of the desired
level. Insert the bar into the two slots on the
guides and push the guides in with your hand
until they stop.
BAKING PAN SUPPORT allows easy
removal of baking pans from the oven while
they are still hot.
2
3

10
602220
PROBE for roasting larger chunks of meat.
(Depending on the model)
DESCALING AGENT for cleaning the steam
system.
TEST PAPER STRIP for testing water
hardness.
MECHANICAL DOOR LOCK prevents
the opening of oven door until the lock is
released.
To open it, gently push your thumb to the
right while pulling the door outwards.
The appliance and some of the accessible parts tend to heat up
during cooking. Use oven mitts.

11
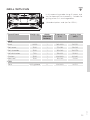
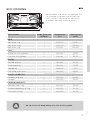
TECHNICAL SPECIFICATIONS
(DEPENDING ON THE MODEL)
602220
The rating plate indicating the basic
information about the appliance is located
at the edge of the oven and it is visible
when the oven door is opened.
A Serial number
B Code/ID
C Type
D Brand
E Model
F Technical data
G Compliance symbols

12
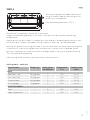
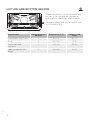
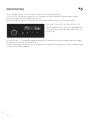
CONTROL UNIT
(DEPENDING ON THE MODEL)
1
COOKING
SYSTEM
SELECTOR KNOB
(depending on the
model)
2
CHILD LOCK
KEY 3
OVEN
LIGHTING ON/
OFF KEY
4
TEMPERATURE
NOTE:
Symbols of cooking systems may be located on the knob or on the front panel
(depending on the appliance model).
602220

13
5
ELECTRONIC
PROGRAM
TIMER
Cooking duration
End of cooking
Alarm
Clock
6
START/STOP
KEY
Use this key to
start or stop the
program.
7
SETTINGS KNOB
(-/+)
Use this knob
to set the time,
temperature.
8
COOKING
INFORMATION
AND CLOCK DISPLAY
NOTE:
The keys will respond better if you touch them with a larger area of your fingertip. Each
time you press a key, a short acoustic signal will be sounded.
602220

14
602220
BEFORE USING THE APPLIANCE
FOR THE FIRST TIME
Upon receiving the appliance, remove all parts, including any transport equipment, from
the oven.
Clean all accessories and utensils with warm water and regular detergent. Do not use any
abrasive cleaners.
When the oven heats up for the first time, the characteristic smell of a new appliance will
be emitted. Ventilate the room thoroughly during the first use.
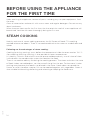
STEAM COOKING
Healthy and natural, steam cooking preserves the full flavour of foods. This cooking
method releases no odours. There is no need to add salt to the water or to add herbs and
spices.
Following are the advantages of steam cooking:
Cooking (braising, roasting) starts before the temperature inside the oven reaches 100 °C.
Slow cooking (braising, roasting) is also possible at lower temperatures.
It is healthy: vitamins and minerals are well preserved because only a small share of them
is dissolved in the condensation water that touches the food.
There is no need to add any fat during the cooking process. The steam maintains the taste
of food. It does not add odours, nor the taste of the grill or the pan. Furthermore, it takes
nothing away because the food is not diluted in the water. Steam does not spread the
flavour or smell; therefore, meat or fish can be cooked together with vegetables. Steam is
also suitable for blanching, defrosting and reheating or keeping the food warm.

15
602220
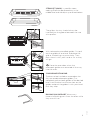
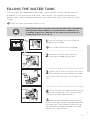
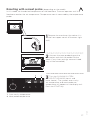
FILLING THE WATER TANK
The tank allows for independent water supply to the steamer. The tank volume amounts
to approx. 1.3 litres (maximum water level – see marking). This amount of water allows
approximately 3 hours of cooking time with max. steam cycle (hot air with steam on "high"
system).
Clean the water tank before the first use.
Always fill the water tank with clean and cool water from the pipeline,
bottled water without additives, or distilled water suitable for use
in cooking. Water that is poured into the water tank should be at a
temperature of 20 °C (+/- 10 °C).
1
Press on the spot with the sticker to
open the tank door.
The sticker can be later removed.
2
Remove the water tank from the
housing by grabbing the notch.
3
Open the lid. Wash the tank with water.
Re-assemble the tank. Before use, add
fresh water up to the MAX marking on the
tank.
4
Push the water tank back into the housing
to the final position (until the short click).
Then, press the tank door to close it.
After the cooking process, the remaining
water in the steam system is pumped back into
the water tank. The lid and the water tank can
be washed with standard non-abrasive liquid
cleaners or in a dishwasher.

16
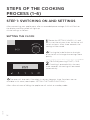
1
Rotate the SETTINGS KNOB (-/+) and
first set the minutes; then, the cursor will
switch to hours. After three seconds, the
settings will be saved.
Turning the knob farther to the right
or to the left will change the settings more
quickly.
2
Confirm by pressing START/ STOP.
If nothing is pressed within the next
three seconds, the setting will be stored
automatically.
The oven will also work if the clock is not set. However, timer functions are not
available in this case (see chapter: SETTING THE TIMER FUNCTIONS).
After a few minutes of idling, the appliance will switch to standby mode.
602220
STEPS OF THE COOKING
PROCESS (1–6)
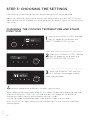
STEP 1: SWITCHING ON AND SETTINGS
After connecting your appliance or after an extended power outage, 12:00 will flash on
the display and the symbol will light up.
All the settings as follows:
SETTING THE CLOCK

17
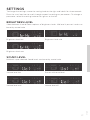
SETTINGS
To change the settings, rotate the setting knob to the right and hold it for three seconds.
Press the start/sop icon to scroll through respective settings or parameters. To change a
parameter, rotate the setting knob to the right or to the left.
BRIGHTNESS LEVEL
Select between three different options of brightness levels. Mid level is pre-set. Levels can
be set by rotate knob.
Brightness level low Brightness level mid
Brightness level max
SOUND LEVEL
Mid level is pre-selected. Sound levels can be set by rotate knob.
Volume level low Pre-set mid sound level
Volume level max Volume level off
602220

18
WATER HARDNESS (active only on steam ovens)
Water hardness test should be carried out before first use.
Soak the test paper strip (supplied with the appliance) in water for one (1) second.
Wait one minute and observe the number of stripes on the paper. Enter the information
on the number of stripes into the appliance.
4 green stripes Soft Hrd 1
1 red stripe Slightly hard Hrd 2
2 red stripes Medium hard Hrd 3
3 red stripes Hard Hrd 4
4 red stripes Very hard Hrd 5
You can selected between five different options of water hardness levels. Water hardness
level 5 is pre-set,text is visible. Levels can be set by rotating knob.
DECALTINATION (active only on steam ovens)
You can activate decaltination process by selecting ˝on˝ or ˝off˝ with jogger(rotate) knob
and later by pressing the start/stop icon to confirm it. Decaltination ˝on˝ is pre-set.
STEP1 - Add the descaling agent into the
water tank.
STEP2 - Descaling procedure complete.
Please remove the liquid, rinse the water
tank and add fresh water for the rinsing
process.
602220

19
STEP3/End - Rinsing process complete.
Clean the tank and wipe the oven.
Also clean the filter foam (see chapter
CLEANING THE FILTER FOAM)
END
By pressing the start/stop icon, user can go out of settings menu back to standby mode.
You can go out of settings menu also if you hold selection knob on the left for 3 sec, or it
you turn the system knob.
To change the settings, rotate the setting knob to the right and hold it for three seconds.
Press the start/sop icon to scroll through respective settings or parameters. To change a
parameter, rotate the setting knob to the right or to the left.
602220
After a power outage or after the appliance is switched off, the
additional function settings will remain stored for no more than a
few minutes. Then, all settings, except for the acoustic signal and
child lock will be reset to factory defaults.

20
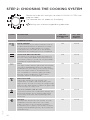
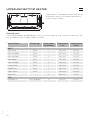
STEP 2: CHOOSING THE COOKING SYSTEM
Rotate the knob (left and right) to select COOKING SYSTEM (see
program table).
The selected icon will appear on the display.
Settings can also be changed during operation.
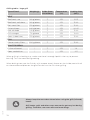
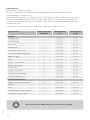
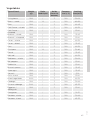
SYSTEM DESCRIPTION PRE-SET
TEMPERATURE
(°C)
MIN - MAX
TEMPERA-
TURE (°C)
COOKING SYSTEMS
RAPID PREHEAT
Use this function if you wish to heat the oven to
the desired temperature as quickly as possible.
This function is not appropriate for cooking
food. When the oven heats up to the desired
temperature, the heating process is completed.
160 30-230
UPPER AND BOTTOM HEATER
The heaters in the bottom and in the ceiling of
the oven cavity will radiate heat evenly into the
oven interior. Pastry or meat can only be baked/
roasted at a single height level.
200 30-230
GRILL
The upper heater and the grill heater will operate.
The heat is radiated directly by the grill heater
installed in the oven ceiling. To boost the heating
effect, the upper heater is activated as well.
This combination is used for grilling a smaller
amount of open sandwiches, meat or beer
sausages, and for toasting bread.
230 30-230
GRILL WITH FAN
Grill heater and the fan will operate. This
combination is used to grill meat and to roast
larger chunks of meat or poultry at a single height
level. It is also appropriate for dishes au gratin and
for browning to a crispy crust.
170 30-230
HOT AIR AND BOTTOM HEATER
The bottom heater, the round heater, and the hot
air fan will operate. This is used to bake pizza,
moist pastry, fruitcakes, leavened dough and
shortcrust.
200 30-230
HOT AIR
Round heater and the fan will operate. The fan
installed in the back wall of the oven cavity
makes sure the hot air constantly circulates
around the roast or pastry. This mode is used for
roasting meat and baking pastry at several levels
simultaneously.
180 30-230
602220
Page is loading ...
Page is loading ...
Page is loading ...
Page is loading ...
Page is loading ...
Page is loading ...
Page is loading ...
Page is loading ...
Page is loading ...
Page is loading ...
Page is loading ...
Page is loading ...
Page is loading ...
Page is loading ...
Page is loading ...
Page is loading ...
Page is loading ...
Page is loading ...
Page is loading ...
Page is loading ...
Page is loading ...
Page is loading ...
Page is loading ...
Page is loading ...
Page is loading ...
Page is loading ...
Page is loading ...
Page is loading ...
Page is loading ...
Page is loading ...
Page is loading ...
Page is loading ...
Page is loading ...
Page is loading ...
Page is loading ...
Page is loading ...
Page is loading ...
Page is loading ...
Page is loading ...
Page is loading ...
Page is loading ...
Page is loading ...
Page is loading ...
Page is loading ...
-
 1
1
-
 2
2
-
 3
3
-
 4
4
-
 5
5
-
 6
6
-
 7
7
-
 8
8
-
 9
9
-
 10
10
-
 11
11
-
 12
12
-
 13
13
-
 14
14
-
 15
15
-
 16
16
-
 17
17
-
 18
18
-
 19
19
-
 20
20
-
 21
21
-
 22
22
-
 23
23
-
 24
24
-
 25
25
-
 26
26
-
 27
27
-
 28
28
-
 29
29
-
 30
30
-
 31
31
-
 32
32
-
 33
33
-
 34
34
-
 35
35
-
 36
36
-
 37
37
-
 38
38
-
 39
39
-
 40
40
-
 41
41
-
 42
42
-
 43
43
-
 44
44
-
 45
45
-
 46
46
-
 47
47
-
 48
48
-
 49
49
-
 50
50
-
 51
51
-
 52
52
-
 53
53
-
 54
54
-
 55
55
-
 56
56
-
 57
57
-
 58
58
-
 59
59
-
 60
60
-
 61
61
-
 62
62
-
 63
63
-
 64
64


Gorenje BCS547ORAW Owner's manual
- Category
- Ovens
- Type
- Owner's manual
- This manual is also suitable for
Ask a question and I''ll find the answer in the document
Finding information in a document is now easier with AI
Related papers
-
Gorenje BCS599S22X Owner's manual
-
-
-
-
-
-
 ORA ITO BO658ORAB Owner's manual
-
Gorenje BO6727E03X Operating instructions
-
-

Other documents
-
Kleenmaid TO100X Owner's manual
-
elco A-7160 User manual
-
Anova Precision® Oven Lift User guide
-
Panasonic HLCK614SBPQ Operating instructions
-
-
Ilve ILCS45X User manual
-
Asko OCS8487S User manual
-
Hoover HOZP7876B User manual
-
-
Asko OCS8687S User manual