
3-860-747-12 (1)
©1997 by Sony Corporation
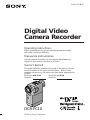
DCR-PC10
Digital Video
Camera Recorder
Operating Instructions
Before operating the unit, please read this manual thoroughly,
and retain it for future reference.
Manual de instrucciones
Antes de emplear la unidad, lea este manual detenidamente y
consérvelo para realizar consultas en el futuro.
Owner’s Record
The model and serial numbers are located on the bottom. Record
the serial number in the space provided below. Refer to these
numbers whenever you call upon your Sony dealer regarding this
product.
Model No. DCR-PC10 Model No. AC-V100
Serial No. Serial No.

2
Español
FORMA DE DESHACERSE DE LAS
PILAS DE IONES DE LITIO
PILA DE IONES DE LITIO
FORMA APROPIADA DE DESHACERSE DE
LAS PILAS
Usted podrá devolver las pilas de iones de litio a un
centro de reparaciones Sony o a una fábrica Sony.
Nota: En ciertas zonas puede estar prohibido tirar las
pilas de iones de litio a la basura.
Para información sobre el centro de reparaciones Sony
más cercano, llame a 1-800-222-SONY (EE.UU.
solamente)
Para información sobre la fábrica Sony más cercana,
llame a 416-499-SONY (Canadá solamente)
Precaución: No utilice pilas de iones de litio dañadas o
con fugas de electrólito.
ADVERTENCIA
Para evitar riesgos de incendio o descargas,
no exponga la unidad a la lluvia ni a la
humedad.
Para evitar descargas eléctricas, no abra la
unidad y solicite asistencia técnica sólo a
personal cualificado.
RISK OF ELECTRIC SHOCK
DO NOT OPEN
CAUTION : TO REDUCE THE RISK OF ELECTRIC SHOCK,
DO NOT REMOVE COVER (OR BACK).
NO USER•SERVICEABLE PARTS INSIDE.
REFER SERVICING TO QUALIFIED SERVICE PERSONNEL.
CAUTION
Note:
This equipment has been tested and found to comply
with the limits for a Class B digital device, pursuant to
Part 15 of the FCC Rules. These limits are designed to
provide reasonable protection against harmful
interference in a residential installation. This equipment
generates, uses, and can radiate radio frequency energy
and, if not installed and used in accordance with the
instructions, may cause harmful interference to radio
communications. However, there is no guarantee that
interference will not occur in a particular installation. If
this equipment does cause harmful interference to radio
or television reception, which can be determined by
turning the equipment off and on, the user is
encouraged to try to correct the interference by one or
more of the following measures:
— Reorient or relocate the receiving antenna.
— Increase the separation between the equipment and
receiver.
— Connect the equipment into an outlet on a circuit
different from that to which the receiver is connected.
— Consult the dealer or an experienced radio/TV
technician for help.
For the Customers in CANADA
CAUTION
TO PREVENT ELECTRIC SHOCK, DO NOT USE THIS
POLARIZED AC PLUG WITH AN EXTENSION CORD,
RECEPTACLE OR OTHER OUTLET UNLESS THE
BLADES CAN BE FULLY INSERTED TO PREVENT
BLADE EXPOSURE.
English
WARNING
To prevent fire or shock hazard, do
not expose the unit to rain or
moisture.
This symbol is intended to alert the
user to the presence of uninsulated
“dangerous voltage” within the
product’s enclosure that may be of
sufficient magnitude to constitute a
risk of electric shock to persons.
This symbol is intended to alert the
user to the presence of important
operating and maintenance
(servicing) instructions in the
literature accompanying the
appliance.
For the customers in the United
States and Canada
DISPOSAL OF LITHIUM ION BATTERY.
LITHIUM ION BATTERY.
DISPOSE OF PROPERLY.
You can return your unwanted lithium ion batteries to
your nearest Sony Service Center or Factory Service
Center.
Note: In some areas the disposal of lithium ion batteries
in household or business trash may be prohibited.
For the Sony Service Center nearest you call
1-800-222-SONY (United States only).
For the SONY Factory Service Center nearest you call
416-499-SONY (Canada only).
Caution: Do not handle damaged or leaking lithium ion
batteries.
For the Customers in the U.S.A.
CAUTION
You are cautioned that any changes or modifications not
expressly approved in this manual could void your
authority to operate this equipment.

3
Before you begin / Antes de comenzar
Before you begin
Using this manual................................................... 5
Checking supplied accessories ............................. 7
Getting started
Charging and installing the battery pack............ 8
Inserting a cassette................................................ 12
Basic operations
Camera recording ................................................. 13
Using the zoom feature ..................................... 16
Selecting the start/stop mode .......................... 18
Shooting with the LCD screen ......................... 19
Letting the subject monitor the shot ............... 20
Hints for better shooting ..................................... 22
Checking the recorded picture ........................... 24
Playing back a tape............................................... 25
Searching for the end of the picture................... 29
Advanced operations
Using alternative power sources ........................ 30
Using the house current.................................... 30
Using a car battery ............................................. 32
Changing the mode settings ............................... 33
—for camera recording—
Fade-in and fade-out ............................................ 38
Photo recording .................................................... 40
Enjoying picture effect ......................................... 43
Using the wide mode function ........................... 45
Using the PROGRAM AE function.................... 47
Releasing the STEADYSHOT function.............. 49
Focusing manually ............................................... 51
Adjusting the exposure........................................ 53
Adjusting the white balance ............................... 54
English
Table of contents
—for playing back/editing—
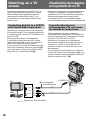
Watching on a TV screen ..................................... 56
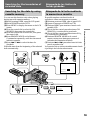
Searching for the boundaries of recorded
date....................................................................... 58
Searching for the scene with title ....................... 62
Searching for a photo – photo search/
photo scan ........................................................... 63
Returning to a pre-registered position .............. 67
Displaying recording data
– data code function .......................................... 68
Editing onto another tape.................................... 69
Replacing recording on a tape
– insert editing.................................................... 72
Audio dubbing...................................................... 73
Superimposing a title ........................................... 75
Making a custom title........................................... 79
Labeling a cassette ................................................ 81
Additional Information
Usable cassettes and playback modes ............... 82
Charging the vanadium-lithium battery in the
camcorder ........................................................... 84
Resetting the date and time................................. 85
Tips for using the battery pack ........................... 87
Maintenance information and precautions....... 93
Using your camcorder abroad ............................ 98
Trouble check ........................................................ 99
Self-diagnosis function ...................................... 104
Specifications....................................................... 111
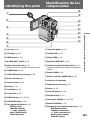
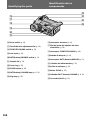
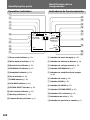
Identifying the parts........................................... 113
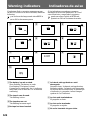
Warning indicators ............................................. 122
Index ........................................................ Back cover
Page is loading ...

5
Before you begin / Antes de comenzar
Before you begin
Using this manual
Welcome!
Congratulations on your purchase of this Sony
Handycam
Vision camcorder. With your
Handycam Vision you can capture life’s precious
moments with superior picture and sound
quality.
Your Handycam Vision is loaded with advanced
features, but at the same time it is very easy to
use. You will soon be producing home video that
you can enjoy for years to come.
As you read through this manual, buttons and
settings on the camcorder are shown in capital
letters.
e.g., Set the POWER switch to CAMERA.
As indicated with in the illustrations, you can
hear the beep sound to confirm your operation.
Note on TV color systems
TV color systems differ from country to country.
To view your recordings on a TV, you need an
NTSC system-based TV.
Note on cassette memory
This camcorder is based on the DV format. You
can only use mini DV cassettes with this
camcorder.
We recommend you to use a mini DV
cassette tape with cassette memory.
For details, see page 82.
The functions which depend on whether the tape
has the cassette memory or not are:
•End Search (p. 29)
•Date Search (p. 58)
•Photo Search (p. 63).
The functions you can operate only with the
cassette memory are:
•Title Search (p. 62)
•Superimposing titles (p. 75)
•Making a custom title (p. 79)
•Labeling a cassette (p. 81)
¡Bienvenido!
Enhorabuena por la adquisición de esta
videocámara Handycam Vision
TM
de Sony. Con
ella podrá capturar los momentos más preciosos
de su vida con una calidad de imagen y sonido
superior.
La Handycam Vision dispone de muchas
funciones avanzadas de fácil uso. Pronto estará
realizando videos domésticos de los que
disfrutará durante muchos años.
En este manual los botones y ajustes de la
videocámara aparecen en mayúsculas.
Ejemplo: Ajuste el interruptor POWER en
CAMERA.
Como se indica con en las ilustraciones, es
posible oír pitidos para confirmar las
operaciones.
Nota sobre sistemas de color de
TV
Los sistemas de color de TV varían en función del
país. Para ver las grabaciones en un TV, éste debe
estar basado en el sistema NTSC.
Nota sobre la memoria en
cassette
Esta videocámara está basada en el formato DV.
Sólo es posible utilizar videocassettes mini DV
con ella.
Se recomienda emplear videocassettes mini
DV con memoria en cassette.
Para más información, consulte la página 82.
A continuación se enumeran las funciones que
dependen de si la cinta dispone de memoria en
cassette o no:
•Búsqueda de imágenes finales (p. 29)
•Búsqueda de fechas (p. 58)
•Búsqueda de fotografías (p. 63).
A continuación se enumeran las funciones que
sólo pueden utilizarse con la memoria en
cassette:
•Búsqueda de títulos (p. 62)
•Superposición de títulos (p. 75)
•Creación de títulos personalizados (p. 79)
•Etiquetado de videocassettes (p. 81)
Antes de comenzar
Uso de este manual

6
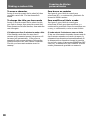
Precaution on copyright
Television programs, films, video tapes, and
other materials may be copyrighted.
Unauthorized recording of such materials may
be contrary to the provision of the copyright
laws.
Precautions on camcorder care
•The LCD screen and/or the color viewfinder
are manufactured using high-precision
technology. However, there may be some
tiny black points and/or bright points (red,
blue or green in color) that constantly
appear on the LCD screen and/or in the
viewfinder. These points are normal in the
manufacturing process and do not affect the
recorded picture in any way. Over 99.99%
are operational for effective use.
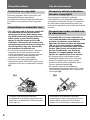
•Do not let the camcorder get wet. Keep the
camcorder away from rain and sea water.
Letting the camcorder get wet may cause the
unit to malfunction, and sometimes this
malfunction cannot be repaired [a].
•Never leave the camcorder exposed to
temperatures above 140°F (60°C), such as in a
car parked in the sun or under direct sunlight
[b].
Using this manual
Contents of the recording cannot be
compensated if recording or playback is not
made due to a malfunction of the camcorder,
video tape, etc.
[b][a]
Precaución sobre los derechos
de autor (copyright)
Los programas de televisión, películas,
videocassettes y otros materiales pueden estar
protegidos por derechos de autor. La grabación
no autorizada de tales materiales puede ir en
contra de lo establecido por las leyes de derechos
de autor.
Precauciones sobre cuidados de
la videocámara
•La pantalla LCD y/o el visor electrónico en
color están fabricados con tecnología de alta
precisión. No obstante, es posible que
aparezcan de forma constante en la pantalla
LCD y/o en el visor electrónico pequeños
puntos negros y/o brillantes (rojos, azules o
verdes). Estos puntos son normales en el
proceso de fabricación y no afectan en
absoluto a la imagen grabada. Más del
99,99% son operativos en el uso efectivo.
•No permita que la videocámara se moje.
Manténgala alejada de la lluvia y del agua
marina. Si permite que se moje, pueden
producirse fallos de funcionamiento que a
veces no puedan repararse [a].
•No exponga nunca la videocámara a
temperaturas superiores a 140°F (60°C), como
en un automóvil aparcado al sol o bajo la luz
solar directa [b].
Uso de este manual
El contenido de la grabación no podrá
compensarse si ésta o la reproducción no se
realiza debido a algún fallo de funciona-
miento de la videocámara, videocassette, etc.

7
Before you begin / Antes de comenzar
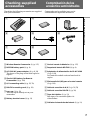
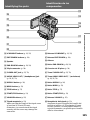
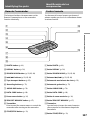
Check that the following accessories are supplied
with your camcorder.
1 Wireless Remote Commander (1) (p. 117)
2 NP-F100 battery pack (1) (p. 8)
3 AC-V100 AC power adaptor (1) (p. 8, 30)
The shape of the plug varies from region to
region.
4 Size AA (R6) battery for Remote
Commander (2) (p. 118)
5 A/V connecting cable (1) (p. 56, 70)
6 DK-626 connecting cord (1) (p. 30)
7 Lens cap (1) (p. 13)
This lens cap is already set on your
camcorder.
8 Battery terminal cover (1) (p. 11)
Checking supplied
accessories
4
123
5
78
6
Compruebe que ha recibido junto con la
videocámara los siguientes accesorios:
1 Control remoto inalámbrico (1) (p. 117)
2 Paquete de batería NP-F100 (1) (p. 8)
3 Adaptador de alimentación de CA AC-V100
(1) (p. 8, 30)
La forma del enchufe varía en función de la
región.
4 Pila tamaño AA (R6) para el control remoto
(2) (p. 118)
5 Cable de conexión de A/V (1) (p. 56, 70)
6 Cable de conexión DK-626 (1) (p. 30)
7 Tapa del objetivo (1) (p. 13)
Esta tapa ya se encuentra fijada a la
videocámara.
8 Cubierta de terminales de batería (1) (p. 11)
Comprobación de los
accesorios suministrados

8
Before using your camcorder, you first need to
charge and install the battery pack. To charge
the battery pack, use the supplied AC power
adaptor.
This camcorder operates with the
“InfoLITHIUM“ battery pack. If you use any
other battery pack to operate your camcorder, the
camcorder may not operate or the battery life
may be shortened.
“InfoLITHIUM“ is a trademark of Sony
Corporation.
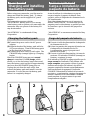
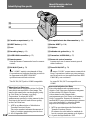
Charging the battery pack
(1)Connect the power cord to the AC power
adaptor.
(2)Align the hooks of the battery pack with the
AC power adaptor. Then fit the battery pack
in the direction of the arrow.
(3)Connect the power cord to a wall outlet. The
CHARGE lamp (orange) lights up. Charging
begins.
When the CHARGE lamp goes out, normal
charge is completed. For full charge, which
allows you to use the battery longer than usual,
leave the battery pack in place for approximately
one hour after the CHARGE lamp goes out.
Unplug the unit from the wall outlet, then
remove the battery pack and install it into the
camcorder. You can also use the battery pack
before it is completely charged.
Getting started
Charging and installing
the battery pack
CHARGE
1
2
3
Antes de utilizar la videocámara, es preciso
cargar e instalar el paquete de batería. Para
cargarlo, utilice el adaptador de alimentación de
CA suministrado.
Esta videocámara funciona con el paquete de
batería “InfoLITHIUM”. Si utiliza otro tipo de
paquete para la videocámara, es posible que ésta
no funcione o que la duración del paquete se
reduzca.
“InfoLITHIUM” es una marca comercial de Sony
Corporation.
Carga del paquete de batería
(1)Conecte el cable de alimentación al adaptador
de alimentación de CA.
(2)Alinee los ganchos del paquete de batería con
el adaptador de alimentación de CA.
A continuación, encaje el paquete en el
sentido de la flecha.
(3)Conecte el cable de alimentación a la toma de
corriente. El indicador CHARGE (naranja) se
ilumina y comienza la carga.
Si el indicador CHARGE se apaga significa que la
carga normal ha finalizado. Para obtener una
carga completa, que permite utilizar el paquete
durante más tiempo del habitual, deje dicho
paquete cargándose durante aproximadamente
una hora después de apagarse el indicador
CHARGE. Desenchufe la unidad de la toma de
corriente y, a continuación, extraiga el paquete de
batería e instálelo en la videocámara. También
puede emplear el paquete antes de que esté
completamente cargado.
Procedimientos iniciales
Carga e instalación del
paquete de batería

9
Getting started / Procedimientos iniciales
Charging and installing the
battery pack
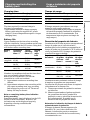
Charging time
Battery pack Charging time *
NP-F100 (supplied) 130 (70)
NP-F200 170 (110)
NP-F300 250 (190)
The time required for a normal charge is
indicated in parentheses.
* Approximate minutes to charge an empty
battery pack using the supplied AC power
adaptor. (Lower temperatures require a longer
charging time.)
Battery life
Upper numbers are the time when recording
with the viewfinder. Lower numbers are the time
when recording with the LCD screen. Using both
will further reduce recording time.
Battery Continuous Typical Playing
pack recording recording time
time ** time *** with
LCD
NP-F100 60 (55) 35 (30)
50 (45)
(supplied) 45 (40) 25 (20)
NP-F200 110 (95) 55 (50)
85 (75)
80 (70) 45 (40)
NP-F300 250 (225) 140 (125)
195 (175)
190 (170) 105 (90)
Numbers in parentheses indicate the time when
you use a normally charged battery.
Battery life will be shorter if you use the
camcorder in a cold environment.
** Approximate continuous recording time
indoors.
*** Approximate minutes when recording while
you repeat recording start/stop, zooming
and turning the power on/off. The actual
battery life may be shorter.
Note on remaining battery time indication
during recording
Remaining battery time is displayed on the LCD
screen or in the viewfinder. However, the
indication may not be displayed properly,
depending on using conditions and
circumstances.
Carga e instalación del paquete
de batería
Tiempo de carga
Paquete de batería Tiempo de carga *
NP-F100 (suministrado) 130 (70)
NP-F200 170 (110)
NP-F300 250 (190)
El tiempo necesario para obtener una carga
normal se indica entre paréntesis.
* Minutos aproximados para cargar un paquete
de batería descargado mediante el adaptador
de alimentación de CA suministrado. (Las
temperaturas bajas requieren un tiempo de
carga mayor.)
Duración del paquete de batería
Los números de la línea superior corresponden al
tiempo al grabar con el visor electrónico,
mientras que los de la inferior corresponden al
tiempo al grabar con la pantalla LCD. Si utiliza el
visor y la pantalla LCD, el tiempo de grabación
se reducirá en mayor medida.
Paquete Tiempo Tiempo Tiempo
de batería de graba- de graba-
de repro-
ción con- ción ducción
tinua ** normal *** con
LCD
NP-F100 60 (55) 35 (30)
50 (45)
(suministrado)
45 (40) 25 (20)
NP-F200 110 (95) 55 (50)
85 (75)
80 (70) 45 (40)
NP-F300 250 (225) 140 (125)
195 (175)
190 (170) 105 (90)
Los números entre paréntesis indican el tiempo
al emplear un paquete con carga normal.
La duración del paquete será menor si emplea la
videocámara en un entorno frío.
** Tiempo aproximado de grabación continua
en interiores.
*** Minutos aproximados al grabar repitiendo
las operaciones de inicio/parada de la
grabación, zoom y activación/desactivación
de la alimentación. Es posible que la
duración real del paquete sea menor.
Nota sobre la indicación de tiempo de batería
restante durante la grabación
El tiempo de batería restante aparece en la
pantalla LCD o en el visor electrónico. No
obstante, la indicación puede no mostrarse
correctamente, en función de las condiciones y
circunstancias de uso.

10
Charging and installing the
battery pack
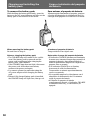
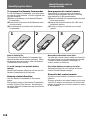
To remove the battery pack
While holding the battery pack firmly, press the
button on the AC power adaptor and take out the
battery pack in the direction of the arrow.
When removing the battery pack
Be careful not to drop it.
Notes on charging the battery pack
•The CHARGE lamp will remain lit for a while
even if the battery pack is removed and the
power cord is unplugged after charging the
battery pack. This is normal.
•If the CHARGE lamp does not light, disconnect
the power cord. After about one minute,
reconnect the power cord again.
•You cannot operate the camcorder using the
AC power adaptor while charging the battery
pack.
•When a fully charged battery pack is installed,
the CHARGE lamp will light once, then go out.
Carga e instalación del paquete
de batería
Para extraer el paquete de batería
Mientras sujeta firmemente el paquete, presione
el botón del adaptador de alimentación de CA y
extraiga dicho paquete en el sentido de la flecha.
Al extraer el paquete de batería
Tenga cuidado de no dejarlo caer.
Notas sobre la carga del paquete de batería
•El indicador CHARGE permanecerá iluminado
durante unos instantes aunque haya extraído el
paquete de batería y haya desenchufado el
cable de alimentación después de cargar dicho
paquete. Esto es normal.
•Si el indicador CHARGE no se ilumina,
desconecte el cable de alimentación.
Transcurrido un minuto aproximadamente,
vuelva a conectarlo.
•No es posible emplear la videocámara con el
adaptador de alimentación de CA mientras
carga el paquete de batería.
•Al instalar un paquete de batería
completamente cargado, el indicador CHARGE
se iluminará una vez y, a continuación, se
apagará.

11
Getting started / Procedimientos iniciales
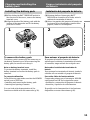
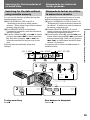
Installing the battery pack
(1)While sliding the BATT RELEASE switch in
the direction of the arrow, remove the battery
terminal cover.
(2)Align the hooks of the battery pack with the
catches of the camcorder and fit the battery
pack until it clicks.
To remove the battery pack
The battery pack is removed in the same way as
the battery terminal cover. When removing the
battery pack, be careful not to drop it.
Note on battery terminal cover
To protect the battery terminals, install the
battery terminal cover after the battery pack is
removed.
To prevent malfunction
In the following cases make sure that the POWER
switch is set to OFF first.
•Installing and removing the battery pack.
•Inserting and ejecting a cassette.
You can look at the demonstration of the
functions available with this camcorder (p.36).
Charging and installing the
battery pack
Instalación del paquete de batería
(1)Mientras desliza el interruptor BATT
RELEASE en el sentido de la flecha, retire la
cubierta de terminales de batería.
(2)Alinee los ganchos del paquete de batería con
los cierres de la videocámara e instale dicho
paquete, hasta oír un chasquido.
Para extraer el paquete de batería
El paquete de batería se extrae de la misma
manera que la cubierta de terminales de batería.
Al extraerlo, tenga cuidado de no dejarlo caer.
Nota sobre la cubierta de terminales de
batería
Para proteger los terminales de batería, instale la
cubierta una vez extraído el paquete de batería.
Para evitar fallos de funcionamiento
Compruebe primero que el interruptor POWER
está ajustado en OFF en los siguientes casos:
•Instalación y extracción del paquete de batería.
•Inserción y expulsión de videocassettes.
Es posible ver la demostración de las funciones
disponibles con esta videocámara (p.36).
Carga e instalación del paquete
de batería
1 2
BATT RELEASE

12
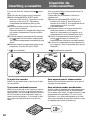
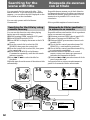
Inserting a cassette
You can use mini DV cassette with logo*
only.
Make sure that the power source is installed.
(1)While sliding 6 OPEN/EJECT in the
direction of the arrow 1, open the lid in the
direction of the arrow 2. The cassette
compartment automatically lifts up and
opens.
(2)Push the middle portion of the back of the
tape to insert a cassette.
Insert the cassette in a straight line deeply into
the cassette compartment with the window
facing out .
(3)Close the cassette compartment by pressing
the mark on the cassette compartment.
The cassette compartment automatically goes
down.
(4)After the cassette compartment going down
completely, close the lid until it clicks.
* is a trademark.
To eject the cassette
Follow the procedure above and in step 2, take
out the cassette.
To prevent accidental erasure
Slide and open the tab on the cassette to expose
the red mark. If you try to record with the red
mark exposed, the L and 6 indicators flash on
the LCD screen or in the viewfinder, and you
cannot record on the tape. To re-record on this
tape, slide and close the tab to cover the red
mark.
Inserción de
videocassettes
Sólo es posible utilizar videocassettes mini DV
con el logotipo *.
Compruebe que ha instalado la fuente de
alimentación.
(1)Mientras desliza 6 OPEN/EJECT en el
sentido de la flecha 1, abra la tapa en el
sentido de la flecha 2. El compartimiento de
videocassettes se eleva y se abre
automáticamente.
(2)Presione el centro de la parte trasera de la
cinta para insertar un videocassette.
Inserte el videocassette por completo en el
compartimiento con la ventana hacia fuera.
(3)Cierre el compartimiento presionando la
marca existente en el mismo. El
compartimiento desciende automáticamente.
(4)Una vez el compartimiento haya descendido
por completo, cierre la tapa hasta que oiga un
chasquido.
* es una marca comercial.
Para expresionar el videocassette
Realice el procedimiento anterior y en el paso 2,
extraiga el videocassette.
Para evitar borrados accidentales
Deslice y abra la lengüeta del videocassette para
que la marca roja sea visible. Si intenta grabar
con la marca roja visible, los indicadores L y 6
parpadearán en la pantalla LCD o en el visor
electrónico, y no será posible grabar en la cinta.
Para volver a grabar en esta cinta, deslice y cierre
la lengüeta para cubrir la marca roja.
2
33
mark/
Marca
1
1
2
4

13
Basic operations / Operaciones básicas
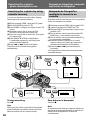
Make sure that the power source is installed and
a cassette is inserted and that the START/STOP
MODE switch is set to .
When you use the camcorder for the first time,
power on it and reset the date and time to your
time before you start recording (p. 85).
Before you record one-time events, you may
want to make a trial recording to make sure that
the camcorder is working correctly.
(1)Remove the lens cap and pull the lens cap
string.
(2)While pressing the small green button on the
POWER switch, set it to CAMERA. The
camcorder is set to Standby mode.
(3)Press START/STOP.
The camcorder starts recording. The “REC”
indicator appears in the viewfinder. The
camera recording lamp on the front of the
camcorder also lights up.
You can also select Recording mode, SP
(standard play) mode or LP (long play) mode.
Set REC MODE in the menu system according to
the length of your planned recording before you
start.
Basic operations
Camera recording
Compruebe que ha instalado la fuente de
alimentación, que ha insertado un videocassette y
que el interruptor START/STOP MODE está
ajustado en .
Si utiliza la videocámara por primera vez,
actívela y ajuste la fecha y la hora antes de iniciar
la grabación (p. 85).
Antes de grabar acontecimientos únicos, es
posible que desee realizar una grabación de
prueba para asegurarse de que la videocámara
funciona correctamente.
(1)Retire la tapa del objetivo y tire del cordón de
ésta.
(2)Ajuste el interruptor POWER en CAMERA
mientras presiona el botón verde pequeño del
mismo. La videocámara quedará ajustada en
el modo de espera.
(3)Presione START/STOP.
La videocámara inicia la grabación y el
indicador “REC” aparece en el visor
electrónico. El indicador de grabación con la
cámara de la parte frontal de la videocámara
también se ilumina.
También puede seleccionar el modo de
grabación, el modo SP (reproducción estándar) o
el LP (reproducción de larga duración).
Antes de comenzar, ajuste REC MODE en el
sistema de menús en función de la longitud de la
grabación que haya planeado.
Operaciones básicas
Grabación con la
cámara
OFFPOWER
VTR CAMERA
PHOTO
2
3
1
–:– –:– –
STBY
40min
60min
–:– –:– –
REC
40min
60min
OFFPOWER
VTR CAMERA
PHOTO

14
Camera recording
To stop recording momentarily [a]
Press START/STOP. The “STBY” indicator
appears in the viewfinder (Standby mode).
To finish recording [b]
Press START/STOP again to stop recording. Set
the POWER switch to OFF. Then, eject the
cassette and remove the battery pack.
To focus the viewfinder lens
If you cannot see the indicators in the viewfinder
clearly, or after someone else has used the
camcorder, focus the viewfinder lens. Turn the
viewfinder lens adjustment dial so that the
indicators in the viewfinder come into sharp
focus.
Note on Standby mode
If you leave the camcorder in Standby mode for 5
minutes while the cassette is inserted, the
camcorder turns off automatically. This prevents
wearing down the battery and wearing out the
tape. To resume Standby mode, while pressing
the small green button on the POWER switch, set
it to OFF once, and then to CAMERA. To start
recording, press START/STOP.
Note on the lock knob
When you set the lock knob to the left position,
the POWER switch will not be set to PHOTO.
OFFPOWER
VTR CAMERA
PHOTO
0:35:20
STBY
20min
25min
[a]
[b]
OFFPOWER
VTR CAMERA
PHOTO
OFFPOWER
VTR CAMERA
PHOTO
Grabación con la cámara
Para detener la grabación
momentáneamente [a]
Presione START/STOP. El indicador “STBY”
aparece en el visor electrónico (modo de
espera).
Para finalizar la grabación [b]
Vuelva a presionar START/STOP para detener la
grabación. Ajuste el interruptor POWER en OFF
y, a continuación, expulse el videocassette y
extraiga el paquete de batería.
Para enfocar el objetivo del visor
electrónico
Si no puede ver nítidamente los indicadores del
visor electrónico, o si alguien ha utilizado la
videocámara, enfoque el objetivo del visor
electrónico. Gire el dial de ajuste del objetivo de
dicho visor de forma que los indicadores del
visor electrónico queden nítidamente enfocados.
Nota sobre el modo de espera
Si deja la videocámara en el modo de espera
durante 5 minutos con un videocassette
insertado, dicha videocámara se apagará
automáticamente. De esta forma se evita el
desgaste del paquete de batería y de la cinta. Para
reanudar el modo de espera, ajuste una vez el
interruptor POWER en OFF mientras presiona el
botón verde pequeño del mismo y, a
continuación, en CAMERA. Para iniciar la
grabación, presione START/STOP.
Nota sobre el mando de bloqueo
Si ajusta este mando en la posición izquierda, el
interruptor POWER no se ajustará en PHOTO.
OFFPOWER
VTR CAMERA
PHOTO
Lock knob/
Pestillo de bloqueo

15
Basic operations / Operaciones básicas
Notes on LP mode
•If you use this camcorder under high
temperatures to record in LP mode or to play
back a tape recorded in LP mode, the picture
may become still or noisy with a mosaic
pattern, or the sound may be intermittent when
the tape is played back.
•We recommend to use this camcorder to play
back a tape recorded on this camcorder. If a
tape recorded on other camcorder is played
back on this camcorder, or vice versa, mosaic-
pattern noise may appear.
•When you record in SP and LP modes on one
tape or you record some scenes in LP mode, the
playback picture may be distorted or the time
code may not be written properly between
scenes.
•When you record in LP mode, we recommend
you to use a Sony Excellence/Master mini DV
cassette so that you can get the most out of your
camcorder.
•You cannot make audio dubbing on a tape
recorded in LP mode. Use the SP mode for the
tape to be audio dubbed.
Notes on the time code and editing
•The time code indicates the recording or
playback time, "0:00:00" (hours : minutes :
seconds) in CAMERA mode and "0:00:00:00"
(hours : minutes : seconds : frames) in VTR
mode.
•Do not make a blank portion during recording.
If there is a blank portion between pictures:
- The time code starts from “0:00:00:00” again,
and you cannot rewrite the time code on the
tape.
- The search and title functions may not operate
correctly.
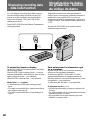
Note on connecting an external microphone
You can record audio sound by connecting the
VMC-LM7 adaptor (not supplied) and an
external microphone (not supplied). Connect the
microphone to the MIC jack of the VMC-LM7
adaptor. While recording through an external
microphone, the built-in microphone of the
camcorder does not work.
Camera recording
Notas sobre el modo LP
•Si utiliza esta videocámara expuesta a altas
temperaturas para grabar en el modo LP o para
reproducir una cinta grabada en el modo LP, es
posible que la imagen aparezca fija o con ruido
con un patrón mosaico, o que el sonido sea
intermitente al reproducir la cinta.
•Se recomienda utilizar esta videocámara para
reproducir una cinta grabada en la misma. Si
reproduce en esta videocámara una cinta
grabada en otra videocámara o viceversa, es
posible que aparezca ruido de patrón mosaico.
•Si graba en los modos SP y LP en una cinta o si
graba algunas escenas en el modo LP, es posible
que la imagen de reproducción aparezca
distorsionada o que el código de tiempo no se
registre correctamente entre las escenas.
•Si graba en el modo LP, se recomienda emplear
un videocassette Excellence/Master mini DV de
Sony para obtener el máximo rendimiento de la
videocámara.
•No es posible realizar copias de audio en cintas
grabadas en el modo LP. Utilice el modo SP
para las cintas en las que vaya a realizar copias
de audio.
Notas sobre el código de tiempo y la edición
•El código de tiempo indica el tiempo de
grabación o de reproducción, “0:00:00” (horas :
minutos : segundos) en el modo CAMERA y
“0:00:00:00” (horas : minutos : segundos :
fotogramas) en el modo VTR.
•No deje espacios en blanco durante la
grabación. Si hay espacios en blanco entre
imágenes:
- El código de tiempo volverá a iniciarse a partir
de “0:00:00:00”, y no será posible volver a
registrarlo en la cinta.
- Es posible que las funciones de búsqueda y
titulación no se activen correctamente.
Nota sobre la conexión de un micrófono
externo
Es posible grabar audio mediante la conexión del
adaptador VMC-LM7 (no suministrado) y un
micrófono externo (no suministrado). Conecte el
micrófono a la toma MIC del adaptador VMC-
LM7. Durante la grabación mediante un
micrófono externo, el incorporado de la
videocámara no funciona.
Grabación con la cámara

16
Camera recording
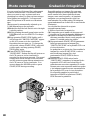
Note on the beep sound
As indicated with in the illustrations, a beep
sounds when you turn the power on or when
you start recording, and two beeps sound when
you stop recording, confirming the operation.
Several beeps also sound as a warning of any
unusual condition of the camcorder.
Note that the beep sound is not recorded on the
tape. If you do not want to hear the beep sound,
select “OFF” in the menu system.
Note on remaining tape indicator
The indicator may not be displayed accurately
depending on the tape. Though the indicator
does not appear at the time of recording, it will
appear in a few seconds.
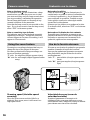
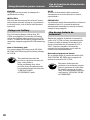
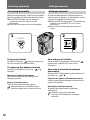
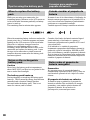
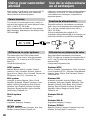
Using the zoom feature
Zooming is a recording technique that lets you
change the size of the subject in the scene.
For more professional-looking recordings, use
the zoom function sparingly.
“T” side: for telephoto (subject appears closer)
“W” side: for wide-angle (subject appears farther
away)
Zooming speed (Variable speed
zooming)
Move the power zoom switch a little for a
relatively slow zoom; move it still more for a
high-speed zoom.
ZOOM
T
W
W
T
W
T
Grabación con la cámara
Nota sobre los pitidos
Como se indica con en las ilustraciones, la
unidad emite un pitido al activar la alimentación
o al iniciar la grabación, y dos al detener ésta
para confirmar la operación. También se oyen
varios pitidos como aviso sobre algún estado
inusual de la videocámara.
Observe que los pitidos no se graban en la cinta.
Si no desea oírlos, seleccione “OFF” en el sistema
de menús.
Nota sobre el indicador de cinta restante
Es posible que el indicador no aparezca con
precisión en función de la cinta. Aunque dicho
indicador no aparezca en el momento de la
grabación, aparecerá en unos segundos.
Uso de la función de zoom
El zoom es una técnica de grabación que permite
cambiar el tamaño del sujeto de la escena.
Para que las grabaciones presenten un aspecto
más profesional, emplee la función de zoom
moderadamente.
Lado “T”: para telefoto (el sujeto aparece más
cerca)
Lado “W”: para gran angular (el sujeto aparece
lejos)
Velocidad de zoom (zoom de
velocidad variable)
Desplace ligeramente el interruptor de
alimentación de zoom para obtener un zoom
relativamente lento; desplácelo en mayor medida
para obtener un zoom a alta velocidad.

17
Basic operations / Operaciones básicas
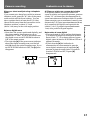
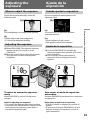
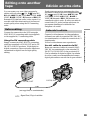
When you shoot a subject using a telephoto
zoom
If you cannot get a sharp focus while in extreme
telephoto zoom, press the “W” side of the power
zoom switch until the focus is sharp. You can
shoot a subject that is at least about 2 5/8 feet
(about 80 cm) away from the lens surface in the
telephoto position, or about 1/2 inch
(about 1 cm) away in the wide-angle position.
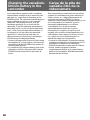
Notes on digital zoom
•More than 12x zoom is performed digitally, and
the picture quality deteriorates as you go
toward the “T” side. If you do not want to use
the digital zoom, set the D ZOOM function to
OFF in the menu system.
•The right side [b] of the power zoom indicator
shows the digital zooming zone, and the left
side [a] shows the optical zooming zone. If you
set the D ZOOM function to OFF, the [b] zone
disappears.
Camera recording
W
T
W
T
[a] [b]
Al filmar un sujeto con un zoom de telefoto
Si no puede obtener un enfoque nítido en el
zoom de telefoto en la posición extrema, presione
el lado “W” del interruptor de alimentación de
zoom hasta obtener un enfoque nítido. Es posible
filmar un sujeto que se encuentre al menos a una
distancia de 2 5/8 pies (aproximadamente 80 cm)
de la superficie del objetivo en la posición de
telefoto, o de 1/2 pulgada (aproximadamente
1 cm) en la posición de gran angular.
Notas sobre el zoom digital
•El zoom de más de 12x se realiza digitalmente,
y la calidad de imagen se deteriora al avanzar
hacia el lado “T”. Si no desea utilizar el zoom
digital, ajuste la función D ZOOM en OFF en el
sistema de menús.
•El lado derecho [b] del indicador de
alimentación de zoom muestra la parte de
zoom digital, mientras que el izquierdo [a]
muestra la parte de zoom óptico. Si ajusta la
función D ZOOM en OFF, la parte [b]
desaparecerá.
Grabación con la cámara

18
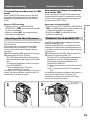
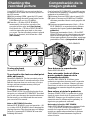
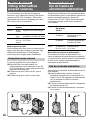
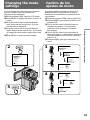
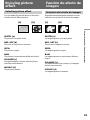
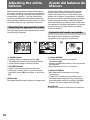
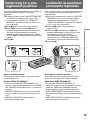
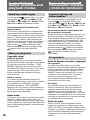
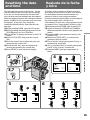
Camera recording
Selecting the start/stop mode
Your camcorder has two modes besides normal
start/stop mode. These modes enable you to
take a series of quick shots resulting in a lively
video.
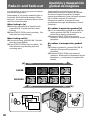
(1)Set START/STOP MODE to the desired
mode.
:Recording starts when you press START/
STOP, and stops when you press it again
(normal mode).
ANTI GROUND SHOOTING : The
camcorder records only while you press down
START/STOP so that you can avoid
recording unnecessary scenes.
5SEC : When you press START/STOP, the
camcorder records for 5 seconds and then
stops automatically.
(2)Press START/STOP. Recording starts.
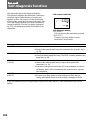
If you selected 5SEC, five dots appear in the
viewfinder. The dots disappear at a rate of one
per second. When five seconds elapse and all the
dots disappear, the camcorder switches to
Standby mode automatically.
1
0:00:00
REC
0:00:04
REC
2
START/STOP MODE
ANTI GROUND SHOOTING
5
SEC
OFFPOWER
VTR CAMERA
PHOTO
Grabación con la cámara
Selección del modo de inicio/
detención
La videocámara dispone de dos modos además
del normal de inicio/detención. Estos modos
permiten realizar varias tomas rápidas,
obteniéndose así imágenes vivas.
(1)Ajuste START/STOP MODE en el modo que
desee.
: La grabación se inicia al presionar
START/STOP, y se detiene al volver a
pulsarlo (modo normal).
ANTI GROUND SHOOTING : La
videocámara graba sólo mientras mantiene
presionado START/STOP; de esta forma, se
evita grabar escenas innecesarias.
5SEC : Al presionar START/STOP, la
videocámara graba durante 5 segundos y, a
continuación, se detiene automáticamente.
(2)Presione START/STOP. La grabación se
inicia.
Si ha seleccionado 5SEC, aparecerán cinco puntos
en el visor electrónico. Los puntos desaparecerán
a un ritmo de uno por segundo. Cuando han
transcurrido cinco segundos y desaparecen todos
los puntos, la videograbadora cambia al modo de
espera automáticamente.

19
Basic operations / Operaciones básicas
2
180˚
90˚
90˚
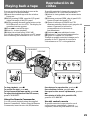
To extend the recording time in 5SEC
mode
Press START/STOP again before all the dots
disappear. Recording continues for about 5
seconds from the moment you press START/
STOP.
Notes on 5SEC recording
•When you select ANTI GROUND
SHOOTING or 5SEC, you cannot use the fade-
in/fade-out function.
•When you select 5SEC, the remaining tape
indicator is not displayed.
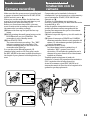
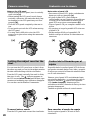
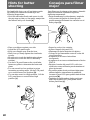
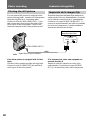
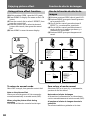
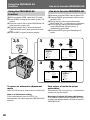
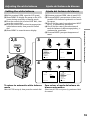
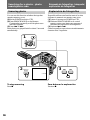
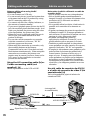
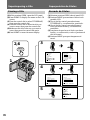
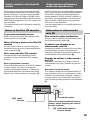
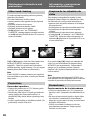
Shooting with the LCD screen
You can also record the picture while looking at
the LCD screen.
When using the LCD screen, the viewfinder
screen turns off automatically. You cannot
monitor the sound from the speaker during
recording.
(1)While pressing OPEN, open the LCD panel.
(2)Adjust angle of the LCD panel.
The LCD panel moves about 90 degrees to
this side and about 180 degrees to the other
side.
To adjust the brightness of the LCD screen,
press LCD BRIGHT.
+ side: to brighten the LCD screen
– side: to dim the LCD screen
The battery life is longer when the LCD panel is
closed. Use the viewfinder instead of the LCD
screen to save the battery power.
Camera recording
LCD BRIGHT
1
Para ampliar el tiempo de grabación
en el modo 5SEC
Vuelva a presionar START/STOP antes de que
desaparezcan los puntos. La grabación continúa
durante unos 5 segundos desde el momento en
que presione START/STOP.
Notas sobre la grabación 5SEC
•Si selecciona ANTI GROUND SHOOTING o
5SEC, no podrá emplear la función de aparición
y desaparición gradual de imágenes.
•Si selecciona 5SEC, el indicador de cinta
restante no aparecerá.
Filmación con la pantalla LCD
También es posible grabar imágenes mientras
observa la pantalla LCD.
Si utiliza la pantalla LCD, la pantalla del visor
electrónico se desactivará automáticamente. No
es posible controlar el sonido del altavoz durante
la grabación.
(1)Mientras presiona OPEN, abra el panel LCD.
(2)Ajuste el ángulo del panel LCD.
El panel LCD se desplaza aproximadamente
90 grados a un lado y 180 grados al otro.
Para ajustar el brillo de la pantalla LCD,
presione LCD BRIGHT.
Lado +: para aumentar el brillo de la pantalla
LCD
Lado –: para atenuar el brillo de la pantalla
LCD
La duración del paquete de batería será mayor si
el panel LCD está cerrado. Utilice el visor
electrónico en lugar de la pantalla LCD para
ahorrar la energía del paquete.
Grabación con la cámara

20
[a]
[b]
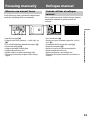
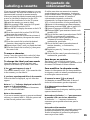
Camera recording
Notes on the LCD panel
•When closing the LCD panel, turn it vertically
until it clicks [a].
•When turning the LCD panel, turn it always
vertically; otherwise, the camcorder body may
be damaged or the LCD panel may not close
properly [b].
•Close the LCD panel completely when not in
use.
•Do not push nor touch the LCD when moving
the LCD panel.
•You may find it difficult to view the LCD
screen due to glare when using the camcorder
outdoors.
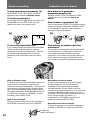
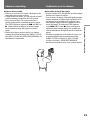
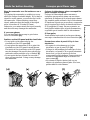
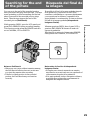
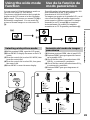
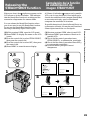
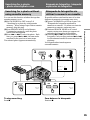
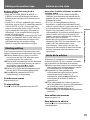
Letting the subject monitor the
shot
You can turn the LCD panel over so that it faces
the other way and you can let the subject monitor
the shot while shooting with the viewfinder.
Turn the LCD panel vertically first until it clicks,
then turn it over. The indicator appears on
the LCD screen (mirror mode) and the date, tape
counter and remaining tape indicators disappear.
You can also use the Remote Commander.
To cancel mirror mode
Turn the LCD panel back toward the viewfinder.
Grabación con la cámara
Notas sobre el panel LCD
•Para cerrar el panel LCD, gírelo verticalmente
hasta que oiga un chasquido [a].
•Al girar el panel LCD, gírelo siempre
verticalmente; en caso contrario, es posible que
el cuerpo de la videocámara se dañe o que el
panel LCD no se cierre correctamente [b].
•Cierre el panel LCD por completo cuando no lo
utilice.
•No presione ni toque la pantalla LCD al mover
el panel LCD.
•Puede resultar difícil ver la pantalla LCD
debido a reflejos al utilizar la videocámara en
exteriores.
Control de la filmación por el
sujeto
Es posible darle la vuelta al panel LCD de forma
que quede orientado hacia el otro lado y permitir
al sujeto que controle la filmación mientras filma
con el visor electrónico.
Primero, gire el panel LCD verticalmente hasta
que oiga un chasquido y, a continuación, dele la
vuelta. El indicador aparece en la pantalla
LCD (modo de espejo), mientras que los
indicadores de fecha, contador de cinta y de cinta
restante desaparecen.
También es posible utilizar el control remoto.
Para cancelar el modo de espejo
Vuelva a girar el panel LCD hacia el visor
electrónico.

21
Basic operations / Operaciones básicas
Camera recording
Notes on mirror mode
•When you turn the LCD panel 180 degrees, the
camcorder enters mirror mode.
•Using the mirror mode, you can record yourself
while watching yourself on the LCD screen.
•The picture on the LCD screen looks like a
mirror-image while recording in mirror mode.
The STBY indicator appears as Pr and REC as
r. Other indicators appear as mirror-image.
Some indicators may not appear in mirror
mode.
•While recording in mirror mode, you cannot
operate the following functions: MENU, TITLE,
and DATA CODE and ZERO SET MEMORY on
the Remote Commander.
Grabación con la cámara
Notas sobre el modo de espejo
•Si gira el panel LCD 180 grados, la videocámara
entrará en el modo de espejo.
•Con el modo de espejo, es posible grabarse uno
mismo mientras se observa en la pantalla LCD.
•La imagen de la pantalla LCD aparece como
una imagen espejo durante la grabación en el
modo de espejo. El indicador STBY aparece
como Pr y REC como r. Otros indicadores
aparecen como imagen espejo. Es posible que
ciertos indicadores no aparezcan en el modo de
espejo.
•Durante la grabación en el modo de espejo, no
es posible utilizar las siguientes funciones:
MENU, TITLE (titulación) y DATA CODE
(código de datos) y ZERO SET MEMORY
(memoria de ajuste a cero) en el control remoto.
Page is loading ...
Page is loading ...
Page is loading ...
Page is loading ...
Page is loading ...
Page is loading ...
Page is loading ...
Page is loading ...
Page is loading ...
Page is loading ...
Page is loading ...
Page is loading ...
Page is loading ...
Page is loading ...
Page is loading ...
Page is loading ...
Page is loading ...
Page is loading ...
Page is loading ...
Page is loading ...
Page is loading ...
Page is loading ...
Page is loading ...
Page is loading ...
Page is loading ...
Page is loading ...
Page is loading ...
Page is loading ...
Page is loading ...
Page is loading ...
Page is loading ...
Page is loading ...
Page is loading ...
Page is loading ...
Page is loading ...
Page is loading ...
Page is loading ...
Page is loading ...
Page is loading ...
Page is loading ...
Page is loading ...
Page is loading ...
Page is loading ...
Page is loading ...
Page is loading ...
Page is loading ...
Page is loading ...
Page is loading ...
Page is loading ...
Page is loading ...
Page is loading ...
Page is loading ...
Page is loading ...
Page is loading ...
Page is loading ...
Page is loading ...
Page is loading ...
Page is loading ...
Page is loading ...
Page is loading ...
Page is loading ...
Page is loading ...
Page is loading ...
Page is loading ...
Page is loading ...
Page is loading ...
Page is loading ...
Page is loading ...
Page is loading ...
Page is loading ...
Page is loading ...
Page is loading ...
Page is loading ...
Page is loading ...
Page is loading ...
Page is loading ...
Page is loading ...
Page is loading ...
Page is loading ...
Page is loading ...
Page is loading ...
Page is loading ...
Page is loading ...
Page is loading ...
Page is loading ...
Page is loading ...
Page is loading ...
Page is loading ...
Page is loading ...
Page is loading ...
Page is loading ...
Page is loading ...
Page is loading ...
Page is loading ...
Page is loading ...
Page is loading ...
Page is loading ...
Page is loading ...
Page is loading ...
Page is loading ...
Page is loading ...
Page is loading ...
Page is loading ...
-
 1
1
-
 2
2
-
 3
3
-
 4
4
-
 5
5
-
 6
6
-
 7
7
-
 8
8
-
 9
9
-
 10
10
-
 11
11
-
 12
12
-
 13
13
-
 14
14
-
 15
15
-
 16
16
-
 17
17
-
 18
18
-
 19
19
-
 20
20
-
 21
21
-
 22
22
-
 23
23
-
 24
24
-
 25
25
-
 26
26
-
 27
27
-
 28
28
-
 29
29
-
 30
30
-
 31
31
-
 32
32
-
 33
33
-
 34
34
-
 35
35
-
 36
36
-
 37
37
-
 38
38
-
 39
39
-
 40
40
-
 41
41
-
 42
42
-
 43
43
-
 44
44
-
 45
45
-
 46
46
-
 47
47
-
 48
48
-
 49
49
-
 50
50
-
 51
51
-
 52
52
-
 53
53
-
 54
54
-
 55
55
-
 56
56
-
 57
57
-
 58
58
-
 59
59
-
 60
60
-
 61
61
-
 62
62
-
 63
63
-
 64
64
-
 65
65
-
 66
66
-
 67
67
-
 68
68
-
 69
69
-
 70
70
-
 71
71
-
 72
72
-
 73
73
-
 74
74
-
 75
75
-
 76
76
-
 77
77
-
 78
78
-
 79
79
-
 80
80
-
 81
81
-
 82
82
-
 83
83
-
 84
84
-
 85
85
-
 86
86
-
 87
87
-
 88
88
-
 89
89
-
 90
90
-
 91
91
-
 92
92
-
 93
93
-
 94
94
-
 95
95
-
 96
96
-
 97
97
-
 98
98
-
 99
99
-
 100
100
-
 101
101
-
 102
102
-
 103
103
-
 104
104
-
 105
105
-
 106
106
-
 107
107
-
 108
108
-
 109
109
-
 110
110
-
 111
111
-
 112
112
-
 113
113
-
 114
114
-
 115
115
-
 116
116
-
 117
117
-
 118
118
-
 119
119
-
 120
120
-
 121
121
-
 122
122
-
 123
123
-
 124
124


Ask a question and I''ll find the answer in the document
Finding information in a document is now easier with AI
in other languages
- español: Sony DCR-PC10 Manual de usuario