Page is loading ...

Models: GDI-EXSJ400 / 401
User Guide
Sol Jam

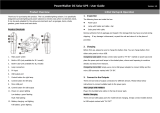
On/Off
Press the Standby Power Button once to
power ON/OFF.
IMPORTANT: Standby Power function
will NOT operate when the Master
Power is set OFF. Master Power Switch
under the cap on the back panel must
be set ON for Standby & your Sol Jam
to operate.
Bluetooth
When turned ON, the Sol Jam will power
on and search for your Bluetooth. Refer
to “Set Up Recommendations 1-2-3”
part for details.
Speaker Volume
Press to decrease or to increase
Speaker Volume.
NOTE: Some Bluetooth devices may
require to be manually set for maximum
audio level.
Control Buttons
LED Status Indicators
Power, Battery, Bluetooth
Quick Start
Open Cap on the back
of your Sol Jam
Turn on the Main Power Switch
Press the Standby Button to
power on your Sol Jam
Search your Bluetooth
Connection on your Smart Device
Pair & Play
1
2
3
4
5
Control Buttons & Operations
3

Your Sol Jam will beep to indicate when
maximum volume setting is reached.
Track Selection
Press button once to select Previous Song
track & Next Song track .
Play/Pause/Answer
Press button once to pause & play song
tracks and to answer mobile calls (MUST
be paired with Bluetooth).
Battery Level
Press the button to check the battery
level. There are five LED battery level
indicators located on the top of the unit.
Each LED represents 20% of a charge.
Five full LEDs indicate a full charge.
Battery Indicator
When connected with a USB cable to a
power source, the LED indicates a USB
connection and charging status.
RED: charge in process
GREEN: full charge complete
Using the Sun to
Power Sol Jam
Power ON
Ensure the Master
Power Switch is set
to the ON position.
Solar charging
will NOT work if
the Master Power
Switch is OFF.
The solar panel will recharge the battery
within Sol Jam if Sol Jam is ON or in
Standby Power mode.
Solar Charging
Place Sol Jam in direct sunlight. The solar
charging is most efficient if the entire
solar panel on Sol Jam is directly facing
the sun without any obstacles in the way.
You can verify that the sun is charging
Sol Jam by viewing the five blue LEDs
on the Sol Jam unit. When the sun is

charging Sol Jam, the blue LEDs will
sequentially flash – 1 flashing LED is low
sun charging, and 5 sequentially flashing
LEDs is optimal charging.
The efficiency of the solar charging varies
based on a variety of factors: angle of
the sun, global location, time of day,
time of year, and cloud cover.
Battery Level
Check the charge of the battery by
pressing the Battery Level Button
on the Sol Jam unit: 1 solid LED
indicates 20% charged, 5 solid LEDs
indicate fully charged.
If the Sol Jam battery is full, the solar
charging circuitry within Sol Jam turns
off until the battery is drained and
needs recharging.
IMPORTANT: When using the Sol Jam
to charge devices, always do so in a dry
environment. If the cap on the back
panel is not properly closed, the unit is
NOT watertight.
Set Up
Recommendations 1-2-3
1
Charge Your Sol Jam
Before you power on your Sol Jam
for the FIRST TIME, for best
performance, connect the USB Micro
port with a USB cable to a power
source and fully charge your Sol Jam.
NOTE: To check the battery
charge level, press the Battery Level
Button . Charge the unit until
all 5 LED battery level indicators are
solid blue, indicating a full charge.
Approximately 3 hours of charging
time is required from a low to a full
charge, using a power adapter.
Power source options include a USB
connection to your computer or a
power outlet using a USB to AC power
adapter as well as solar power. It is
recommended to always use the USB
cable included with your Sol Jam.

Power ON, Battery,
& LED Status Indicators
Once fully charged, press the Standby
Power Button on your Sol Jam.
You will see the green LED light & you
will hear an ascending bell tone.
IMPORTANT: Ensure the Main
Power Switch, located in the back
compartment under the cap, is set in
the Upper ON position. If the switch
is in the Lower OFF position, your
Sol Jam will not be able to turn on
using the Standby Button.
NOTE: The LED battery level
indicators are located on the top of
the unit. Each LED represents 20% of
a charge, with 5 full LEDs indicating a
full charge.
Audio playback time over Bluetooth
connection is approximately 12 hours
at 75% volume.
Bluetooth Pairing & Your Audio
Connecting With Bluetooth: Connect
To Your Smart Device & Play Audio
When your Sol Jam is turned on, the
blue LED light on the top panel will
flash rapidly indicating the unit is
ready to pair.
Turn on Bluetooth on your Bluetooth
device (Smart Device) and set the device
in pairing mode. Available Bluetooth
connections shall appear. Select the
ECOXGEAR speaker from the list of
discovered devices on your Bluetooth
device. Wait for a few seconds until the
connection is completed.
NOTE: Bluetooth connection feature
is found in the Settings section of
most mobile phones and other
Bluetooth enabled devices.
When the ECOXGEAR selection is
made and the Bluetooth connection
is completed, your Sol Jam will
announce: “Bluetooth connected”
3
2

Once connected, select and play your
desired audio.
Pairing Mode: If the LED is not flashing
or if you wish to place your Sol Jam in
pairing mode, press and release the
Bluetooth Button . Your Sol Jam shall
announce “pairing ready” when ready to
pair to a new device.
NOTE: Your Sol Jam shall sync &
wirelessly pair with most Bluetooth
enabled devices. The unit remembers the
last device paired and will automatically
search for previous connections when
the speaker is turned on or when a device
comes back into Bluetooth range. If
a connection is lost due to range, the
speaker will look to re-establish that
connection. If Bluetooth is turned off on
your Smart Device, the Sol Jam may not
automatically look for the device.
RECOMMENDATION: If you are not
familiar with Bluetooth pairing for your
Smartphone, or other Smart Device, refer
to the User Guide for your Smartphone
to learn how to add and pair a new
device (Sol Jam for instance) to your
Smartphone using Bluetooth.
Bluetooth Pairing & Connections:
Once paired, should you have an
issue switching between Bluetooth
connections between devices, open
the Bluetooth Section within the device
currently connected to the Sol Jam and
delete the Bluetooth connection. The
Sol Jam will then be available to pair
& connect to an alternate Bluetooth
enabled Smartphone / Audio Device.

AUDIO
AUX-IN
ON
OFF
OUTPUT
INPUT
2
AUDIO
AUX-IN
ON
OFF
OUTPUT
INPUT
3
1
Important: Maintaining
Waterproofness
If the cap on the back panel is
not properly closed, the unit is
NOT watertight.
To ensure the unit is watertight &
waterproof, ALWAYS CLOSE THE
CAP PROPERLY.
Turn the cap to the RIGHT so the
cap’s arrow point lines up with the
locked symbol along the back
edge of the unit.
To access the
connections,
turn the cap to
the LEFT so the
cap’s arrow point
lines up with the
unlocked symbol
along the back
edge of the unit.
Master Power Switch
& Connections
Access Connections
Select Unlocked
Open Cap

AUDIO
AUX-IN
ON
OFF
OUTPUT
INPUT
Master Power Switch
Sol Jam has a separate Master Power
Switch and a Standby Button. The switch
MUST be set to the ON position to power
your Sol Jam. Once the switch is set to
ON, use the Standby Button located
on the top panel to turn the unit On/Off.
NOTE: When not in use for extended
periods, turn the Master Power off to
preserve battery life.
IMPORTANT: Standby Power function
will NOT operate when the Master Power
is set to OFF.
Audio AUX-IN
Connect an audio device using the 3.5mm
cable connection as an alternative to a
Bluetooth connection to your Sol Jam.
NOTE: Volume level must be controlled
from the audio device when connected to
the AUX-IN connection.
Input
Connect the USB cable to the USB micro
Input to charge your Sol Jam.
RECOMMENDATION: Use the USB cable
included in the box.
NOTE: Charge time from low to full
charge is approximately 3 hours.
While playing audio, Sol Jam can be
charged or charge your device. Battery
play time shall be reduced depending on
the time and size of the device charging
while connected to your Sol Jam.
CAUTION: Do NOT charge if unit and/or
connections are wet or damp.
Back Panel: Functions

Output
Connect to the USB Output (5V, 1A)
port to charge your personal device.
Use the USB cable included with your
personal device.
NOTE: Charging rates are similar to the
charging rate when connected to the
USB of a desktop PC.
Charge time is approximately 3 hours
from low to full for most Smartphones;
however, charge times will vary
depending on the device being charged,
the device’s battery specifications, and
the device features.
In some instances your personal device
may not indicate if charge is in process.
CAUTION: Do NOT charge if unit and/or
connections are wet or damp.
Specifications
Unit Weight
25.1 ounces
Output Power
RMS 20W (10 Watt
x2 speakers/
4 ohms)
S/N Ratio
88dB +/- 3dB
Power Source
3.7V, 2800mAh
Lithium Battery
Frequency Range
125Hz-18,000Hz
Mount Attachment
Point
¼” diameter
Bluetooth
Bluetooth
®
CSR 4.1
Recommended
Storage (Battery)
Temperature
59°F / 15°C
Operating
Temperature
23°F to 104°F /
-5°C to 40°C
6.1”
5.0”
3.1”
Mount Attachment
Point
Unit Dimensions

User Guide
Models: GDI-EXSJ400 / 401
Sol Jam
Carabiner
USB Cable
Sol Jam
User Guide
For Charging
AC (5V, 1A) USB Wall Outlet Power Adapter
AC (5V, 1A) USB Car Power Adapter
For Mounting
Suction Cup Mount (¼” mount)
Handlebar Mount Adapter (¼” mount)
Optional Accessories
Solar Panel
Photovoltaic (PV)
Solar Charge
Charging Options
Solar, USB to AC
adapter, USB
to computer
Charging Time
Approx. 3 hrs (AC
adapter) Solar
charge rate varies
with environmental
conditions
Play Time
12+ hours from
full charge at 75%
volume level
USB Input /
Output
5V, 1A
Waterproof /
Dust Rating
IP67

FCC COMPLIANCE
STATEMENT & WARNING:
This device has been tested & found to comply with
the limits for a Class B digital device, pursuant to
Part 15 of the FCC Rules. These limits are designed
to provide reasonable protection against harmful
interference in a residential installation. The device
generates, uses & can radiate radio frequency
energy & if not installed & used in accordance with
instructions may cause harmful interference to
radio communications. There is no guarantee that
interference will not occur in a particular installation.
If this device causes interference to radio or television
reception, try one of these measures: reorient or
relocate the receiving antenna, increase separation
between device & receiver, connect the device into
an outlet on a circuit different from that to which the
receiver is connected, consult a dealer or experienced
radio / TV technician for assistance. Changes or
modifications not expressly approved by the party
responsible for compliance could void the user’s
authority to operate the device and / or void the
manufacturer’s limited warranty.
PRODUCT USE AND PROTECTION:
Read and follow all instructions.
Use only as intended.
The ECOXGEAR Bluetooth speaker is intended to
be used indoors or outdoors and in land or water
environments. The speaker has been tested to IP67
waterproofing standards, which means the speaker
can be submerged in up to 3 feet of water for 30
minutes without any damage. However, the speaker
is not intended for constant underwater use.
Always make sure the cap(s) / covers(s) are clean,
free from sand or debris, and correctly fitted. The
speaker will only meet IP67 ratings if all rubber seals,
gasket(s), and cover(s) / cap(s) are in place. If you
notice a muffling of audio after submersion, gently
shake the unit to clear excess water. If your speaker
is exposed to salt water, clean it thoroughly after use
with fresh water.
The USB cables, power adapters, and unit with an
improperly fitted cap are NOT waterproof.
To prevent fire or shock, do NOT attempt to charge
this unit if it is wet or you suspect water has entered
the unit. In this situation, please return the unit to
Grace Digital for a free assessment. If we have found
that the unit has carried water, we will repair or
replace the unit free of charge.
SAFETY ADVISORY & WARNING:
Read and follow all instructions.
Use only as intended.
CAUTION: Do NOT open to repair. A qualified
technician must carry out repair work.
ATTENTION: Do NOT charge while the unit is wet.
Towel dry the unit AND make sure all
connections are dry BEFORE plugging
in the charging connector. Failure to do
so may result in electrical damage to
the unit and may void the warranty.

WARNING: This product may contain chemicals
listed in Proposition 65 (www.oehha.ca.
gov/prop65/prop65_list/Newlist.html)
WARNING: Sol Jam has a built-in Lithium battery.
The battery must NOT be used in or near
an open heat source or excessive heat.
WARNING: Danger of explosion if battery is
incorrectly replaced.
ATTENTION: Do NOT dispose of in a landfill. Contact
Grace Digital at www.gracesupport.com
or a certified recycling agent to dispose of
the unit.
ATTENTION: AC adapter is a device forming a part of
the main plug; therefore, an AC adapter
can always be readily disconnected from
AC socket-outlet.
SAFETY:
This product has a limited life span of use and should
be replaced when it shows obvious signs of wear.
Do not modify or remove any original component
parts of the speaker. Doing so could cause damage
to the unit allowing water to ingress. A unit with water
ingress should not be charged due to potential risk of
fire or shock.
Do not attempt to mount the unit except with the
approved ECOXGEAR mounts. Doing so could cause
damage to the unit allowing water to ingress. A unit
with water ingress should not be charged due to
potential risk of fire or shock.
Please exercise care and good judgment when using
your ECOXGEAR speaker. Audio levels should be
appropriate to your environment, comply with all local
regulations, and always ensure that you can hear and
be aware of any potential hazards around you.
You should always
1) Use the ECOXGEAR speaker in accordance with
any music or noise rules and regulations.
2) Use the proper ECOXGEAR mounts if you intend
to mount the unit.
3) Properly seal the ECOXGEAR prior and after each
use when in humid or water environments to
avoid water damage to the internal components.
Salt water / air is particularly corrosive. Always
make sure that the gaskets are sealed when in salt
water environment and the unit properly rinsed
off after use.
4) Properly clean the ECOXGEAR and ensure the
gaskets have no sand, dirt, or water on them prior
to storage or removing the back cover.
5) Store your unit with all caps properly sealed
to avoid long term internal moisture damage
inside your unit.
6) Completely dry and clean your ECOXGEAR
prior to attempting to charge the unit.
7) Return the ECOXGEAR to Grace Digital if you
suspect water ingress into the unit or if the unit
has experienced a severe impact that may have
affected the integrity of the unit to take on water.

You should never
1) Never charge your ECOXGEAR if you suspect
water has entered the device. Charging a device
with water inside could be potentially hazardous
and cause fire or a spark.
2) Never use your ECOXGEAR if you have dropped
it or thrown it against a hard surface which may
have destroyed the integrity of the speakers,
housings, or gaskets. In the event of a severe
impact to your unit please return the unit to
Grace Digital to review for potential damage.
3) Never open the auxiliary door in a water
environment. This could cause water to ingress
into the unit which could potentially be hazardous
and cause a fire or a spark.
4) Never connect a device to the auxiliary input
jack when in a water environment. The auxiliary
jack should only be used in a dry environment.
5) Never attempt to fix, repair your ECOXGEAR
unit. Please send it back to Grace Digital for
any assessments and repairs.
CARE, MAINTENANCE & PRECAUTIONS:
1) The unit is waterproof only when the cap is
properly closed.
2) Close the cap properly before use. If the unit
is placed in water without the cap properly
closed, water may enter into the unit and
void your warranty.
3) Dry unit completely before opening the cap. Do
NOT open the cap if wet or in a wet environment.
4) Do NOT apply excessive force to any surfaces
of the unit when wet or in a wet environment.
5) Do NOT use or store the unit in places with
high temperature.
6) AVOID prolonged exposure to strong
magnetic fields.
7) Periodically check the rubber seal for
premature wear.
8) Periodically clean the rubber with a soft moist
cloth and ensure no objects such as dirt, hair, or
sand are on the rubber seal ring. Do NOT use any
oily solvent or chemicals for cleaning.
9) Rinse off the unit with tap water after use in salt
water or swimming pool.
10) Power and / or charge the built-in rechargeable
battery for portable use by connecting the
USB cord to a computer USB connection or to
an AC outlet using the AC-to-USB cord 5V, 1A
power adapter intended for use with the unit.
11) Noise and audio distortion may occur when the
batteries are nearing end of charge.
12) Do NOT remove the built-in battery. Do NOT
remove the grill covers.

LIMITED MANUFACTURER’S WARRANTY:
The Sol Jam is covered by a 3 year limited
warranty that covers defects in workmanship
and / or materials for a period of 3 years from
original purchase date. This warranty does not apply
to any products which have been abused, neglected,
modified, or used for a purpose other than the one
for which they were manufactured. Please refer to
the above care and maintenance instructions for
suggested care details. The warranty is valid only
for the original owner who purchases the unit from
an authorized dealer. Transfers do not qualify for
warranty protection. Grace Digital reserves the right
to replace any out-of-stock or discontinued product
with a comparable product. Discontinued products
may not be available for warranty replacement.
Any contents are NOT covered by the limited
manufacturer’s warranty. Warranty terms may be
revised without notification at the discretion of the
manufacturer. Please visit www.ecoxgear.com for
additional product & warranty information.
Sol Jam by ECOXGEAR,
a division of Grace Digital Inc., San Diego, California.
Designed in California. Made in China.
Patent Pending.
/