Dell EMC PowerVault ME4084 Owner's manual
- Category
- Servers
- Type
- Owner's manual
The Dell EMC PowerVault ME4084 is a high-performance, scalable, and secure storage array designed for small and medium businesses. It offers advanced features such as:
- High capacity and scalability: The ME4084 supports up to 1.6PB of raw storage capacity and can scale up to 240 drives to meet growing data needs.
- Performance optimization: Equipped with dual active-active controllers and a 12Gb SAS back-end, the ME4084 delivers consistent performance for demanding workloads.
- Data protection and security: The ME4084 provides comprehensive data protection features, including snapshots, replication, and encryption, to safeguard your critical data.

A Dell EMC Deployment and Configuration Guide
Deploying the 65TB Data Warehouse Fast Track
Reference Architecture for Microsoft SQL Server
2017 using Dell EMC PowerEdge R640 and Dell
EMC PowerVault ME4024
Deployment guide with step-by-step instructions
Abstract
Step-by-step instructions for building a Microsoft
®
SQL Server
®
data
warehouse workload, and requirements for preparing the hardware
platform and provisioning the OS to achieve a balanced, optimized 65TB
configuration.
September 2018

Revisions
2 Deploying the 65TB Data Warehouse Fast Track Reference Architecture for Microsoft SQL Server 2017 using
Dell EMC PowerEdge R640 and Dell EMC PowerVault ME4024 | 4023-CD-SQL
Revisions
Date
Description
September 2018
Initial release
Acknowledgements
Author: Doug Bernhardt
The information in this publication is provided “as is.” Dell Inc. makes no representations or warranties of any kind with respect to the information in this
publication, and specifically disclaims implied warranties of merchantability or fitness for a particular purpose.
Use, copying, and distribution of any software described in this publication requires an applicable software license.
© 2018 Dell Inc. or its subsidiaries. All Rights Reserved. Dell, EMC, Dell EMC and other trademarks are trademarks of Dell Inc. or its subsidiaries. Other
trademarks may be trademarks of their respective owners.
Dell believes the information in this document is accurate as of its publication date. The information is subject to change without notice.

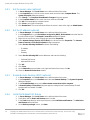
Table of contents
3 Deploying the 65TB Data Warehouse Fast Track Reference Architecture for Microsoft SQL Server 2017 using
Dell EMC PowerEdge R640 and Dell EMC PowerVault ME4024 | 4023-CD-SQL
Table of contents
Revisions............................................................................................................................................................................. 2
Acknowledgements ............................................................................................................................................................. 2
Table of contents ................................................................................................................................................................ 3
Overview ............................................................................................................................................................................. 4
1 Solution requirements .................................................................................................................................................. 5
2 Deployment workflow ................................................................................................................................................... 7
3 Cabling requirements ................................................................................................................................................... 8
4 Configure the PowerVault ME4024 storage array ........................................................................................................ 9
4.1 Configure local ports ........................................................................................................................................... 9
4.2 Configure disks ................................................................................................................................................... 9
4.3 Create the host and volumes .............................................................................................................................. 9
5 Configure the PowerEdge R640 server ..................................................................................................................... 11
5.1 Update the firmware ......................................................................................................................................... 11
5.2 Configure the system BIOS .............................................................................................................................. 11
5.3 Reset the HBAs to default settings ................................................................................................................... 12
5.4 Configure the HBAs .......................................................................................................................................... 12
6 Install and configure Windows Server 2016 ............................................................................................................... 13
6.1 Install Windows Server 2016 ............................................................................................................................ 13
6.2 Configure Windows Server 2016 ...................................................................................................................... 13
6.3 Configure the Windows volumes ...................................................................................................................... 17
7 Install and configure SQL Server 2017 Enterprise Edition ......................................................................................... 19
7.1 Install SQL Server 2017 Enterprise Edition ...................................................................................................... 19
7.2 Install SQL Server Management Studio (optional) ........................................................................................... 20
7.3 Configure SQL Server 2017 Enterprise Edition ................................................................................................ 20
8 Verify the deployment ................................................................................................................................................. 23
A Technical support and resources ............................................................................................................................... 24

Overview
4 Deploying the 65TB Data Warehouse Fast Track Reference Architecture for Microsoft SQL Server 2017 using
Dell EMC PowerEdge R640 and Dell EMC PowerVault ME4024 | 4023-CD-SQL
Overview
This guide provides step-by-step instructions to build a balanced configuration for a Microsoft
®
SQL Server
®
data warehouse workload, as specified in the companion reference architecture document, 65TB Data
Warehouse Fast Track Reference Architecture for Microsoft SQL Server 2017 using Dell EMC PowerEdge
R640 and Dell EMC PowerVault ME4024 (available on Dell.com/support). This guide also covers
requirements for preparing the hardware platform and provisioning the OS to achieve a balanced, optimized
65TB configuration for a Microsoft SQL Server 2017 data warehouse by using Dell EMC™ PowerEdge™
R640 servers, Dell EMC PowerVault™ ME4024 storage arrays, and Microsoft Data Warehouse Fast Track
(DWFT) principles.
Single-server reference architecture
Note: The 65TB solution includes both a single-server configuration and a highly available (HA) configuration.
For simplicity, this guide only covers the single-server implementation.

Solution requirements
5 Deploying the 65TB Data Warehouse Fast Track Reference Architecture for Microsoft SQL Server 2017 using
Dell EMC PowerEdge R640 and Dell EMC PowerVault ME4024 | 4023-CD-SQL
1 Solution requirements
This section lists the hardware and software components required to implement the single-server reference
architecture. The versions of firmware on the server used to validate the reference architecture are also listed.
Hardware and software components
Component
Description
Server
PowerEdge R640
Processors
Dual Intel
®
Xeon
®
Gold 6126 Processor (2.6 GHz, 12 cores, 24
threads)
Total cores
24
Total logical
processors
48 (Hyper-Threading Technology enabled)
Total memory
896 GB
Network
adapters
Minimum of one network adapter (1 Gbps or 10 Gbps based on
requirements)
Recommended to have more than one network adapter with load
balancing configured
Host bus
adapters
Two QLogic
®
QLE2662 dual-port 16 Gbps FC HBA
Software
Operating
system
Microsoft Windows Server
®
2016 Standard Edition
Database
software
SQL Server 2017 Enterprise Edition
Storage
Array
PowerVault ME4024 (firmware: GT275R0003-01)
Front-end I/O
ports
8 x 16 Gbps FC ports (four per controller)
Disk drives
24 x 1.92 TB SSDs (2.5" SAS)
Server firmware versions
Hardware component
Firmware version
BIOS
1.4.9
Backplane 1
4.26
Dell™ 64 Bit uEFI Diagnostics
4301X09
Dell OS Driver Pack
18.04.07
Integrated Dell Remote Access Controller
3.21.21.21
Intel
®
Ethernet 10G 4P X520/l350 rNDC
18.5.17

Solution requirements
6 Deploying the 65TB Data Warehouse Fast Track Reference Architecture for Microsoft SQL Server 2017 using
Dell EMC PowerEdge R640 and Dell EMC PowerVault ME4024 | 4023-CD-SQL
Hardware component
Firmware version
Intel
®
Gigabit 4P X710/l350 rNDC
18.5.7
Lifecycle Controller
3.21.21.21
OS Collector
3.0
Power supply
00.24.7D
QLogic QLE2662
14.04.09
System CPLD
1.0.1

Deployment workflow
7 Deploying the 65TB Data Warehouse Fast Track Reference Architecture for Microsoft SQL Server 2017 using
Dell EMC PowerEdge R640 and Dell EMC PowerVault ME4024 | 4023-CD-SQL
2 Deployment workflow
This section outlines the sequence of deploying the 65TB Data Warehouse Fast Track for SQL Server 2017
reference architecture using the PowerEdge R640 server and PowerVault ME4024 storage array.
To deploy the reference architecture, perform the following tasks:
1. Configure the PowerVault ME4024 storage array.
2. Configure the PowerEdge R640 server.
3. Install and configure the Windows Server 2016 operating system.
4. Install and configure SQL Server 2017 Enterprise Edition.
This guide assumes the reader has a general understanding of installing and configuring Windows servers,
SQL Server, and Dell EMC PowerVault ME4 Series arrays.

Cabling requirements
8 Deploying the 65TB Data Warehouse Fast Track Reference Architecture for Microsoft SQL Server 2017 using
Dell EMC PowerEdge R640 and Dell EMC PowerVault ME4024 | 4023-CD-SQL
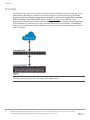
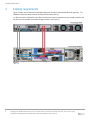
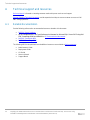
3 Cabling requirements
Figure 2 shows how to cable the PowerEdge R640 server and the PowerVault ME4024 storage array. The
hardware components were connected using Dell EMC best practices.
In a direct-connect configuration, each HBA should have one port connected to the top storage controller and
the other port connected to the bottom storage controller (see Figure 2).
Single-server configuration cabling diagram

Configure the PowerVault ME4024 storage array
9 Deploying the 65TB Data Warehouse Fast Track Reference Architecture for Microsoft SQL Server 2017 using
Dell EMC PowerEdge R640 and Dell EMC PowerVault ME4024 | 4023-CD-SQL
4 Configure the PowerVault ME4024 storage array
This section describes the configuration of the PowerVault ME4024 storage array. ME4 Series arrays can be
configured using the ME Storage Manager interface or ME4 Series command-line interface (CLI). This guide
covers the configuration steps using ME Storage Manager.
4.1 Configure local ports
On the Ports tab > System Settings, the Host Port Mode should be either FC or FC-and-iSCSI. When
using FC-and iSCSI, set Ports A0, A1, B0, and B1 to Speed: auto, Connection Mode: point-to-point.
4.2 Configure disks
Under Pools > Add Disk Group, add two disk groups. For each disk group, perform the following steps:
1. Specify a name (optional).
2. Select Virtual as the type (default).
3. Select A as the pool for the first disk group, and B as the pool for the second disk group (default)
4. For Data Protection, select RAID-5.
5. Select disks 0-11 for the first disk group, and disks 12-23 for the second disk group.
6. Click Add.
4.3 Create the host and volumes
A host object is used when presenting storage to a server. To create the host object, perform the following
steps:
1. Open ME Storage Manager.
2. Click the Hosts tab.
3. Click Action and select Host Setup. The Host Setup wizard appears.
4. In the Name box, enter the name of the server.
5. Select all four initiators listed. Verify that the initiator IDs match the FC ports on the host.
6. In the Host Bus Adapters list box, select all four FC ports for the server and click Next.
7. Select Do not group this host and click Next.

Configure the PowerVault ME4024 storage array
10 Deploying the 65TB Data Warehouse Fast Track Reference Architecture for Microsoft SQL Server 2017 using
Dell EMC PowerEdge R640 and Dell EMC PowerVault ME4024 | 4023-CD-SQL
8. Using the Add Row button, create the volumes listed in Table 3. The volume sizes will depend upon
your database configuration.
ME4 Series volumes
Volume name
Volume size
Pool
MPHost
1GB
A
SQLSystem
20GB
B
SQLLog
Site Dependent
A
SQLData01
Site Dependent
A
SQLData02
Site Dependent
B
SQLData03
Site Dependent
A
SQLData04
Site Dependent
B
SQLData05
Site Dependent
A
SQLData06
Site Dependent
B
SQLData07
Site Dependent
A
SQLData08
Site Dependent
B
SQLTempdb01
Site Dependent
A
SQLTempdb02
Site Dependent
B
9. Click Next.
10. Click Configure Host.
11. When prompted to configure another host, click No.

Configure the PowerEdge R640 server
11 Deploying the 65TB Data Warehouse Fast Track Reference Architecture for Microsoft SQL Server 2017 using
Dell EMC PowerEdge R640 and Dell EMC PowerVault ME4024 | 4023-CD-SQL
5 Configure the PowerEdge R640 server
5.1 Update the firmware
The firmware update feature of the Dell Lifecycle Controller can be used to update the firmware on the server.
The Lifecycle Controller is accessible during the server boot cycle.
To update the firmware using the Lifecycle Controller, perform the following steps:
1. Reboot the server and press F10 when prompted to enter the Lifecycle Controller.
2. On the left-hand side of the screen, click Firmware Update.
3. Click Launch Firmware Update.
4. On the Select Update Repository screen, leave FTP Server selected and click Next.
5. On the Enter Access Details screen, under Proxy Settings, uncheck Enable Settings and click
Next.
6. On the Select Updates screen, available updates will have a check mark next to the component
name. After verifying the list of selected updates, click Apply. This will apply the updates and reboot
the server.
7. After rebooting, the server will enter the Lifecycle Controller. In some cases, it may be necessary to
repeat this process until all updates have been applied.
8. To exit the Lifecycle Controller, click Exit in the upper right-hand corner of the screen.
9. In the Confirmation dialog box, click Yes. The server will reboot.
5.2 Configure the system BIOS
To configure the BIOS using System Setup, which is accessible during the server boot cycle, perform the
following steps:
1. Reboot the server and press F2 when prompted to enter System Setup.
2. On the System Setup main menu, click System BIOS.
3. Set the system profile to Performance:
a. Click System Profile Settings.
b. In the System Profile drop-down list, select Performance.
c. Click Back to exit System Profile Settings.
4. Enable Hyper Threading:
a. Click Processor Settings.
b. For the Logical Processor option, select Enabled.
c. Click Back to exit Processor Settings.
5. Click Finish to exit System BIOS.
6. Click Finish to exit System Setup.
7. On the Confirm Exit dialog box, click Yes. The server will reboot.

Configure the PowerEdge R640 server
12 Deploying the 65TB Data Warehouse Fast Track Reference Architecture for Microsoft SQL Server 2017 using
Dell EMC PowerEdge R640 and Dell EMC PowerVault ME4024 | 4023-CD-SQL
5.3 Reset the HBAs to default settings
To reset the HBAs using QLogic Fast!UTIL, which is accessible during the server boot cycle, perform the
following steps:
1. Reboot the server and press [Ctrl]+[Q] when prompted to enter QLogic Fast!UTIL.
2. In Select Host Adapter, select the first port in the list and press [Enter].
3. Reset the HBA port to factory defaults:
a. In Fast!UTIL Options, select Configuration Settings and press [Enter].
b. In Configuration Settings, select Restore Default Settings and press [Enter].
c. After Adapter Defaults Restored is displayed, press any key to return to the Configuration
Settings screen.
d. Press [Esc] to exit Configuration Settings. When prompted, select Save Changes and press
[Enter].
4. In Fast!UTIL Options, select Select Host Adapter and press [Enter].
5. In Select Host Adapter, select the next port in the list and press [Enter].
6. Using the instructions in step 3, reset the port to factory defaults. Repeat these steps until all four
ports have been configured.
5.4 Configure the HBAs
The HBAs can be configured using QLogic Fast!UTIL, which is accessible during the server boot cycle. This
section assumes that QLogic Fast!UTIL is still open on the server after completing the previous procedure.
To configure the HBAs using QLogic Fast!UTIL, perform the following steps:
1. In Fast!UTIL Options, select Select Host Adapter and press [Enter].
2. In Select Host Adapter, select the first port in the list and press [Enter].
3. Set the parameters on the HBA port according to best practices:
a. In Configuration Settings, select Adapter Settings and press [Enter].
b. In Adapter Settings, complete the following:
i. Set Connection Options to 1 (Point to point only).
ii. Press [Esc] to exit Adapter Settings.
c. In Configuration Settings, select Advanced Adapter Settings and press [Enter].
d. In Advanced Adapter Settings, complete the following:
i. Set Login Retry Count to 60.
ii. Set Port Down Retry Count to 60.
iii. Set Link Down Timeout to 30.
iv. Press [Esc] to exit Advanced Adapter Settings.
e. Press [Esc] to exit Configuration Settings. When prompted, select Save Changes and press
[Enter].
4. In Fast!UTIL Options, select Select Host Adapter and press [Enter].
5. In Select Host Adapter, select the next port in the list and press [Enter].
6. Using the instructions in step 3, set the parameters according to best practices. Repeat these steps
until all four ports have been configured.

Install and configure Windows Server 2016
13 Deploying the 65TB Data Warehouse Fast Track Reference Architecture for Microsoft SQL Server 2017 using
Dell EMC PowerEdge R640 and Dell EMC PowerVault ME4024 | 4023-CD-SQL
6 Install and configure Windows Server 2016
6.1 Install Windows Server 2016
The OS Deployment feature of the Lifecycle Controller can be used to install the operating system. One
advantage of this approach is that Windows will be installed with the proper drivers for the PowerEdge R640
server.
To install Windows using the Lifecycle Controller, perform the following steps:
1. Reboot the server and press [F10] when prompted to enter Lifecycle Controller.
2. Click OS Deployment on the left-hand side of the screen.
3. Click Deploy OS.
4. Under Boot Mode, select BIOS if not already be selected.
5. Under Available Operating Systems, select Microsoft Windows Server 2016 and click Next.
6. Under Select Installation Mode, select Manual Install and click Next.
7. Insert the Windows Server 2016 install media and click Next.
8. Review the options that were selected on the previous screens. If the information is correct, click
Finish. The server will reboot. If prompted to boot from the Windows install disk, press any key. The
Windows Setup screen will appear.
9. On the first screen, enter the following and click Next:
- Language to install
- Time and currency format
- Keyboard or input method
10. On the next screen, click Install Now. The Windows Setup dialog box will appear.
11. On the Select the operating system you want to install screen, select Windows Server 2016
Standard (Desktop Experience) and click Next.
12. On the Applicable notices and License terms screen, select I accept the license terms and click
Next.
13. On the screen, Which type of installation do you want?, click Custom: Install Windows only
(advanced).
14. On the screen, Where do you want to install Windows?, click Drive 0 and click Next.
15. The Windows installation will start. After it has completed, the server will reboot.
16. On the Customize Settings screen, enter the administrator password and click Finish.
6.2 Configure Windows Server 2016
Once Windows Server is installed, it needs to be configured for the Data Warehouse Fast Track workload.
To configure Windows Server, perform the following prerequisite steps:
1. Press [Ctrl]+[Alt]+[Delete] and log in as Administrator.
2. On the Networks pop-up window on the right-hand side of the screen, click No.
To complete the configuration, perform the steps in the following subsections in order.

Install and configure Windows Server 2016
14 Deploying the 65TB Data Warehouse Fast Track Reference Architecture for Microsoft SQL Server 2017 using
Dell EMC PowerEdge R640 and Dell EMC PowerVault ME4024 | 4023-CD-SQL
6.2.1 Set the server name (optional)
1. In Server Manager, click Local Server on the left-hand side of the screen.
2. In the Properties pane, click the current server name next to the label, Computer Name. The
System Properties dialog box appears.
3. Click Change. The Computer Name/Domain Changes dialog box appears.
4. In the Computer Name text box, enter the server name and click OK.
5. Click OK to acknowledge the computer restart.
6. Click Close to exit System Properties.
7. Click Restart Now. The server will reboot. When the server is back online, login as Administrator.
6.2.2 Set the IP address (optional)
1. In Server Manager, click Local Server on the left-hand side of the screen.
2. In the Properties pane, click IPv4 address assigned by DHCP, IPv6 enabled next to the label for
the active Ethernet port. The Network Connections window will appear.
3. Right-click the icon for the active Ethernet port and select Properties.
4. Select Internet Protocol Version 4 (TCP/IPv4) in the list box and click Properties. The Internet
Protocol Version 4 (TCP/IPv4) Properties dialog box appears.
5. Select Use the following IP address and enter the following:
- IP address
- Subnet
- Gateway
6. Select Use the following DNS server addresses and enter the following:
- Preferred DNS server
- Alternate DNS server
7. Click OK.
8. Click Close.
9. On the Networks pop-up window on the right-hand side of the screen, click No.
10. Close the Network Connections window.
6.2.3 Enable Remote Desktop (RDP) (optional)
1. In Server Manager, click Local Server on the left-hand side of the screen.
2. In the Properties pane, click Disabled next to the label Remote Desktop. The System Properties
dialog box appears.
3. In the Remote Desktop pane, select Allow remote connections to this computer.
4. A Remote Desktop Connection dialog box appears, stating that the Remote Desktop Firewall
exception will be enabled. Click OK.
5. Click OK.
6.2.4 Install the Multipath I/O feature
1. In Server Manager, click Local Server on the left-hand side of the screen.
2. Scroll down until the Roles and Features pane is visible.
3. In the Tasks drop-down list at the top of the pane, select Add Roles and Features. The Add Roles
and Features wizard will start.
4. On the Before you begin screen, click Next.

Install and configure Windows Server 2016
15 Deploying the 65TB Data Warehouse Fast Track Reference Architecture for Microsoft SQL Server 2017 using
Dell EMC PowerEdge R640 and Dell EMC PowerVault ME4024 | 4023-CD-SQL
5. On the Select installation type screen, select Role-based or feature-based installation, and click
Next.
6. On the Select destination server screen, select the server and click Next.
7. On the Select server roles screen, click Next without selecting any roles.
8. On the Select features screen, perform the following:
a. Scroll down and select Multipath I/O.
b. Click Next.
9. Click Install.
10. When the installation is complete, click Close.
11. Clear the installations completion message in Server Manager:
a. Click the flag icon in the menu bar.
b. Click the X to close the feature installation message.
c. Click the flag icon in the menu bar.
6.2.5 Remove install disk
Eject the Windows installation disk from the server.
6.2.6 Set the time zone of the server (optional)
1. Place the cursor over the time in the lower left-hand corner of the screen.
2. Right-click and select Adjust date/time. The Settings window will appear.
3. Under Time zone, select the correct time zone in the drop-down list.
4. Close the Settings window.
6.2.7 Configure MPIO
1. Open the Control Panel.
2. In the View by drop-down list, select Small icons.
3. Click the MPIO icon. The MPIO Properties dialog box appears.
4. Click Discover Multi-Paths tab.
5. Your storage system model should be listed. Select the device and click Add.
6. The Reboot Required dialog box appears.
7. Click Yes. The server will reboot. When the server is back online, log in as Administrator.
6.2.8 Set the Power Plan
Set the Power Plan to High performance:
1. Open the Control Panel.
2. Click the Power Options icon.
3. In the Power Options window, under Preferred plans, select High performance.
4. Close the Power Options window.

Install and configure Windows Server 2016
16 Deploying the 65TB Data Warehouse Fast Track Reference Architecture for Microsoft SQL Server 2017 using
Dell EMC PowerEdge R640 and Dell EMC PowerVault ME4024 | 4023-CD-SQL
6.2.9 Remove SMBv1 (optional)
1. Run the following PowerShell command:
Remove-WindowsFeature -Name "FS-SMB1"
2. Reboot the server. When the server is back online, log in as Administrator.
6.2.10 Configure Windows Updates (optional)
1. Click the start icon.
2. Click the settings icon.
3. Click Update & security.
4. Under Update Status, click Check for updates.
5. Apply all important updates.
6. Repeat until there are no results after clicking Check for updates and Update Status shows Your
device is up to date.
6.2.11 Create a local SQL Server service account
Create a local SQL Server service account called SQLService:
1. Open Computer Management.
2. Expand Local Users and Groups.
3. Right-click Users and select New User. The New User dialog box appears.
4. In the User name text box, enter SQLService.
5. In the Description text box, enter SQL Server service account.
6. In the Password and Confirm password text boxes, enter the password.
7. Deselect User must change password at next logon.
8. Select Password never expires.
9. Click Create.
10. Click Close.
11. Close the Computer Management window.
6.2.12 Lock pages in memory
Grant the Lock pages in memory right to the SQL Server service account:
1. Right-click the start icon and select Run.
2. In the Open text box, enter secpol.msc. The Local Security Policy window appears.
3. Expand Local Policies.
4. Select User Rights Assignment.
5. In the Policy list, double-click Lock pages in memory. The Lock Pages in Memory Properties
dialog box appears.
6. Click Add User or Group. The Select Users or Groups dialog box appears.
7. Enter SQLService in the text box.
8. Click Check Names and click OK.
9. Click OK.
10. Close the Local Security Policy window.

Install and configure Windows Server 2016
17 Deploying the 65TB Data Warehouse Fast Track Reference Architecture for Microsoft SQL Server 2017 using
Dell EMC PowerEdge R640 and Dell EMC PowerVault ME4024 | 4023-CD-SQL
6.2.13 Change the optical drive letter (optional)
Change the drive letter for the optical drive to Z:
1. Open Disk Management.
2. Right-click the optical drive in the list of disks in the lower pane of the center of the screen and select
Change Drive Letter and Paths. The Change Drive Letter and Paths dialog box appears.
3. Click Change. The Change Drive Letter or Path dialog box appears.
4. Select Z from the drop-down list of drive letters and click OK.
5. A Disk Management dialog box will appear asking if you want to continue. Click Yes.
6. Close the Computer Management window.
6.2.14 Configure the Windows Firewall
Because security requirements can vary significantly from site to site, the configuration of the firewall is not
included in this document. Using default settings, the Windows firewall may interfere with RDP connections
and with connections to SQL Server. During validation of the solution, the Windows firewall was disabled.
6.3 Configure the Windows volumes
This section describes the steps required to configure the ME4 Series volumes for use by Windows.
6.3.1 Map and format the remaining volumes.
All volumes, except for the boot volume, will need to be mapped to the server and formatted in Windows.
Format all volumes as NTFS. These volumes, along with required parameters, are listed in Table 4.
Remaining volumes to map and format
Volume name
Drive letter/
mount point
Volume label
Allocation unit
MPHost
M:\
MPHost
Default
SQLSystem
M:\ft\SQLSystem
SQLSystem
64K
SQLLog
M:\ft\SQLLog
SQLLog
64K
SQLData01
M:\ft\SQLData01
SQLData01
64K
SQLData02
M:\ft\SQLData02
SQLData02
64K
SQLData03
M:\ft\SQLData03
SQLData03
64K
SQLData04
M:\ft\SQLData04
SQLData04
64K
SQLData05
M:\ft\SQLData05
SQLData05
64K
SQLData06
M:\ft\SQLData06
SQLData06
64K
SQLData07
M:\ft\SQLData07
SQLData07
64K
SQLData08
M:\ft\SQLData08
SQLData08
64K
SQLTempdb01
M:\ft\SQLTempdb01
SQLTempdb01
64K
SQLTempdb02
M:\ft\SQLTempdb02
SQLTempdb02
64K

Install and configure Windows Server 2016
18 Deploying the 65TB Data Warehouse Fast Track Reference Architecture for Microsoft SQL Server 2017 using
Dell EMC PowerEdge R640 and Dell EMC PowerVault ME4024 | 4023-CD-SQL
Execute the following steps for each volume, one at time, in order as the volumes are listed in Table 4:
1. Open ME Storage Manager and connect to the ME4 Series array.
2. Click the Storage tab.
3. Map the volume in the ME Storage Manager:
a. Expand the volume folder containing the volume.
b. Right-click the volume and select Map Volume to Server. The Map Volume to Server dialog
box appears.
c. Expand the server folder containing the server object.
d. Select the server object and click Next.
e. Review the information and click Finish.
4. Format the volume on the Windows server:
a. Open Disk Management.
b. Click Action in the menu bar and select Rescan Disks. Continue to rescan disks until the new
disk appears. It may take multiple rescans.
c. Right-click the new disk and select Online.
d. Right-click the new disk and select Initialize Disk. The Initialize Disk dialog box appears.
e. Under Use the following partition style for the selected disks, select GPT.
f. Click OK.
g. Right-click the unallocated space of the new disk and select New Simple Volume.
h. The New Simple Volume Wizard starts.
i. Click Next.
j. On the Specify Volume Size screen, keep the default size, and click Next.
k. On the Assign Drive Letter or Path screen, use the drive letter or mount point listed in Table 4
for the volume and click Next.
l. On the Format Partition screen, complete the following:
i. In the File system drop-down list, select NTFS.
ii. In the Allocation unit size drop-down list, select the value from Table 4.
iii. In the Volume label text box, enter the value from Table 4 and click Next.
m. Review the settings and click Finish.
Once the volumes have been mapped and formatted, perform the following steps:
1. Verify that the odd-numbered SQL Server data volumes are on one controller and the even-
numbered SQL Server data volumes are on the other controller. This can be corrected by remapping
the volume and specifying the correct controller.
2. Verify that the tempdb data volumes are on different controllers. This can be corrected by remapping
the volume and specifying the correct controller.
3. Create a folder named Data on each mount point under M:\ft, with the exception of
M:\ft\SQLSystem, by performing the following:
a. Open the File Explorer.
b. Select the mount point (for example, M:\ft\SQLData01) in the directory tree.
c. Right-click the mount point, select New, and select Folder.
d. Name the folder Data.
e. Repeat until all mount points (except for M:\ft\SQLSystem) have a Data folder.

Install and configure SQL Server 2017 Enterprise Edition
19 Deploying the 65TB Data Warehouse Fast Track Reference Architecture for Microsoft SQL Server 2017 using
Dell EMC PowerEdge R640 and Dell EMC PowerVault ME4024 | 4023-CD-SQL
7 Install and configure SQL Server 2017 Enterprise Edition
7.1 Install SQL Server 2017 Enterprise Edition
To install SQL Server 2017 Enterprise Edition, perform the following steps:
1. Insert the SQL Server 2017 Enterprise Edition install media.
2. Double-click Setup.exe. The SQL Server Installation Center window appears.
3. Click Installation in the pane on the left-hand side.
4. Click New SQL Server stand-alone installation or Add features to an existing installation. The
SQL Server 2017 Setup dialog box will appear.
5. On the Product Key screen, enter the product key and click Next.
6. On the License Terms screen, select I accept the terms and click Next.
7. On the Microsoft Update screen, leave Use Microsoft Update to check for updates unselected
and click Next.
8. On the Feature Selection screen, select the following features and click Next:
- Database Engine Services
- SQL Server Replication (optional)
- Full-Text and Semantic Extractions for Search (optional)
- Client Tools Connectivity
- Client Tools Backwards Compatibility
- Documentation Components
9. On the Instance Configuration screen, leave Default Instance selected and MSSQLSERVER in
the Instance ID textbox. Click Next.
10. On the Server Configuration screen, do the following:
On the Service Accounts tab, complete the following:
a. Enter the SQL Server service account name (.\SQLService) and password for the SQL Server
Agent.
b. Change the startup type for the SQL Server Agent to Automatic.
c. Enter the SQL Server service account name (.\SQLService) and the SQL Server Database
Engine.
d. Select the Grant Perform Volume Maintenance Task privilege to SQL Server Database
Engine Service.
e. On the Collation tab, leave the Collation at the default setting and click Next.
11. On the Database Engine Configuration screen, complete the following:
On the Server Configuration tab:
a. Under Authentication Mode, select Mixed Mode.
b. Enter and confirm the sa password.
c. Click Add Current User.
On the Data Directories tab:
a. In the Data root directory text box, enter M:\ft\SQLSystem.
b. Leave the remaining directory text boxes as-is.
On the TempDB tab:

Install and configure SQL Server 2017 Enterprise Edition
20 Deploying the 65TB Data Warehouse Fast Track Reference Architecture for Microsoft SQL Server 2017 using
Dell EMC PowerEdge R640 and Dell EMC PowerVault ME4024 | 4023-CD-SQL
a. In the Number of files list box, enter 8.
b. Remove existing directories in the Data directories list box. Select the directory and click
Remove.
c. Add the directory M:\ft\SQLTempdb01\Data. Click Add. The Browse for Folder dialog box
appears. Select the folder and click OK.
d. Add the directory M:\ft\SQLTempdb02\Data. Click Add. The Browse for Folder dialog box
appears. Select the folder and click OK.
e. In the Log directory list box, enter M:\ft\SQLLog\Data.
f. On the FILESTREAM tab (optional), select Enable FILESTREAM for Transaction-SQL access
and click Next.
12. On the Ready to Install screen, click Install.
13. On the Complete screen, click Close.
14. Close the SQL Server Installation Center window.
15. Remove the SQL Server install media.
7.2 Install SQL Server Management Studio (optional)
Starting with SQL Server 2016, SQL Server Management Studio (SSMS) is no longer installed as part of the
SQL Server installation and is installed separately.
1. Download the latest SSMS installation package from Microsoft.
2. Double-click the SSMS setup executable file (for example, SSMS-Setup-ENU.exe).
3. On the Welcome screen, click Install.
4. On the Setup Completed screen, click Close.
7.3 Configure SQL Server 2017 Enterprise Edition
After SQL Server is installed, a few configuration changes need to be made to optimize SQL Server for the
Data Warehouse Fast Track workload.
To configure SQL Server, perform the steps in the following subsections.
7.3.1 Open SQL Server Management Studio
1. The Connect to Server dialog box appears.
2. In the Server name text box, enter the server name.
3. In the Authentication drop-down list, select Windows Authentication.
4. Click Connect.
7.3.2 Turn on advanced configuration options
1. Click New Query on the toolbar.
2. Enter the following T-SQL commands:
EXECUTE sp_configure 'show advanced options', 1
GO
RECONFIGURE
GO
3. Click !Execute on the toolbar.
Page is loading ...
Page is loading ...
Page is loading ...
Page is loading ...
-
 1
1
-
 2
2
-
 3
3
-
 4
4
-
 5
5
-
 6
6
-
 7
7
-
 8
8
-
 9
9
-
 10
10
-
 11
11
-
 12
12
-
 13
13
-
 14
14
-
 15
15
-
 16
16
-
 17
17
-
 18
18
-
 19
19
-
 20
20
-
 21
21
-
 22
22
-
 23
23
-
 24
24


Dell EMC PowerVault ME4084 Owner's manual
- Category
- Servers
- Type
- Owner's manual
The Dell EMC PowerVault ME4084 is a high-performance, scalable, and secure storage array designed for small and medium businesses. It offers advanced features such as:
- High capacity and scalability: The ME4084 supports up to 1.6PB of raw storage capacity and can scale up to 240 drives to meet growing data needs.
- Performance optimization: Equipped with dual active-active controllers and a 12Gb SAS back-end, the ME4084 delivers consistent performance for demanding workloads.
- Data protection and security: The ME4084 provides comprehensive data protection features, including snapshots, replication, and encryption, to safeguard your critical data.
Ask a question and I''ll find the answer in the document
Finding information in a document is now easier with AI
Related papers
-
Dell Storage Solution Resources Owner's manual
-
Dell PowerEdge R640 Owner's manual
-
-
-
-
Dell EMC PowerVault ME412 Expansion Quick start guide
-
Dell PowerVault NX3200 Owner's manual
-
Dell Storage NX430 Administrator Guide
-
-
Dell EMC NX440 User guide