
LMV1940DW
LMV1940DB
P/NO. 3828W5A4328
Printed in Korea
website: http://www.lg.ca

- 2 -
TABLE OF CONTENTS
TABLE OF CONTENTS .......................................
SAFETY................................................................
Important Safety Instructions .............................
Precautions To Avoid Possible Exposure To
Excessive Microwave Energy ...........................
INFORMATION.....................................................
Location of Model Number.................................
Oven Specifications ...........................................
Electrical Rating.................................................
Electrical Requirements.....................................
Grounding Instructions ......................................
Microwave Oven Features.................................
Oven Control Panel ...........................................
OPERATION ........................................................
Learn about your Microwave Oven.................
Clock...............................................................
Kitchen Timer..................................................
Light Timer......................................................
Fan Hi/Low/Off................................................
Turntable On/Off .............................................
Child Lock .......................................................
Light Hi/Low/Off ..............................................
Custom Set .....................................................
Help.................................................................
Hold Warm......................................................
Ez-On..............................................................
More/Less .......................................................
Custom Cook ..................................................
Cooking at Lower Power Levels .....................
Cooking at High Cook Power........................
Cooking Guide for Lower Power Levels........
One Touch Control........................................
Popcorn.........................................................
Potato............................................................
Cook..............................................................
Pizza .............................................................
Cooking Guide for One Touch Cook.............
Reheat...........................................................
Beverage.......................................................
Cooking Guide for Reheat.............................
Ez Defrost .....................................................
Auto Defrost ..................................................
Defrosting Tips ..............................................
Auto Defrost Chart ........................................
Two Position Metal Rack...............................
COOKING...........................................................
Getting the Best Cooking Results .................
Fish & Shellfish .............................................
Appetizers/Sauces/Soups.............................
Meat ..............................................................
Poultry...........................................................
Pasta and Rice..............................................
MAINTENANCE..................................................
Care and Cleaning ........................................
Metal Rack ....................................................
Cleaning the Grease Filters ..........................
Charcoal Filter Replacement.........................
Cooktop/Countertop Light Replacement.......
Oven Light Replacement...............................
Questions and Answers ................................
Microwave Utensil Guide ..............................
BEFORE CALLING FOR SERVICE...................
WARRANTY .......................................................
2
3
3
4
5
5
5
5
5
5
6
7
9
9
9
9
9
10
10
10
10
10
11
11
11
11
12
12
12
13
14
14
14
14
14
15
16
16
16
17
17
17
18
19
20
20
20
21
21
23
24
25
25
25
25
25
26
26
26
27
28
30

- 3 -
WARNING-To reduce the risk of burns, electric
shock, fire, injury to persons or exposure to excessive
microwave energy.
• Read all the instructions before using your oven.
• Do not allow children to use this oven without
close supervision.
• Read and follow the specific
“PRECAUTIONS TO
AVOID POSSIBLE EXPOSURE TO EXCESSIVE
MICROWAVE ENERGY”
found on page 4.
• Use the microwave oven only for its intended use as
described in its manual. Do not use corrosive
chemicals or vapors, in the microwave oven. This
type of oven is specifically designed to heat, cook or
dry food. It is not designed for industrial or
laboratory use.
• Do not use or store this appliance outdoors. Do not
use this product near water -for example, near a
kitchen sink, in a wet basement, or near a swimming
pool, and the like.
• Do not use the cavity for storage purposes. Do not
leave paper products, cooking utensils, or food in
the cavity when not in use.
• Clean the ventilating hood frequently. Do not
allow grease to accumulate on the hood or the
filters.
• When flaming foods under the hood, turn the fan on.
• Suitable for use above both gas and electric cooking
equipment 36 inches wide or less.
• Use care when cleaning the vent hood filters.
Corrosive cleaning agents such as lye-based oven
cleaners, may damage the filters.
• When cleaning the door and the surfaces that
touch the door, use only mild, non-abrasive
soaps or detergents and a sponge or soft cloth.
• Do not tamper with the built-in safety switches
on the oven door. The oven has several built-in
safety switches to make sure the power is off when
the door is open.
• If your oven is dropped or damaged, have it
thoroughly checked by a qualified service technician
before using it again.
• To avoid a fire hazard:
- Do not severely overcook food. Severely
overcooked foods can starts a fire in the oven.
Watch the oven carefully, especially if you have
paper, plastic, or other combustibles in the oven.
- Do not store combustible items (bread, cookies,
etc.) in the oven, because if lightning strikes the
power lines, it may cause the oven to turn on.
- Do not use wire twist-ties in the oven. Be sure to
remove them before placing the item in the oven.
• If a fire should start:
- Keep the oven door closed.
- Turn the oven off.
- Disconnect the power cord or shut off the
power at the fuse or circuit breaker panel.
• To avoid electric shock:
- This appliance must be grounded. Connect it
only to a properly grounded outlet. See the
electrical grounding instructions on page 5.
- Do not operate this appliance if it has a
damaged cord or plug, if it is not working properly
or if it has been damaged or dropped.
- Do not immerse the electrical cord or plug in
water.
- Keep the cord away from heated surfaces.
- This appliance should be serviced only by qualified
service personnel.
• Install or locate the microwave oven only in
accordance with the provided installation
instructions.
• Do not mount onen a sink.
• Do not let cord hang over edge of table or counter.
• Take care when The Door is opened.
There is a possibility of being injured.
IMPORTANT SAFETY INSTRUCTIONS
The safety instructions below will tell you how to use your oven to avoid harm to yourself or damage
to your oven.
SAFETY

- 4 -
• To avoid improperly cooking some foods.
- Do not heat any types of baby bottles or baby
food. Uneven heating may occur and possibly
cause personal injury.
- Do not heat small-necked containers, such as
syrup bottles.
- Do not deep-fat fry in your microwave oven.
- Do not attempt home canning in your
microwave oven.
- Do not heat the following items in the
microwave oven: whole eggs in the shell; water
with oil or fat; sealed containers or closed glass
jars. These items may explode.
• Do not use this oven for commercial purposes.
It is made for household use only.
• Do not cover or block any openings in the oven.
• Do not run the oven empty, without food in it.
- Do not allow the gray film on special microwave-
cooking packages to touch the oven floor. Put the
package on a microwavable dish.
- Do not cook anything directly on the oven floor. Use
a microwavable dish.
- Keep a browning dish at least 3/16 inch above floor.
Carefully read and follow the instructions for the
browning dish. If you use a browning dish incorrectly,
you could damage the oven floor.
• Preserve the metal rack:
- Remove the metal rack from the oven when you are
not using it.
- Do not use the oven empty with the metal rack in it.
- The metal rack may get hot while cooking. Use pot
holders to remove it after cooking.
- Do not use foil or metal containers on the metal
rack.
• This appliance should be serviced only by qualified
service personnel. Contact nearest authorized
service facility for examination, repair or adjustment.
SAVE THESE INSTRUCTIONS
• Do not attempt to operate this oven with the door open, since open-door operation can result in harmful
exposure to microwave energy. It is important not to defeat or tamper with the safety interlock.
• Do not operate the oven if it is damaged. It is particularly important that the oven door close properly and
that there is no damage to the:
- door (bent)
- hinges and latches (broken or loosened)
- door seals and sealing surfaces.
• Do not place any object between the oven front face and the door, or allow soil or cleaner residue to
accumulate on sealing surfaces.
• The oven should not be adjusted or repaired by anyone except properly qualified service personnel.
PRECAUTIONS TO AVOID POSSIBLE
EXPOSURE TO EXCESSIVE MICROWAVE
ENERGY ...
SAFETY

- 5 -
Please read this owner’s manual. It will tell you how
to use all the fine features of this microwave oven.
LOCATION OF MODEL NUMBER
To request service information or replacement parts,
the service center will require the complete model
number of your microwave oven. The number is on the
oven front as shown in the illustration below.
OVEN SPECIFICATIONS
Output Power 1,050W (IEC 60705 Standard)
Outer Dimensions 29-15/16”(W) x 16-7/16”(H) x 15-5/8”(D)
Cavity Volume 1.9 Cu.ft
Net Weight 60 lbs.
ELECTRICAL RATING
* Electrical Rating of the Oven: 120V AC, 60Hz
* 13 Amp./ 1,500W ( MWO + Cooktop Lamp +
Ventilation Fan)
ELECTRICAL REQUIREMENTS
The oven is designed to operate on a Standard
120V/60Hz household outlet. Be sure the circuit is at
least 15A or 20A and the microwave oven is the only
appliance on the circuit. It is not designed for 50Hz or
any circuit other than a 120V/60Hz circuit.
GROUNDING INSTRUCTIONS
This appliance must be grounded. If an electrical
short circuit occurs, grounding reduces the risk of
electric shock by providing an escape wire for the
electric current. The cord for this appliance has a
grounding wire with a grounding plug. Put the plug into
an outlet that is properly installed and grounded.
WARNING - If you use the grounding plug
improperly, you risk electric shock.
Ask a qualified electrician if you do not understand the
grounding instructions or if you wonder whether the
appliance is properly grounded.
Because this appliance fits under the cabinet, it has a
short power-supply cord. See the separate Installation
Instructions for directions on placing the cord properly.
Keep the electrical power cord dry and do not pinch or
crush it in any way.
If it is necessary to use an extension cord, use only a
3-wire extension cord that has a 3-blade grounding
plug, and a 3-slot receptacle that will accept the plug
on the appliance. The marked rating of the extension
cord shall be equal to or greater than the electrical
rating of the appliance.
For a permanently connected appliance:
This appliance must be connected to a grounded,
metallic, permanent wiring system, or an equipment
grounding conductor should be run with the circuit
conductors and connected to the equipment grounding
terminal or lead on the appliance.
Ensure proper ground
exists before use
MODEL NUMBER LABEL
INFORMATION

- 6 -
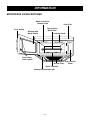
MICROWAVE OVEN FEATURES
Door Handle
Window with
Metal Shield
Oven Control
Panel
Cooktop/Countertop Light
Grease Filter
Door Safety
Lock System
Model and Serial
Number Plate
Cooking Guide
Vent Grille
Two-position
Metal Rack
Glass Turntable
INFORMATION

- 7 -
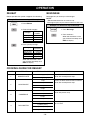
OVEN CONTROL PANEL
5
9
10
1
2
3
6
4
8
14
15
17
20
11
7
12
13
16
18
19
21
22
INFORMATION

- 8 -
INFORMATION
1. DISPLAY: The display includes a clock and
indicators to tell you time of day, cooking time
settings, and cooking functions selected.
2. ONE TOUCH CONTROL: Press these keys let you
cook foods easily.
See page for more information.
3. MORE: Press this pad to add ten seconds of
cooking time each time you press it.
See page for more information.
4. CUSTOM COOK: Press this pad to recall one
cooking instruction previously programmed into
memory.
See page for more information.
5. LESS: Press this pad to subtract ten seconds of
cooking time each time you press it.
See page for more information.
6. AUTO DEFROST: Press this pad to select food type
and defrost food by weight.
See page for more information.
7. Ez DEFROST: This pad provides you with the quick
defrosting method for 1.0 pounds frozen foods.
See page for more information.
8. CUSTOM SET: Press this pad to change the oven’s
default settings for sound, clock, display speed and
defrost weight .
See page for more information.
9. HOLD WARM: Press this pad to keep hot, cooked
foods safely warm in your microwave oven for up to
99 minutes.
See page for more information.
10. CLOCK(TIME OF DAY): Press this pad to enter
the time of day.
See page for more information.
11. NUMBER: Press number pads to enter cooking
time, power level, quantities, or weights.
12. TIME COOK: Press this pad followed by number
Pads to set a cooking time.
13. POWER LEVEL: Press this pad to select a cooking
power level.
14. STOP/CLEAR: Press this pad to stop the oven or
to clear all entries.
15. Ez-ON: Press this pad to cook for 30 seconds at
100% power level.
See page for more information.
16. START: Press this pad to start a function. If you
open the door after oven begins to cook, START
again.
17. KITCHEN TIMER: Press this pad to set the kitchen
timer.
See page for more information.
18. LIGHT TIMER: Press this pad to set the light timer.
See page for more information.
19. HELP: Press this pad to learn how to use each
oven function.
See page for more information.
20. FAN HI/LOW/OFF: Press this pad to turn the fan
on or off.
See page for more information.
21. LIGHT HI/LOW/OFF: Press this pad to turn on the
cooktop/countertop light.
See page for more information.
22. TURNTABLE ON/OFF: Press this pad to turn off
the turntable. OFF will appear in the display.
See page for more information.

- 9 -
LEARN ABOUT YOUR MICROWAVE OVEN
This section discusses the concepts behind microwave cooking and introduces you to the basics you need to
know to operate your microwave oven. Please read this information before use.
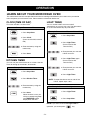
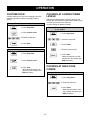
CLOCK(TIME OF DAY)
This oven includes a 24-hour clock.
OPERATION
1. Press Stop/Clear.
2. Press Clock.
(Press once for AM, twice for
PM.)
3. Enter the time by using the
number key.
4. Press Start.
Example: To set 8:00 AM.
1. Press Stop/Clear.
2. Press Kitchen Timer.
3. Enter the time by using the
number key.
4. Press Start.
When the time is over, you
will hear seventh long beep
and TIMER END will be
displayed at one time.
Example: To count 3 minutes.
KITCHEN TIMER
You can use your microwave oven as a timer. Use the
Timer for timing up 99 minutes, 99 seconds.
LIGHT TIMER
You can set the LIGHT to turn on and off
automatically at any time you want. The light comes
on at the same time every day until reset.
1. Press Stop/Clear.
2. Press Light Timer.
(Press once for AM,
twice for PM.)
3. Enter the time you want the
LIGHT to turn on.
4. Press Light Timer again.
(Press once for AM,
twice for PM.)
5. Enter the time you want the
LIGHT to turn off.
6. Press Light Timer.
Example: Turn on 2:00 AM, turn off 7:00 AM.
1. Press Light Timer.
2. Press Stop/Clear.
NOTE: To reset that time to turn on and off the
LIGHT, repeat steps 2 to 6.
Example: To cancel the Light timer.
NOTE: If you want to cancel the Light Timer in
operation, you should press key.

- 10 -
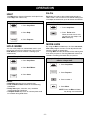
TURNTABLE ON/OFF
For best cooking results, leave the
turntable on. It can be turned off for
large dishes. Press Turntable On/Off
to turn the turntable on or off.
NOTE: Sometimes the turntable can become hot to
touch. Be careful touching the turntable during
and after cooking.
FAN HI/LOW/OFF
The Fan moves steam and other
vapors from the surface cooking.
Press Fan once for High fan speed,
twice for Low fan speed, or three
times to turn the fan off.
NOTE: If the temperature around the microwave
oven gets too hot, the fan in the vent hood will
automatically turn on at the LOW setting to cool
the oven. It may stay on up to an hour to cool the
oven. When this occurs, you can not turn the fan
off manually.
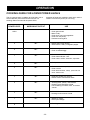
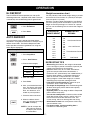
CUSTOM SET
You can change the default values for beep sound,
clock, display speed and defrost weight.
See following chart for more information.
NUMBER
1
1
2
1
2
1
2
3
1
2
2
Beep ON/OFF
control
Sound ON
Sound OFF
Clock ON
Clock OFF
Slow speed
Normal speed
Fast speed
Lbs
Kg
Clock display
control
Display
Defrost weight
mode select
3
4
FUNCTION
RESULT
1. Press Stop/Clear.
2. Press Custom Set.
3. Press number 4.
4. Press number 2.
Example: To change defrost weight mode.
(from Lbs. to Kg.)
NUMBER
LIGHT HI/LOW/OFF
Press Light once for bright light,
twice for night light, or three times
to turn the light off.
OPERATION
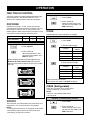
CHILD LOCK
You may lock the key to prevent the microwave from
being accidentally started or used by children.
1. Press Stop/Clear.
2. Press and hold 0 more than 4
seconds.
LOCKED will appear in the
display window with two beeps.
To set the Child lock.
1. Press and hold 0 more than 4
seconds. LOCKED will
disappear and you hear two
beeps. At this time the oven is
ready.
To cancel the Child lock.
WARNING:
DO NOT RUN THE OVEN EMPTY WITHOUT FOOD
IN IT, OTHERWISE THE OVEN MAY BE DAMAGED.

- 11 -
HOLD WARM
You can safely keep hot, cooked food warm in your
microwave oven for up to 99 minutes. You can use
Hold Warm by itself or to follow a cooking cycle
automatically.
NOTES:
• Hold Warm operates for up to 99 minutes.
• Food cooked covered should be covered during
Hold Warm.
• Pastry items (pies, turnovers, etc.) should be
uncovered during Hold Warm.
• Complete meals kept warm on a dinner plate could
be covered during Hold Warm.
OPERATION
1. Press Stop/Clear.
2. Press Hold Warm.
3. Press Start.
Example: To use the Hold warm.
Ez-On
Ez-On lets you cook or reheat food for 30 seconds at
100% Power. You can also use it to extend cooking time
in multiples of 30 seconds, up to 99 minutes 59 seconds.
1. Press Stop/Clear.
2. Press Ez-On twice.
When the cook time is over,
you will hear four beeps and
END will display.
Example: To cook for 1 minutes.
HELP
The Help display feature information and helpful hints.
Press Help, then select a key.
1. Press Stop/Clear.
2. Press Help.
3. Press Popcorn.
Example: To learn about Popcorn.
MORE/LESS
By using the More or Less keys, all of the one touch,
time cook program and etc. can be adjusted to cook
food for a longer or shorter time.
Pressing More will add 10 seconds of the cooking time
each time you press it. Pressing Less will subtract 10
seconds of cooking time each time you press it.
1. Press Stop/Clear.
2. Press Popcorn.
3. Press number 1.
4. Press More.
NOTE: Press the More or Less
key during time countdown.
Example: To adjust the 1.75 oz Popcorn cooking
time for a longer time.

- 12 -
1. Press Stop/Clear.
2. Press Custom Cook.
3. Enter the cook time.
4. Press Start.
Example: To memorize for 2 minutes.
CUSTOM COOK
Custom Cook lets you recall one cooking instruction
previously placed in memory and begin cooking
quickly.
OPERATION
COOKING AT HIGH COOK
POWER
1. Press Stop/Clear.
2. Enter the cook time.
3. Press Start.
When the cook time is over,
you will hear four beeps and
END will display.
Example: To cook food for 8 minutes 30 seconds.
1. Press Stop/Clear.
2. Press Custom Cook.
3. Press Start.
When the cook time is over,
you will hear four beeps and
END will display.
Example: To recall the Custom Cook.
1. Press Stop/Clear.
2. Enter the cook time.
3. Press Power.
4. Enter the power level.
5. Press Start.
When the cook time is over,
you will hear four beeps and
END will display.
Example: To cook food for 7 minutes 30 seconds
at 70% power.
COOKING AT LOWER POWER
LEVELS
HIGH power cooking does not always give you the
best results with foods that need slower cooking, such
as roasts or custards. Your oven has
9 power settings in addition to HIGH.

- 13 -
OPERATION
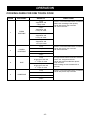
POWER LEVEL
MICROWAVE OUTPUT
USE
• Boil water.
• Cook ground beef.
• Make candy.
• Cook fresh fruits and vegetables.
• Cook fish and poultry.
• Preheat browning dish.
• Reheat meat slices quickly.
• Saute onions, celery, and green pepper.
• All reheating.
• Cook scrambled eggs.
• Cook breads and cereal products.
• Cook cheese dishes, veal.
• Cook cakes, muffins, brownies, cupcakes.
• Cook pasta.
• Cook meats, whole poultry.
• Cook custard.
• Cook whole chicken, turkey, spare ribs, rib
roast, sirloin roast.
• Cook less tender cuts of meat.
• Reheat frozen convenience foods.
• Thawing meat, poultry, and seafood.
• Cooking small quantities of food.
• Finish cooking casserole, stew, and some
sauces.
• Soften butter and cream cheese.
• Heating small amounts of food.
• Soften ice cream.
• Raise yeast dough.
• Standing time.
10
HIGH
9
8
7
6
5
4
3
2
1
0
100%
90%
80%
70%
60%
50%
40%
30%
20%
10%
COOKING GUIDE FOR LOWER POWER LEVELS
The nine power levels in addition to HIGH allow you to
choose the best power level for the food you are
cooking. Below are listed all the power levels,
examples of foods best cooked at each level, and the
amount of microwave power you are using.

- 14 -
OPERATION
1. Press Cook.
2. Choose food category.
3. Enter quantity/servings.
When the cook time is over,
you will hear four beeps and END will display.
Example: To cook 2 cups of Rice.
COOK
Cook provides four preset categories for cooking
.
POTATO
The Potato lets you cook potatoes with preset times and
cook powers. You can choose from 1 to 4 potatoes.
NOTE:
• Cooking times are based on an average 8 ounce potato.
• Before baking, pierce potato with fork several times.
• After baking, let stand for 5 minutes.
1. Press Potato.
2. Press number 2.
When the cook time is over,
you will hear four beeps and
END will display.
POPCORN
Popcorn lets you pop 1.75, 3.0, and 3.5 ounce bags
of commercially packaged microwave popcorn. Pop only
one package at a time. If you are using a microwave
popcorn popper, follow manufacturer’s instructions.To set
your microwave oven correctly, follow this chart:
ONE TOUCH CONTROL
Your oven’s menu has been preprogrammed to cook
food automatically. Tell the oven what you want.
Then let you microwave oven cook your selections.
1. Press Popcorn.
2. Press number 2.
When the cook time is over.
you will hear four beeps and
END will display.
Example: To pop a 3.0 oz. bag.
Bag Size-ounces 1.75 3.0 3.5
Press NUMBER 1 2 3
Example: To cook 2 Potatoes.
1. Press Pizza.
2. Press number 2.
When the cook time is over,
you will hear four beeps and
END will display.
Example: To reheat 2 slices of Pizza.
PIZZA (Refrigerated)
Pizza lets you reheat up to 3 slices pizza.
A slice is based on a 5 ounce slice.
NOTE:
• Place on a low plate & paper towel.
• Do not cover.
Category
Press pad
number
1
2
3
4
When popping commercially packaged popcorn,
Remove the rack from the oven; Do not place
the bag of microwave popcorn on the rack or under
the rack.
Fresh vegetable
Frozen vegetable
Rice
Casserole
Category
Number of
cups
1 - 4 cups
1 - 4 cups
1 - 2 cups
1 - 4 cups
Fresh vegetable
Frozen vegetable
Rice
Casserole

- 15 -
OPERATION
COOKING GUIDE FOR ONE TOUCH COOK
CATEGORY
CODE
QUANTITY
DIRECTIONS
FRESH
VEGETABLE
FROZEN
VEGETABLE
RICE
CASSEROLE
1
2
3
4
Place in a microwavable bowl or casserole.
Add water according to the quantity.
Cover with plastic wrap and vent.
Let stand 5 minutes.
1 cup
Vegetables and
2 tbsp water
2 cups
Vegetables and
1/4 cup of water
3 cups
Vegetables and
1/3 cup of water
4 cups
Vegetables and
1/2 cup of water
Place in a microwavable bowl or casserole.
Cover with plastic wrap and vent.
Let stand 5 minutes.
1 cup
2 cups
3 cups
4 cups
1 cup
2 cups
3 cups
4 cups
In large microwavable casserole, combine
water, rice, margarine and salt.
Cover with microwavable lid or plastic
wrap and vent.
After cooking, let stand covered for 5
minutes.
1 cup
of long grain rice and
2
1
/4 cups of water
2 cups
of long grain rice and
4
1
/4 cups of water
Place in a microwavable bowl or casserole.
Cover with plastic wrap and vent.

- 16 -
OPERATION
1. Press Beverage.
2. Press number 1.
When the cook time is over,
you will hear four beeps and
END will display.
Example: To reheat one cup of Beverage.
BEVERAGE
Beverage lets you heat up to 2 beverages.
NOTE:
• Reheat times based on an 8 ounce cup.
•
Beverage may be very hot; remove from oven with care.
1. Press Reheat.
2. Choose food category.
3. Enter quantity/servings.
When the cook time is over,
you will hear four beeps and
END will display.
Example: To reheat 2 servings of Dinner plate.
Category
Dinner plate
Soup/sauce
Casserole
Roll/Muffin
Press pad
number
1
2
3
4
Category
Dinner plate
Soup/sauce
Casserole
Roll/Muffin
Number of
cups/Items
1 - 2 servings
1 - 4 cups
1 - 4 cups
1 - 4 pieces
REHEAT
Reheat provides four preset categories for reheating.
COOKING GUIDE FOR REHEAT
CATEGORYCODE
1
2
3
4
DINNER PLATE
SOUP/SAUCE
CASSEROLE
ROLL/MUFFIN
Place in shallow microwavable casserole.
Cover with vented plastic wrap.
Place in shallow microwavable casserole.
Cover with vented plastic wrap.
Place in a microwavable bowl or casserole.
Cover with plastic wrap.
Place on paper towel.
Do not cover.
1 serving (small)
2 servings (large)
1 cup
2 cups
3 cups
4 cups
1 cup
2 cups
3 cups
4 cups
1 piece (2 oz.)
2 pieces (4 oz.)
3 pieces (6 oz.)
4 pieces (8 oz.)
SERVING AMOUNT DIRECTION

- 17 -
OPERATION
Weight conversion chart
You are probably used to food weights being in pounds
and ounces that are fractions of a pound (for example
4 ounces equals 1/4 pound).
However, in order to enter food weight in Auto Defrost,
you must specify pounds and tenths of a pound. If the
weight on the food package is in fractions of a pound,
you can use the following chart to convert the weight to
decimals.
DEFROSTING TIPS
• When using Auto Defrost, the weight to be entered
is the net weight in pounds and tenths of pounds (the
weight of the food minus the container).
• Use Auto Defrost only for raw food. Auto Defrost
gives best results when food to be thawed is a
minimum of 0˚F (taken directly from a true freezer). If
food has been stored in a refrigerator-freezer that
does not maintain a temperature of 5˚F or below,
always program a lower food weight (for a shorter
defrosting time) to prevent cooking the food.
• If the food is stored outside the freezer for up to
20 minutes, enter a lower food weight.
• The shape of the package alters the defrosting time.
Shallow rectangular packets defrost more quickly
than a deep block.
• Separate pieces as they begin to defrost. Separated
pieces defrost more easily.
• You can use small pieces of aluminum foil to shield
foods like chicken wings, leg tips, and fish tails, but
the foil must not touch the side of the oven. Foil
causes arcing, which can damage the oven lining.
• Shield areas of food with small pieces of foil if they
start to become warm.
• For better results, a preset standing time is
included in the defrosting time.
NUMBER AFTER
DECIMAL
EQUIVALENT
OUNCE WEIGHT
.10
.20
.25
.30
.40
.50
.60
.70
.75
.80
.90
1.00
1.6
3.2
4.0
4.8
6.4
8.0
9.6
11.2
12.0
12.8
14.4
16.0
One-Quarter Pound
One- Half Pound
Three-Quarters Pound
One Pound
AUTO DEFROST
Your microwave oven is preset with three defrost
sequences. Using AUTO DEFROST is the best way to
defrost frozen foods. The Defrost Sequence Table
below provides some basic guidelines for using the
three defrost sequences.
1. Press Stop/Clear.
2. Press Auto Defrost.
3. Choose food category.
Example: To defrost 1.2 lbs. of meat.
Category
Meat
Poultry
Fish
Press pad
number
1
2
3
4. Enter the weight.
5. Press Start.
6. After 1/2 of the defrost time is
over, The display will prompt
you to turn food over. Open
door, turn food over, and
shield any warm portions.
7. Close the door and restart.
8. When the defrost time is
over, you will hear four beeps
and END will display.
NOTE: If you do not open the
door within 3 seconds,
the display will resume
the countdown.
1. Press Ez Defrost.
2. Press Start.
Example: To defrost 1lb ground beef.
Ez DEFROST
The Ez DEFROST feature provides you with the Ez
defrosting method for 1.0 pound frozen foods. The oven
automatically sets the defrosting time for ground beef.

- 18 -
OPERATION
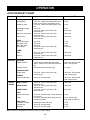
Sequence At Beep
Food
Stand Time
MEAT
POULTRY
STEAK/
CHOPS
BEEF
Ground beef
Cubes for stew
Hamburger patties
Pot roast
Rib roast, Rump roast
Chuck roast
PORK
Bacon, Hot Dogs
Sausage, Links
Sausage, Bulks
Ribs, Roast
LAMB
Ribs
Roasts
POULTRY
Whole Chicken
Chicken Pieces
CORNISH HENS
Whole, Split
TURKEY
Breast(under 6 lbs.)
BEEF STEAKS
PORK CHOPS
LAMB CHOPS
FISH
Steaks, Whole fish
Fillets
SHELLFISH
Crabmeat, Shrimp
Lobster tails
Scallops
Turn over. Remove thawed portions and
break apart. Return remainder to oven.
Turn over. Remove thawed portions with
fork.
Turn over.
Turn over. Cover warm areas with
aluminum foil.
Turn over. Cover warm areas with
aluminum foil.
Turn over. Cover warm areas with
aluminum foil.
Turn over.
Turn over.
Turn over.
Turn over. Cover warm areas with
aluminum foil.
Turn over. Cover warm areas with
aluminum foil.
Turn over. Cover warm areas with
aluminum foil.
Turn over(finish defrosting breastside
down). Cover warm areas with aluminum
foil.
Separate pieces and rearrange.
Turn over. Cover warm areas with
aluminum foil.
Turn over and rearrange.
Turn over. Cover warm areas with
aluminum foil.
Turn over. Cover warm areas with
aluminum foil.
Turn over. Cover warm areas with
aluminum foil.
Turn over and rearrange. Cover head and
tail with foil.
Turn over. Separate fillets when partially
thawed if possible.
Rearrange and break apart.
Turn over and rearrange.
Turn over and rearrange.
5 min.
5 min.
5 min.
10-20 min.
10-20 min.
10-20 min.
2 min.
5 min.
5 min.
10-20 min.
10-20 min.
10-20 min.
10-20 min. Rinse under
cold running water.
5-10 min.
10-20 min. Rinse under
cold running water.
10-20 min. Rinse under
cold running water.
10-20 min.
10-20 min.
10-20 min.
5 min.
5 min. Rinse under
cold water to separate.
5 min.
5 min.
5 min.
AUTO DEFROST CHART
Note: Food to be defrosted must be not more than 6.0 lbs(4.0kg).

- 19 -
OPERATION
TWO POSITION METAL RACK
The two position Metal Rack gives you extra space
when cooking in more than one container at the same
time. The metal rack can be turned upside-down to
help fit taller containers on the bottom of the oven.
NOTE:
• Rack must be on 4 supports when used.
• Insert the rack securely into the four supports on the
side walls of the oven.
• Turn the rack upside-down when using taller
containers on the bottom of the oven.
WARNING:
DO NOT RUN THE OVEN EMPTY WITHOUT FOOD
ON METAL RACK, OTHERWISE THE OVEN MAY BE
DAMAGED.

- 20 -
COOKING
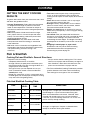
GETTING THE BEST COOKING
RESULTS
To get the best results from your microwave oven, read
and follow the guidelines below.
• Storage Temperature: Foods taken from the freezer
or refrigerator take longer to cook than the same
foods at room temperature. The time for recipes in
this book is based on the normal storage temperature
of the food.
• Size: Small pieces of food cook faster than large
ones, pieces similar in size and shape cook more
evenly. For even cooking, reduce the power when
cooking large pieces of food.
• Natural Moisture: Very moist foods cook more
evenly because microwave energy is attracted to
water molecules.
• Stir foods such as casseroles and vegetables from
the outside to the center to distribute the heat evenly
and speed cooking. Constant stirring is not
necessary.
• Turn over foods like pork chops, baking potatoes,
roasts, or whole cauliflower halfway through the
cooking time to expose all sides equally to microwave
energy.
• Place delicate areas of foods, such as asparagus
tips, toward the center of the dish.
• Arrange unevenly shaped foods, such as chicken
pieces or salmon steaks, with the thicker, meatier
parts toward the outside of the dish.
• Shield, with Small pieces of aluminum foil, parts of
food that may cook quickly, such as wing tips and leg
ends of poultry.
• Let It Stand: After you remove the food from the
microwave, cover food with foil or casserole lid and let
it stand to finish cooking in the center and avoid
overcooking the outer edges. The length of standing
time depends on the density and surface area of the
food.
• Wrapping in waxed paper or paper towel:
Sandwiches and many other foods containing
prebaked bread should be wrapped prior to
microwaving to prevent drying out.
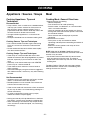
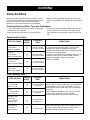
Fish & Shellfish
Cooking Fish and Shellfish: General Directions
• Prepare the fish for cooking.
- Completely defrost the fish or shellfish.
- Arrange unevenly shaped pieces with thicker parts
toward the outside of the dish. Arrange shellfish in a
single layer for even cooking.
- The type of cover you use depends on how you
cook. Poached fish needs a microwavable lid or
vented plastic wrap.
- Baked fish, coated fish, or fish in sauce needs to be
covered lightly with waxed paper to keep the coating
crisp and sauce from getting watery.
- Always set the shortest cooking time. Fish is done
when it turns opaque and the thickest part begins to
flake. Shellfish is done when the shell turns from
pink to red and the flesh is opaque and firm.
• The Fish and Shellfish Cooking Table below provides
specific directions with Power Level and Cooking
Time settings for most types of fish and shellfish.
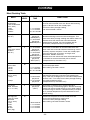
Fish And Shellfish Cooking Table
FISH
Fish fillets
Fish steaks
Whole fish
Scallops
Shrimp, shelled
HI
HI
7
HI
HI
3
1/2
-41/2 minutes
4
1/2
-51/2 minutes
4
1/2-6 minutes
3
1/2-5 minutes
3
1/2-5 minutes
Arrange fish in a single layer with thickest portion toward
outside edge of 11/2 quart microwavable baking dish.
Brush with melted butter and season, if desired. Cook
covered with vented plastic wrap. Let stand covered
2 minutes. If you are cooking more than 1 lb. of fish, turn
the fish halfway through cooking.
Arrange in a single layer. Prepare as directed above,
except stir instead of turning the shellfish.
POWER
LEVEL
COOKING
TIME
DIRECTIONS
Page is loading ...
Page is loading ...
Page is loading ...
Page is loading ...
Page is loading ...
Page is loading ...
Page is loading ...
Page is loading ...
Page is loading ...
Page is loading ...
-
 1
1
-
 2
2
-
 3
3
-
 4
4
-
 5
5
-
 6
6
-
 7
7
-
 8
8
-
 9
9
-
 10
10
-
 11
11
-
 12
12
-
 13
13
-
 14
14
-
 15
15
-
 16
16
-
 17
17
-
 18
18
-
 19
19
-
 20
20
-
 21
21
-
 22
22
-
 23
23
-
 24
24
-
 25
25
-
 26
26
-
 27
27
-
 28
28
-
 29
29
-
 30
30


Ask a question and I''ll find the answer in the document
Finding information in a document is now easier with AI
Related papers
Other documents
-
Goldstar MV-1525B User manual
-
Maytag MMV4205BAQ Owner's manual
-
-
-
Magic Chef MCO165UW User manual
-
Amana AMV5164AA Owner's manual
-
-
Goldstar MV1604SB Owner's Manual & Cooking Manual
-
-