Omron M6 User manual

Category
Blood pressure units
Type
User manual

This manual is also suitable for

Omron M6 Comfort is a compact, fully automatic blood pressure monitor that uses advanced “IntelliSense” technology to comfortably measure your blood pressure and pulse rate. It stores up to 90 measurements in memory and calculates an average value based on the last three readings. The device also features an irregular heartbeat display and a movement error display to ensure accurate readings.

Omron M6 Comfort is a compact, fully automatic blood pressure monitor that uses advanced “IntelliSense” technology to comfortably measure your blood pressure and pulse rate. It stores up to 90 measurements in memory and calculates an average value based on the last three readings. The device also features an irregular heartbeat display and a movement error display to ensure accurate readings.

Digital Automatic Blood Pressure Monitor
Model M6
• Instruction Manual
• Mode d’emploi
• Gebrauchsanweisung
• Manuale de instructone
• Manual de instrucciones
• Gebruiksaanwijzing
ɊɍɄɈȼɈȾɋ Ɍȼ ɈɉɈɗɄɋɉɅ ɍȺɌȺɐɂɂ
EN
FR
DE
IT
ES
NL



2
Contents
Introduction ..............................................................................3
Important Safety Information ..................................................4
1. Overview ..............................................................................5
2. How to Obtain Meaningful Readings.................................7
3. Preparation ..........................................................................8
3.1 Installing/Replacing the Batteries.....................................8
3.2 Setting the Date and Time ...............................................9
4. Using the Monitor..............................................................11
4.1 Applying the Arm Cuff ....................................................11
4.2 Taking a Reading...........................................................14
4.3 Using the Memory Function ...........................................18
5. Handling Errors and Problems ........................................20
6. Optional Parts....................................................................21
7. Storage and Maintenance.................................................22
8. Technical Data...................................................................23
9. Some Useful Information about Blood Pressure ...........25
3
EN
Introduction
The OMRON M6 is a compact, fully automatic blood pressure
monitor, operating on the oscillometric principle. It measures
your blood pressure and pulse rate simply and quickly. For
comfortable controlled inflation without the need of pressure
pre-setting or re-inflation the devices uses its advanced “Intelli-
Sense” technology.
The device also stores up to 90 measurements in memory and
calculates an average value based on the last three measure-
ments. Each measurement is stored along with the date and
time of measurement.
4
Important Safety Information
Blood pressure measurement is not suitable in cases of seri-
ous arteriosclerosis (hardening of the arteries).
The pulse display is not suitable for monitoring the frequency
of cardiac pacemakers.
Pregnant women should only measure their own blood pres-
sure in consultation with their doctor, since the readings can
be changed by pregnancy.
Do not use the monitor on babies, young children or persons
who cannot express their consent.
Do not use the monitor for any purpose other than measuring
blood pressure.
Do not use a cellular phone near the monitor. This may result
in the monitor operating incorrectly.
The battery liquid may leak and damage the monitor. Please
observe the following points.
- When you are not going to use the unit for a long period of time
(approximately three months or more), take out the batteries.
- Replace old batteries with new ones immediately.
- Do not use old and new batteries together.
- Do not insert the batteries with their polarities incorrectly aligned.
Please remember: Self-measurement is not the same as
medical treatment.
• You should never change the dose of medicines prescribed by
your doctor but you can help your doctor to optimize the treat-
ment by documenting the measured values. If there are unu-
sual values, please inform your doctor immediately.
Never unplug the power cord with wet hands.
Use only the original AC adapter designed for this unit. Use of
unsupported adapters may damage the device.
5
1.Overview
EN
1. Overview
Monitor
A. Display
B. O/I START button
C. Memory ( ) buttons
D. Date/Time ( ) setting
button
E. Battery compartment
F. A i r j a c k
G. AC adapter jack (for optional
AC adapter)
B
D
A
C
E
G
F
6
1.Overview
Display
Package contents
H. Systolic blood pressure
I. Diastolic blood pressure
J. Memory display
K. Average value display
L. Movement error display
M. Irregular heartbeat display
N. Battery low display
O. Heartbeat display
P. Pulse display
Q. Deflation display
R. Date/Time display
S. Arm cuff (Medium cuff: arm
circumference 22-32 cm)
T. Air plug
U. Air tube
V. Storage case
W. Four “AA” alkaline (LR6)
batteries
H
O
Q
I
K
M
L
J
P
R
N
S
W
UT
V
7
2.How to Obtain Meaningful Readings
EN
2. How to Obtain Meaningful Readings
To help ensure a reliable reading, avoid eating, smoking, or
exercising for at least 30 minutes before taking a measure-
ment.
Note: Remove any tight-fitting clothing from your upper arm.
1. Sit on a chair with your feet flat on the floor and place your arm
on a table so that the arm cuff will be at the same level as your
heart.
2. Apply the arm cuff to your upper arm. The coloured marker
should be centred on the inside of your arm and point down the
inside of the arm, so that the air tube runs down the inside of
your forearm and is in line with your middle finger.
3. Secure the cuff around your arm using the fabric fastener strip.
4. Press the O/I START button.
When measurement is complete,
the monitor displays your blood
pressure and pulse rate, and auto-
matically deflates the cuff.
Notes:
Always wait at least 2-3 minutes before taking another blood
pressure measurement.
Please note that all measurement are stored in the memory. If
different people measure with the same device make sure
that you are aware of this fact.
8
3.Preparation
3. Preparation
3.1 Installing/Replacing the Batteries
1. Remove the battery cover.
2. Insert four “AA” batteries as indi-
cated in the battery compartment
and then replace the battery cover.
Notes:
If the battery low display ( ) appears on the display, replace
all four batteries at the same time. Long-life alkaline batteries
are recommended.
Remove the batteries if the monitor will not be used for three
months or more.
If the batteries are removed for a long period of time, the
Date/Time setting will need to be reset. See “Setting the Data
and Time” for details.
Dispose of batteries according to applicable local regulations.
9
3.Preparation
EN
3.2 Setting the Date and Time
Your blood pressure monitor automatically stores up to 90
measurements values in its memory and calculates an average
reading based on the measurements from the last three read-
ings.
Set the monitor to the correct date and time before taking a
measurement for the first time.
If the batteries have been removed for a long period of time,
the date and time setting will need to be reset.
1. When the batteries are installed, the
year digits will flash in the display
when you turn on the monitor.
Note: If you need to reset the date
and time for some reason,
hold down the button while the power is off.
2. Press the button to advance
the digits one at a time.
To change the digits to a lower
number, press the button to
lower the digits one at a time.
If you hold down the or
button, the digits will advance (or
lower) rapidly.
3. Press the button to confirm the
setting when the desired number
appears on the display.
10
3.Preparation
4. Repeat steps 2 and 3 to set the month and date (day).
5. Repeat steps 2 and 3 to set the hour and minutes for the time.
6. Press the O/I START button when
you have finished setting the date
and time.
or
or
or
or
11
4.Using the Monitor
EN
4. Using the Monitor
4.1 Applying the Arm Cuff
You can wrap the cuff either on your right or left arm.
Remove tight-fitting clothing from
your upper arm.
Do not place the cuff over thick
clothes and do not roll up your
sleeve if it is too tight.
1. If the cuff is assembled correctly, the
hook material will be on the outside of
the cuff loop and the metal D-ring will
not touch your skin.
Note: If the cuff is not assembled,
pass the end of the cuff fur-
thest from the tubing through
the metal D-ring to form a loop. The smooth cloth should
be on the inside of the cuff loop.
2. Insert the air plug into the air jack (on the left side of the
device).
The cuff must be fully deflated when it is inserted into the air
jack.
Pile side material
Sewn hook material
D-ring
Air plug
Air jack
12
4.Using the Monitor
3. Sit in a chair with your feet flat on the floor and place your arm
on a table so that the cuff will be at the same level as your
heart.
4. Put your arm through the cuff loop.
The bottom of the cuff should be approximately 1 to 2 cm
above the elbow.
Apply the cuff to your upper arm so that the coloured marker is
centred on the middle of your inner arm and points down the
inside of the arm. The air tube should run down the inside of
your forearm and be in line with your middle finger.
Bottom Edge 1 to 2 cm
Air tube
Marker
13
4.Using the Monitor
EN
5. Pull the cuff so that the top and bot-
tom edges are tightened evenly
around your arm.
6. When the cuff is positioned correctly,
close the fabric fastener FIRMLY.
Notes:
Make certain the cuff fits snugly around your arm.
The cuff should make good contact with your skin. You should
be able to fit your index finger between the cuff and your arm
easily, so you can pull the cuff off and on.
Make sure that there are no kinks in the air tubing.
Taking measurements on the right arm
Please note the following points
when applying the cuff to your right
arm. Apply the cuff so that the air
tube is at the side of your elbow.
Notes:
Be careful not to rest your arm on the air tube, or otherwise
restrict the flow of air to the cuff.
Apply the arm cuff so that no part of the cuff is positioned over
the elbow joint. The cuff should be 1 to 2 cm above the elbow.
14
4.Using the Monitor
4.2 Taking a Reading
1. Press the O/I START button and remain still, the cuff will start
to inflate automatically.
As the cuff begins to inflate, the monitor automatically deter-
mines your ideal inflation level. Remain still and do not talk until
measurement is completed.
Note: Do not inflate the cuff if it is not wrapped around your
arm.
2. Inflation stops automatically
and measurement is started.
As the cuff slowly deflates,
decreasing numbers appear
on the display and the Heart-
beat display flashes at every heartbeat.
In rare circumstances, the monitor might re-inflate the cuff to
continue with the measurement.
3. When the measurement is complete, the arm
cuff completely deflates and your blood pres-
sure and pulse rate are displayed.
Note: The monitor automatically stores the
blood pressure readings and pulse rate
along with date and time of measurement in its memory.
15
4.Using the Monitor
EN
4. Press the O/I START button to turn
the monitor off.
Note: If you forget to turn the moni-
tor off, it will automatically
shut itself off after five minutes.
Important:
Wait 2-3 minutes before taking another blood pressure meas-
urement. Waiting between readings allows the arteries to
return to the condition prior to taking the blood pressure
measurement.
If you move during measurement, the movement display
( ) may appear. Repeat the measurement and remain still
until the measurement is complete.
Your blood pressure monitor includes an irregular heartbeat
feature. Irregular heartbeats can influence the results of the
measurement. The irregular heartbeat algorithm automati-
cally determines if the measurement is usable or needs to be
repeated. If the irregular heartbeat display ( ) is shown
after your have taken a measurement, repeat the measure-
ment. If the irregular heartbeat display ( ) is shown fre-
quently, please make your doctor aware of it.
Instructions for special conditions
If your systolic pressure is known to
be more than 220 mmHg, after the
cuff starts to inflate, press and hold
the O/I START button until the moni-
tor inflates 30 to 40 mmHg higher
than your suspected systolic pressure.
Important:
The monitor will not inflate above 300 mmHg.
Do not apply more pressure than necessary.
16
4.Using the Monitor
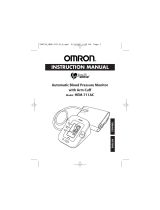
What is Irregular Heartbeat?
An irregular heartbeat is a
heartbeat rhythm that varies
by more than 25% from the
average heartbeat rhythm
detected while the unit is
measuring the systolic and
diastolic blood pressure.
If such an irregular rhythm is
detected more than twice dur-
ing measurement, the irregular heartbeat display ( )
appears on the display when the measurement results are dis-
played. If too many irregular rhythms are detected during
measurement, the irregular heartbeat display appears ( )
but no measurement is displayed.
What is Arrhythmia?
A heartbeat is stimulated by electrical signals that cause the
heart to contract.
Arrhythmia is a condition where the heartbeat rhythm is abnor-
mal due to flaws in the bio-electrical system that drives the
heartbeat. Typical symptoms are skipped heartbeats, prema-
ture contraction, an abnormally rapid (tachycardia) or slow
(bradycardia) pulse. This can be caused by heart disease,
aging, physical predisposition, stress, lack of sleep, fatigue etc.
Arrhythmia can only be diagnosed by a doctor through a spe-
cial examination.
Whether the appearance of irregular heartbeat display ( ) in
the results indicates arrhythmia or not can only be determined
by an examination and diagnosis by your doctor.
If the irregular heartbeat display ( ) is shown frequently,
please make your doctor aware of it. Conducting self-diagnosis
and treatment based on measurement results is dangerous. Be
sure to follow the instructions of your doctor.
N
orma
lH
eart
b
eat
Irregular Heartbeat
Pulse
Blood pressure
Blood pressure
Short
Long
Pulse
17
4.Using the Monitor
EN
4.3 Using the Memory Function
This monitor has a memory capable of storing 90 sets of read-
ings. Every time you complete the measurement, the monitor
automatically stores blood pressure and pulse rate. The moni-
tor also calculates an average reading based on the measure-
ments from the last three readings.
Note: To ensure that the measurement results are recorded
correctly, make sure that the date and time are set cor-
rectly before taking a measurement.
When 90 sets of readings are stored in memory, the old-
est set will be deleted to store a new set.
The date and time of stored readings will be alternately
displayed.
To View the Average Value
Press the memory button.
The average values, based on the last three measurements, is
displayed.
18
4.Using the Monitor
To View Previous Readings Stored in Memory
1. Press the button, while the average reading is displayed,
to view reading stored in memory from the most recent to the
oldest.
2. Press the or button repeatedly to cycle through the
previous measurement values
( button: from the most recent to the oldest,
button: from the oldest to the most recent)
Keep the button pressed down to cycle rapidly through the pre-
vious values.
To Delete All the Values Stored in Memory
Caution!
You cannot delete the stored readings partially, all the reading
in the monitor will be deleted.
To delete stored readings, press the memory button and
the O/I START button simultaneously, then all the readings will
be deleted.
Alternatin
g
displa
y
19
5.Handling Errors and Problems
EN
5. Handling Errors and Problems
Error Display Cause Remedy
Cuff is under inflated.
Carefully read and repeat the
steps listed under “Taking a Read-
ing” on p. 14.
Movement during meas-
urement
Cuff over inflated.
This icon indicates irreg-
ular or weak pulses are
detected, but result can
be considered reliable.
Remove the arm cuff. Wait 2-3
minutes and then take another
measurement.
Repeat the steps in “Taking a
Reading” on p. 14. If this error
continues to appear, contact your
physician.
Batteries have run down.
Replace all four “AA” batteries
with new ones.
20
6.Optional Parts
6. Optional Parts
Problem Cause Remedy
No display appears
when the O/I START
button is pressed.
The batteries are empty. Replace the batteries.
Cannot measure or
readings are too high.
Is the cuff wrapped
firmly around the arm?
Attach the arm cuff cor-
rectly.
The cuff pressure does
not rise although the
pump motor can be
heard.
Check that the air plug
is properly connected to
the monitor. Push the air
plug firmly into the air
jack.
The blood pressure is
different each time. The
reading is extremely low
(or high).
Blood pressure readings constantly vary with time
of measurement and nervous condition. Take deep
breaths to relax before taking a measurement.
AC Adapter (Q-adapter
or F-adapter)
Small cuff
Arm circumference 17 -
22 cm
Large cuff
Arm circumference 32 -
42 cm
  • Page 1 1
  • Page 2 2
  • Page 3 3
  • Page 4 4
  • Page 5 5
  • Page 6 6
  • Page 7 7
  • Page 8 8
  • Page 9 9
  • Page 10 10
  • Page 11 11
  • Page 12 12
  • Page 13 13
  • Page 14 14
  • Page 15 15
  • Page 16 16
  • Page 17 17
  • Page 18 18
  • Page 19 19
  • Page 20 20
  • Page 21 21
  • Page 22 22
  • Page 23 23
  • Page 24 24
  • Page 25 25
  • Page 26 26

Omron M6 User manual

Category
Blood pressure units
Type
User manual
This manual is also suitable for

Omron M6 Comfort is a compact, fully automatic blood pressure monitor that uses advanced “IntelliSense” technology to comfortably measure your blood pressure and pulse rate. It stores up to 90 measurements in memory and calculates an average value based on the last three readings. The device also features an irregular heartbeat display and a movement error display to ensure accurate readings.

Ask a question and I''ll find the answer in the document

Finding information in a document is now easier with AI