Hotpoint SL D07 BEB UK User guide
- Category
- Vacuum cleaners
- Type
- User guide
This manual is also suitable for

EN Operating Instructions

SL D10 BPB UK | SL D10 BAB UK | SL D07 BEB UK
1
13
8
12
9
21
22
23
25 26
27
28
30
29
10
24
11
14
16
17
15
19
20
18
36
41
31-32
33
34
40 4039
44
35
37
43
42
38
3
5
4
6
7
2
2

G
A
F
B C
D
E

J
H
I
K

N
L
Q
M
O
P
R
S T

66
en
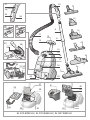
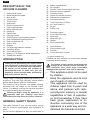
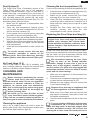
DESCRIPTION OF THE
VACUUM CLEANER
1. Deluxe Multi brush*
2. Bristle-adjustment pedal
3. Multi brush*
4. Parquet brush*
5. Turbo brush*
6. Sofa brush *
7. Deluxe Parquet brush*
8. Pipe length regulator
9. Metal extension pipe
10. Hand grip
11. Plastic hose
12. Carrying handle
13. Trolley System opening/closing button
14. Dust compartment opening button
15. Dust compartment lid
16. Suction inlet
17. Release
18. Full dust bag/container indicator
19. Start/Stop button
20. Cord-rewind button
21. Buttons +/- for electronic power adjustment*
22. Start&Pause button*
23. Battery compartment*
24. Air regulator
25. Remote Power Control signal receiver*
26. Electronic power regulator*
27. Precision nozzle
28. Nozzle for delicate surfaces
29. Attachment compartment
30. Horizontal housing
31. Pure Clean Hepa 13 lter*
32. Air Fresh Hepa 13*
33. Air grill
34. Power cord
35. Dust bag support
36. Pure Clean dust bag
37. Motor lter
38. Motor lter grill
39. Gasket
40. Dust compartment
41. Dust container
42. Filter protection grill
43. Pre-lter
44. Pure Clean Hepa 13 lter
* on some models only
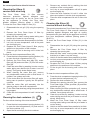
intended use. Any improper use could cause damage
to persons and/or property.
The voltage of your system must match the
voltage of the vacuum cleaner (220-240 V).
Any connection error could cause irreversible
damage to the appliance and void its warranty.
• This appliance shall not be used
by children.
• Keep the appliance and its cord
out of reach of children.
• This appliance can be used by
children aged from 8 years and
above and persons with redu-
ced physical, sensory or mental
capabilities or lack of experien-
ce and knowledge if they have
been given supervision or in-
struction concerning use of the
appliance in a safe way and un-
derstand the hazards involved.
INTRODUCTION
Thank you for purchasing our Trolley Power
vacuum cleaner. In doing so you have opted
for an effective, high performance appliance.
We advise you to register this product on
www.hotpoint.co.uk to make sure you are
Hotpoint Customer Service.
Trolley Power is designed combining efciency and
ergonomy. They new high efciency motors ensure
optimal performances with low consumption.
The exclusive Trolley Sysyem, with patent pending,
combined with the usage of the Remote Power
control (if available) ensures the maximal ergonomy
and maneuverability around furniture.
Before you begin using the appliance, it is
important that you carefully read these
instructions and keep them for further reference.
GENERAL SAFETY RULES
The safety features of your vacuum cleaner comply
with the technical specications and regulations in
force.
Do not use the appliance for any use other than its

77
en
• The equipment was designed
for household and similar uses
such as in:
• - staff kitchen areas in shops,
ofces and other work envi-
ronments;
• - farm houses;
• - hotels, motels and other
residential environments by
the guests;
• - bed&breakfast-type envi-
ronments.
• Supervise children to prevent
them from playing with the ap-
pliance.
• Turn unit off and unplug from
outlet when not in use, before
putting on or taking off parts, and
before cleaning. To disconnect,
turn unit off, grasp plug, and pull
out from wall outlet. Never yank
on cord.
• Do not operate any appliance
with a damaged cord or plug or
after the appliance malfunctions
or has been damaged in any
manner. Return the appliance to
an authorized service facility for
examination, repair, or electrical
or mechanical adjustment.
• Do not leave the appliance unat-
tended while it is running.
• Never use the power cord to move or carry the
appliance around.
• After use, disconnect the plug from the electrical
outlet and rewind the power cord.
• Do not bend the power cord and keep it away
from sharp edges to avoid any damage.
• Never leave or use the appliance over or close
to ames, ovens, ammable materials or other
sources of heat.
• Do not use the vacuum cleaner on persons or
animals. Keep the suction ends away from your
body while it is in operation.
• Should you suspect a failure, immediately unplug
it from the electrical outlet.
• Never immerse the vacuum cleaner in water
or any other liquid. Never spray any liquid
substances onto the appliance.
• Do not leave the appliance in the open air and
exposed to inclement weather conditions.
• For safety, we advise you to keep the vacuum
cleaner always lower than your own position
when cleaning the stairs.
Never suck up any liquid or damp
substances as this could affect the
operation of the appliance.
• Never suck up any ammable materials or
incandescent objects such as ash, cigarette
ends etc. Some parts of the vacuum cleaner
could catch re.
• Never suck up any sharp or cutting objects as
this could damage the appliance.
• If very ne dust or powders are sucked up such
as our, etc. small electrostatic discharges could
occur. When sucking up materials previously
mentioned, we advise not to use the metal
extension pipe, but only the plastic exible hose
and to set a low suction power level.
• For your safety, every repair or maintenance
action should be carried out on the appliance
only by Hotpoint authorised staff.
• No responsibility shall be accepted in case of
damage resulting from any improper use of the
appliance.
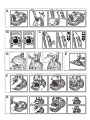
BEFORE FIRST USE
Remove all adhesives, protective plastic materials
and cardboard packaging. Make sure all adhesive
parts are removed with a soft damp cloth.
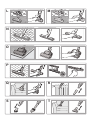
Assembling
1. Fasten the plastic exible hose (11) to the suction
inlet (16) until it clicks into place. To remove it,
press the release (17) and pull it out.
2. Fit the metal extension pipe (9) into the hand
grip (10) until it locks into place. Use the length
regulator (8) to adjust the length of the pipe.
3. Fit the attachment you need (see chapter
“Attachments”) into the end of the metal
extension pipe until it locks into place.
If your appliance is equipped with a Remote
Power Control, you will need to insert the

88
en
8. Secure the oor head into its horizontal / vertical
housing and store the appliance.
Do not start the vacuum cleaner if the plastic
damage the appliance.
FEATURES
Electronic power regulator (B)
The electronic power regulator (26) (if available) al-
lows to set the suction power required.
On some models, the ideal power levels are indica-
ted, according to the surface to be cleaned: awnings,
carpets and hard oors.
The Eco function (if available) allows to save 25%
energy, compared with the consumption relative to
max suction power, ensuring at the same time clea-
ning efcacy.
Remote Power Control (C)
The Remote power control (if available) enables you
to adjust the suction power directly and effortlessly
from the hand grip, with no need to bend. When using
the vacuum cleaner, you can keep it on standby by
pressing the Start & Pause button (22).
To insert or change the batteries of your Remote
Power Control:
1. Open the battery compartment (23).
2. Insert two AAA batteries, making sure of the
positive and negative poles.
3. Close the battery compartment until it clicks into
place.
Trolley System (D)
The Trolley System allows you to move your vacuum
cleaner easily when cleaning and carry it from room
to room effortlessly.
1. Press the opening/closing button on the Trolley
System (13) to pull out the carry handle (12) until
it locks into place at the desired length.
2. Having completed your cleaning, press the
opening/closing button on the Trolley System
and close the carrying handle until it locks into
place.
Use the Trolley System's carrying handle to
store the appliance, making sure you have
correctly locked it into place.
Start & Pause (E)
The Start & Pause function (if available) allows you
to keep the vacuum cleaner on stand-by and lock
the cleaning head in the park position: just insert the
brush into its horizontal housing (30).
batteries supplied (see paragraph “Remote Power
Control” under chapter “Features”).
USING
THE VACUUM CLEANER (A)
The appliance is equipped with a safety
device that prevents the dust-compartment
lid from closing unless the dust bag has been
correctly installed. Do not force the dust bag lid to
close and make sure all the parts are in the correct
position to allow you to close the lid.
Do not use the vacuum cleaner without
or dust container, as the appliance could get
damaged.
1. Unwind the power cord (34) and plug the
appliance into an electrical outlet (220/240V).
We advise you to unwind the entire power
cord (yellow marker: 6,5m; red marker: 7m)
to avoid any overheating and damage.
2. Press the start/stop button (19) to start the
appliance.
3. Press the Trolley System opening/closing
button (13) to extend the carrying handle (12)
to the desired length until it locks into place.
Then manoeuvre the vacuum cleaner using the
carrying handle when cleaning the house.
4. To select the desired suction intensity
(based on the model) use the +/- button
and electronically adjust the power (21) of
the Remote Power Control; or manually
rotate the electronic power regulator (26).
We advise you to use a low suction power
on delicate surfaces such as curtains,
fabrics, cushions etc to avoid any damage; or at
least open the air regulator to reduce the suction
effect.
5. To pause the vacuum cleaner, if this feature is
available, you can use the standby button (22)
on the Remote Power Control or the Start & Stop
function (based on the model). Just insert the
brush into its horizontal housing (30).
6. To switch off the appliance press the start/stop
button again.
7. Disconnect the plug from the electrical
outlet and press the cord-rewind
button (20) until rewinding is complete.
Make sure the cord does not get entangled
during rewinding.

99
en
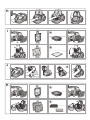
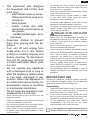
Cleaning the dust compartment (G)
For the routine cleaning of the dust compartment (40):
1. Press the dust-compartment opening button (14)
to open the dust compartment lid (15).
2. Based on the model, remove the Pure Clean
dust bag (36) or the dust container (41).
3. Clean the dust compartment by removing any
residual dirt with a small brush. If needed, use a
damp soft cloth, taking care to wipe all its parts
entirely dry.
4. Re-place the Pure Clean dust bag or dust
container correctly and close the dust
compartment lid until it clicks into place.
Replacing the Pure Clean dust bag (H)
We recommend always using Hotpoint
original Pure Clean dust bags (on selected
models only), because their special fabric
powder retention, high performances and a
long motor life.
As the Pure Clean dust bags (36) are made of fabric,
they are more resistant than conventional paper bags
and can retain very ne dust/powder particles more
effectively, thus ensuring maximum hygiene.
We recommend replacing the Pure Clean
bag as soon as the full-bag indicator
illuminates. Change at least once a year to be
always sure of the hygienic condition of your
vacuum cleaner. The pores of a bag clogged with
power and can cause damage.
1. Make sure the appliance is disconnected from
the electrical outlet.
2. Press the dust-compartment opening button (14)
to open the dust compartment lid (15).
3. Release the bag support (35) and remove the
Pure Clean dust bag (36).
Dispose of the dust bag in compliance with
all local regulations on waste disposal.
4. Slide a new Pure Clean dust bag into the dust
bag support completely; then place it back into
the special compartment.
5. Close the dust compartment lid until it clicks into
place.
compartment lid, it is likely that the Pure
not been assembled correctly. Do not force the
dust bag lid to close, make sure both parts are in
Dual System (F)
The Trolley Dual Clean (if available) version of the
Trolley Power makes your use of the appliance
extremely versatile because it can be used with or
without dust bag. Just assemble the conversion kit
in the package: it comprises a Pure Clean dust bag
(36), dust bag support (35), gasket (39), and motor
lter grill (38) already tted to the motor lter (37). The
assembling takes place as follows:
1. Make sure the appliance is disconnected from
the electrical outlet.
2. Press the dust-compartment opening button
(14) to open the dust compartment lid (15) and
remove the dust container (41).
3. Fit the gasket into the special groove along the
perimeter of the dust compartment (40).
4. Fit the motor lter grill (already tted to the motor
lter) into the special dust-compartment guides.
5. Slide the Pure Clean dust bag into the dust bag
support all the way; then place it into the special
dust compartment.
6. Close the dust compartment lid until it clicks into
place.
To use the vacuum cleaner with the dust
container, remember to remove all the
following parts: Pure Clean dust bag, dust bag
Air Fresh Hepa 13 (I)
The Air Fresh Hepa 13 lter (32) (if available), with
active carbons treatment, ensures the maximal dust
retention (>99,95%) and the ltration of odours.
CLEANING AND
MAINTENANCE
Before cleaning or maintaining the vacuum
cleaner, make sure it has been unplugged
from the electrical outlet. Do not use aggressive
substances or abrasive materials to clean the
appliance, its internal parts and attachments.
Make sure it is thoroughly dry before using again.
Make sure all its parts are thoroughly dry
before replacing them.
Cleaning the appliance
Use a dry or slightly damp soft cloth to clean the
plastic parts (body, dust compartment, exible hose
etc) and the metal extension pipe (9).

1010
en
3. Remove any residual dirt by washing the dust
container under running water.
4. Let it dry at room temperature until all its parts
are thoroughly dry.
5. Close the dust container lid until it clicks into
place and replace it into the dust compartment.
6. Close the dust compartment lid until it clicks into
place.
version without dust bag
This model comprises two Pure Clean Hepa 13 lters.
The Pure Clean Hepa 13 lter ensures maximum
protection against allergens and high air quality,
because the air given back by the appliance is entirely
free from dust/powder residues (ltering power >
99.95 %).
To clean the Pure Clean Hepa 13 lter (31) in the
back:
1. Disassemble the air grill (33) using the opening
tab.
2. Remove the Pure Clean Hepa 13 lter by
releasing the opening tab.
3. Wash the lter under running water, taking care
that the jet of water is not too strong.
4. Hold it so that the water ows parallel to its folds.
5. Let it dry at room temperature until all of it’s parts
are thoroughly dry.
6. Re-place the Pure Clean Hepa 13 lter, paying
attention to the positions of the notches.
7. Fit the air grill into its housing until it clicks into
place.
To clean the dust compartment lters (40):
8. Press the dust-compartment opening button (14)
to open the dust compartment (15).
9. Remove the dust container (41).
10. Release the opening tab and then remove the
Pure Clean Hepa 13 lter, pre-lter (43) and lter
protection grill (42).
11. When cleaning the lter protection grill, remove
any dust/powder residues with a small brush. If
needed, use a damp soft cloth.
12. Clean the pre-lter by washing it under running
water, taking care that the jet of water is not too
strong. Allow to dry.
13. Wash the Pure Clean Hepa 13 lter under
running water, taking care that the jet of water is
not too strong.
14. Hold it so that the water ows parallel to its folds.
15. Let it dry at room temperature until all its parts
are thoroughly dry.
the correct position to allow lid closure.
version with dust bag
The Pure Clean Hepa 13 lter ensures
maximum protection against allergens and
maintains high air quality, as the air given back
by the appliance is entirely free from dust/
powder residues (ltering power > 99.95 %).
To clean the Pure Clean Hepa 13 lter (31):
1. Disassemble the air grill (33) using the opening
tab.
2. Remove the Pure Clean Hepa 13 lter by
releasing the opening tab.
3. Wash the lter under running water, taking care
that the jet of water is not too strong.
4. Hold it so that the water ows parallel to its folds.
5. Let it dry at room temperature until all its parts
are thoroughly dry.
6. Replace the Pure Clean Hepa 13 lter, paying
attention to the position of the notches.
7. Fit the air grill into its housing until it clicks into
place.
To clean the dust compartment lters (40):
8. Press the dust-compartment opening button (14)
to open the dust compartment lid (15).
9. Remove the Pure Clean dust bag (36), motor
lter grill (38) and motor lter (37) from the motor
lter grill.
10. Clean the motor lter by washing it under running
water, taking care that the jet of water is not too
strong. Then gently shake water loose.
11. When cleaning the motor lter grill, remove
any dust/powder residues with a small brush. If
needed, use a damp soft cloth.
12. Fit the motor lter into the motor lter grill again,
taking care to position it gently into the special
notches.
13. Slide the motor lter grill assembly into the
special guides in the dust compartment.
14. Fit the Pure Clean dust bag using the special dust
bag support.
15. Close the dust compartment lid until it clicks into
place.
Cleaning the dust container (J)
For the routine cleaning of the dust container:
1. Press the dust-compartment opening button (14)
to open the dust compartment (15) and remove
the dust container (41).
2. Open the lid and empty the dust container.

1111
en
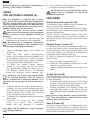
The Deluxe Parquet brush (7) is suitable for
vacuuming delicate and parquet oors. The brush is
equipped with very delicate rotating bristles, which
are operated by the vacuum cleaner's suction power,
and soft wheels protecting delicate oors. To clean
the plastic parts of the Deluxe Parquet brush, remove
the brush from the metal extension pipe (9) and wipe
with a dry or slightly damp soft cloth. To clean the
rotating bristles, turn the safety lock into position and
remove, then disassemble the rotating brush and
start cleaning. Remove any hairs or threads that got
entangled using scissors, taking care not to damage
the bristles.
Upholstery brush (Q)
The Upholstery brush (6) is suitable for vacuuming
surfaces such as sofas, mattresses, blankets,
cushions etc. It is equipped with rotating bristles
operated by the vacuum cleaner’s suction power that
enable you to clean in depth and remove any fur, hairs
or mites from fabrics. The protection grill prevents the
bristles from touching the surfaces to be cleaned, thus
ensuring maximum on fabrics.
Precision nozzle (R)
The precision nozzle in the attachment compartment
(29) helps you vacuum corners, crevices and other
difcult-to-reach areas.
Nozzle for delicate surfaces (S)
The nozzle for delicate surfaces (28) in the attachment
compartment (29) is suitable for vacuuming surfaces
requiring special care such as radiators, furniture etc.
Its special natural bristles enable you to use it on very
delicate surfaces without any harm.
Upholstery nozzle (T)
The upholstery nozzle is suitable for the precise
vacuuming of particular surfaces such as sofas,
mattresses, blankets, cuscions, etc.
16. Fit the pre-lter into the special indentation of the
Pure Clean Hepa 13 lter, locking both lters in
place using the protection grill.
17. Fit the pre-lter, Pure Clean Hepa 13 lter
and protection grille assembly onto the dust
container, paying attention to the positions of the
notches, until it clicks into place.
18. Re-place the dust container into the dust
compartment.
19. Close the dust compartment lid until it clicks into
place.
ATTACHMENTS
The attachments can either be supplied as standard
features (based on the model) or be purchased
separately from Hotpoint authorised centres.
The Multi brush (3) is suitable for vacuuming hard
oor and carpets on a daily basis.
The Multi Deluxe brush (1) is designed optimizing the
air ow and is especially suitable for vacuuming hard
and smooth oors as well as carpets.
Use the bristle-adjustment pedal (2) to clean:
Hard oors
Carpets
Parquet brush (N)
The Parquet brush (4) is suitable for vacuuming
delicate areas such as wooden oors. The special
natural bristles enable you to use on very delicate
surfaces without harm.
Turbo brush (O)
The Turbo brush (5), with rotating bristles, is
especially suitable for the in-depth vacuuming of
short-pile carpets and removing pet hair. The special
antibacterial treatment prevents the proliferation of
bacteria. An arrow under the brush indicates where it
can be opened for dislodging trapped objects.

1212
en
GUARANTEE
12 months Parts and Labour Guarantee
This certicate of guarantee represents the guarantee (“Guarantee” he-
reinafter) offered by Indesit Company UK Limited with registered ofce
at Peterborough PE2 9JB in relation to products purchased in the United
Kingdom and Indesit Ireland Limited with registered ofce in Dublin 9,
Ireland for products purchased in the Republic of Ireland. This Guaran-
tee does not affect your statutory rights.
Your product has the benet of our manufacturer’s Guarantee, which
covers the product for twelve months from the date of purchase.
This gives you the reassurance that if, within that time, your product
is proven to be defective because of either workmanship or materials,
we will, at our discretion, either repair or replace the product at no cost
to you.
This Guarantee is subject to the following conditions:
• Documentary proof of original purchase date is provided.
• Cosmetic damage must be reported within 14 days from the date
of purchase.
• The product has been installed and operated correctly and in ac-
cordance with our operating and maintenance instructions.
• The product is used only on the electricity supply printed on the
rating plate.
• The product has been used for normal domestic purposes only.
• The product has not been altered, serviced, maintained, disman-
tled, or otherwise interfered with by any person not authorised
by us.
• Any repair work must be undertaken by us or our appointed
agent.
• Any parts removed during repair work or any product that is re-
placed become our property.
• The product is used in the United Kingdom or Republic of Ireland.
The Guarantee does not cover:
• Damage resulting from transportation, improper use, neglect or
interference or as a result of improper installation.
• Accidental damage, this includes but is not limited to, damage
which occurs as a result of an external action.
• Replacement of any consumable item or accessory. These inclu-
de but are not limited to:
• plugs, cables, light bulbs, hoses, brushes, covers and lters.
• Replacement of any removable parts made of glass or plastic.
After Sales Service
No one is better placed to care for your Hotpoint product during the
course of its working life than us – the manufacturer.
Essential Contact Information
Advice Line
We have a dedicated team who can provide free advice and assistance
with your product if you experience any technical difculties. Simply call
our Hotpoint Service Hotline on 08448 240 055 (Republic of Ireland
0818 904 041) for telephone assistance.
Please note:
Our advisors will require the following information:
Model number:
Serial number:
Consumables and Accessories
We supply a full range of consumables and accessories to keep your
product functioning efciently throughout its life.
UK: 08448 225 225
Republic of Ireland: 0818 313 413
www.hotpoint.co.uk
Recycling and Disposal Information
As part of Hotpoint’s continued commitment to helping the environment,
Hotpoint reserves the right to use quality, recycled components to keep
down customer costs and minimise material wastage.
Please dispose of packaging and old products carefully.
Register your new product and get a second year FREE!
We want to give you additional benets of ownership of your product
and offer you an additional free 1 year guarantee when you register your
product with Hotpoint within 28 days of purchase. If you do not register
your product with Hotpoint within 28 days, your product is guaranteed
for 1 year only.
To activate your 2 year guarantee register with us online at www.
hotpoint.co.uk. Please note that the 2 year guarantee is only available in
UK and Ireland and is subject to the same conditions as the 1 year Gua-
rantee. Please refer to the certicate of guarantee for more information.
DISPOSAL OF OLD ELECTRICAL
APPLIANCES
The European Directive 2012/19/EU on Waste Electrical
and Electronic Equipment (WEEE), requires that old hou-
sehold electrical appliances must not be disposed of in the
normal unsorted municipal waste stream.
Old appliances must be collected separately in order to op-
timise the recovery and recycling of the materials they con-
tain and reduce the impact on human health and the envi-
ronment.
The crossed out “wheeled bin” symbol on the product re-
minds you of your obligation, that when you dispose of
the appliance it must be separately collected. Consumers
should contact their local authority or retailer for information concerning
the correct disposal of their old appliance.

1313
en
• The plug was not inserted or is not making contact.
• Change the dust bag. If large quantities of very ne dust/powder are
sucked up (e.g. our, etc), the full dust bag indicator may light up
although the bag is not full yet. The reason is that the Pure Clean
dust bag is able to retain very ne dust/powder particles, thus
ensuring maximum hygiene.
• Clean the dust container in models without dust bag.
• Clean the lters and, if needed, replace them.
• Make sure the expansion pipe, exible hose and brush are not
blocked.
• Clean the lters and, if needed, replace them.
• Make sure the expansion pipe, exible hose and brush are not
blocked.
• Change the dust bag. If large quantities of very ne dust/powder are
sucked up (e.g. our, etc), the Pure Clean dust bag may become
clogged.
• Clean the dust container and its lters.
• Battery not charged.
• The batteries were positioned incorrectly inside the battery
compartment. Position the two AAA batteries making sure of the
positive and negative poles.
• Remove batteries; then position them again, making sure of the
positive and negative poles.
• Electronic appliances or obstacles may be interfering or shielding
with the infrared signal.
• If very ne dust or powders are sucked up such as our, etc. small
electrostatic discharges could occur. When sucking up materials
previously mentioned, we advise not to use the metal extension pipe,
but only the plastic exible hose and to set a low suction power level.
• One or more attachments were assembled incorrectly. Make sure the
lters and brushes were assembled according to these instructions.
In the model with dust bag make sure that the gasket is correctly in
place too.
• The dust bag/container is full. Replace the dust bag or clean the dust
container.
• Clean the lters and, if needed, replace them.
• The air regulator is open. Make sure it was closed correctly.
• Reduce suction power, especially on carpets and fabrics in general.
Open the air regulator to reduce the “suction effect”.
• The Pure Clean dust bag or dust container was assembled incorrectly.
Make sure it is correctly in place so that the safety lever will let you
close the dust compartment lid.
TROUBLESHOOTING
Problem
The vacuum cleaner cannot
be switched on.
indicator lights up although
it is not full yet.
Low suction power.
Remote Power not working.
Small electrostatic
discharges occur while
sucking up.
The vacuum cleaner whistles
or vibrates when in use.
The brush moves with
The dust compartment lid
cannot be closed.

Brand Hotpoint Hotpoint Hotpoint
Model SL D10 BPB UK SL D10 BAB UK SL D07 BEB UK
Energy efciency class C C A
Annual energy consumption in kWh/year, rounded
to one decimal place (1)
36 36 25,5
Carpet cleaning performance class D D E
Hard oor cleaning performance class B B C
Dust re-emission class B B B
Sound power level in db(A) 80 80 78
Rated input power in W 1000 1000 700
(1) Indicative annual energy consumption (kWh per year), based on 50 cleaning tasks. Actual annual energy
consumption will depend on how the appliance is used.
1414
en
Vacuum cleaner tested for use on both hard surface and on carpet (general purpose) and veried on the basis
of the standard Europe:
• EN 60312-1:2013, EN 60312-2:2013 for performance and energy consumption,
• EN 60335-1:2012, EN 60335-2-2:2010 + A11: 2012, for the safety and the suction power,
• EN 60704-2-1:2000 for the noise
Information pursuant to EU Regulation 666/2013.

1515
en

Indesit Company UK Ltd
Morley Way,
Peterborough PE2 9JB
www.hotpoint.co.uk
Trolley Power Dual UK
2014/07 ver. 3.0
-
 1
1
-
 2
2
-
 3
3
-
 4
4
-
 5
5
-
 6
6
-
 7
7
-
 8
8
-
 9
9
-
 10
10
-
 11
11
-
 12
12
-
 13
13
-
 14
14
-
 15
15
-
 16
16


Hotpoint SL D07 BEB UK User guide
- Category
- Vacuum cleaners
- Type
- User guide
- This manual is also suitable for
Ask a question and I''ll find the answer in the document
Finding information in a document is now easier with AI
Related papers
-
Whirlpool SL C18 AA0 Owner's manual
-
Whirlpool SL D10 BAW Owner's manual
-
Whirlpool SL C10 BCH Owner's manual
-
-
Hotpoint SL B22 AA0 UK User guide
-
Hotpoint Ariston SL M07 A4H B UK Owner's manual
-
Hotpoint HS B18 AA0 Owner's manual
-
-
-
HOTPOINT/ARISTON HS MR 4A ZO UK User guide
Other documents
-
 Julian Bowen TOR201 Assembly Instructions
-
 Julian Bowen TOR203 Assembly Instructions
-
 Julian Bowen DUN001 Assembly Instructions
-
HQ W7-60351 Datasheet
-
-
-
-
-
-


