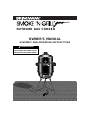
Brinkmann Gas Grill 810-5600-0 User manual
- Category
- Barbecues & grills
- Type
- User manual
This manual is also suitable for

OWNER’S MANUAL
ASSEMBLY AND OPERATING INSTRUCTIONS
OUTDOOR GAS COOKER
WARNING
READ AND FOLLOW ALL WARNINGS AND
INSTRUCTIONS IN THIS MANUAL TO AVOID
PERSONAL INJURY OR PROPERTY DAMAGE.

• Use smoker only on a hard, level, noncombustible, stable surface (concrete, ground, etc.). Never use on wooden or other
surface that can burn.
• Always use a drip pan/ash guard under smoker to protect surface from heat damage and/or discoloration and to catch
ashes, embers and drippings.
• Do not use smoker on a surface that could burn. A drip pan/ash guard will not prevent fires from occurring on a wooden
or other combustible surface. A drip pan/ash guard is designed for use with a smoker for easy clean up of drippings that
can cause discoloration of surface and to catch falling ashes and embers.
• Do not store or use smoker near gasoline or other flammable liquids, gases or where flammable vapors may be present.
• Proper clearance of 10 feet between the smoker and combustible construction should be maintained at all times when
this product is in use. Do not place smoker under a roof overhang or other combustible material.
• Do not leave smoker unattended when in use.
• Never move smoker when it is in use.
• For household use only. Do not use this smoker for other than its intended purpose.
• Use caution when assembling and operating your smoker to avoid scrapes or cuts from sharp edges of metal parts.
• For outdoor use only. Do not operate smoker indoors or in an enclosed area.
• Place smoker in an area where children and pets cannot come into contact with unit. Close supervision is necessary
when smoker is in use.
• Use caution when lifting or moving smoker to prevent strains and back injuries.
• In windy weather, place smoker in an outdoor area that is protected from the wind.
• Do not wear loose clothing or allow hair to hang freely when operating smoker.
• Always wear shoes when operating smoker.
• Use caution when reaching into or under smoker. Always wear oven mitts/or gloves to protect your hands from burns.
Avoid touching hot surfaces.
• We advise that you have a fire extinguisher acceptable for use with gas products on hand. Refer to your local authority to
determine proper size and type of fire extinguisher.
• When lifting the dome lid, keep hands, face and body a safe distance from hot steam or possible flame flare-ups. Always
lift off the smoker body by tilting the dome lid toward you to allow hot steam to escape away from your face. Should a
flare-up occur, replace the dome lid to smother flame. Do not use water to extinguish flame.
• Use extreme caution when adding liquid to water pan. Follow instructions in "Adding Water During Cooking" section of
this manual.
• Water pan should always be used when smoking. Do not allow liquid in water pan to completely evaporate. Check water
pan every 2 hours and add water if level is low (a sizzling sound may indicate a need for water). Follow instructions in
"Adding Water During Cooking" section of this manual.
WARNING
IMPORTANT SAFETY WARNINGS
WE WANT YOU TO ASSEMBLE AND USE YOUR SMOKER AS SAFELY AS POSSIBLE.
THE PURPOSE OF THIS SAFETY ALERT SYMBOL
IS TO ATTRACT YOUR ATTENTION TO POSSIBLE HAZARDS AS YOU ASSEMBLE AND USE YOUR SMOKER.
WHEN YOU SEE THE SAFETY ALERT SYMBOL, PAY CLOSE ATTENTION TO THE INFORMATION WHICH FOLLOWS!
READ ALL SAFETY WARNINGS AND INSTRUCTIONS CAREFULLY
BEFORE ASSEMBLING AND OPERATING YOUR SMOKER.
1

• Use a sufficient amount of flavoring wood to avoid having to remove smoker body from base pan during the cooking
process. This will limit the danger of spilling hot liquid from the water pan which could cause serious bodily injury.
• Accessory attachments not manufactured by The Brinkmann Corporation for this smoker are not recommended and may
lead to personal injury and/or property damage.
• This outdoor gas smoker is designed for propane gas supply. Only cylinders marked “Propane” should be used. The
cylinder should be marked in accordance with the specifications for LP cylinders of the U.S. Department of
Transportation (DOT) and incorporate a safety relief device having direct communications with the vapor space of the
cylinder.
• Always use the gas pressure regulator supplied with the smoker. This regulator is set for an outlet pressure of 11" water
column. Never connect an outdoor gas cooking appliance to an unregulated LP-gas supply.
• Check all gas connections by following directions in the “Gas Leak Testing” section of this manual. Never test for gas
leaks with a lighted match or open flame.
• When lighting the burner, always use long matches, a spark ignitor, or other means that will keep your hands, face and
hair a safe distance from the burner.
• Never add charcoal, lighter fluid, fuel or material of any kind, other than flavoring wood to the base pan where the burner
assembly and lava rocks are housed. Place wood chunks on lava rocks.
• When in use, place the propane tank a safe distance from smoker.
• Always use the propane tank valve to turn the smoker “ON” and “OFF”. Use the burner control knob to adjust flame
ONLY.
• Do not allow the gas hose to come into contact with any hot surfaces.
• Always disconnect the propane tank from the smoker when not in use.
• Always store propane tank outdoors in a well ventilated, shaded area, away from any gas burning apparatus. Do not
store indoors or in an enclosed area. A safety plug should be placed in the propane tank valve as an added precaution.
• Do not move smoker when water pan contains hot liquids. Hot liquid could spill from the pan causing severe burns.
• If a flame flare-up occurs while cooking, turn the regulator control knob to low and cover smoker with dome lid to limit
airflow and extinguish the flare-up. If flare-up does not extinguish, turn the propane tank valve OFF and leave dome lid
on smoker. Wait at least 5 minutes, remove dome lid and relight the smoker.
• Always allow hot water in water pan to cool completely before handling to avoid being burned or scalded.
• Allow smoker to cool completely before cleaning. Make sure embers are completely extinguished. Dispose of remaining
embers and ashes in a noncombustible container. Do not allow ashes to build up in smoker.
• Do not attempt to service smoker other than normal maintenance as explained in "After-Use Safety and Proper Care &
Maintenance" sections of this manual. Repairs should be performed by The Brinkmann Corporation only.
• Properly dispose of all packaging material.
USE CAUTION AND COMMON SENSE WHEN OPERATING YOUR SMOKER.
FAILURE TO ADHERE TO THE SAFETY WARNINGS AND GUIDELINES IN THIS MANUAL
COULD RESULT IN BODILY INJURY OR PROPERTY DAMAGE.
SAVE THIS MANUAL FOR FUTURE REFERENCE.
WARNING
2

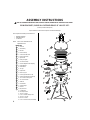
ASSEMBLY INSTRUCTIONS
READ ALL WARNINGS AND INSTRUCTIONS CAREFULLY BEFORE ASSEMBLING OR OPERATING YOUR COOKER.
FOR MISSING PARTS, PLEASE CALL CUSTOMER SERVICE AT 1-800-527-0717.
(Proof of purchase will be required.)
Inspect contents of the box to ensure all parts are included and undamaged.
PARTS LIST:
1 Dome Lid
1 Smoker Body
1 Base Pan
1 Burner Assembly
1 Control Panel with Label
1 Burner Control Knob
1 Ignitor Knob
1 Rotary Gas Ignitor
1 Gas Valve Assembly
1 Hose and Regulator with Safety Tag
3 Handle Brackets
6 Handle Halves
3 19” Legs
3 Leg Brackets
3 Plastic Leg Caps
3 Lower Support Brackets (V Clip)
3 Upper Support Brackets (Single Clip)
2 15 2" Chrome Cooking Grills
1 15” Lava Rock Grate
1 Water Pan
1 Heat Indicator
1 Chrome Triangle
1 Hitch Pin
1 Bag Lava Rocks
2 6-32 Hex Nuts
32 10-24 Square Nuts
3 10-24 x w" Screws
2 8-32 x 4" Thread Cutting Screws
6 10-24 x 12" Screws
23 10-24 x s" Screws
6 8-32 x w" Screws & Nuts (for Handles)
Tools required to assemble your Smoke’N Grill:
• Flathead screwdriver
• Adjustable wrench
•
7
/16" Wrench
NOTE: Pliers can be substituted for the
adjustable wrench.
1
4
11
11
13
14
14
15
15
15
16
18
19
17
20
21
22
23
2
12
24
8
6
7
5
9
10
3
12
12
3
1
2
3
4
5
6
7
8
9
10
11
12
13
14
15
16
17
18
19
20
21
22
23
24

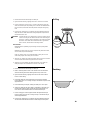
STEP 1:
a. Turn base pan upside down to assemble. Attach leg brackets to base
pan with 10-24 x s" screws and square nuts.
NOTE: The two screw holes in tube portion of leg bracket must align to
point to center of base pan.
b. Insert end of leg with two holes into leg bracket and align holes. Make
sure the single hole on opposite end of leg is facing center of base
pan. Fasten with a 10-24 x 12" screw and square nut.
NOTE: Prior to placing another leg into leg bracket, insert hook of
chrome triangle into single hole of attached leg. Make sure the
entire hook is inserted into leg.
c. Insert hook of the chrome triangle into second leg by turning leg into
place as illustrated above. Insert leg into leg bracket. Align holes and
fasten with a 10-24 x 12" screw and square nut. Repeat procedure for
remaining leg.
d. Install plastic leg caps on the end of legs.
STEP 2:
a. Set base pan assembly upright.
b. Connect regulator hose to gas valve assembly using
7
/16" wrench.
Tighten securely.
NOTE: Use pipe thread compound suited for gas to properly seal
connection.
c. Insert gas valve stem through center hole in the control panel. Attach
gas valve assembly to back of control panel using two 6-32 hex head
nuts.
d. Install burner control knob by pressing knob onto the gas valve stem.
e. Insert rotary gas ignitor stem through the designated hole in the con-
trol panel. Attach rotary gas ignitor to back of control panel using two
8-32 x 4" thread cutting screws. Do not over-tighten.
f. Install ignitor knob by pressing knob onto the rotary gas ignitor stem.
10-24 x s"
screws
Base Pan
Legs
10-24 x 12"
screw
Leg Brackets
Square Nuts
Base Pan
View from Bottom
Single
Hole
Chrome Triangle
Plastic
Leg Caps
Gas Valve
Assembly
Rotary Gas
Ignitor Stem
Gas Valve
Stem
Burner Control
Knob
6-32
Hex Nuts
Ignitor
Knob
8-32 x 4"
Thread
Cutting Screws
Rotary Gas
Ignitor
Control Panel
4

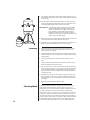
STEP 3:
a. Install control panel assembly to front of base
pan by inserting end of brass extension tube
through elongated hole in base pan. Attach
control panel to base pan using two 10-24 x s"
screws and square nuts.
Elongated Hole
Base Pan
Square
Nuts
Control
Panel
10-24 x s"
screws
Brass
Extension Tube
Electrode Wire
STEP 4:
a. Check gap between end of ignitor electrode wire
and gas portholes of burner assembly. Gap
should be
5
/32". Adjust gap if necessary by
bending electrode wire.
NOTE: Bend the electrode wire by holding the
wire steady with pliers and gently bending
end of wire with fingers. Use caution to
avoid damaging the ceramic tube. The end
of electrode wire should be lined up with a
gas porthole on burner.
b. Thread ignitor lead wire of burner assembly
through small hole (next to the elongated hole)
in front of base pan and insert socket end into
terminal plug of rotary gas ignitor.
5
/32
" Gap
Ceramic
Tube
Gas Portholes
Control
Panel
Socket
End
Ignitor
Lead Wire
Terminal Plug
of Rotary Gas
Ignitor
Gas Control
Knob
Spark Area
Ignitor
Lead Wire
Ignitor
Knob
Burner
Assembly
c. Test ignitor system for electrical spark by laying
burner upside down in base pan to ground it.
d. Turn ignitor knob clockwise several times and
watch for spark between electric wire and
burner.
If there is no spark:
• Check to see that burner is grounded to
base pan.
• Check connection of ignitor lead wire to
ignitor terminal plug.
• Re-check gap setting between end of
ignitor electrode wire and gas porthole of
the burner assembly.
5

STEP 5:
a. Turn burner assembly over in base pan.
Insert the end of brass extension tube
(that extends inside the base pan) into the
head of burner mixer tube.
b. Position burner assembly in center of
base pan and push tab on bottom of
burner bracket through slot in bottom of
base pan.
c. Install the hitch pin through the hole in
the tab on the underside of base pan. This
will hold the burner assembly in place.
IMPORTANT: The burner mixer tube head
must remain sleeved over the
brass extension tube. Visually
inspect the installation by
looking into the air opening
on the side of the burner
mixer tube head. When
properly installed, the end of
the brass extension tube can
be seen inside the mixer tube.
NOTE: The air opening in the mixer tube
head must not be obstructed in any
manner. Check periodically and
clean grease and other substances
from burner mixer tube head to
allow proper airflow.
STEP 6:
a. Insert a 10-24 x 12" screw in each of the
three lower holes on side of base pan
directly above each leg. Secure screws
using square nuts on the inside of base
pan. These screws will hold the 15" lava
rock grate.
b. Insert a 10-24 x w" screw in each of the
three holes located near the top edge of
base pan directly above the screws for the
lava rock grate. Secure screws using
square nuts on the inside of base pan.
c. Place the 15" lava rock grate inside of
base pan on the three 10-24 x 12"
screws (lower level).
d. Place an even layer of lava rocks over
entire surface of grate. Position rocks
closely together so there are no large
gaps between rocks.
NOTE: To convert this unit to a gas grill,
simply place a 152" chrome
cooking grill on top of the
10-24 x w" screws.
Air Opening
Hitch Pin
Burner Assembly
Burner Mixer
Tube Head
Burner
Mixer Tube
Brass
Extension
Tube
Lava Rocks
15" Lava Rock Grate
Square Nuts
10-24 x w"
Screw
10-24 x 12"
Screw
6

STEP 7:
a. Attach wooden handle halves to metal brackets using 8-32 x w"
screws and nuts as illustrated.
b. Attach two handles to sides of smoker body using 10-24 x s" screws
and square nuts.
c. Attach the three lower support brackets (V clips) to inside of smoker
body through the three 4" holes that are located about halfway down
on sides. Mount each bracket with notched side facing up using
10-24 x s" screws and square nuts. Tighten screws securely.
d. Attach the three upper support brackets (single clip) to inside of
smoker body through the three 4" holes located near the top edge.
Mount each bracket with notched side facing up using 10-24 x s"
screws and square nuts. Tighten screws securely.
STEP 8:
a. Attach handle to top of dome lid using two 10-24 x s" screws and
square nuts.
b. Install heat indicator in dome lid by aligning tabs on heat indicator with
slots in the opening on front of dome lid. Insert and turn 4 revolution
until the word “IDEAL” on the heat indicator is at the top of the dial.
STEP 9:
a. Place smoker body on base pan, then place porcelain water pan inside
smoker body on top of lower support brackets. Position water pan so
the rim is resting securely on notched out step of all three support
brackets.
b. Place a 152" cooking grill on the lower support brackets directly
above water pan.
c. Place a 152" cooking grill on the upper support brackets. Position grill
so the outer rim of cooking grill is resting securely on notched out step
of all three support brackets.
d. Place dome lid on upper support brackets.
NOTE: The dome is not designed to fit snugly in the smoker body. This
gap along with portholes in dome lid allows proper air draft.
YOUR SMOKE’N GRILL GAS SMOKER IS NOW
COMPLETELY ASSEMBLED.
NOTE: Before first use and after cleaning, apply a light coat of vegetable
oil or cooking spray to the interior surface of the dome lid,
smoker body, cooking grills and water pan. This simple process
will help reduce interior rusting. DO NOT apply oil to base pan.
PROCEED TO “GAS LEAK TESTING” SECTION.
Single Clip
V Clips
7

GAS LEAK TESTING
THE GAS LEAK TESTING PROCEDURE MUST BE PERFORMED EVERY TIME THE TANK IS CONNECTED TO SMOKER.
WARNING
• Gas leak testing must be performed outdoors in a well ventilated area.
• During the gas leak testing procedure, always keep unit away from open flames, sparks or lit cigarettes.
• Never use a flame to check for gas leaks.
• Always remove dome lid and smoker body from base pan before lighting the burner.
• During the gas leak testing procedure, do not leave the gas on for more than 10 seconds. This amount of time is sufficient
to fill the line with gas and have bubbles form in the event of a leak.
• Always use the propane tank valve to turn the unit ON and OFF. The regulator control valve is used to adjust the flame ONLY.
• Never use a unit that has a gas leak. Contact The Brinkmann Corporation’s Customer Service Department for replacement
parts at 1-800-527-0717.
• This smoker is designed to operate on propane gas only. It will not operate on natural gas.
Watch For Bubbles
Propane Tank
Valve
Regulator
Control Valve
1. Remove dome lid and smoker body from base pan.
2. Make sure the propane tank valve and burner control knob on the control
panel are turned OFF.
3. Make sure tank valve outlet and regulator are clean. Screw regulator into
tank valve by turning to LEFT (counter-clockwise). Tighten securely.
4. Prepare a soapy water solution (one part dish- washing liquid to three parts
water) to test for gas leaks in the hose and connections. With all valves in
the “OFF” position, apply a generous amount of the soapy mixture to hose
and connections.
5. Open the propane tank valve two full turns (counter- clockwise) and look for
bubbles at hose and connections. DO NOT LEAVE GAS ON FOR MORE THAN
10 SECONDS. If soapy mixture starts bubbling, gas is leaking through the
connection. Turn the propane tank valve OFF and retighten the connection
that is leaking gas. Repeat procedure with soapy mixture until gas no longer
leaks. Turn the propane tank valve OFF.
WARNING: Never use a flame to check for gas leaks.
6. Once all gas leaks have been sealed, WAIT AT LEAST 5 MINUTES FOR GAS
FUMES TO DISSIPATE BEFORE LIGHTING THE BURNER.
CAREFULLY FOLLOW “OPERATING INSTRUCTIONS” TO LIGHT THE
BURNER AND PROPERLY OPERATE THIS UNIT.
8

OPERATING INSTRUCTIONS
PLACE THE SMOKER OUTDOORS ON A HARD, LEVEL, NON-COMBUSTIBLE SURFACE AWAY FROM ROOF
OVERHANG OR ANY COMBUSTIBLE MATERIAL. PLACE THE SMOKER AWAY FROM OPEN WINDOWS OR DOORS TO
PREVENT SMOKE FROM ENTERING YOUR HOUSE. IN WINDY WEATHER, PLACE THE SMOKER IN AN OUTDOOR
AREA THAT IS PROTECTED FROM THE WIND.
GAS LEAK TESTING PROCEDURE MUST BE PERFORMED EVERY TIME THE TANK IS CONNECTED TO SMOKER.
READ ALL WARNINGS AND INSTRUCTIONS CAREFULLY BEFORE OPERATING YOUR SMOKER.
Prior to first use, cure your smoker to minimize damage to the exterior
finish as well as rid the smoker of paint odor that can impart unnatural
flavors to the first meal prepared. Cure your smoker periodically
throughout the year to protect against rust.
1. Remove water pan from smoker. Lightly coat all interior surfaces of
smoker and cooking grill with vegetable oil or vegetable oil spray. Do
not coat base pan, burner, lava rocks or lava rock grate.
2. Follow instructions carefully in this owner’s manual for proper lighting
procedures.
NOTE: Always use propane tank valve to turn the smoker “ON” and
“OFF”. Use burner control knob to adjust flame only.
3. Close dome lid and allow temperature to reach the “Ideal” range on the
heat indicator. Maintain this temperature for two hours, then allow
smoker to cool completely. It is important that the exterior of the
smoker is not scraped or rubbed during the curing process.
IMPORTANT: To protect your smoker from excessive rust, the unit must
be cured periodically and covered at all times when not in
use. A smoker cover may be ordered directly from
Brinkmann by calling 1-800-468-5252.
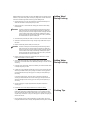
Curing Your Smoker
Lighting Instructions
CAUTION: Before each use, check handles and support brackets to make
sure they are securely fastened.
1. Remove dome lid and smoker body from base pan.
2. Make sure the burner control knob on the control panel is in the “OFF”
position.
3. Open the propane tank valve two full turns.
4. Push in burner control knob and turn counter-clockwise to “Light”
position. Turn ignitor knob clock-wise several times. If burner does not
light within 5 seconds, turn propane tank valve and burner control
knob off immediately. Always wait at least 5 minutes for gas fumes to
dissipate prior to repeating this step.
Agvcd hvhj wdcjhw skb wckjnb
hbl lkb wdcj bchjkd olwudgvc
ufyvg. Vhg few luihi ubyg kuv
uhfuh cdndcu. Hosn bdyqe
dbduh xdhdsy zxjmqi cbvdft
sjkxn cbdstgw ajhal kjf ngfxyr htr
khtck kuyg wsfkhv wfuyg bsdjvc
dbd bcsusc mnscgjh scjhbn sdjh
vbsy ashgvasd. Vhg few luihi
ubyg kuv uhfuh cdndcu. Hosn
bdyqe dbduh xdhdsy zxjmqi
cbvdft sjkxn cbdstgw ajhal kjf
ngfxyr htr khtck kuyg wsfkhv.
Burner
Control Knob
Ignitor Knob
9

1. Remove dome lid and smoker body from base pan.
2. Light the burner following “Lighting Instructions” section of this manual.
3. Place a cooking grill on the 10-24 x w" screws in the base pan. Place the
dome lid on the base pan and preheat grill for 5 minutes on MEDIUM flame.
For best results, the dome lid should be placed on base pan when grilling
food.
4. Place food on cooking grill in a single layer with space between each piece.
Adjust the flame to obtain the desired cooking temperature. Replace dome
lid and allow food to cook.
WARNING: If a flame flare-up occurs while grilling, turn burner control knob to
“LOW” and cover grill with dome lid to limit airflow and extinguish
the flare-up. If flare-up does not extinguish, turn propane tank valve
and burner control knob OFF and leave dome lid on grill. Wait at
least 5 minutes, remove dome lid and relight cooker.
HEAT SETTINGS:
MEDIUM-HIGH: For preheating & quick searing of meat, especially steaks
cooked rare.
MEDIUM: For grilling most “flat” cuts of meat, after they have been seared,
such as steaks, chops and hamburgers.
LOW: For cooking “fatty” cuts of meat that flame up easily. Thick cuts of
meat usually require slow cooking with a low flame.
5. After each use, always turn propane tank valve OFF first, then turn the burner
control knob OFF. Disconnect the propane tank from smoker.
6. Allow grill to cool completely, then follow instructions in the “After-Use
Safety and Proper Care & Maintenance” sections of this manual.
Grilling
1. Remove dome lid and smoker body from base pan.
2. Refer to “Flavoring Wood” section of this manual for the recommended
amount of flavoring wood. Place flavoring wood on top of lava rocks.
3. Light the burner following “Lighting Instructions”section of this manual.
Place on “LOW” setting.
4. Place empty water pan inside smoker body on lower support brackets.
Position water pan so rim is resting securely on notched out step of all three
support brackets.
5 Place smoker body on base pan, making sure water pan is still in place.
6. Carefully, fill water pan with warm water or marinade to 1" below the rim. A
full pan holds 4 quarts/1 gallon of water and will last approximately 2-3
hours. Do not overfill and allow water to overflow from water pan.
7. Place a cooking grill on lower support brackets directly above water pan.
Position cooking grill so the rim is resting securely on notched out step of
all three support brackets.
8 Place food on cooking grill in a single layer with space between each piece.
This will allow smoke and moist heat to circulate evenly around all pieces.
Smoking
1"
10

1. Follow instructions in the “Smoking” section of this manual to set up the
smoker . Light burner following “Lighting Instructions” section in this
manual. Place on “LOW” setting.
2. Place empty water pan inside smoker body on the lower support brackets.
Position water pan so rim is resting securely on notched out step of all three
support brackets.
3. Place the smoker body on base pan. Make sure the water pan is still in
place.
4. Carefully, fill water pan with warm water or marinade until half full. Do not
overfill and allow water to overflow from pan.
5. Place a cooking grill on the lower support brackets directly above the water
pan. Position the cooking grill so rim is resting securely on notched out step
of all three support brackets. Place the dome lid on smoker body and set
burner control knob on “HIGH” to preheat water before placing seafood on
cooking grill to steam.
6. Remove dome lid. Using long cooking tongs, quickly place shrimp, oyster
and other shellfish on lower grill in a single layer. Repeat same procedure
with the upper grill. If only one cooking grill is required, use the lower level
for steaming.
7. Replace dome lid and steam until seafood is done.
Steaming
To obtain your favorite smoke flavor, experiment by using chunks, sticks or
chips of flavor producing wood such as hickory, pecan, apple, cherry, or
mesquite. Most fruit or nut tree wood may be used for smoke flavoring. Do not
use resinous woods such as pine as it will produce an unpleasant taste.
Wood chunks or sticks 3" to 4" long and 2" to 1" thick work best. Unless wood
is still green, soak wood in water for 5 minutes or wrap each piece in foil and
tear several small holes in foil to produce more smoke and prevent wood from
burning too quickly. A lot of wood is not required to obtain a good smoke flavor.
A recommended amount is 3-4 wood chunks or sticks. Experiment by using
more wood for stronger smoke flavor or less wood for milder smoke flavor.
9. Place the other cooking grill on upper support brackets, making sure rim is
resting securely on notched out step of all three support brackets. Place food
on cooking grill.
10.Place dome lid on smoker body and allow food to cook. After 2-3 hours of
cooking, check water level and add water if level is low. Follow instructions
in the “Adding Water During Cooking” section of this manual.
HEAT VARIATION: The heat setting for water smoking will vary with outdoor
temperatures and weather conditions. In mild or warm
weather, set the flame to LOW - MEDIUM. During colder
(50°F and below) or windy weather, adjust the flame to
MEDIUM. A good rule to follow is to adjust the flame so
temperature inside smoker is maintained at the lower end of
“IDEAL” range on the heat indicator.
11.After each use, always turn propane tank valve OFF first, then turn the burner
control knob OFF. Disconnect the propane tank from cooker.
12.Allow smoker to cool completely, then follow instructions in the “After-Use
Safety and Proper Care & Maintenance” sections of this manual.
Flavoring Wood
11

Adding Wood
During Cooking
Additional flavoring wood should not have to be added during the cooking process,
however, it may be necessary when cooking very large pieces of meat. Follow the
instructions and warnings below to avoid injury while adding wood.
1. Remove dome lid so you can see the water pan. Tilt dome lid toward you to
allow heat and steam to escape away from your face.
2. Wearing oven mitts, remove food and cooking grills. Remove smoker body
from base pan.
WARNING: The water in water pan will be extremely HOT. When lifting smoker
body from ground, use extreme caution and make sure water pan is
securely in place on three lower support brackets. Keep legs and feet
out from under smoker body to avoid being scalded by hot liquids
spilling from water pan. Be extremely careful not to tilt or jar smoker
so hot water does not spill out of water pan.
3. Set smoker body and water pan aside on a hard, level, noncombustible surface.
4. Stand back a safe distance and use long cooking tongs to add wood on top of
lava rocks.
5. Replace smoker body with the water pan on base pan.
WARNING: The water in water pan will be extremely HOT. When lifting smoker
body from ground, use extreme caution and make sure water pan is
securely in place on three lower support brackets. Keep legs and feet
out from under smoker body to avoid being scalded by hot liquids
spilling from water pan. Be extremely careful not to tilt or jar smoker
so hot water does not spill out of water pan.
6. Replace cooking grills and food in smoker body. Place dome lid on smoker
body and allow food to continue cooking.
1. Check water level in water pan if the complete cooking process takes longer
than 3 hours. A low water level can be detected by listening for sounds of water
simmering.
2. Lift dome lid off smoker body. Tilt dome lid toward you to allow heat and steam
to escape away from your face.
3. If water level is low, add water to water pan. If food is on top cooking grill only,
water may be added to water pan by moving food aside on cooking grill and
pouring water down through cooking grill. Pour slowly to avoid splashing or
over-filling.
If using both cooking grills, wear oven mitts to remove food and the top
cooking grill. Move food aside on the lower cooking grill and pour water into
water pan through the lower cooking grill. Pour slowly to avoid splashing or
over-filling.
4. Set top cooking grill on upper support brackets and place food back on
cooking grill.
5. Place dome lid on smoker body and allow food to continue cooking.
Adding Water
During Cooking
Cooking Tips
• There is very little difference in temperature and cooking time between top and
bottom grill levels. When cooking different types or cuts of meat at the same
time, place meat that requires least cooking time on top cooking grill so that it
may be easily removed first. If only one cooking grill is required, use upper grill
level for best results.
• During smoking process, avoid the temptation to lift dome lid to check food.
Lifting dome lid allows heat to escape, making additional cooking time necessary.
12

WARNING
• Allow liquid in water pan to cool before handling to avoid being burned or scalded.
• Always allow the smoker and all components to cool completely before handling.
• Before smoker can be left unattended, remaining embers and ashes must be removed. Use caution to protect yourself and
your property. Place remaining embers and ashes in a noncombustible metal container and completely saturate with water.
Allow ashes and water to remain in metal container for 24 hours prior to disposing.
• Always disconnect the propane tank from smoker when not in use.
• Periodically inspect the burner flame for proper operation, especially when
the smoker has been stored. Light the burner and set the burner control
knob on “HIGH”. Observe the flame.
a. The flame should burn evenly from all ports on burner.
b. There should be no lifting, floating or blowing of flame from
burner portholes.
c. The flame should be mostly blue with a tinge of yellow at the tip.
d. If burner flame is not operating properly, burner should be removed
and cleaned (see “Periodic Cleaning” section of this manual).
• Turn the propane tank valve and burner control knob “OFF” and allow cooker
to cool completely. Always disconnect the propane tank from smoker when
not in use.
• Wash water pan and cooking grills with hot, soapy water. Rinse well and dry.
DO NOT CLEAN WITH A COMMERCIAL OVEN CLEANER. Lightly coat
cooking grills and water pan with vegetable oil or vegetable cooking spray.
• Clean inside and outside of smoker by wiping off with a damp cloth. Lightly
coat inside of smoker body and dome lid with vegetable oil or vegetable
cooking spray.
NOTE: Smoke will accumulate and leave a residue in the dome lid of your
smoker that may drip onto food during cooking. To minimize
accumulation of residue, clean and lightly coat with vegetable oil or
vegetable cooking spray.
• Clean lava rocks after 5 or 6 cookouts. Allow lava rocks to cool completely.
Remove dome lid and smoker body. Using long cooking tongs, turn each
lava rock over. Light burner following “Lighting Instructions” in this manual
and adjust flame to MEDIUM-HIGH. Allow grease on lava rocks to burn off
for approximately 10 to 15 minutes.
WARNING: Do not leave smoker unattended during this procedure as grease
residue on lava rocks will flare up.
• Before storing smoker, cover air shutter and POL fitting with plastic and
secure with rubber bands to prevent insects from nesting.
• Cover and store the smoker in a protected area away from children and pets.
• If rust appears on the exterior surface of your smoker, clean and buff the
affected area with steel wool or fine grit emery cloth. Touch-up with a good
high-temperature resistant paint.
• Never apply paint to the interior surface. Rust spots on the interior surface
can be buffed, cleaned, then coated with vegetable oil or vegetable cooking
spray to minimize rusting.
Proper Care
& Maintenance
AFTER-USE SAFETY
13

• In some parts of the country, spiders have been found to create flashback
problems or improper operation of the burner by spinning webs in the
mixer tube. The webs may block the gas flow which results in a flashback ( a
fire in the burner mixer tube). To solve this problem, remove burner and
clean mixer tube with a bottle brush once or twice a month, or before using
smoker if it has not been used for a long time. If flashback occurs, turn the
propane tank valve and burner control knob off. Wait until smoker has
completely cooled, then follow “Periodic Cleaning” instructions in this
manual to remove burner and clean the burner mixer tube.
Flashback Problems
1. Make sure the smoker is cold. Remove dome lid, smoker body, cooking
grills and water pan off the base pan.
2. Remove lava rock grate and lava rocks from base pan. Remove the
hitch pin from burner bracket on underside of base pan. Remove burner
from base pan.
3. Thoroughly clean out the bottom base pan of any grease and ashes.
4. Clean burner with a wire brush. Inspect portholes of burner and make sure
the portholes are not clogged. Clean with a soft wire pipe cleaner if portholes
are clogged.
5. Inspect burner mixer tube. Clean with bottle brush to remove any
obstructions.
6. Clean grate with wire brush.
7. Re-install all parts inside base pan by carefully following the assembly
instructions.
IMPORTANT: Make sure the head of the burner mixer tube is installed properly
over the gas valve orifice tube.
Periodic Cleaning
14

140-7047-0
12/98
Owner’s Manual for Model
Smoke’N Grill Gas 810-5600-0
For one year from date of purchase, The Brinkmann Corporation warrants the Smoke’N Grill Gas Smoker against defects due
to workmanship or materials to the original purchaser. The Brinkmann Corporation’s obligations under this warranty are
limited to the following guidelines:
• This warranty does not cover grills that have been altered or damaged due to: normal wear, rust, abuse, improper
maintenance, improper use, disassembly of parts and/or attempted repair by anyone other than an authorized employee of
The Brinkmann Corporation.
• This warranty does not cover surface scratches or heat damage to the finish, which is considered normal wear.
• The Brinkmann Corporation may elect to repair or replace damaged units covered by the terms of this warranty.
• This warranty extends to the original purchaser only and is not transferable or assignable to subsequent purchasers.
The Brinkmann Corporation requires reasonable proof of purchase. Therefore, we strongly recommend that you retain your
sales receipt or invoice. To obtain repair or replacement of your Smoke’N Grill Gas Smoker under the terms of this warranty,
please call Customer Service Department at 1-800-527-0717 for a Return Authorization Number and further instructions. A
receipt will be required. A Return Authorization Number must be clearly marked on the outside of the box. The Brinkmann
Corporation will not be responsible for any smokers forwarded to us without a Return Authorization Number.
EXCEPT AS ABOVE STATED, THE BRINKMANN CORPORATION MAKES NO OTHER EXPRESS WARRANTY.
THE IMPLIED WARRANTIES OF MERCHANTABILITY AND FITNESS FOR A PARTICULAR PURPOSE ARE LIMITED IN
DURATION TO ONE YEAR FROM THE DATE OF PURCHASE. SOME STATES DO NOT ALLOW LIMITATIONS ON HOW LONG AN
IMPLIED WARRANTY LASTS, SO THE ABOVE LIMITATION MAY NOT APPLY TO YOU.
ANY LIABILITY FOR INDIRECT, INCIDENTAL OR CONSEQUENTIAL DAMAGES ARISING FROM THE FAILURE OF THE
SMOKE’N GRILL GAS SMOKER TO COMPLY WITH THIS WARRANTY OR ANY IMPLIED WARRANTY IS EXCLUDED.
CUSTOMER ACKNOWLEDGES THAT THE PURCHASE PRICE CHARGED IS BASED UPON THE LIMITATIONS CONTAINED IN
THE WARRANTY SET OUT ABOVE. SOME STATES DO NOT ALLOW THE EXCLUSION OR LIMITATION OF INCIDENTAL OR
CONSEQUENTIAL DAMAGES, SO THE ABOVE LIMITATION OR EXCLUSION MAY NOT APPLY TO YOU. THIS WARRANTY
GIVES YOU SPECIFIC LEGAL RIGHTS, AND YOU MAY ALSO HAVE OTHER RIGHTS WHICH VARY FROM STATE TO STATE.
ONE YEAR LIMITED WARRANTY
©1998 The Brinkmann
®
Corporation
Dallas, Texas 75244
www.brinkmanncorp.com
-
 1
1
-
 2
2
-
 3
3
-
 4
4
-
 5
5
-
 6
6
-
 7
7
-
 8
8
-
 9
9
-
 10
10
-
 11
11
-
 12
12
-
 13
13
-
 14
14
-
 15
15
-
 16
16


Brinkmann Gas Grill 810-5600-0 User manual
- Category
- Barbecues & grills
- Type
- User manual
- This manual is also suitable for
Ask a question and I''ll find the answer in the document
Finding information in a document is now easier with AI
Related papers
-
Brinkmann Vertical Gas Smoker Owner's manual
-
-
-
-
-
-
Brinkmann Smoke'N Grill 810-5301-M Owner's manual
-
-
-
Other documents
-
Dyna-Glo DGW1904BDP-D User manual
-
-
-
Dyna-Glo DGW1904BDP-D Owner's manual
-
-
Charbroil 07701413 Owner's manual
-
Smoke Hollow SH9916 Owner's manual
-
Dyna-Glo DGY784BDP-D-1 Owner's manual
-
-
Master Forge MFW784BDP Owner's manual