Page is loading ...

Card Functions
(MultiMediaCard, SD Memory Card)
External Input Recording
NV-MX1B NV-MX5B NV-MX7B
Digital Video Camera
Operating Instructions
VQT8901
Before use, please read these instructions completely.
Model No.
NV-MX1B
NV-MX5B
NV-MX7B
Basic Operations
32
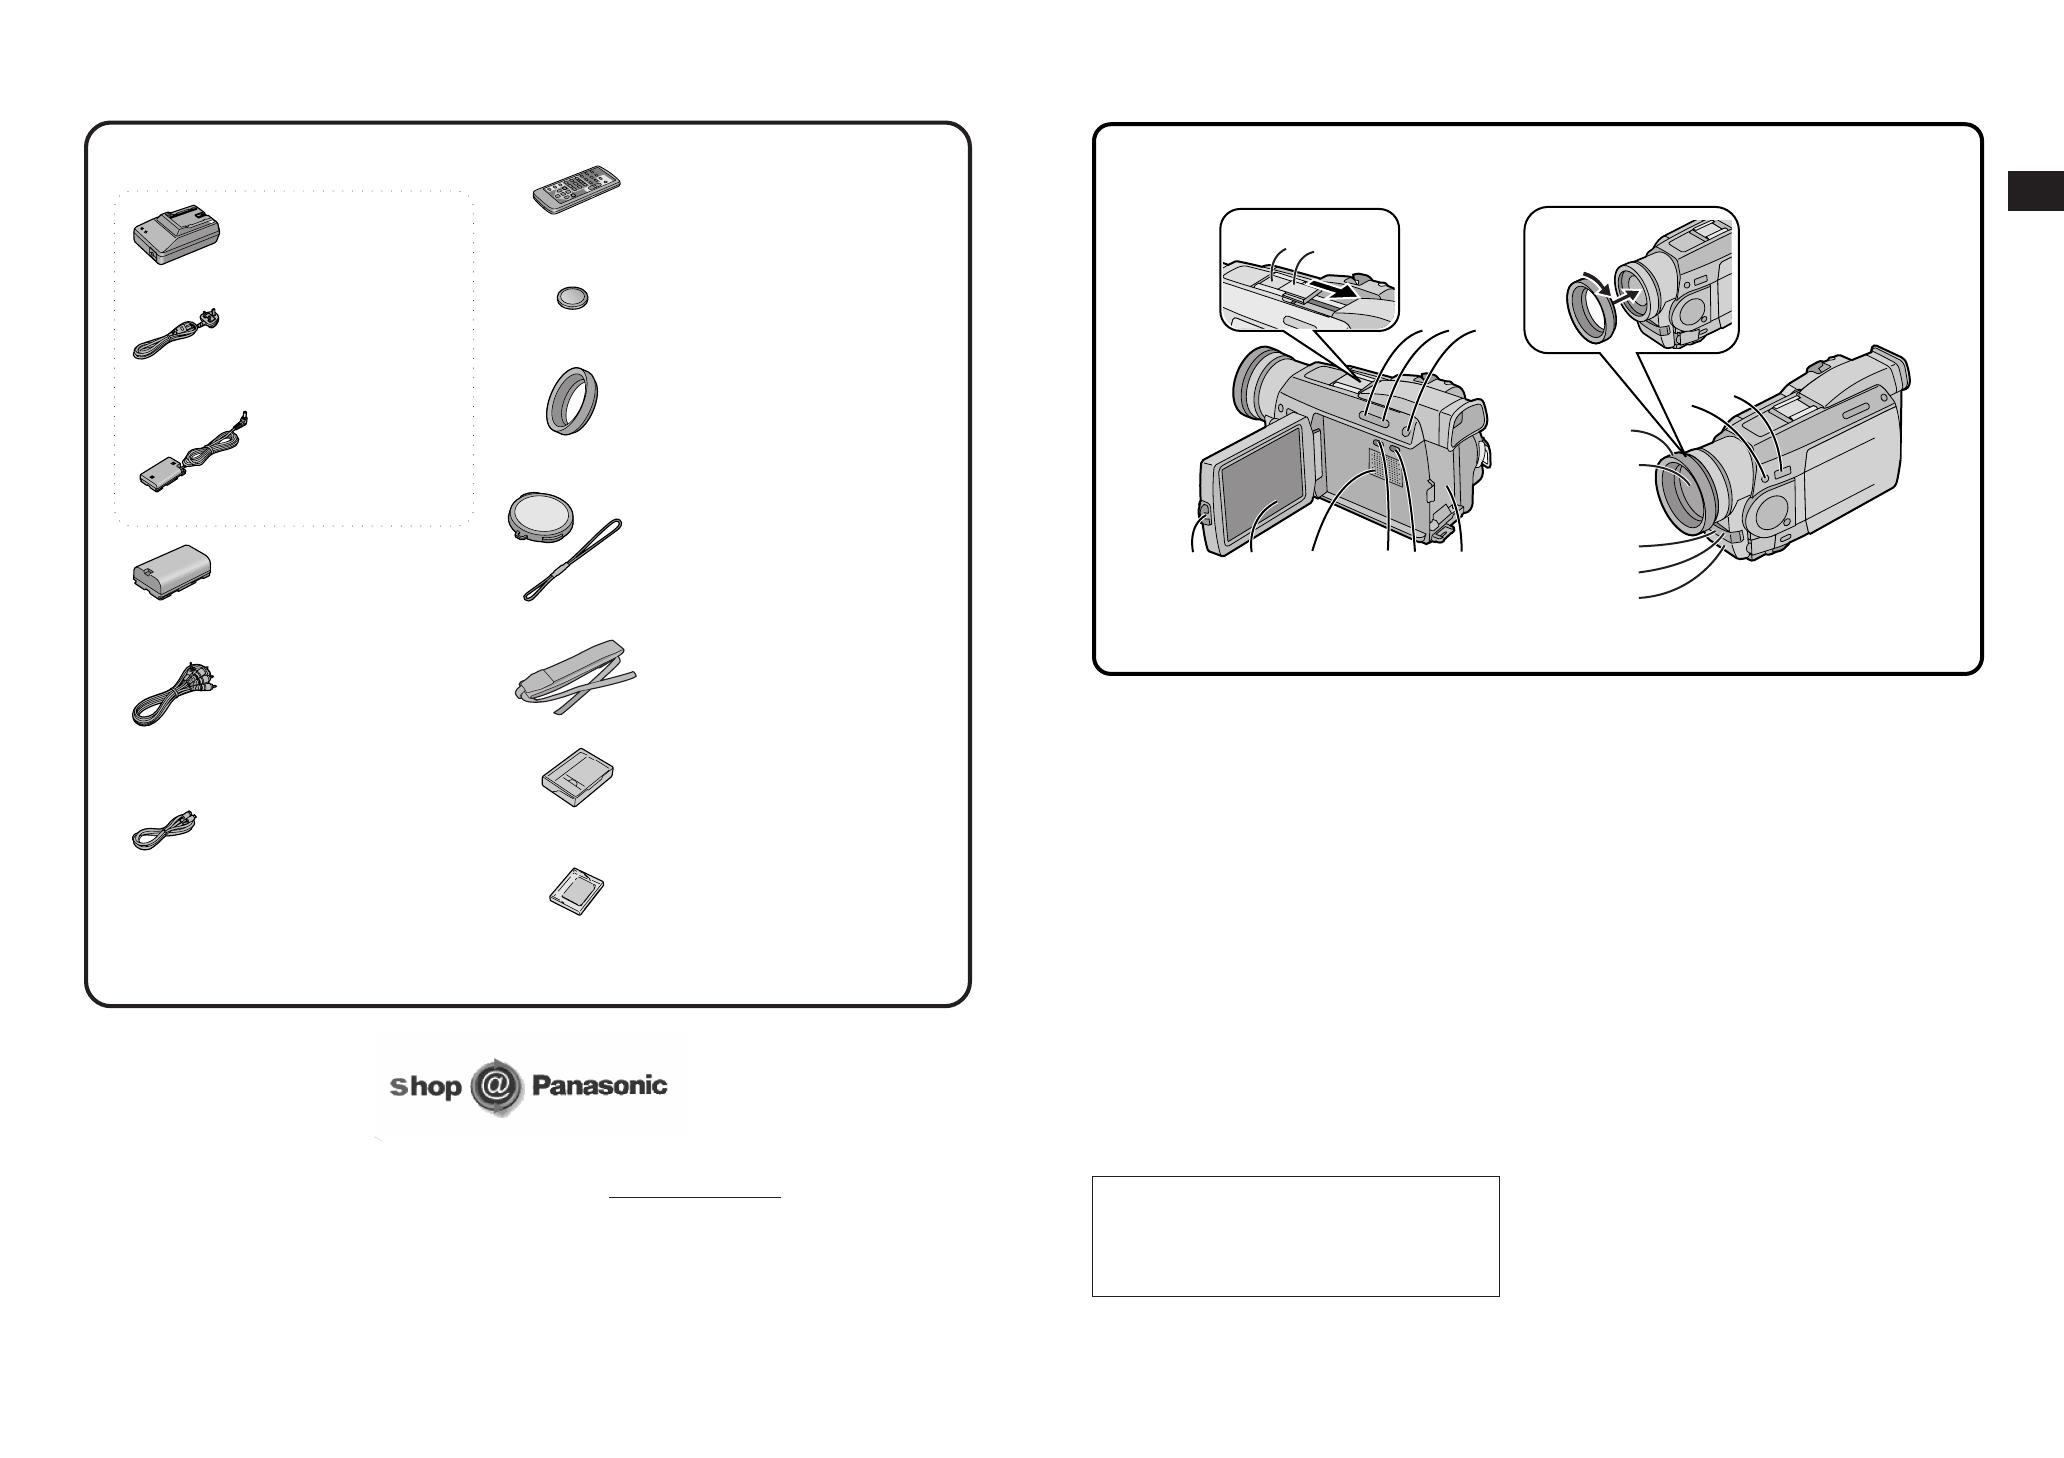
AC Adaptor Set
. . . . . . AC Adaptor
. . . . . .
. . . . . . AC Mains Lead
. . . . . . (VJA0940)
. . . . . . DC Input Lead
(K2GJ2DZ00010)
. . . . . . Battery Pack
(VSB0418)
. . . . . . AV Cable
(K2KC4CB00001)
. . . . . . . . . S-Video Cable
(K2KZ9BA00001)
Controls and Functions
For more details, see the pages indicated in brackets.
543
67 8 9:;
<
@
?
=
A
B
>
1
2
1 Smart Accessory Shoe (NV-MX5, NV-MX7 only)
The Video Flash (VW-FLH3E: optional) (p. 117) or
the Stereo Microphone (VW-VMS2E: optional), etc.
can be attached here. Power is supplied directly from
the Movie Camera when using an accessory
supported by the Smart Accessory Shoe. Remove
the Shoe Cover to attach these accessories.
≥Do not touch the connector part of the Smart
Accessory Shoe.
Accessory Shoe (NV-MX1 only)
Stereo Microphone (VW-VMS2E: optional), etc. is
attached here.
2 Shoe Cover
When using the Shoe, remove the Shoe Cover by
sliding it in the direction of the arrow.
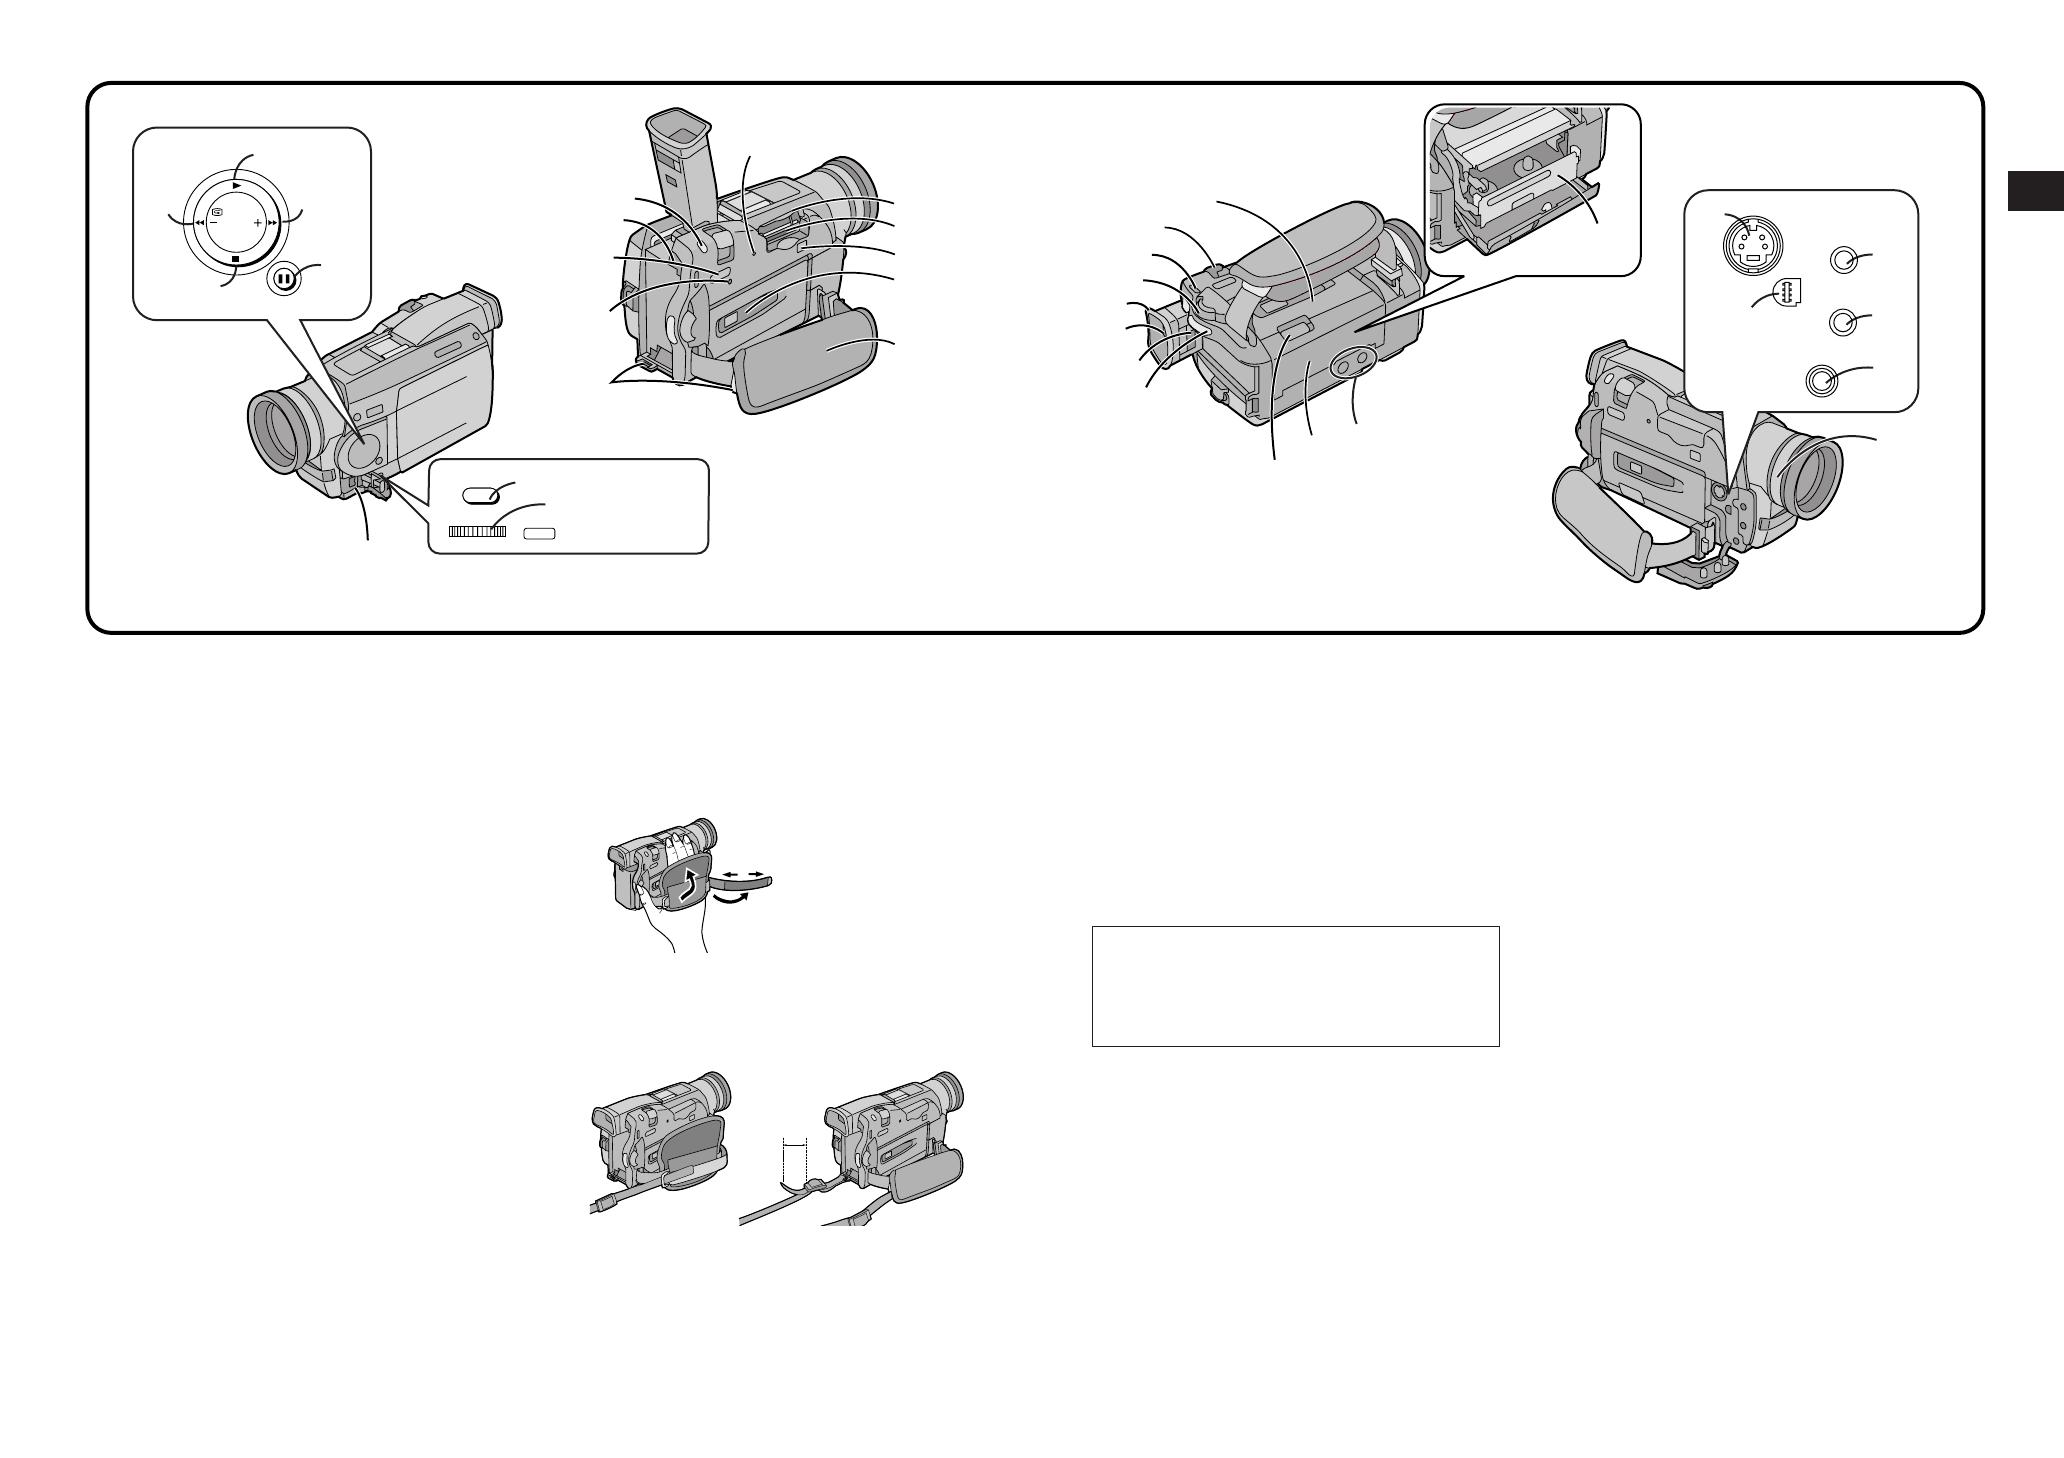
3 Fade Button [FADE] (p. 48)
4 Backlight Button [BLC] (p. 28)
5 Still Button [STILL] (p. 35)
6 LCD Monitor Open Button [PUSH OPEN] (p. 14)
7 LCD Monitor (p. 14, 23, 117)
8 Speaker (p. 39)
9 Title Button [TITLE] (p. 90)
(NV-MX5, NV-MX7 only)
: Multi-Picture Button [MULTI]
(p. 54, 56, 68–73, 88)
Picture-in-Picture Button [P-IN-P] (p. 58)
; Battery Holder (p. 8, 10)
< Mode Selector Switch [AUTO/MNL]
(p. 26, 30, 50, 62, 64)
= Focus Button [FOCUS] (p. 30)
> Lens Hood (p. 117)
Be sure to keep the Lens Hood attached in
order to block out excess light.
? Lens
@ Recording Indicating (Tally) Lamp (p. 27)
A White Balance Sensor (p. 119)
Remote Control Sensor (p. 106)
B Microphone (built-in, stereo)
. . . . . . Remote Controller
(N2QAEC000003)
. . . . . . Button-Type Battery (CR2025)
. . . . . . Lens Hood (VYQ1988)
. . . . . . Lens Cap (VYP7852)
Lens Cap Cord (VGQ5138)
. . . . . . Shoulder Strap (VFC3506)
. . . . . . Digital Video Head Cleaner
(VFK1451)
. . . . . . MultiMediaCard (VFA0324)
(NV-MX5, NV-MX7 only)
Check List for the Standard Accessories
≥For purchasing additional Battery Packs, see the list of optional accessories on p. 131.
Due to limitations in LCD production technology,
there may be some tiny bright or dark spots on
the LCD Monitor screen. However, this is not a
malfunction and does not affect the recorded
picture.
≥Order accessory and consumable items for all Audio Visual Products with ease and confidence either by
telephoning our Customer Care Centre on 08705 357357 Mon–Friday 9:00am–6:00pm and Sat 9:00am–1:00pm
≥Or go on line through our Internet Accessory ordering application at www.panasonic.co.uk.
≥Most major credit and debit cards accepted.
≥All enquires transactions and distribution facilities are provided directly by Panasonic UK Ltd.
≥It couldn’t be simpler!
Basic Operations
54
Controls and Functions
(Continued)
L
M
N
U
K
O
R
S
T
H
F
E
C
D
G
J
SEARCH
MENU
PUSH
W.B/SHUTTER/IRIS/VOL/JOG
12
I
V
W
Z
Y
X
\
]
[
^
_
`
a
g
b
c
d
e
f
S-VIDEO
IN/OUT
D.STILL
PICTURE
EDIT
D
(MINI)
AV IN/OUT
PHONES
MIC
P
Q
S Cassette Compartment Window (p. 12)
T Grip Belt
You can adjust the Grip Belt to the size of your hand.
When you open or close the Cassette Compartment,
push down the buckle of the Grip Belt so that it does
not prevent the Cassette Compartment from opening
and closing completely.
U Shoulder Strap Holders
Before you go recording outside, it is recommended
that you attach the Shoulder Strap to prevent the
Movie Camera from dropping accidentally.
Pull the end of the Shoulder Strap through the
Shoulder Strap Holder on the Movie Camera.
Fold the end of the Shoulder Strap back, pull it
through the Shoulder Strap Length Adjuster.
Pull it out more than 2 cm 1 from the Shoulder Strap
Length Adjuster so that it cannot slip off.
Pass your hand through
the Grip Belt and adjust
its length. Fold back the
end of the Grip Belt to
securely fasten the
velcro tape closure.
V Upper Cassette Compartment Cover (p. 12)
W Zoom Lever [W/T] (p. 32)
X Operation Mode Lamps
[CAMERA/VCR/CARD P.B] (p. 26, 38, 88)
(Only the NV-MX5 and NV-MX7 models come with
[CARD P.B] Lamp.)
Y Off/On Mode Selector Switch [OFF/ON/MODE]
(p. 14, 26, 38, 42, 88)
Z Eyecup
[ Viewfinder (p. 14, 23, 117)
c Edit Socket [EDITD (MINI)] (p. 111, 112)
d Audio-Video Input/Output Socket [AV IN/OUT]
(p. 42, 108, 111, 114) (Only the NV-MX7 model
comes with an input function.)
Headphone Socket [PHONES] (p. 43)
When a cable is connected to this socket, the Movie
Camera’s built-in speaker is turned off.
e Microphone Socket [MIC] (p. 117)
To connect an external microphone or audio
equipment. (Connecting to this socket deactivates the
built-in microphone.)
f Digital Still Picture Terminal [D.STILL PICTURE]
(p. 114)
g Focus Ring (p. 30)
Due to limitations in LCD production technology,
there may be some tiny bright or dark spots on
the Viewfinder screen. However, this is not a
malfunction and does not affect the recorded
picture.
\ Eyepiece Corrector Knob (p. 14)
] Recording Start/Stop Button (p. 26)
^ Cassette Eject Lever [OPEN/EJECT] (p. 12, 42)
_ Lower Cassette Compartment Cover (p. 12)
` Tripod Receptacle
To mount the Movie Camera on an optional tripod.
a Cassette Holder (p. 12)
b S-Video Input/Output Socket [S-VIDEO IN/OUT]
(p. 42, 108, 111, 112, 114)
(Only the NV-MX7 model comes with an input
function.)
Connect the S-Video Cable to this socket to record
clearer pictures or view on the TV screen.
1
C Play Button [1] (p. 38, 89, 94)
D Rewind/Review Button [6] (p. 38, 94)
Recording Check Button [S] (p. 28)
Reverse Search Button [sSEARCH] (p. 44, 88)
E Stop Button [∫] (p. 38, 89, 94)
F Fast Forward/Cue Button [5] (p. 38, 94)
Forward Search Button [SEARCHr] (p. 44, 88)
G Pause Button [;] (p. 40, 89, 94)
H DV Terminal (i.LINK) [¥] (p. 110)
Connect it to digital video equipment.
“i.LINK” is the name of the connector in accordance
with the IEEE1394-1995.
“¥” is the logo marked on products conforming with
the “i.LINK” specifications.
(It is only possible to input digital signals with model
NV-MX7.)
I Menu Button [MENU] (p. 16)
J Multi-Function Dial [PUSH]
(p. 16, 23, 24, 39, 41, 62, 64)
K Photoshot Button [PHOTO SHOT]
(p. 34, 82–87, 90, 92, 96)
L Battery Eject Button [BATT. EJECT] (p. 11)
M Tape/Card Photoshot Selector [TAPE/CARD]
(p. 34, 82–87) (NV-MX5, NV-MX7 only)
N Reset Button [RESET] (p. 128)
O Card Access Lamp [ACCESS] (p. 81)
(NV-MX5, NV-MX7 only)
P Card Slot Cover (p. 80) (NV-MX5, NV-MX7 only)
Q Card Slot (p. 80) (NV-MX5, NV-MX7 only)
R Card Slot Cover Open Lever [OPEN] (p. 80)
(NV-MX5, NV-MX7 only)

Basic Operations
6 7
Title Procedure Remarks, etc.
≥Before disconnecting the AC Mains Lead, set the
[OFF/ON/MODE] Switch on the Movie Camera to
[OFF].
≥If you use the Movie Camera for a long time, it
becomes warm. However, this is normal.
≥The AC Mains Lead does not fit entirely into the AC
Adaptor socket, however this has no effect on
operation.
The 3 Types of Power Supply
1) AC Adaptor (supplied) to supply power from an AC
mains socket
2) Car Battery Charger (optional) to supply power from
the Cigarette Lighter Socket in a car
3) Battery (supplied) (p. 10)
1) Supplying Power from an AC Mains Socket
AC Adaptor
AC Mains Lead
DC Input Lead
2) Supplying Power from the Cigarette Lighter
Socket in a Car
The use of the Car Battery Charger (VW-KBD2E;
optional) makes it possible to supply power to the
Movie Camera in a car for recording and playback. It
also allows charging the Movie Camera’s Battery.
Start the engine and then plug the Car Battery
Charger into the Cigarette Lighter Socket.
Car Battery Charger
DC Input Lead
Connect the other end
of the AC Mains Lead to
an AC mains socket.
Connect the AC
Mains Lead to the
AC Adaptor.
Insert the Battery-
shaped Connector of
the DC Input Lead
into the Battery
Holder on the Movie
Camera and slide it
downward until it
locks with a click.
Connect the other plug
of the DC Input Lead to
the [DC OUT] Socket
on the AC Adaptor.
≥After use, be sure to disconnect the Car Battery
Charger from the Cigarette Lighter Socket.
≥If the Car Battery Charger is already connected to the
cigarette lighter socket when you start the engine, the
fuse in the Car Battery Charger’s plug may blow out.
≥Also read the operating instructions of the Car Battery
Charger.
Tilt the Viewfinder
upward.
Do not pull on the Eyecup
to extend the Viewfinder.
Battery-shaped Connector
Basic Operations
8 9
Title Procedure Remarks, etc.
PUSH
BATT.
EJECT
AC Adaptor
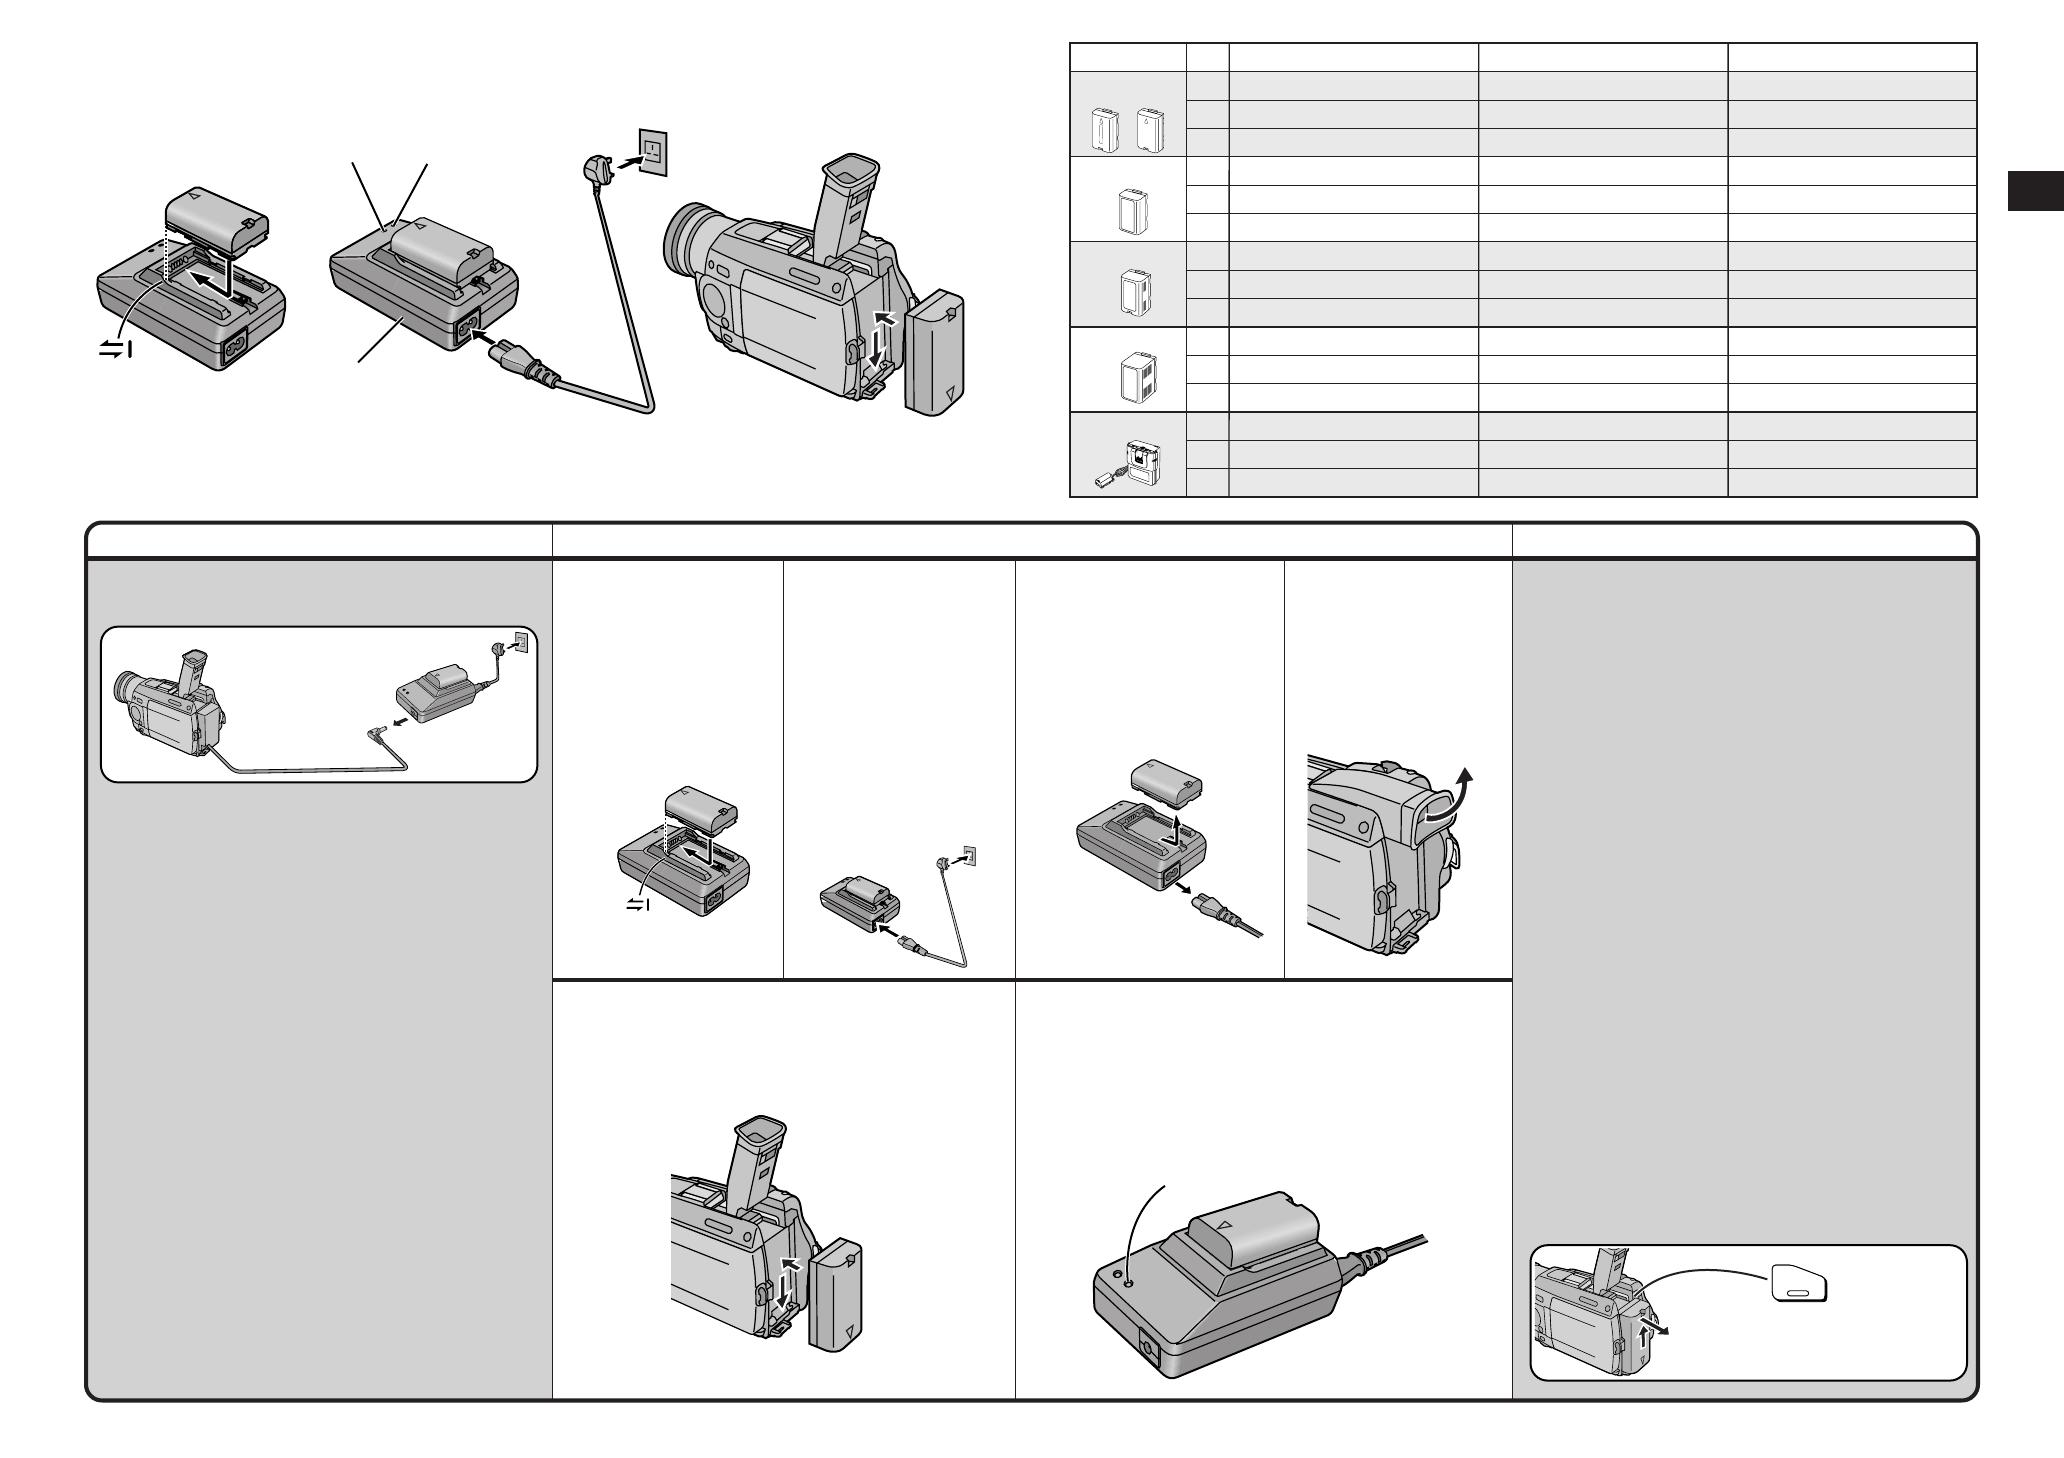
3) Supplying Power with the Battery
Before use, fully charge the Battery.
When the [CHARGE] Lamp Flashes Continuously
If the temperature of the Battery is extremely low or
extremely high, the [CHARGE] Lamp on the AC
Adaptor flashes continuously. It also flashes
continuously when some malfunction has occurred in
the Battery or the AC Adaptor. For details, read “Notes
about the AC Adaptor”. (p. 115)
≥Charge the Battery at a room temperature between
10oC and 30oC.
≥If the DC Input Lead is connected to the AC Adaptor,
disconnect it as charging is not possible otherwise.
≥If the [CHARGE] Lamp does not light even though the
Battery is attached, remove the Battery and then re-
attach it.
≥During recording and charging, the Battery becomes
warm. However, this is normal.
≥If the temperature of the Battery is extremely high or
extremely low, the [CHARGE] Lamp may keep on
flashing and charging is not possible. After the
Battery has cooled down or warmed up sufficiently,
charging starts automatically.
1
Have the front edge of
the battery lined up with
the
1 mark on the side
of the AC Adaptor, and
then slide it horizontally
until it locks with a
click.
5
Insert the Battery into the Battery Holder on the
Movie Camera and slide it downward until it locks
with a click.
2
Connect the AC Mains
Lead to the AC Adaptor
and an AC mains socket.
The [POWER] Lamp and
the [CHARGE] Lamp light
and charging starts.
≥The AC Mains Lead
does not fit entirely into
the AC Adaptor socket,
however this has no
effect on operation.
4
Tilt the Viewfinder
upward.
Charging Time and Maximum Time for
Continuous Recording
The times shown in the above chart are
approximations. The figures in parentheses show the
recording time when using the LCD Monitor.
The times listed above for your information indicate the
duration of recording performed at an ambient
temperature of 20°C and 60% relative humidity. The
charging time may be longer when you charge the
Battery at higher or lower temperature.
A Charging Time
B Maximum Continuous Recording Time
C Intermittent Recording Time
(The Intermittent Recording Time indicates the total
recording time possible when you start and stop
recording repeatedly.)
≥The Battery Model VSB0418 is supplied.
≥During use and charging, the Battery becomes warm.
The Movie Camera, too, becomes warm during use.
≥
When you repeatedly stop and restart recording, the
recording time per Battery is shorter than listed above.
≥If you do not use the Battery for a long time, please
read “Precautions for Storage”. (p. 116)
≥The Battery models CGP-D110 and CGP-D105
cannot be charged with this AC Adaptor.
Removing the Battery from the Movie Camera
While pressing the [BATT. EJECT] Button, slide the
Battery upward to remove it.
≥Be careful not to drop the Battery by accident.
≥Before removing the Battery, set the [OFF/ON/MODE]
Switch to [OFF].
1
3
Remove the Battery by
sliding it in the
opposite direction of
Step
1
.
≥Also disconnect the AC
Mains Lead.
When charging,
do not connect
the DC Input
Lead to the
AC Adaptor.
Power Lamp
Charge Lamp
Battery Eject Button
Charge Lamp [CHARGE]
Lit: During charging.
Off: When the Battery is fully charged.
Charge Lamp
CGP-D210
NV-MX1 NV-MX5 NV-MX7
CGR-D220
CGP-D320
CGR-D815
VSB0418
CGR-D120
A
B
C
A
B
C
A
B
C
A
B
C
A
B
C
1 h.
1 h 50 min.
2 h.
3 h 15 min.
5 h 20 min.
1 h 20 min. (1 h 5 min.)
40 min. (35 min.)
2 h 20 min. (1 h 50 min.)
1 h 10 min. (55 min.)
2 h 50 min. (2 h 15 min.)
1 h 25 min. (1 h 10 min.)
4 h 50 min. (3 h 55 min.)
2 h 25 min. (2 h.)
4 h 35 min. (3 h 50 min.)
9 h 10 min. (7 h 40 min.)
1 h.
1 h 50 min.
2 h.
3 h 15 min.
5 h 20 min.
1 h 25 min. (1 h 5 min.)
45 min. (35 min.)
2 h 20 min. (1 h 55 min.)
1 h 10 min. (1 h.)
2 h 55 min. (2 h 20 min.)
1 h 30 min. (1 h 10 min.)
5 h 5 min. (4 h 5 min.)
2 h 35 min. (2 h 5 min.)
4 h 45 min. (3 h 50 min.)
9 h 25 min. (7 h 40 min.)
1 h.
1 h 50 min.
2 h.
3 h 15 min.
5 h 20 min.
1 h 20 min. (1 h 5 min.)
40 min. (35 min.)
2 h 20 min. (1 h 50 min.)
1 h 10 min. (55 min.)
2 h 50 min. (2 h 15 min.)
1 h 25 min. (1 h 10 min.)
4 h 50 min. (3 h 55 min.)
2 h 25 min. (2 h.)
4 h 35 min. (3 h 50 min.)
9 h 10 min. (7 h 40 min.)
Basic Operations
10 11
Title Procedure Remarks, etc.
PUSH
CLOSE
1
OPEN / EJECT
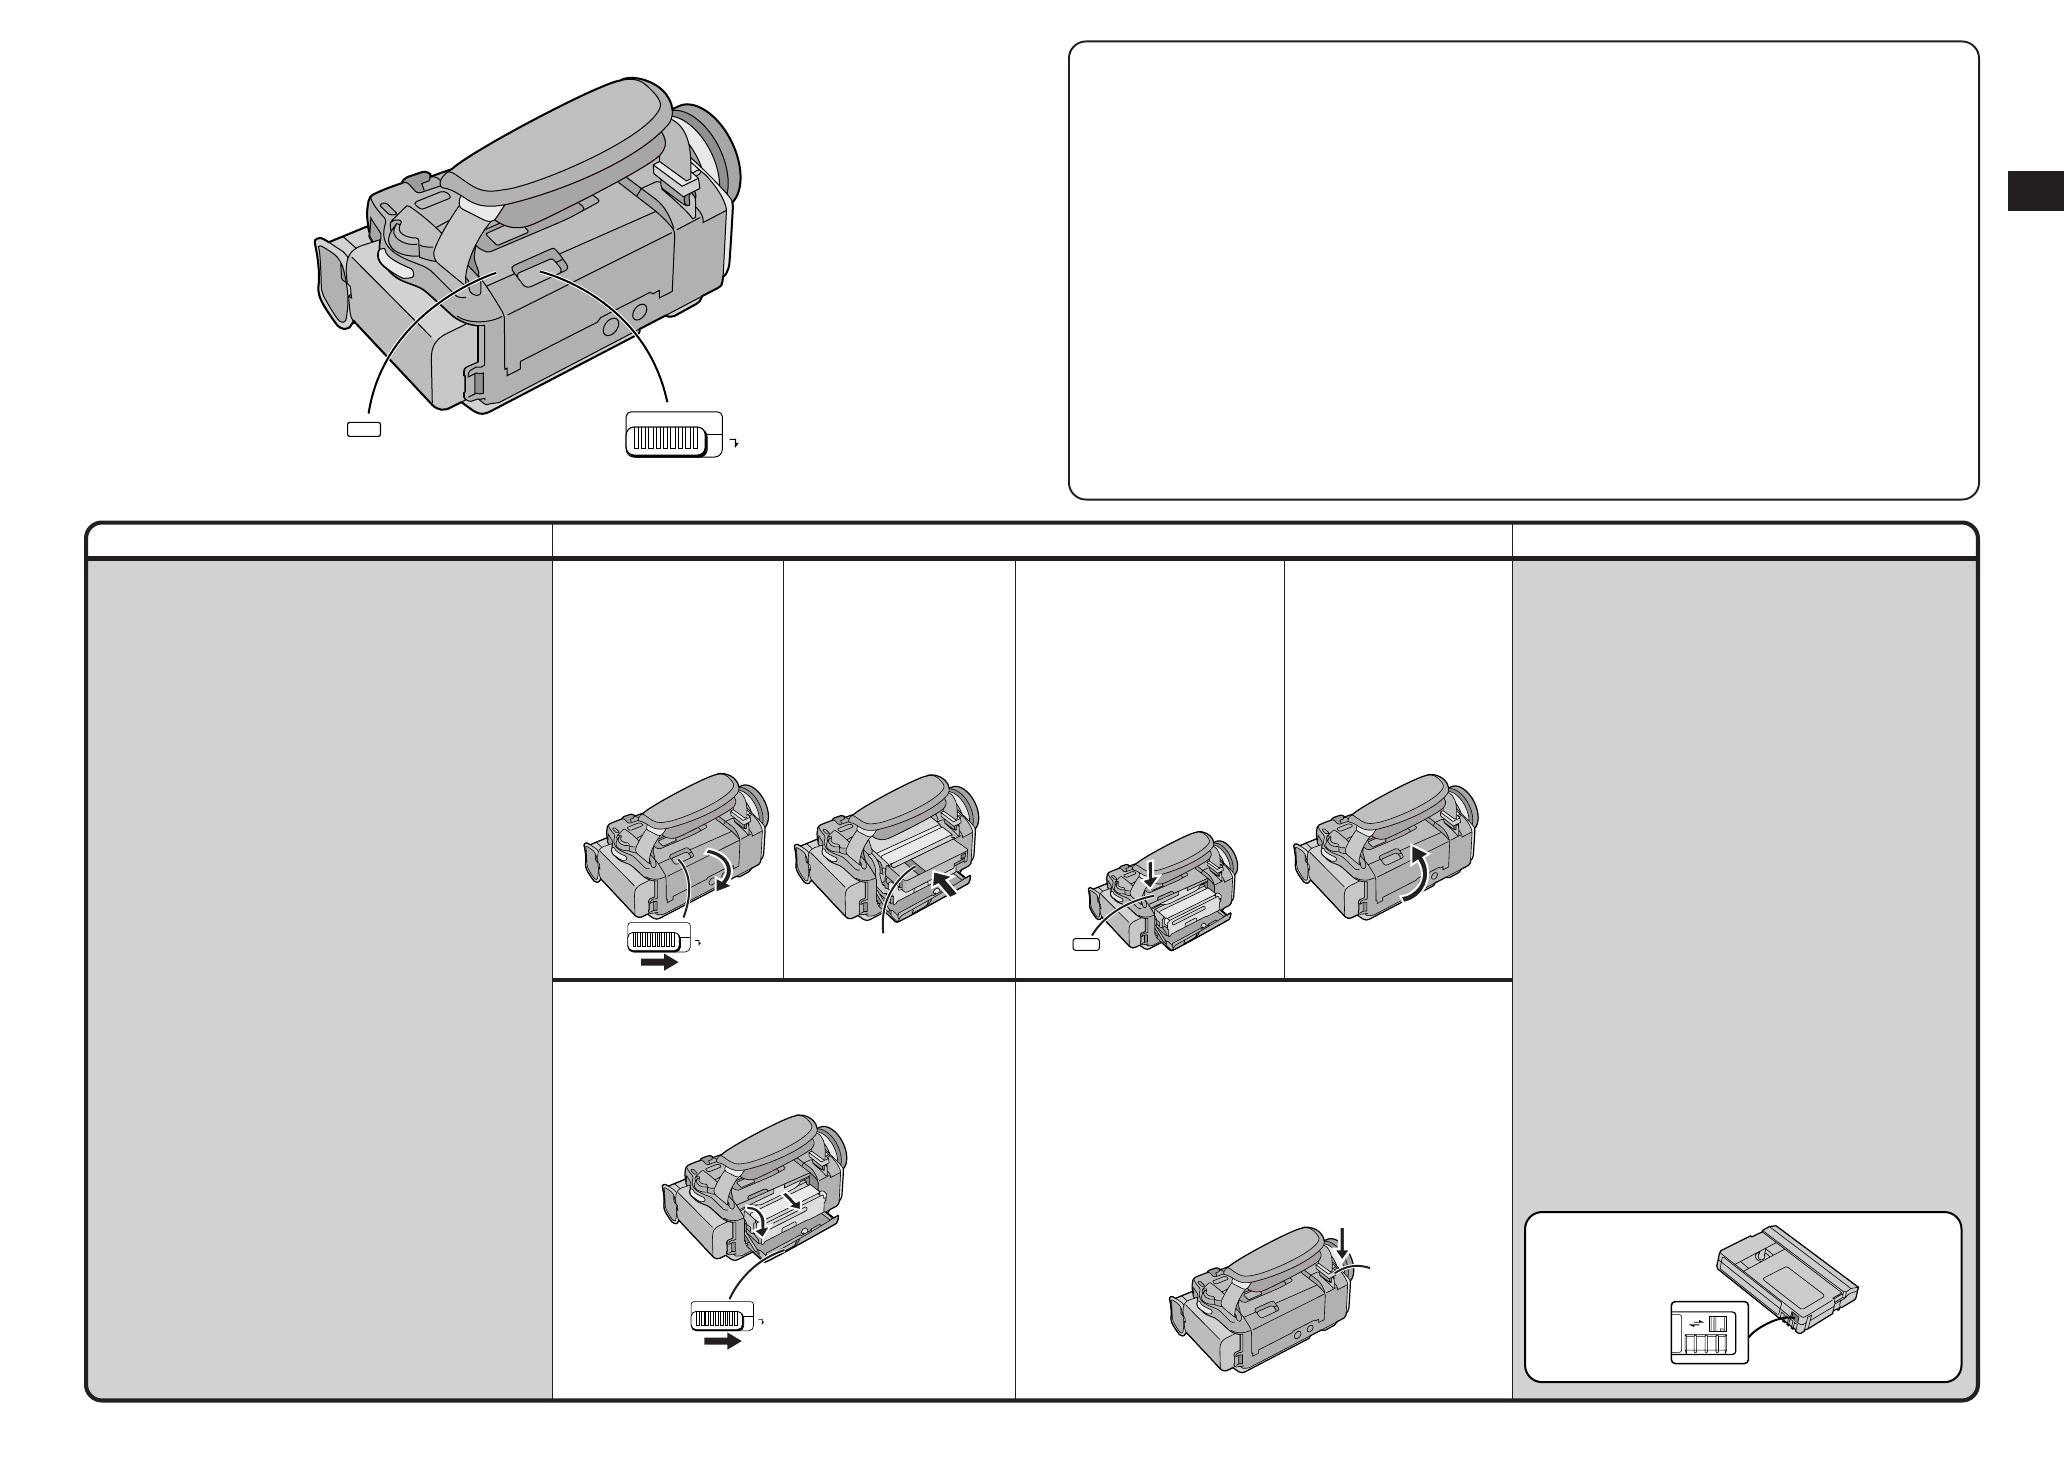
Inserting the Cassette
Ejecting the Cassette
≥If the AC Adaptor or Battery is used to supply power,
it is possible to insert or eject the cassette without
turning on the Movie Camera.
2
Insert the cassette with
its window in position
2.
¥ LP Mode
The desired recording speed can be selected
with [REC SPEED] on the [RECORDING
SETUP] Sub-Menu. (p. 16)
If you select the LP Mode, the possible
recording time is 1.5 times as long as in the
SP Mode.
Recording in the LP Mode does not deteriorate
the picture quality. However, the playback picture
may contain mosaic-like patterns and certain
functions may be restricted.
≥As the recording track width in the LP Mode is
smaller than the head width, recording new
sound onto an already recorded cassette
(audio dubbing) (p. 78) is not possible.
≥In the following cases, mosaic-like patterns may
appear in the playback picture, or the picture
may not be played back correctly:
≥
When a cassette recorded in the LP Mode on
this Movie Camera is played back on other
digital video equipment.
≥
When a cassette recorded in the LP Mode on
other digital video equipment is played back on
this Movie Camera.
≥
When a cassette recorded in the LP Mode on
this Movie Camera is played back on digital
video equipment not featuring the LP Mode.
≥
In the Slow Motion or Still Advance Playback
Mode. (p. 40)
≥
When using the Camera Search Function.
(p. 44)
≥When inserting the cassette, make sure it faces in the
right direction and then push it in until it stops.
≥When you insert a cassette onto which you have
recorded before, use the Camera Search Function
(p. 44) to search for the position from which you want
to continue recording.
≥When you insert a new cassette, rewind the tape to
the beginning before starting to record.
If the Cassette Holder Does Not Slide Back In
≥Press on the [PUSH CLOSE] Mark and close the
Upper Cassette Compartment Cover securely.
≥Turn the Movie Camera off and then on again.
≥Check if the Battery is discharged.
If the Cassette Holder Does Not Slide Out
≥Close the Lower Cassette Compartment Cover
completely and then open it again.
≥Check if the Battery is discharged.
Preventing Accidental Erasure of Recordings
Opening the cassette’s erasure prevention slider 4
(sliding it in the direction of the [SAVE] arrow) prevents
recording. To record again, close the erasure
prevention slider (slide it in the direction of the [REC]
arrow).
When opening or closing the Cassette
Compartment, push down the buckle
3 of the
Grip Belt in the direction of the arrow so that it
does not obstruct the opening and closing of the
Cassette Compartment.
≥Otherwise the Grip Belt may prevent the Cassette
Compartment from opening completely, or it may
get caught under the Cassette Compartment Cover
and prevent it from closing properly.
R E C
SAVE
4
4
Close the Lower
Cassette Compartment
Cover.
1
Slide the [OPEN/EJECT]
Lever
1
to the right and
simultaneously open the
Lower Cassette
Compartment Cover until
it clicks.
The Cassette Holder
slides out.
2
OPEN / EJECT
PUSH
CLOSE
OPEN / EJECT
3
Press on the [PUSH
CLOSE] Mark to close
the Upper Cassette
Compartment Cover.
The Cassette Holder with
the cassette slides back
inside.
Confirm that the
Cassette Holder has
retracted completely.
3
Basic Operations
12 13
Title Procedure Remarks, etc.
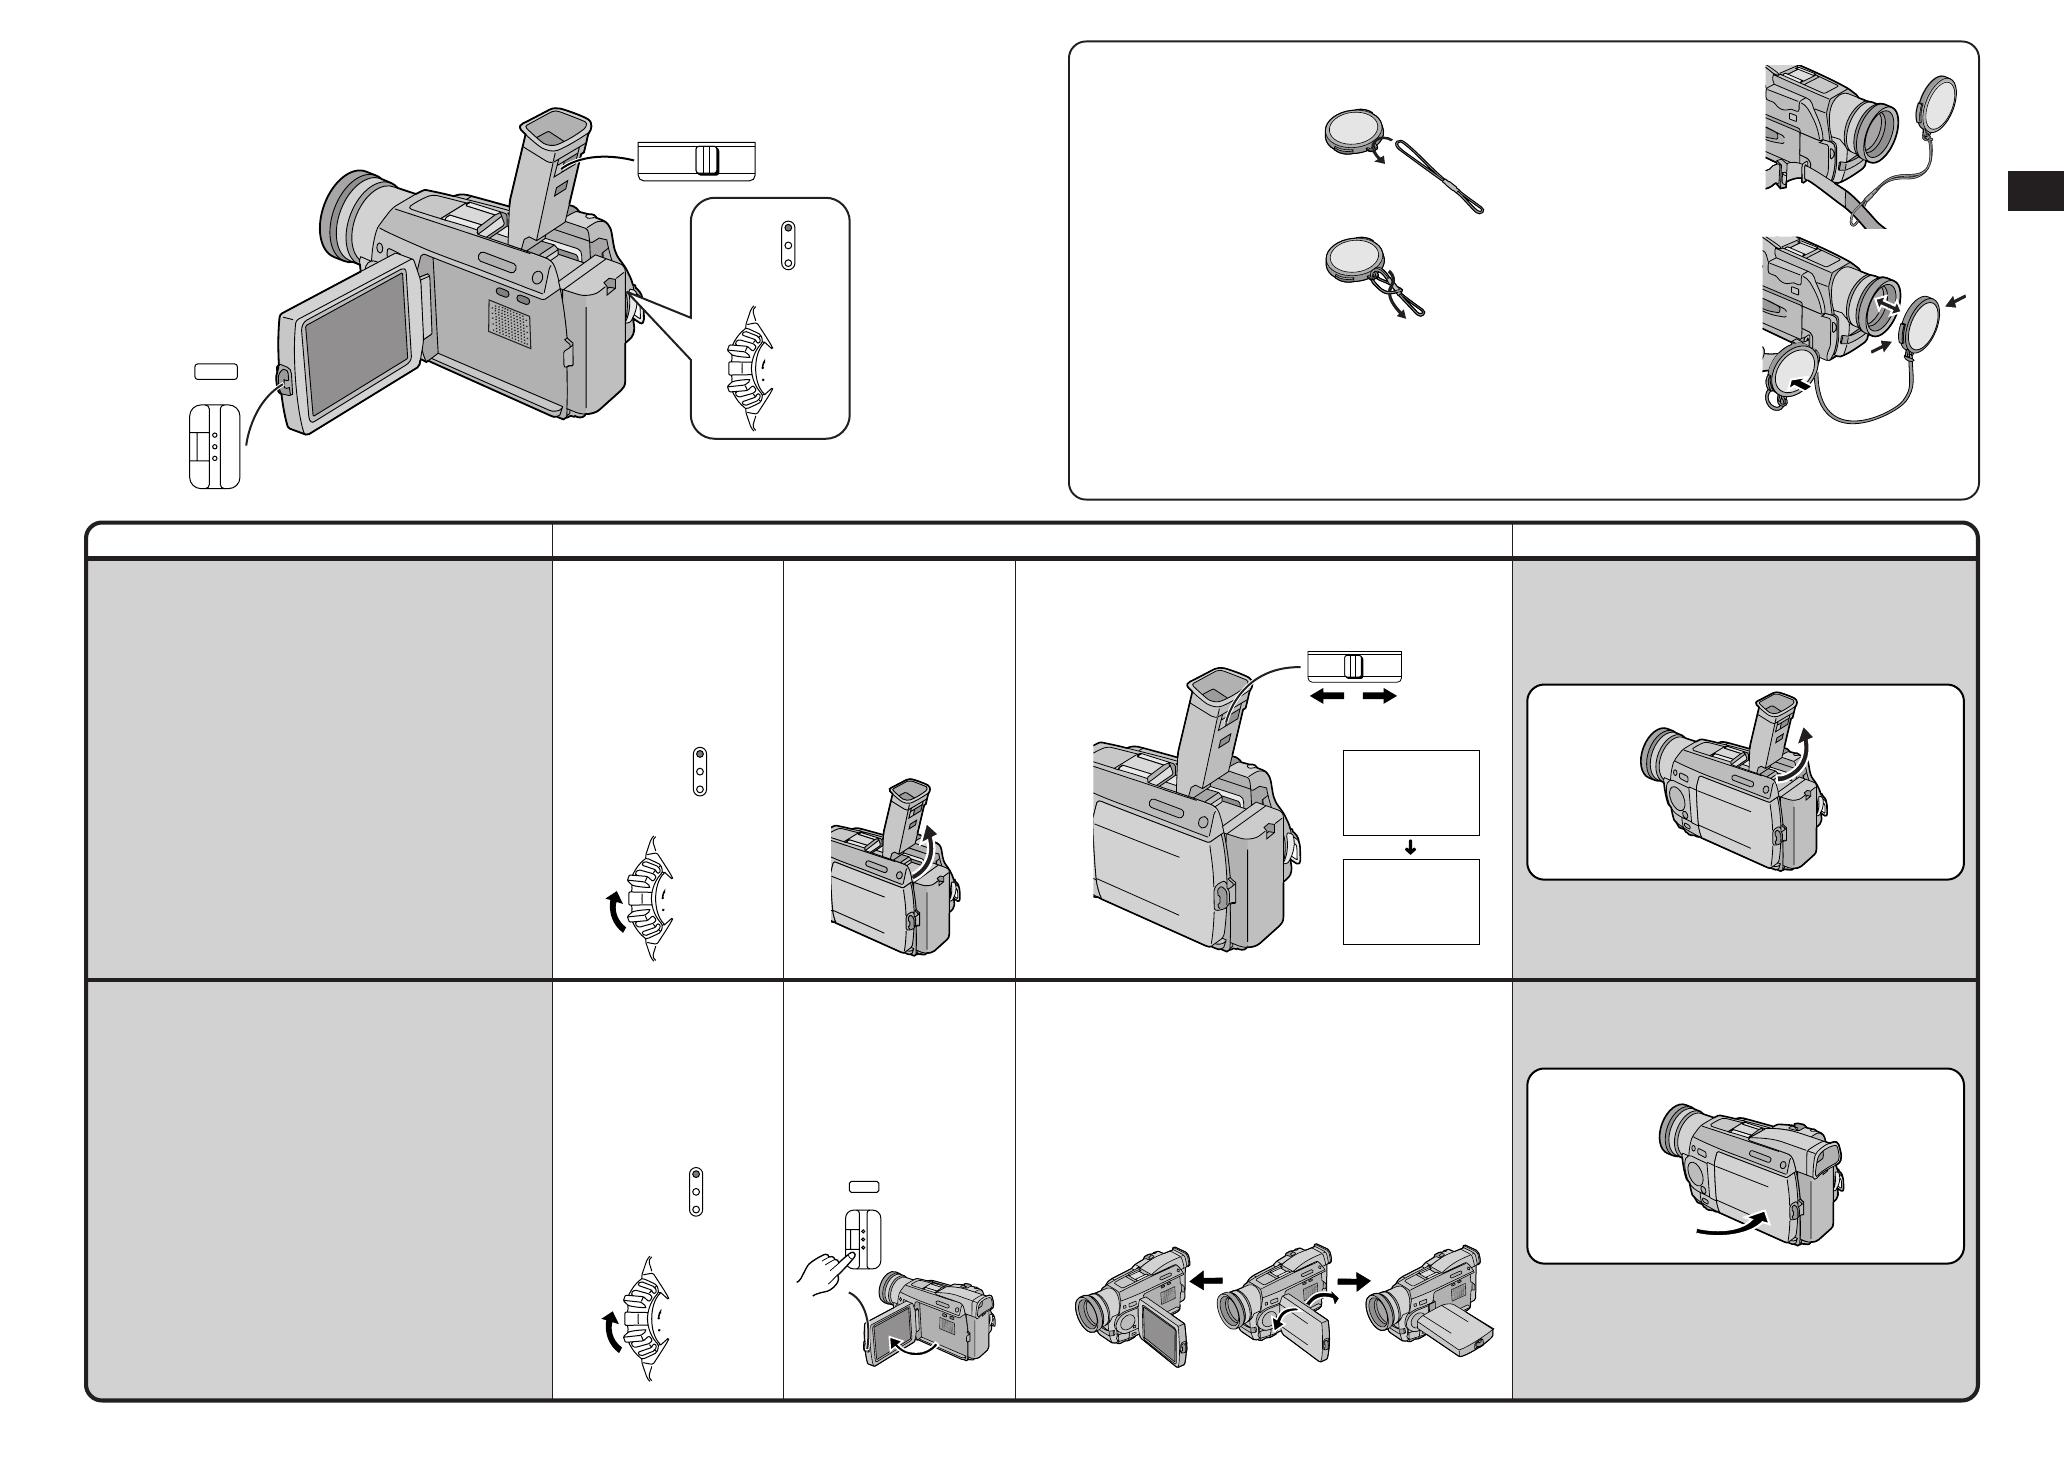
Using the Viewfinder
Before using the Viewfinder, adjust it to your eyesight
so that the indications in the Viewfinder are clear and
easy to read.
≥Due to limitations in production technology, there may
be some tiny bright or dark spots on the Viewfinder,
however, these are not recorded on the tape.
Using the LCD Monitor
It is also possible to record while viewing the picture on
the opened LCD Monitor.
Relationship between Viewfinder and LCD
Monitor
Opening the LCD Monitor turns off the Viewfinder.
Closing the LCD Monitor turns the Viewfinder on again.
However, turning the LCD Monitor forward also turns
on the Viewfinder again. (p. 30)
≥Due to limitations in production technology, there may
be some tiny bright or dark spots on the LCD Monitor
screen, however, these are not recorded on the tape.
1
Set the [OFF/ON/MODE]
Switch to [ON].
1
Set the [OFF/ON/MODE]
Switch to [ON].
2
Tilt the Viewfinder
upward.
The angle of the
Viewfinder can be
adjusted upward.
2
Push the [PUSH OPEN]
Button and turn out the
LCD Monitor
approximately 90x in the
direction of the arrow.
The Viewfinder turns off.
3
Adjust by sliding the Eyepiece Corrector Knob.
≥Do not leave the Viewfinder exposed to direct
sunlight, as its magnifying glass could bundle the light
beams and seriously heat-damage the Viewfinder.
≥The Viewfinder can be tilted upward by up to
approximately 65o.
Closing the LCD Monitor
Push the LCD Monitor close until the [PUSH OPEN]
Button locks with a click.
3 Attach the shorter
loop to the Grip
Belt.
You can hook the
removed Lens Cap onto
the Grip Belt.
When not actually
recording, always attach
the Lens Cap to the Lens
to protect it.
PUSH
OPEN
CAMERA
CARD P.B
VCR
Eyepiece Corrector Knob
MODE
ON
OFF
CAMERA
CARD P.B
VCR
MODE
ON
OFF
PUSH
OPEN
180˚
90˚
12:30:45
15.10.2000
12:30:45
15.10.2000
12:30:45
15.10.2000
12:30:45
15.10.2000
65˚
3
Adjust the angle of the LCD Monitor according to
the desired recording angle.
The LCD Monitor rotates upward a maximum of 180o
and downward a maximum of 90o from its normal
vertical position. Trying to forcefully rotate it beyond
this range could seriously damage the Movie
Camera.
CAMERA
CARD P.B
VCR
MODE
ON
OFF
Attaching the Lens Cap
1 Pass the longer
loop of the Lens
Cap Cord through
the attached eye on
the Lens Cap.
2 Then pass the
shorter loop of the
Lens Cap Cord
through the centre
of the longer loop
and pull tight.
≥Do not leave the Lens exposed to direct sunlight, as it could bundle the light beams and seriously
heat-damage the CCD-Sensor.
≥Before you start recording, remove the Lens Cap.

Basic Operations
14 15
Title Procedure Remarks, etc.
3
Press the [PUSH] Dial
to display the selected
Sub-Menu.
Notes About the Settings Made on the Menu
The settings you selected on the Menu are maintained
when you turn the Movie Camera off. However, if you
disconnect the power supply unit (Battery or AC
Adaptor) from the Movie Camera before turning it off,
the selected settings may not be maintained.
≥While the Menu is displayed, recording or playback is
not possible. During playback, displaying Menu is
possible, but not during recording.
≥Settings for the menu item(s) that cannot be used due
to the combination of the selected functions are
displayed in dark blue.
≥You can also perform these operations by using the
Remote Controller. (p. 104)
12
Exiting the Menu
Press the [MENU] Button again.
4
Turn the [PUSH] Dial to
select the item to be
set.
MENU
PUSH
W.B/SHUTTER/IRIS/VOL/JOG
12
CAMERA
CARD P.B
VCR
MODE
ON
OFF
Using the Menu Screen
This Movie Camera displays the settings of various
functions in Menus to make it easy to select the
desired functions and settings.
1
Press the [MENU] Button.
When the [CAMERA] Lamp is lit, Camera Mode Menu
is displayed.
1
When the [VCR] Lamp is lit, VCR Mode Menu is
displayed.
2
When the [CARD P.B] Lamp is lit, Card Playback
Mode Menu is displayed.
3 (NV-MX5, NV-MX7 only)
2
Turn the [PUSH] Dial to
select the desired
Sub-Menu.
Turning the [PUSH] Dial
changes the highlighted
item.
5
Press the [PUSH] Dial
to set the selected item
to the desired mode.
Every press moves the
cursor [1] to the next
mode.
12
CAMERA FUNCTIONS
PRESS MENU TO EXIT
1.
CAMERA SETUP
2.
DIGITAL EFFECT
3.
CARD SETUP
4.
MULTI-PICTURES
5.
RECORDING SETUP
6.
DISPLAY SETUP
7.
OTHER FUNCTIONS
8.
DEMO MODE
VCR FUNCTIONS
PRESS MENU TO EXIT
2.
DIGITAL EFFECT
1.
PLAYBACK FUNCTIONS
3.
CARD SETUP
4.
MULTI-PICTURES
5.
RECORDING SETUP
6.
AV IN/OUT SETUP
7.
DISPLAY SETUP
8.
OTHER FUNCTIONS
CARD FUNCTIONS
PRESS MENU TO EXIT
1.
CARD PLAYBACK
2.
ERASE PICTURE/TITLE
3.
CARD EDITING
4.
DISPLAY SETUP
5.
OTHER FUNCTIONS
1 Camera Mode
Main-Menu
2 VCR Mode Main-Menu 3 Card Playback Mode
Main-Menu
MENU
MENU
12
12
Basic Operations
1716
[CARD SETUP] Sub-Menu 3
(NV-MX5, NV-MX7 only)
9 Picture Size [PICTURE SIZE] (p. 82)
: Picture Quality [PICTURE QUALITY] (p. 82)
; Title Creation [CREATE TITLE] (p. 92)
[MULTI-PICTURES] Sub-Menu
4
< Multi-Picture Mode [SCAN MODE] (p. 54, 56)
= Strobe Multi-Picture Speed [SPEED] (p. 54)
> Swing Mode [SWING] (p. 55)
? Position of Small Picture inside Normal
Picture [P-IN-P] (p. 58)
[RECORDING SETUP] Sub-Menu
5
@ Recording Speed Mode [REC SPEED] (p. 13)
A Audio Recording Mode [AUDIO REC]
(p. 78, 120)
B Scene Index Mode [SCENEINDEX] (p. 47)
C Wind Noise Reduction [WIND CUT]
If you set [WIND CUT] to [ON], the noise of the
wind hitting the microphone is reduced.
However, this also causes a slight deterioration
of the sound reproduction in the bass range.
D Zoom Microphone [ZOOM MIC] (p. 33)
N Shutter Effect [SHTR EFFECT] (p. 35)
O Date and Time Setting [CLOCK SET] (p. 24)
P Self-Recording [SELFSHOOT] (p. 31)
Q Red Eye Reduction [RED EYE REDUCTION]
(p. 117) (NV-MX5, NV-MX7 only)
This reduces the “red eye” phenomenon which
results when the flashes emitted by the Video
Flash during recording make the pupils of
people recorded by the camera appear red.
[DEMO MODE] Sub-Menu
8
R Demonstration Mode [DEMO MODE]
If you connect the AC Adaptor to the Movie
Camera, set the [OFF/ON/MODE] Switch to
[ON] without any cassette inserted, and leave it
on for approximately 10 minutes without
performing any operation, the Movie Camera
automatically switches over to the
Demonstration Mode to show its functions.
Pressing a button or performing some other
operation suspends the Demonstration Mode.
Leaving the Movie Camera again on for more
than 10 minutes without operating it, causes the
demonstration to start again.
Also, when you set [DEMO MODE] to [ON] and
then exit the Menu, the demonstration starts.
To cancel the Demonstration Mode, insert a
cassette or set [DEMO MODE] to [OFF].
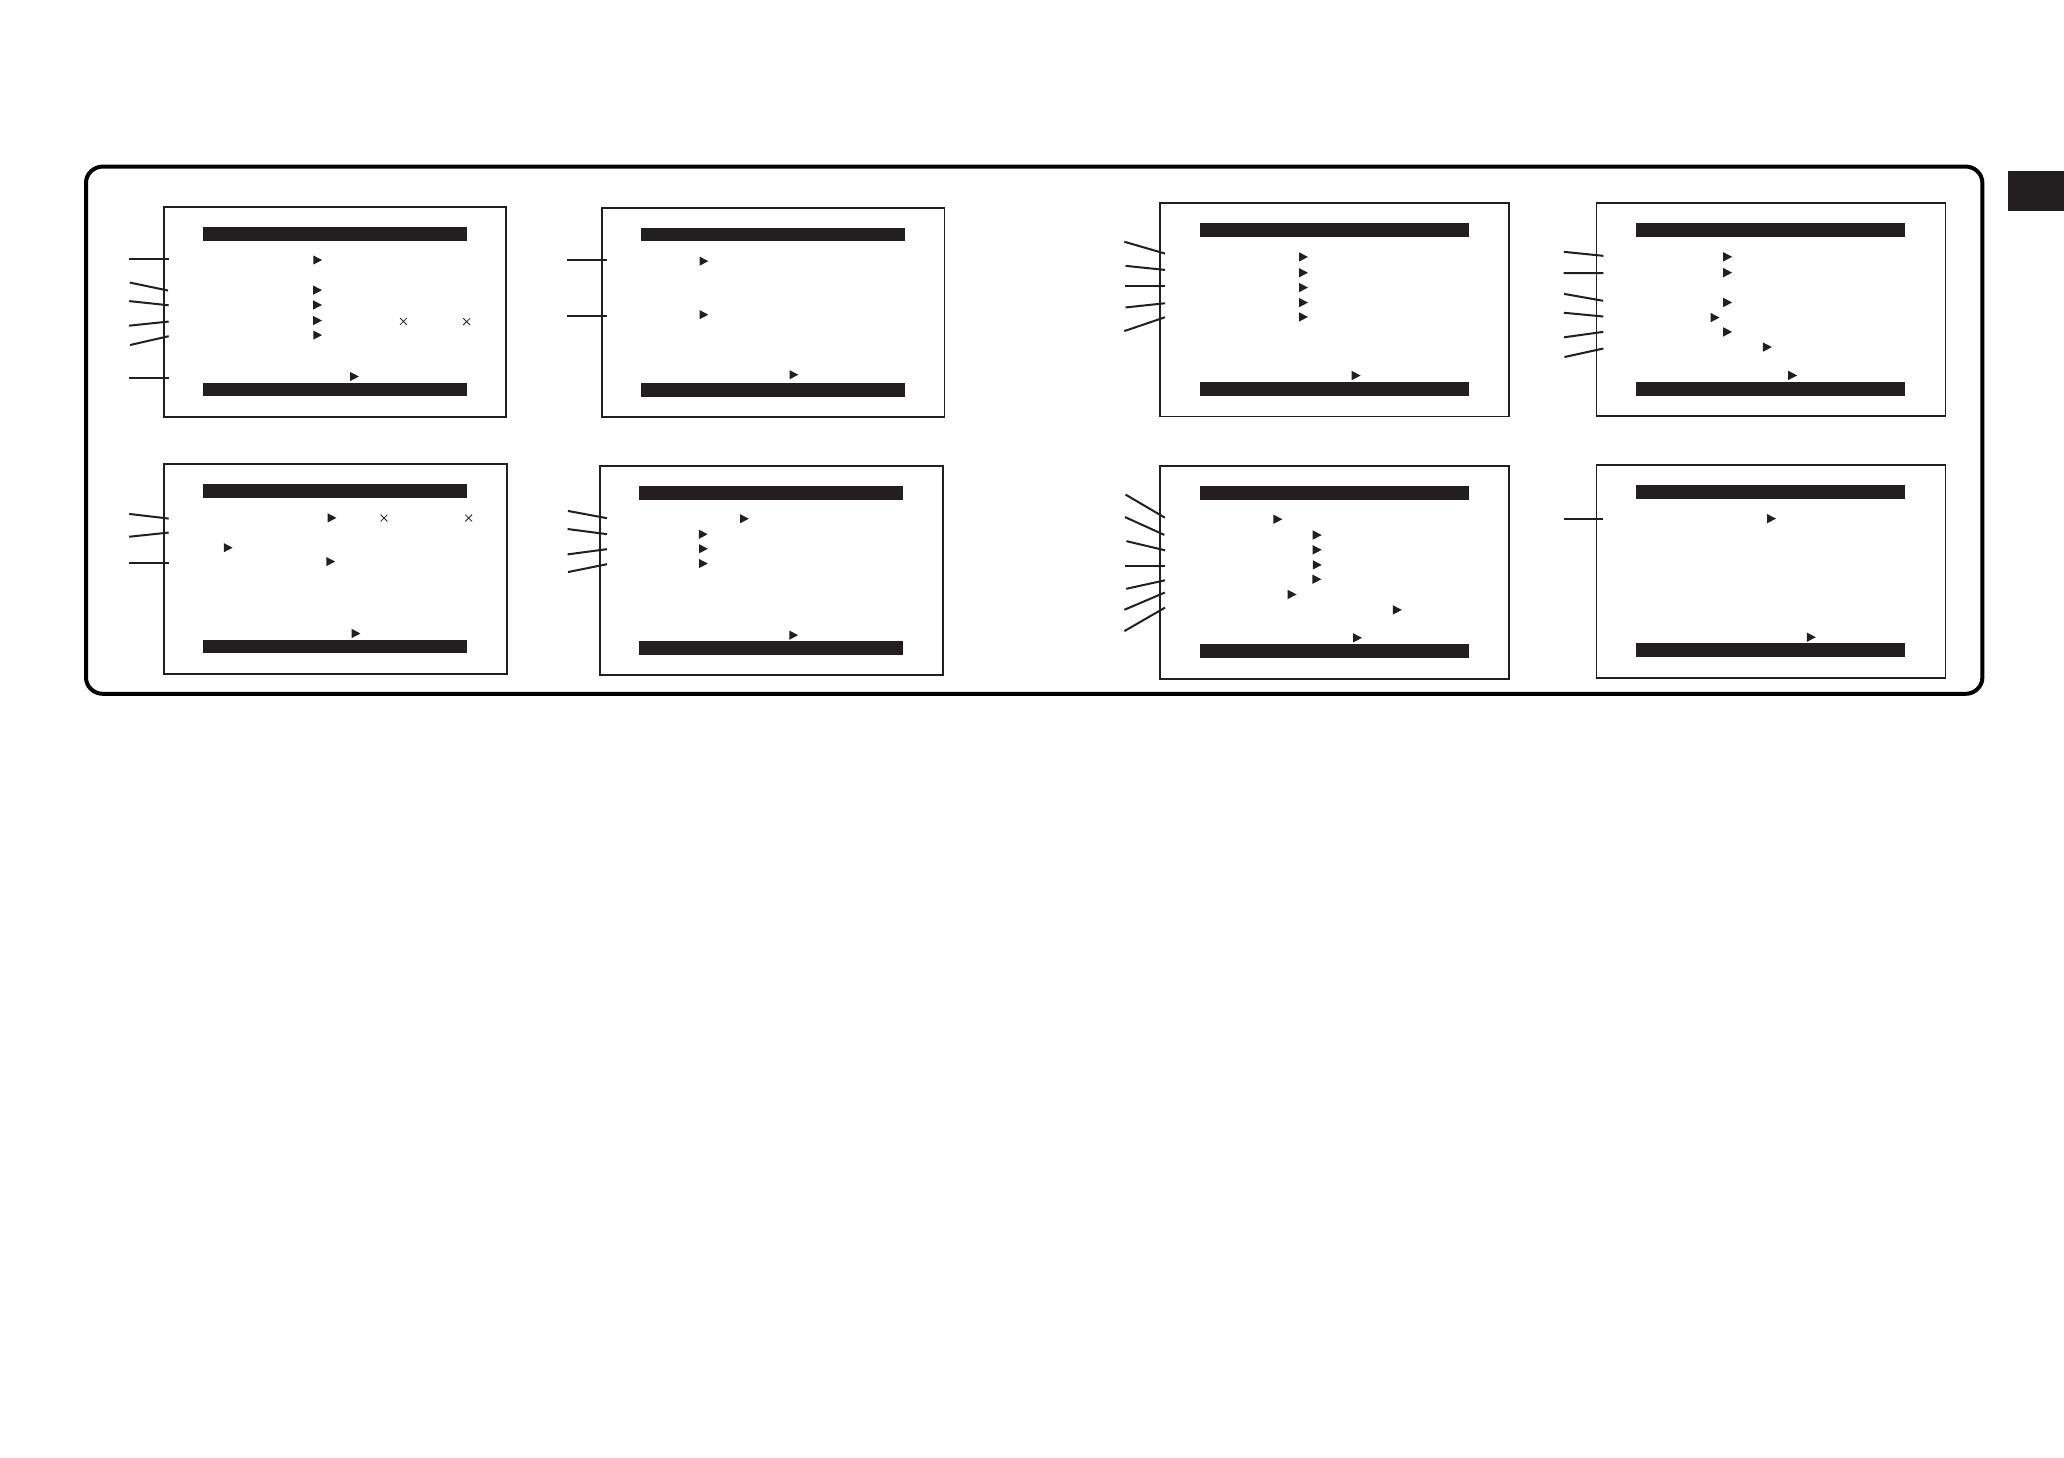
Menu Functions
The illustrations of the Menus are intended for explaining the functions; the actual Menus look somewhat different.
Camera Mode Menu
1
2
3
7
8
<
=
>
?
1
3
2
4
PROG.AE OFF
5 7
N Ω º
RETURN ---- YES
PROGRESSIVE OFF ON AUTO
SIS
D.ZOOM
OFF ON
OFF 20 100
CINEMA OFF ON
WIPE MIX STROBE
GAINUP TRACER
MOSAIC MIRROR
EFFECT1
B/W SOLARI
OFF MULTI P-IN-P
EFFECT2 OFF NEGA SEPIA
RETURN ---- YES
CAMERA SETUP
PRESS MENU TO EXIT
DIGITAL EFFECT
PRESS MENU TO EXIT
SCAN MODE
SPEED FAST NORMAL SLOW
RETURN ---- YES
STROBE MANUAL
SWING OFF ON
P-IN-P 1 2 3 4
MULTI-PICTURES
PRESS MENU TO EXIT
CARD SETUP
PRESS MENU TO EXIT
PICTURE SIZE
1200 900
640 480
RETURN ---- YES
---- YES
PICTURE QUALITY
FINE NORMAL ECONOMY
CREATE TITLE
5
6
9
:
;
4
@
E
F
G
H
R
I
J
5
7
6
8
A
B
C
D
K
L
M
N
O
P
Q
REC SPEED
AUDIO REC 12bit
16bit
RETURN ---- YES
SP LP
SCENEINDEX 2HOUR DAY
WIND CUT OFF ON
ZOOM MIC OFF ON
DATE/TIME
C.DISPLAY COUNTER MEMORY
TIMECODE
RETURN ---- YES
OFF TIME DATE
C.RESET ---- YES
DISPLAY ALL PARTIAL OFF
LCD/EVF SET ---- YES
LCD MODE NORMAL BRIGHT
REMOTE
REC LAMP OFF ON
RETURN ---- YES
VCR1 VCR2 OFF
BEEP SOUND OFF ON
SHTR EFFECT OFF ON
SELFSHOOT NORMAL MIRROR
CLOCK SET
RED EYE REDUCTION OFF ON
---- YES
DEMO MODE
RETURN ---- YES
OFF ON
RECORDING SETUP
PRESS MENU TO EXIT
DISPLAY SETUP
PRESS MENU TO EXIT
OTHER FUNCTIONS
PRESS MENU TO EXIT
DEMO MODE
PRESS MENU TO EXIT
Camera Mode Main-Menu
[CAMERA FUNCTIONS]
1. CAMERA SETUP
2. DIGITAL EFFECT
3. CARD SETUP (NV-MX5, NV-MX7 only)
4. MULTI-PICTURES
5. RECORDING SETUP
6. DISPLAY SETUP
7. OTHER FUNCTIONS
8. DEMO MODE
[CAMERA SETUP] Sub-Menu
1
1 Auto Exposure Mode [PROG.AE] (p. 50)
2 Progressive Photoshot Mode
[PROGRESSIVE] (p. 34)
3 Super Image Stabilizer [SIS] (p. 36)
4 Digital Zoom [D.ZOOM] (p. 32)
5 Cinema-like Format Recording [CINEMA]
(p. 36)
6 Returning to the Main-Menu [RETURN]
If you set [RETURN] to [YES], the Menu
changes back to the Main-Menu.
[DIGITAL EFFECT] Sub-Menu 2
7 Digital Effects 1 [EFFECT1] (p. 52)
8 Digital Effects 2 [EFFECT2] (p. 52)
[DISPLAY SETUP] Sub-Menu
6
E Date and Time Indication [DATE/TIME]
(p. 39)
F Counter Display Mode [C.DISPLAY] (p. 123)
G Counter Reset [C.RESET] (p. 121)
To reset the counter to zero.
However, the Time Code cannot be reset.
H Display Mode [DISPLAY] (p. 123)
I LCD Lighting Mode [LCD MODE] (p. 23)
J LCD and Viewfinder Adjustment
[LCD/EVF SET] (p. 23)
[OTHER FUNCTIONS] Sub-Menu
7
K Remote Controller Mode [REMOTE] (p. 107)
L Recording Lamp [REC LAMP] (p. 27)
M Beep Sound [BEEP SOUND]
If you set [BEEP SOUND] to [ON], a
confirmation/alarm beep sound is emitted in the
following cases:
1 Beep
≥When you start recording
≥When you switch the [OFF/ON/MODE] Switch
from [OFF] to [ON]
2 Beeps
≥When you pause recording
10 Beeps
≥When you operate the Movie Camera in an
inappropriate way before or during recording
Basic Operations
1918
1
2
3
=
>
8
9
1
3
2
4
5
6
7
;
:
4
BLANK SEARCH ---- YES
RETURN ---- YES
RECORD TO CARD ---- YES
AUTO PRINT ---- YES
PLAYBACK FUNCTIONS
PRESS MENU TO EXIT
DIGITAL EFFECT
PRESS MENU TO EXIT
RETURN ---- YES
EFFECT OFF ON
EFFECT SELECT
OFF MULTI WIPE MIX
STROBE NEGA SEPIA
B/W TRACER SOLARI
MOSAIC MIRROR
SEARCH PHOTO SCENE
CARD SETUP
PRESS MENU TO EXIT
PICTURE QUALITY
FINE NORMAL ECONOMY
RETURN ---- YES
12bit AUDIO ST1 ST2 MIX
AUDIO OUT
STEREO L R
---- YES
CREATE TITLE
SCAN MODE
PHOTO SCENE
RETURN ---- YES
STROBE MANUAL
SWING OFF ON
MULTI-PICTURES
PRESS MENU TO EXIT
SPEED FAST NORMAL SLOW
<
B
C
5
7
6
8
@
?
A
OTHER FUNCTIONS
PRESS MENU TO EXIT
REMOTE VCR1 VCR2 OFF
RETURN ---- YES
CLOCK SET ---- YES
RECORDING SETUP
PRESS MENU TO EXIT
REC SPEED SP LP
AUDIO REC 12bit
16bit
RETURN ---- YES
DISPLAY SETUP
PRESS MENU TO EXIT
DATE/TIME OFF TIME DATE
C.DISPLAY COUNTER MEMORY
TIMECODE
C.RESET ---- YES
DISPLAY ALL PARTIAL OFF
LCD MODE NORMAL BRIGHT
LCD/EVF SET ---- YES
RETURN ---- YES
AV IN/OUT SETUP
PRESS MENU TO EXIT
AV JACK
RETURN ---- YES
OFF ON
MIC AV IN
IN/OUT OUT/PHONES
A.DUB INPUT
DV OUT
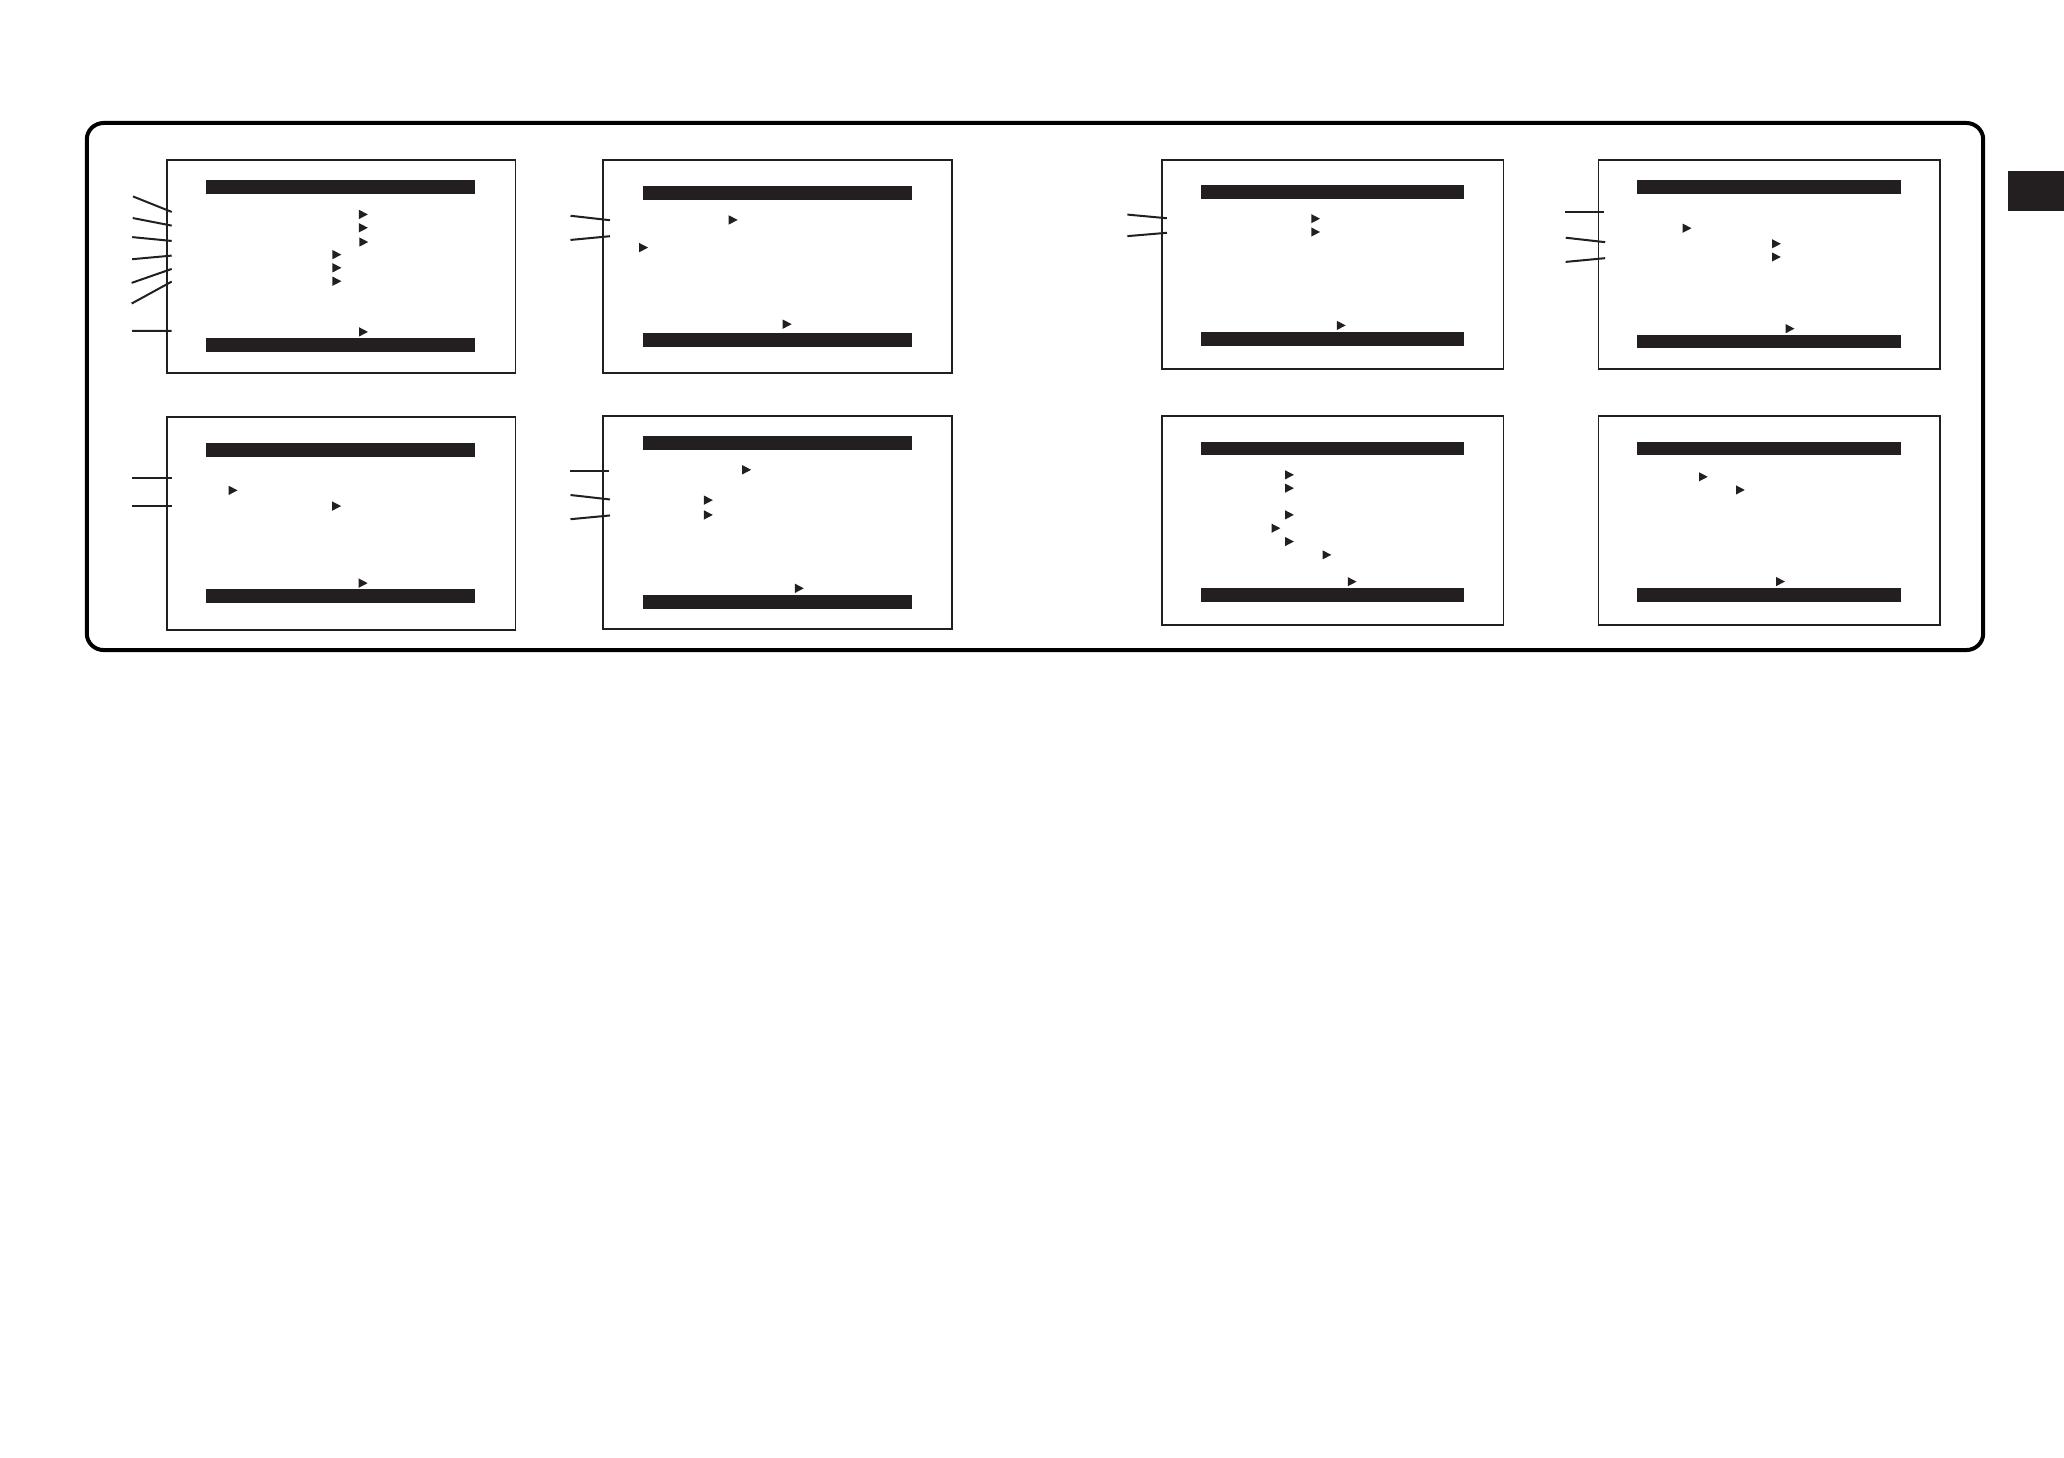
VCR Mode Main-Menu [VCR FUNCTIONS]
1. PLAYBACK FUNCTIONS
2. DIGITAL EFFECT
3. CARD SETUP (NV-MX5, NV-MX7 only)
4. MULTI-PICTURES
5. RECORDING SETUP
6. AV IN/OUT SETUP (NV-MX7 only)
7. DISPLAY SETUP
8. OTHER FUNCTIONS
[PLAYBACK FUNCTIONS] Sub-Menu
1
1 Blank Search [BLANK SEARCH] (p. 44)
2 Recording to Card [RECORD TO CARD]
(p. 84) (NV-MX5, NV-MX7 only)
3 Automatic Printing [AUTO PRINT] (p. 112)
4 Index Search Mode [SEARCH] (p. 46)
5 Audio Output Mode [12bit AUDIO] (p. 79)
6 Audio Selector [AUDIO OUT] (p. 43)
This selects the audio channel.
7 Returning to the Main-Menu [RETURN]
If you set [RETURN] to [YES], the Menu
changes back to the Main-Menu.
[DIGITAL EFFECT] Sub-Menu
2
8 Digital Effect On/Off [EFFECT] (p. 67)
9 Digital Effect Selection [EFFECT SELECT]
(p. 66)
[CARD SETUP] Sub-Menu
3
(NV-MX5, NV-MX7 only)
: Picture Quality [PICTURE QUALITY] (p. 82)
; Title Creation [CREATE TITLE] (p. 92)
[MULTI-PICTURES] Sub-Menu
4
< Multi-Picture Mode [SCAN MODE] (p. 68–73)
= Strobe Multi-Picture Speed [SPEED] (p. 68)
> Swing Mode [SWING] (p. 69)
Menu Functions
(Continued)
VCR Mode Menu
[RECORDING SETUP] Sub-Menu 5
? Recording Speed Mode [REC SPEED]
(p. 109, 110)
≥To select the recording speed when inputting
digital or analog signals and dubbing them.
(NV-MX7 only)
≥When this setting is changed, the [REC
SPEED] setting on the [RECORDING SETUP]
Sub-Menu of the [CAMERA FUNCTIONS]
Main-Menu will likewise be changed.
@ Audio Recording Mode [AUDIO REC]
(p. 78, 110, 120)
≥To select the audio recording mode when
inputting digital or analog signals and dubbing
them.
≥When this setting is changed, the [AUDIO
REC] setting on the [RECORDING SETUP]
Sub-Menu of the [CAMERA FUNCTIONS]
Main-Menu will likewise be changed.
[AV IN/OUT SETUP] Sub-Menu
6
(NV-MX7 only)
A AV Socket [AV JACK] (p. 43, 109)
This sets the method for inputting signals to
and outputting them from the Audio-Video
Input/Output Socket.
B Audio Dubbing Input [A. DUB INPUT] (p. 78)
This sets the audio input method for audio
dubbing.
C AD Conversion Output [DV OUT] (p. 109)
This converts the analog signals into digital
signals and outputs them from the DV Terminal.
[DISPLAY SETUP] Sub-Menu 7
All items on the [DISPLAY SETUP] Sub-Menu are
the same as those on the [DISPLAY SETUP] Sub-
Menu of the [CAMERA FUNCTIONS] Main-Menu.
[OTHER FUNCTIONS] Sub-Menu
8
All items on the [OTHER FUNCTIONS] Sub-Menu
are the same as those on the [OTHER
FUNCTIONS] Sub-Menu of the [CAMERA
FUNCTIONS] Main-Menu.

Basic Operations
2120
LCD Brightness [LCD BRIGHTNESS]
To adjust the brightness of the LCD screen. The
Bar Indication is divided into 8 steps. The more
vertical bars are shown, the brighter is the screen.
LCD Colour Level [LCD COLOUR LEVEL]
To adjust the colour saturation of the LCD screen.
The Bar Indication is divided into 8 steps. The
more vertical bars are shown, the stronger are the
colours.
Viewfinder Brightness [EVF BRIGHTNESS]
To adjust the brightness of the Viewfinder. The Bar
Indication is divided into 8 steps. The more vertical
bars are shown, the brighter is the screen.
LCD/EVF SET
PRESS MENU TO RETURN
LCD BRIGHTNESS
[-]||||----[+]
LCD COLOUR LEVEL
[-]||||----[+]
EVF BRIGHTNESS
[-]||||----[+]
MENU
PUSH
W.B/SHUTTER/IRIS/VOL/JOG
12
Adjusting the Brightness and Colour Level of the LCD Monitor/
Viewfinder
If you set [LCD/EVF SET] on the [DISPLAY SETUP] Sub-Menu to [YES], the following items are displayed.
1 Press the [PUSH] Dial to select the item
that you want to adjust.
2 Turn the [PUSH] Dial. Turning it increases
or decreases the number of vertical bars of
the Bar Indication.
Increasing the Brightness of the Whole LCD
Monitor Screen
Set [LCD MODE] on the [DISPLAY SETUP] Sub-
Menu to [BRIGHT].
≥These adjustments have no influence on the
actually recorded picture.
Card Playback Mode Main-Menu
[CARD FUNCTIONS] (NV-MX5, NV-MX7 only)
1. CARD PLAYBACK
2. ERASE PICTURE/TITLE
3. CARD EDITING
4. DISPLAY SETUP
5. OTHER FUNCTIONS
[CARD PLAYBACK] Sub-Menu
1
1 Playback File [PB FILE] (p. 88, 94)
2 Music Repeat Playback [MUSIC REPEAT]
(p. 95)
3 Saving Power [POWER SAVE] (p. 95)
4 Returning to the Main-Menu [RETURN]
If you set [RETURN] to [YES], the Menu
changes back to the Main-Menu.
[ERASE PICTURE/TITLE] Sub-Menu 2
5 Selecting and Erasing a Picture
[ERASE PICTURE BY SELECTION] (p. 96)
6 Erasing All Pictures
[ERASE ALL PICTURES] (p. 96)
7 Selecting and Erasing a Title
[ERASE TITLE BY SELECTION] (p. 97)
[CARD EDITING] Sub-Menu 3
8 Recording to Cassette [RECORD TO TAPE]
(p. 86)
9 Automatic Printing [AUTO PRINT] (p. 112)
: Searching a Picture [PICTURE SEARCH]
(p. 89)
; Setting the Lock [FILE LOCK] (p. 98)
< Setting DPOF [DPOF SETTING] (p. 100)
= Formatting a Card [CARD FORMAT] (p. 98)
[DISPLAY SETUP] Sub-Menu
4
All items on the [DISPLAY SETUP] Sub-Menu are
the same as those on the [DISPLAY SETUP] Sub-
Menu of the [CAMERA FUNCTIONS] Main-Menu.
[OTHER FUNCTIONS] Sub-Menu
5
All items on the [OTHER FUNCTIONS] Sub-Menu
are the same as those on the [OTHER
FUNCTIONS] Sub-Menu of the [CAMERA
FUNCTIONS] Main-Menu.
Menu Functions
(Continued)
Card Playback Mode Menu (NV-MX5, NV-MX7 only)
1
4
5
23
1
4
2
DISPLAY SETUP
PRESS MENU TO EXIT
DATE/TIME OFF TIME DATE
C.DISPLAY COUNTER MEMORY
TIMECODE
C.RESET ---- YES
DISPLAY ALL PARTIAL OFF
LCD MODE NORMAL BRIGHT
LCD/EVF SET ---- YES
RETURN ---- YES
OTHER FUNCTIONS
PRESS MENU TO EXIT
REMOTE VCR1 VCR2 OFF
CLOCK SET ---- YES
RETURN ---- YES
ERASE PICTURE/TITLE
PRESS MENU TO EXIT
1.
ERASE PICTURE
BY SELECTION
2.
ERASE ALL PICTURES
3.
ERASE TITLE
BY SELECTION
CARD EDITING
PRESS MENU TO EXIT
RECORD TO TAPE ---- YES
PICTURE SEARCH ---- YES
AUTO PRINT ---- YES
FILE LOCK ---- YES
DPOF SETTING ---- YES
CARD FORMAT ---- YES
PB FILE
MUSIC REPEAT OFF ONE ALL
RETURN ---- YES
PICTURE MUSIC
RETURN ---- YESRETURN ---- YES
CARD PLAYBACK
PRESS MENU TO EXIT
3
5
6
8
9
:
;
<
=
7
POWER SAVE OFF ON

Basic Operations
2322
Setting the Date and Time
If you set [CLOCK SET] on the [OTHER FUNCTIONS] Sub-Menu to [YES], the Menu shown below appears.
For example: To set the clock to 15th October
2000, 14:30.
1 Turn the [PUSH] Dial to set to [2000].
The years change in the following order:
2000 # 2001 #…# 2089 # 2000 #…
2 Press the [PUSH] Dial to select [MONTH],
then turn it to set to [10].
3 Press the [PUSH] Dial to select [DAY], then
turn it to set to [15].
4 Press the [PUSH] Dial to select [HOUR],
then turn it to set to [14].
5 Press the [PUSH] Dial to select [MIN.], then
turn it to set to [30].
6 Press the [MENU] Button to finish the date
and time setting.
The operation of the clock starts from
[00] seconds.
Pressing the button one more time makes
the Menu disappear.
CLOCK SET
PRESS MENU TO RETURN
YEAR 2000
MONTH 10
DAY 15
HOUR 14
MIN. 30
MENU
PUSH
W.B/SHUTTER/IRIS/VOL/JOG
12
∫ Charging the Built-in Lithium Battery
The built-in lithium battery maintains the operation
of the clock. When the [0] Indication appears,
the built-in lithium battery is discharged. Charge
the discharged battery in the following way and
after charging is finished, set the date and time.
1 Connect the AC Adaptor to the Movie
Camera and to an AC mains socket. (p. 8)
2 Leave the Movie Camera turned off.
3 Leave the Movie Camera in this condition
for approximately 4 hours.
After charging for 4 hours, the built-in lithium
battery can power the clock for approximately
3 months.
WARNING
THE LITHIUM BATTERY IN THIS
EQUIPMENT MUST ONLY BE REPLACED
BY QUALIFIED PERSONNEL. WHEN
NECESSARY, CONTACT YOUR LOCAL
PANASONIC SUPPLIER.
Information for your safety
≥As the time of the Movie Camera’s built-in clock
is subject to a slight imprecision, be sure to
check the time before recording. If the flashing
[0] Indication appears, charge the built-in
lithium battery and set the date and time again.
≥The clock employs the 24-hour system.
Basic Operations
24 25
Title Procedure Remarks, etc.
3
To pause recording:
Press the Recording
Start/Stop Button
again.
The [PAUSE] Indication
appears.
4
To finish recording:
Set the [OFF/ON/MODE]
Switch to [OFF].
≥If you leave the Movie Camera in the Recording
Pause Mode for more than 6 minutes, it
automatically switches off to protect the tape and
to conserve battery power. To resume recording
from this condition, set the [OFF/ON/MODE]
Switch to [OFF] and then to [ON] again.
≥Recording onto the cassette is not possible if the
[TAPE/CARD] Selector is at [CARD]. (NV-MX5,
NV-MX7 only)
≥Be sure to remove the Lens Cap before setting the
[OFF/ON/MODE] Switch to [ON]. If the Lens Cap is
attached to the Lens when you set the
[OFF/ON/MODE] Switch to [ON], the automatic white
balance adjustment (p. 119) may not be precise.
Recording Indicating (Tally) Lamp
The Recording Indicating (Tally) Lamp lights during
recording to let the people in front of the Movie Camera
know that recording is being performed.
If you set [REC LAMP] on the [OTHER FUNCTIONS]
Sub-Menu to [OFF], the Recording Indicating (Tally)
Lamp does not light.
≥Even if [REC LAMP] on the [OTHER FUNCTIONS]
Sub-Menu is set to [OFF], the Recording Indicating
(Tally) Lamp flashes briefly to confirm when the
Movie Camera has received a command from the
Remote Controller.
Recording
Indicating (Tally)
Lamp
PAUSE
PAUSE
MODE
ON
OFF
Recording (Filming)
After setting the [OFF/ON/MODE] Switch to [ON] to
turn the Movie Camera on and setting the Mode
Selector Switch to [AUTO], you can start recording
simply by pressing the Recording Start/Stop Button. In
this case, the Movie Camera adjusts the focus and
white balance fully automatically.
1
Set the [OFF/ON/MODE]
Switch to [ON].
The [CAMERA] Lamp
lights.
2
Press the Recording
Start/Stop Button.
Recording starts.
The [RECORD] Indication
appears briefly and then
changes to [REC].
MNL
AUTO
CAMERA
CARD P.B
VCR
MODE
ON
OFF
PAUSE
CAMERA
CARD P.B
VCR
MODE
ON
OFF
RECORD
REC
Before Recording
Check the following settings before recording
especially important scenes:
≥Recording Speed (p. 13, 18, 78)
When you intend to perform editing or audio dubbing
afterward: Set to [SP].
≥Audio Recording Mode (p. 18, 78)
When you want to perform audio dubbing afterward:
Set to [12bit].
≥Cinema Mode (p. 18, 36)
≥Depending on the light source and recording
situation, correct automatic focusing and white
balance adjustment may not be possible. In such
cases, adjust them manually.
Focus: p. 30
White Balance: p. 62
Mode Selector Switch
Basic Operations
26 27
Title Procedure Remarks, etc.
Returning to Normal Recording
Press the Backlight Button [BLC].
≥For Recording Check, the Movie Camera must be in
the same mode (SP or LP) as used for recording,
otherwise the playback picture is distorted.
Using the Mini-DV Format Digital Video Head
Cleaner (VFK1451)
1
Insert the Head Cleaner into the Movie Camera in
the same way as a video cassette.
2
Press the Play Button [1], and after
approximately 20 seconds press the Stop Button
[∫]. (Do not rewind the tape.)
3
Take out the Head Cleaner. Insert a video
cassette, perform recording and then play it back
to check the picture.
4
If the picture is still not clear, repeat above
operation steps
1
–
3
. (Do not use the Head
Cleaner more than 3 times in succession.)
≥This Video Head Cleaner (VFK1451) is available
from Panasonic service centres.
Notes:
≥Do not rewind the tape in the Head Cleaner after
every use. Rewind it only after the tape has
reached its end, and then use it again in the same
way from the beginning.
≥If the video heads again become clogged with dirt
soon after cleaning, this might be caused by a
damaged tape. In this case, stop using that
cassette immediately.
≥Be careful not to clean the video heads too much.
(Too much cleaning could cause excessive wear to
the video heads. If the video heads get worn, the
picture is not played back clearly even after
cleaning.)
≥If using the Head Cleaner does not clear the video
head clogging, the Movie Camera requires
cleaning or repairing by a service centre.
Please consult with your dealer.
≥Video head cleaning due to clogging is not a
malfunction of the product and is not covered by
your warranty.
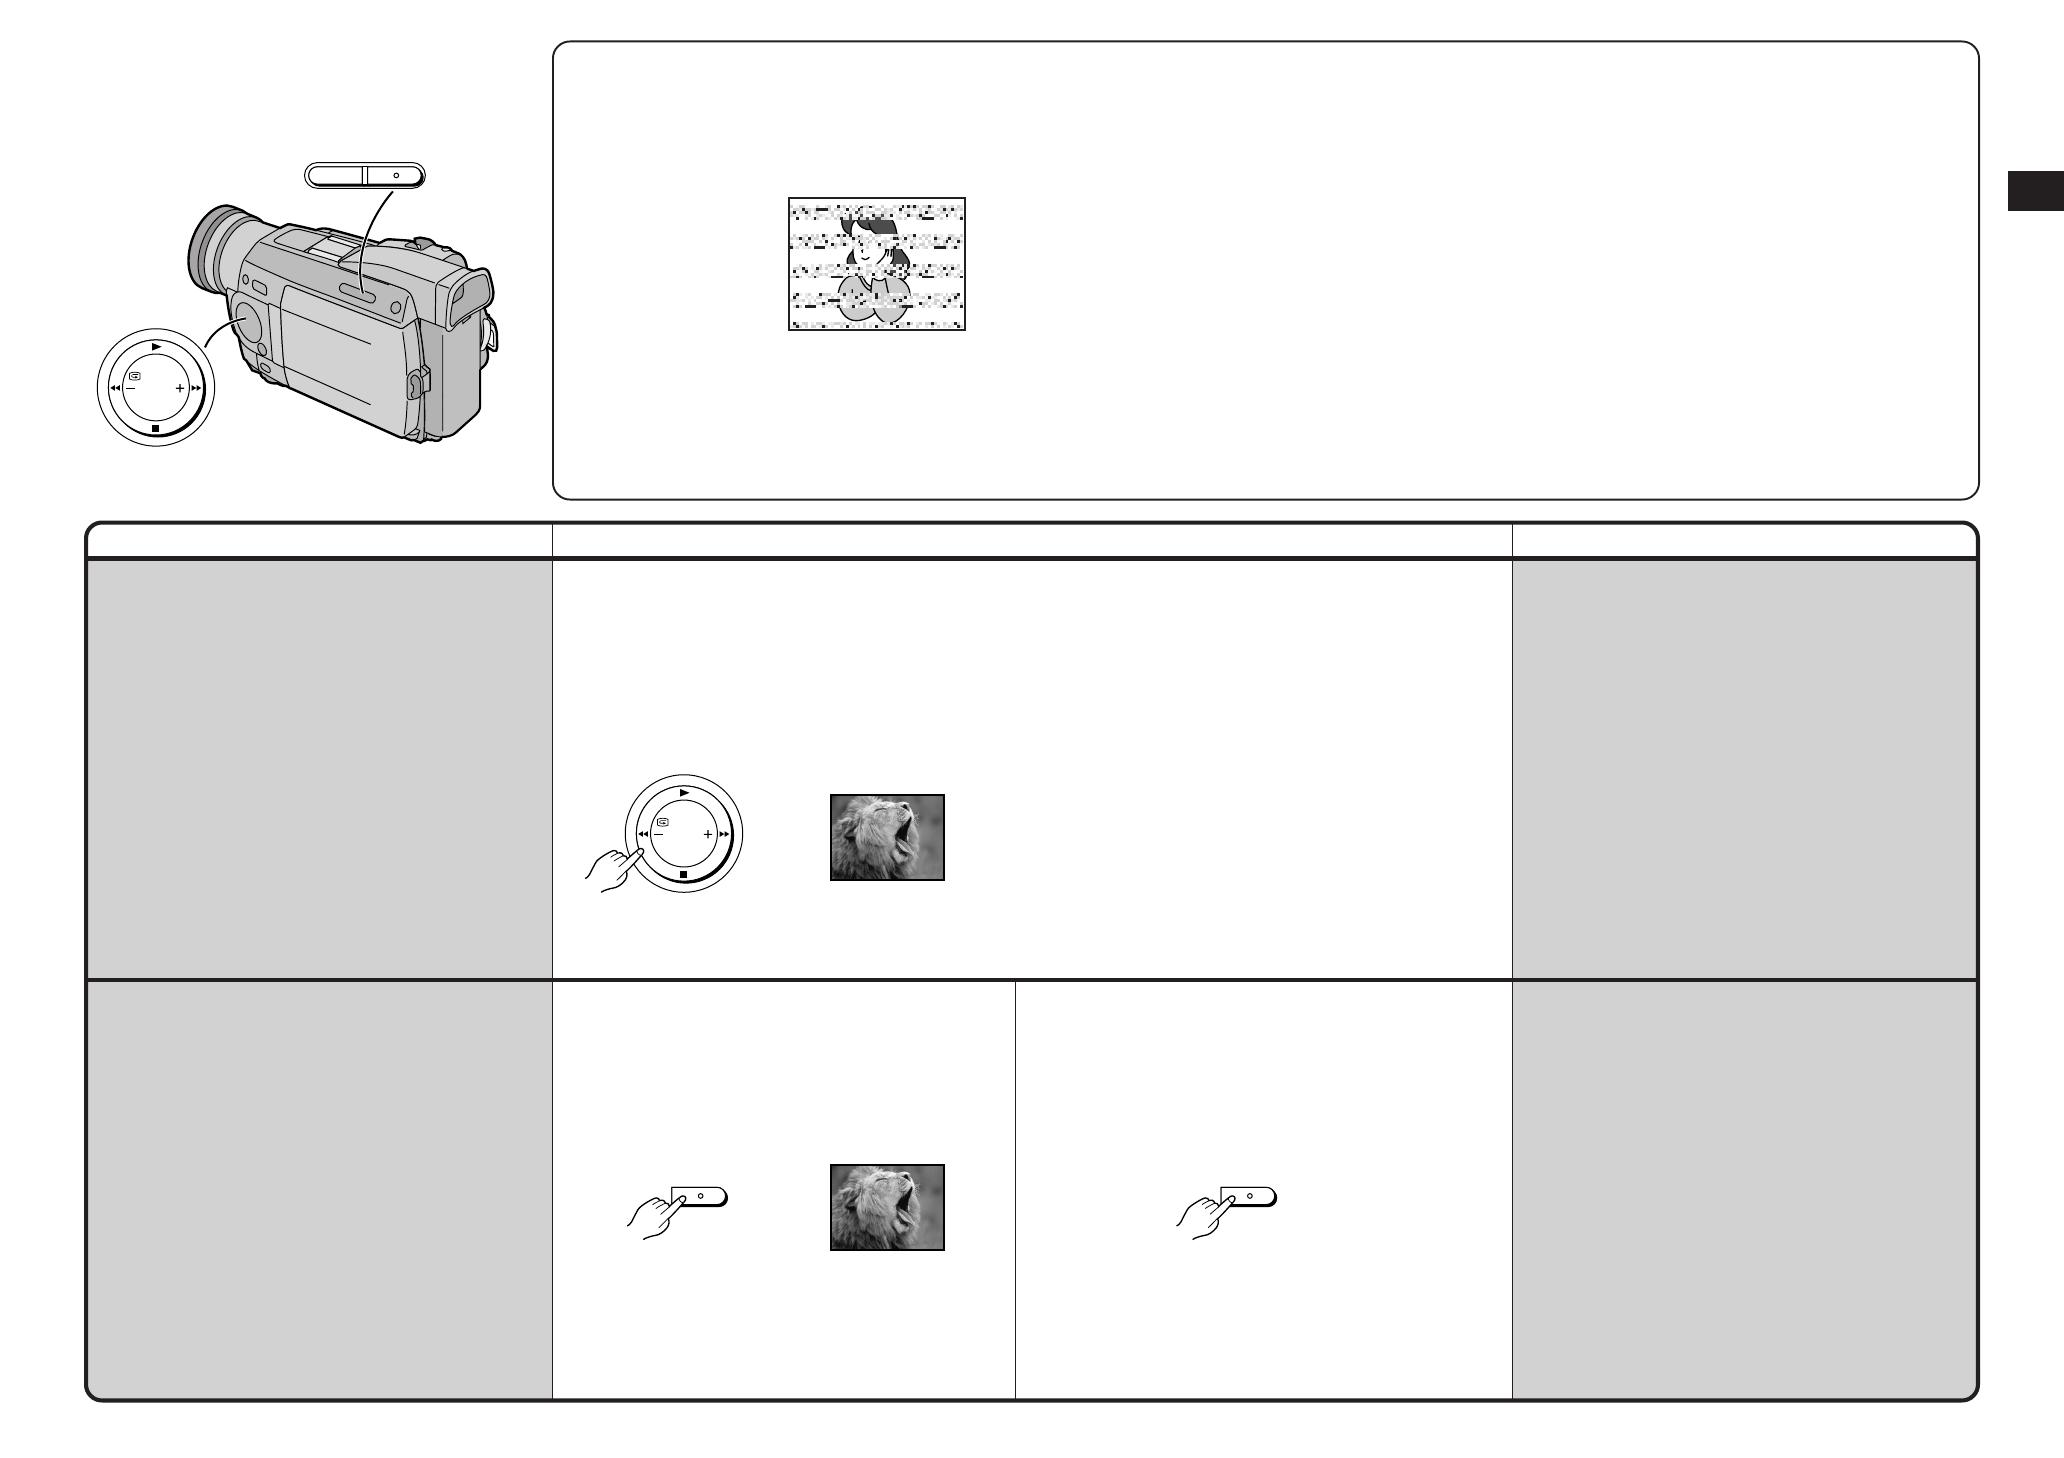
Checking If the Picture Is
Recorded
(Recording Check)
To play back the final few seconds of the last recorded
scene in the Recording Pause Mode.
Recording Backlit Scenes
(Backlight Compensation)
To prevent the backlit subject from being recorded very
dark.
(Backlight means that the light falls on the subject from
behind, i.e. the subject is between the light source and
the Movie Camera.)
1
Press the Recording Check Button [S] briefly in
the Recording Pause Mode.
The [CHK] Indication appears.
After checking, the Movie Camera returns to the
Recording Pause Mode.
1
Press the Backlight Button [BLC].
After the [ª] Indication flashes, it will be displayed.
SEARCH
FADE BLC
SEARCH
CHK
BLC
∫ Video Head Clogging and Remedy
When the video heads (which contact the tape) are
dirty, the playback picture contains mosaic-like
patterns or the whole screen becomes black. If they
become even more dirty, the recording performance
deteriorates and in the worst case, recording may
not be possible at all.
Causes of Dirty Video Heads
≥A lot of dust in the air
≥High-temperature and high-humidity environment
≥Damaged tape
≥Long-time use
≥When the Backlight Button [BLC] is pressed, the
screen will get bright all over.
≥When the [OFF/ON/MODE] Switch is operated, the
Backlight Compensation will be cancelled.
BLC
ª

Basic Operations
28 29
Title Procedure Remarks, etc.
3
Turn the Focus Ring to
adjust the focus.
Returning to the
Automatic Focusing
Mode
Press the [FOCUS]
Button to make the [MF]
Indication disappear
2.
Or, set the Mode
Selector Switch to
[AUTO].
≥In the Mirror Mode, only the following
indications are displayed.
¥: Recording
¥;: Recording Pause
x: Remaining Battery Power
ø: Card Photoshot
(NV-MX5, NV-MX7 only)
When the General Warning/Alarm Indication [°]
appears, turn the LCD Monitor backward so that
you can confirm the actual Warning/Alarm
Indication. (p. 124, 125)
≥If the flash is fired in a dark environment when the
Video Flash has been installed, the subject may go
out of focus. (NV-MX5, NV-MX7 only)
Hint for Manual Focus Adjustment
≥If you adjust the focus in the wide-angle setting, the
subject may go out of focus when you enlarge it.
Therefore, enlarge the subject
3 before you adjust
the focus, so that the picture remains focused when
you zoom out
4.
Opening the LCD Monitor automatically turns off the
Viewfinder. However, when you turn the LCD Monitor
forward, the picture also appears in the Viewfinder.
This lets you aim the Movie Camera and view the
picture in the Viewfinder, while the persons in front of
the Movie Camera can check the picture on the LCD
Monitor during recording.
FOCUS
MNL
AUTO
MNL
2
or
34
¥
°
ø
x
Mirror Mode for the Picture on the LCD
Monitor
You are used to looking at yourself in the mirror.
Therefore, when recording yourself with the LCD
Monitor facing forward, the picture (as it is being
recorded) might look unusual and distracting. If
you prefer to see yourself on the LCD Monitor in
the same way as you see yourself in a mirror, i.e.
with the sides reversed, set [SELFSHOOT] on
the [OTHER FUNCTIONS] Sub-Menu to
[MIRROR]. However, the picture will still be
recorded in the normal, non-reversed way.
This Mirror Mode for the picture on the LCD
Monitor works only during recording and in the
Recording Pause Mode with the LCD Monitor
facing forward. Also, it is completely different
from the Mirror Mode of the Digital Effects 1.
(p. 52)
Recording Yourself
(Recording with the LCD Monitor Facing
Forward)
This makes it possible to record yourself while viewing
the picture on the LCD Monitor or to show the persons
in front of the Movie Camera the picture being
recorded.
Focusing on the Subject
Manually
(Manual Focus)
This makes it possible to adjust the focus manually for
subjects and recording situations for which automatic
focusing is not precise.
1
Open the LCD Monitor and turn it so that it faces
forward (Lens side).
1
Set the Mode Selector
Switch to [MNL].
The [MNL] Indication
appears.
2
Press the [FOCUS]
Button to make the [MF]
Indication (Manual
Focus Mode)
1 appear.
FOCUS
MNL
AUTO
MENU
PUSH
W.B/SHUTTER/IRIS/VOL/JOG
12
MNL
AUTO
FOCUS
MF
MNL
1
MF: Manual Focus Mode
MNL: Manual

Basic Operations
30 31
Title Procedure Remarks, etc.
≥As a general rule, the further you push the [W/T]
Zoom Lever toward [W] or [T], the faster the zooming
speed.
≥In the Recording Pause Mode, if you push the [W/T]
Zoom Lever toward [W] or [T] until you feel a click,
you can zoom between 1k and 10k in an extremely
fast approximately 0.5 seconds. (Jet Zoom)
≥During recording, zooming between 1k and 10k is
possible in as short a time as approximately
1.0 second. However, even if you push the [W/T]
Zoom Lever until you feel a click, it is not possible to
zoom faster than in 1.0 second. Therefore, it is not
recommended that you push the [W/T] Zoom Lever
all the way until you feel a click, as a click sound
could be recorded in this case.
≥During very fast zooming, the picture may temporarily
go out of focus.
≥When you have zoomed to the tele setting, precise
focusing is only possible on subjects no closer than
1.2 metres.
≥Up to 10k, the zooming is done optically.
≥The higher the Digital Zoom Magnification is, the
lower is the picture quality.
≥If you zoom to 10k or higher (digital zoom range)
when [PROGRESSIVE] on the [CAMERA SETUP]
Sub-Menu is set to [AUTO], the Progressive
Photoshot Mode is automatically cancelled.
≥When you have zoomed to 10k or higher (digital
zoom range), manually adjusting the white balance is
not possible.
≥During the Mega-Pixel Setting (p. 82), the Digital
Zoom Function cannot be used. (NV-MX5, NV-MX7
only)
Recording Extra Close-up Shots of Small
Subjects (Macro Close-up Function)
When the zoom magnification is 1k, the Movie
Camera can focus on subjects down to a distance of
approximately 35 mm between lens and subject. This
allows recording very small subjects such as insects.
Using the Zoom Microphone Function
When using Zoom-in to record from a distance, a
zoom effect which makes the sound in front of
the Movie Camera more audible can be
achieved.
≥Set the [ZOOM MIC] on the [RECORDING
SETUP] Sub-Menu to [ON]. ([Z.MIC] Indication
appears.)
≥The Zoom Microphone Function may not be
effective if the surrounding noise is too much.
1tW
5tW
10tW
T
T
T
Enlarging Your Subject or
Widening the Recording Angle
(Zooming In/Out)
Recording close-ups of your subjects and recording
wide-angle shots add special effects to your videos.
Enlarging Your Subjects Even
More
(Digital Zooming)
This function is convenient when you want to enlarge a
very distant subject even more than is possible with the
normal (optical) zoom which offers a magnification
range of 1k–10k. For the Digital Zoom Function, you
can choose between up to 20k and up to 100k
magnification.
1
To record a wider view (Zooming-out):
Push the [W/T] Zoom Lever toward [W].
To enlarge your subject (Zooming-in):
Push the [W/T] Zoom Lever toward [T].
The Zoom Magnification Indication appears for a few
seconds.
CAMERA FUNCTIONS
PRESS MENU TO EXIT
1.
CAMERA SETUP
2.
DIGITAL EFFECT
3.
CARD SETUP
4.
MULTI-PICTURES
5.
RECORDING SETUP
6.
DISPLAY SETUP
7.
OTHER FUNCTIONS
8.
DEMO MODE
PROG.AE OFF
5 7
N Ω º
RETURN ---- YES
PROGRESSIVE AUTO ON OFF
SIS
D.ZOOM
OFF ON
OFF 20 100
CINEMA OFF ON
CAMERA SETUP
PRESS MENU TO EXIT
WT
MENU
PUSH
W.B/SHUTTER/IRIS/VOL/JOG
12
WT
3
Push the [W/T] Zoom
Lever toward [W] or [T]
to zoom in or out on
the subject.
Cancelling the Digital
Zoom Function
Set [D. ZOOM] on the
[CAMERA SETUP] Sub-
Menu to [OFF].
1
Set [D. ZOOM] on the
[CAMERA SETUP] Sub-
Menu to [20t] or
[100t].
≥20k: Digital zooming
up to 20k.
100k: Digital zooming
up to 100k.
2
Press the [MENU]
Button to exit the Menu.
MENU
12
MENU
WT
MENU
12
REC SPEED
AUDIO REC 12bit
16bit
RETURN ---- YES
SP LP
SCENEINDEX 2HOUR DAY
WIND CUT OFF ON
ZOOM MIC OFF ON
RECORDING SETUP
PRESS MENU TO EXIT
CAMERA FUNCTIONS
PRESS MENU TO EXIT
1.
CAMERA SETUP
2.
DIGITAL EFFECT
3.
CARD SETUP
4.
MULTI-PICTURES
6.
DISPLAY SETUP
7.
OTHER FUNCTIONS
8.
DEMO MODE
5.
RECORDING SETUP
20tW
T
D.ZOOM

Basic Operations
32 33
Remarks, etc.
Title Procedure
Continuous Photoshot
If you set [SHTR EFFECT] on the [OTHER
FUNCTIONS] Sub-Menu to [ON] and keep the
[PHOTO SHOT] Button pressed, the Movie Camera
automatically records still pictures successively at
intervals of approximately 0.7 seconds until you
release the button.
≥One more still picture may be recorded after you
release the [PHOTO SHOT] Button.
≥Continuous Photoshot Function is not possible if the
Video Flash is used (NV-MX5, NV-MX7 only).
Notes about the Photoshot Function
≥It is recommended that you press the [STILL] Button
first and then press the [PHOTO SHOT] Button.
≥If you set [SHTR EFFECT] on the [OTHER
FUNCTIONS] Sub-Menu to [ON], the screen blinks
briefly and a simulated shutter click sound can be
recorded when you press the [PHOTO SHOT]
Button. This audiovisual effect is also recorded.
≥With the still pictures that you have recorded in the
Photoshot Mode, you can do the following:
≥
Index Search (p. 46)
≥
Automatic transmission of pictures to Card (p. 84)
(NV-MX5, NV-MX7 only)
≥
Automatic printing (p. 112)
≥The visual shutter effect and click sound may occur
with slight delay after recording of the still picture
has started.
≥The picture quality deteriorates slightly.
≥During normal recording, the Photoshot Function
cannot be used.
Notes about the Progressive Photoshot Function
≥When the [æ] Indication is displayed, you can use
the Progressive Photoshot Function.
≥When you record a still picture in the Progressive
Photoshot Mode while [PROG.AE] on the [CAMERA
SETUP] Sub-Menu is set to Sports Mode [5] or
Portrait Mode [7] (p. 50), the picture brightness
may vary from picture to picture.
≥When you press the [PHOTO SHOT] Button, the
Movie Camera emits a click sound. However, this is
normal and not a malfunction.
≥During normal recording, the Progressive Photoshot
Function cannot be used.
When [PROGRESSIVE] Is Set to [ON]:
You can always use the Progressive Photoshot
Function.
In this case, however, the following functions are
deactivated:
≥Digital Effect Modes in [EFFECT1] (p. 52)
≥Digital Zoom [D.ZOOM] (p. 32)
≥Shutter Speeds of 1/750 s or faster (p. 64)
≥Continuous Photoshot Function
When [PROGRESSIVE] Is Set to [AUTO]:
In the following cases, using the Progressive
Photoshot Function is not possible:
≥When the zoom magnification is approximately 10k
or higher.
≥When the shutter speed is 1/750 s or faster.
≥When [EFFECT1] is set to [WIPE], [MIX],
[STROBE], [GAINUP], [TRACER], [MOSAIC] or
[MIRROR].
≥When a picture is displayed in the Multi-Picture
Mode or in the Picture-in-Picture Mode.
≥Continuous Photoshot Function
MENU
PUSH
W.B/SHUTTER/IRIS/VOL/JOG
12
PHOTO
SHOT
CAMERA FUNCTIONS
PRESS MENU TO EXIT
1.
CAMERA SETUP
2.
DIGITAL EFFECT
3.
CARD SETUP
4.
MULTI-PICTURES
5.
RECORDING SETUP
6.
DISPLAY SETUP
7.
OTHER FUNCTIONS
8.
DEMO MODE
PROG.AE OFF
5 7
N Ω º
RETURN ---- YES
PROGRESSIVE OFF ON AUTO
SIS
D.ZOOM
OFF ON
OFF 20 100
CINEMA OFF ON
CAMERA SETUP
PRESS MENU TO EXIT
STILL
TAPE CARD
Recording Still Pictures on the
Cassette
∫ Photoshot
With this function, you can record still pictures with
sound for approximately 7 seconds each.
This function is convenient for example for pictures that
you want to print on a Digital Video Printer.
PHOTO
1
Slide the [TAPE/CARD]
Selector to [TAPE].
(NV-MX5, NV-MX7 only)
PHOTO
PHOTO
PHOTO
PHOTO
∫ Progressive Photoshot
The Progressive Photoshot Function lets you record
still pictures with higher resolution than the normal
Photoshot Function. This is ideal for example for
pictures that you want to print with a Digital Video
Printer or import into a computer.
"
Set [PROGRESSIVE] on
the [CAMERA SETUP]
Sub-Menu to [ON] or
[AUTO].
[æ] Indication appears.
#
Press the [PHOTO
SHOT] Button in the
Recording Pause Mode.
The Movie Camera
records a still picture for
approximately
7 seconds and then
switches back to the
Recording Pause Mode.
PHOTO
SHOT
Digital Still Picture
A picture can be viewed as a still picture by pressing
the [STILL] Button. The Digital Still Picture Mode is
released by pressing the button again.
≥It is recommended that the [PHOTO SHOT]
Button be pressed after the Digital Still Picture
Mode has been established by pressing the
[STILL] Button where the shot is to be taken.
≥The digital still picture is cleared when the
[TAPE/CARD] Selector is switched. (NV-MX5,
NV-MX7 only)
≥If the Digital Still Picture Mode is used when the
Video Flash is installed, the flash will fire.
(NV-MX5, NV-MX7 only)
≥The still pictures recorded in the Continuous
Photoshot Mode or in the Digital Still Picture
Mode are not marked with photoshot index
signals.
MENU
12
2
Press the [PHOTO
SHOT] Button in the
Recording Pause Mode.
The Movie Camera
records a still picture for
approximately 7 seconds
and then switches over to
the Recording Pause
Mode.
PHOTO
SHOT
TAPE CARD
Basic Operations
3534
Title Procedure Remarks, etc.
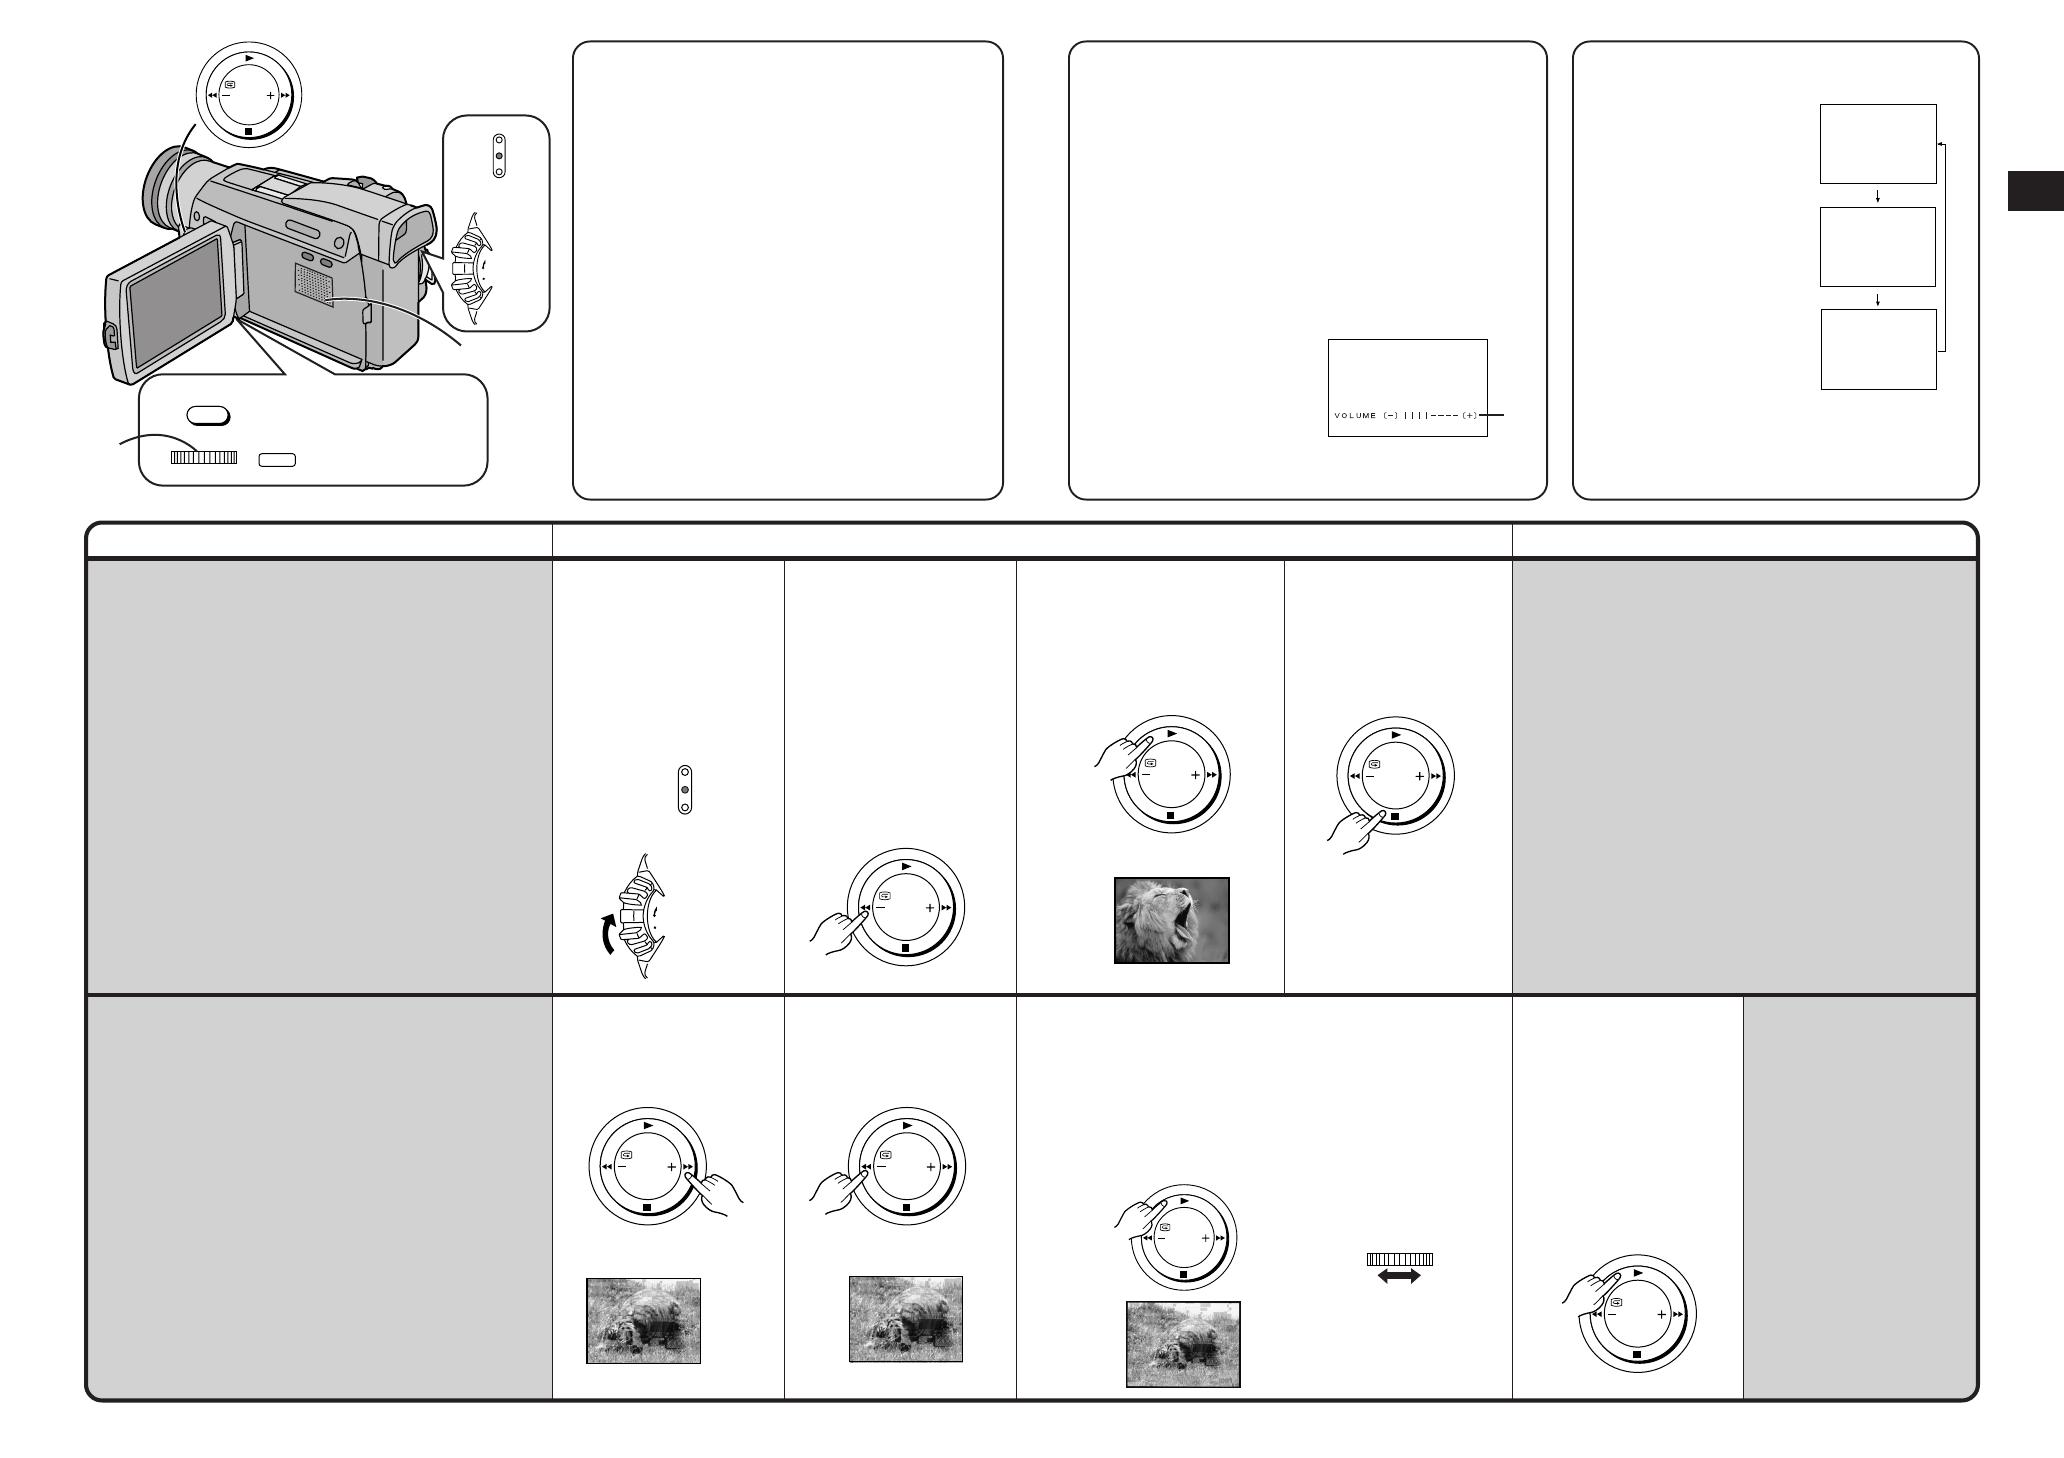
Viewing the Just Recorded
Scenes on the Movie Camera
(Playback)
You can play back recorded scenes right after
recording.
Searching for a Scene That You
Want to Play Back
1
Slide the
[OFF/ON/MODE] Switch
from the [ON] position
to put the Movie
Camera in the VCR
Mode.
The [VCR] Lamp lights.
Cue Playback
Keep the Cue Button
[5] pressed during
playback.
2
Press the Rewind
Button [6] to rewind
the tape.
≥Rewind the tape to the
point where the
recording started.
≥If the tape reaches the
beginning during
rewinding, it
automatically stops.
Review Playback
Keep the Review Button
[6] pressed during
playback.
3
Press the Play Button
[1] to start playback.
4
To stop playback:
Press the Stop Button
[∫].
Making the Date/Time
Indication Appear
This Movie Camera
automatically records the
date and time, however
not directly in the picture
but as part of the sub
code. (p. 120)
To make the Date/Time
Indication appear, set
[DATE/TIME] on the
[DISPLAY SETUP] Sub-
Menu to the desired
setting.
It is also possible to make
the Date/Time Indication
appear and change it by
repeatedly pressing the
[DATE/TIME] Button on
the Remote Controller.
(p. 104)
1
SEARCH
MENU
PUSH
W.B/SHUTTER/IRIS/VOL/JOG
12
3
CAMERA
CARD P.B
VCR
MODE
ON
OFF
CAMERA
CARD P.B
VCR
MODE
ON
OFF
%
SEARCH
SEARCH
&
SEARCH
!
SEARCH
SEARCH
12:00:00
15.10.2000
15.10.2000
Repeat Playback
If you keep the Play Button [1] pressed for more than
5 seconds, the Movie Camera switches over to the
Repeat Playback Mode and the [R !] Indication
appears. (To cancel the Repeat Playback Mode, set
the [OFF/ON/MODE] Switch to [OFF].)
Variable Speed Search Function
It is possible to change the speed of Cue Playback or
Review Playback.
2 Turn the [PUSH]
Dial to select the
desired search
speed.
Returning to Normal
Playback
Press the Play Button
[1].
Playback continues at
normal speed.
≥The Variable Speed
Search Function offers
the following 6 different
playback speeds both in
forward and reverse
directions: 1/5k (slow
playback in SP Mode
only), 1/3k (slow
playback in LP Mode
only), 1k, 2k, 5k, 10k,
20k
≥During Variable Speed
Search Function,
mosaic-like patterns
appear in the picture.
≥When using the
Variable Speed Search
Function, the sound is
muted.
12
1k%
SEARCH
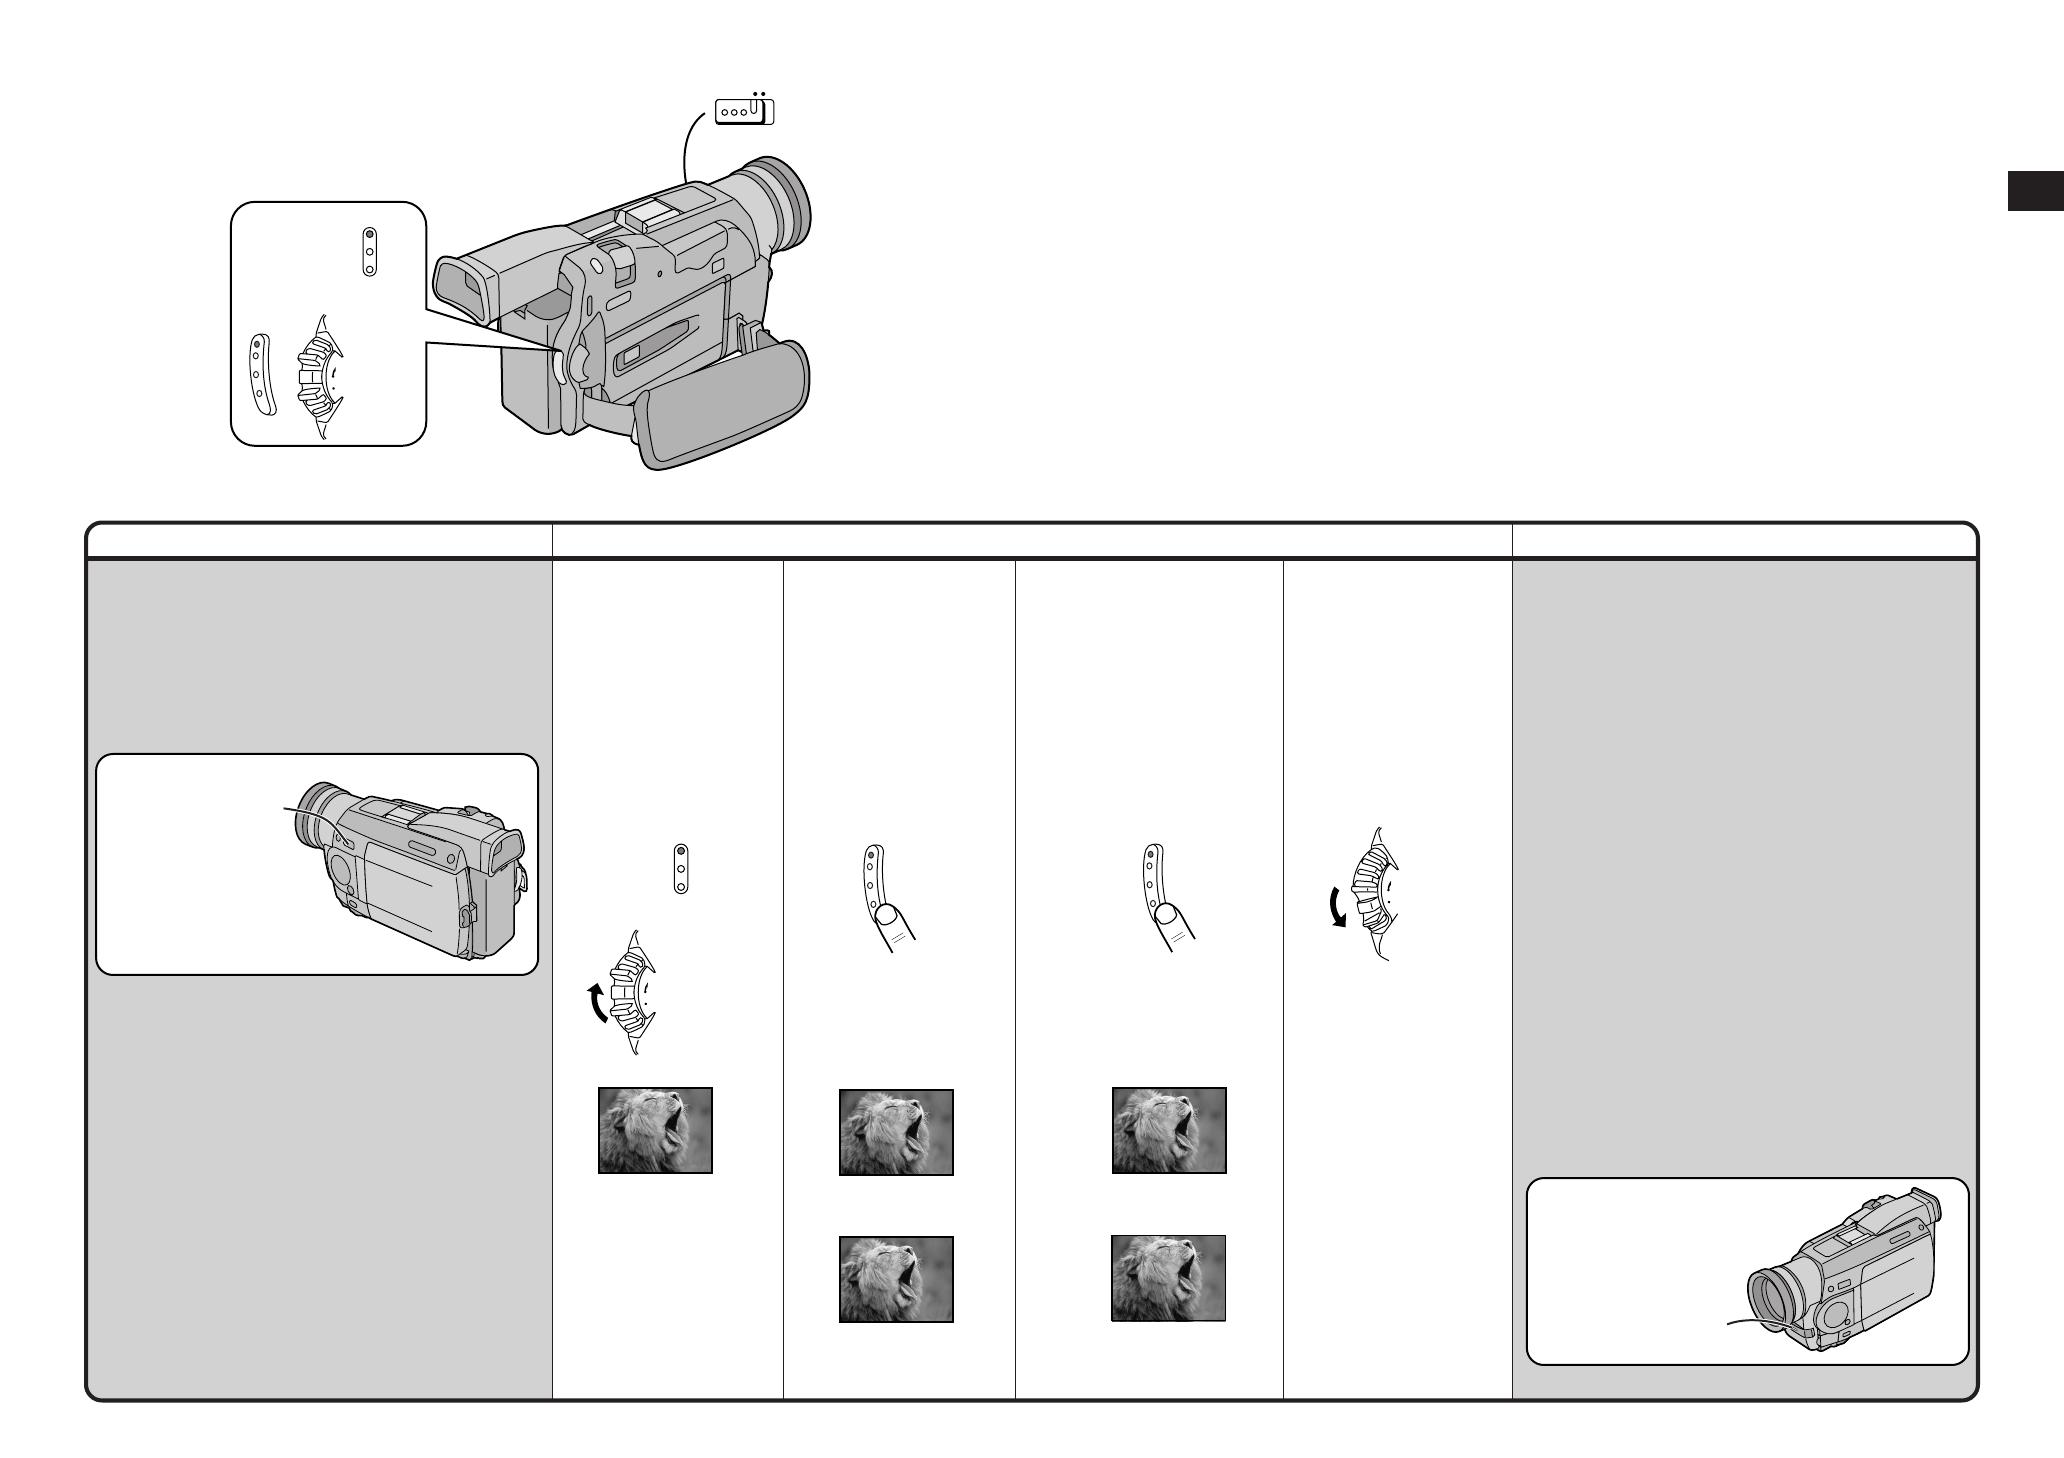
¥ Adjusting the Sound Volume
Keep the [PUSH] Dial 1 pressed until the [VOLUME]
Indication 2 appears. Then, turn the [PUSH] Dial to
adjust the volume. After adjusting, press the [PUSH]
Dial to make the [VOLUME] Indication disappear.
To adjust the volume with the Remote Controller,
press the [T] or [W] Button to make the [VOLUME]
Indication appear. You can then increase the volume
by pressing the [T] Button or decrease it by pressing
the [W] Button. A few seconds after finishing the
adjustment, the [VOLUME] Indication disappears.
≥The output volume from the built-in speaker
3 and
[PHONES] socket is adjusted.
≥When using the Playback
Zoom Function, it is not
possible to adjust the
sound volume.
≥If a cassette recorded with
copyright protection signal
is played back, the screen
becomes black.
Search Lock Function
For longer Cue or Review Playback, press the
Cue Button [5] or the Review Button [6]
only briefly. As this locks the search function,
you do not need to keep the button pressed for
a long time.
≥To resume normal playback, press the Play
Button [1].
≥In Cue and Review Playback, pictures with
fast-moving subjects may contain mosaic-like
patterns.
Hyper Check Function
≥If you press the Fast-forward Button [5]
during fast-forwarding of the tape or the
Rewind Button [6] during rewinding of the
tape, Cue Playback or Review Playback
continues for as long as you keep the button
pressed.
≥At the beginning and end of Cue Playback or
Review Playback, some momentary picture
distortion may occur.
2
SEARCH
1 Press the Play
Button [1] during
playback.

Basic Operations
3736
Title Procedure Remarks, etc.
Playing Back in Slow Motion
(Slow Motion Playback)
Playing Back Still Pictures and
Advancing Them One by One
(Still Playback/Still Advance Playback)
You can freeze the action during playback and
advance the still pictures one by one.
1
Press the Play Button
[1].
1
Press the Play Button
[1].
2
Press the Slow
Motion/Still Advance
Button [E] or [D] on the
Remote Controller.
2
Press the Pause Button
[;].
The playback picture
stops in the Still Playback
Mode.
Pressing the [E] Button
starts slow motion
playback in reverse
direction, and pressing
the [D] Button starts slow
motion playback in
forward direction.
3
Press the Slow
Motion/Still Advance
Button [E] or [D] on the
Remote Controller.
Resuming Normal
Playback
Press the Play Button
[1].
Playback continues with
normal speed.
Resuming Normal
Playback
Press the Play Button
[1].
Playback continues with
normal speed.
Using the Jog Dial (Jog Playback)
By turning the Jog Dial ([PUSH] Dial) on the
Movie Camera in the Still Playback Mode, you
can advance the still pictures one by one in
forward or reverse direction.
≥During slow motion playback in reverse direction, the
Time Code Indication may not be accurate.
≥Scenes recorded in the SP Mode are played back at
approximately 1/5th of the normal speed.
Scenes recorded in the LP Mode are played back at
approximately 1/3rd of the normal speed.
≥When you play back the picture recorded in the
Picture-in-Picture Mode (p. 58) or Multi-Picture Mode
(p. 54, 56), the picture may shake vertically.
Pressing the [E] Button advances the still pictures one
by one in reverse direction. Pressing the [D] Button
advances the still pictures one by one in forward
direction.
≥Each press of the [E] Button advances to the next still
picture in reverse direction. Each press of the [D]
Button advances to the next still picture in forward
direction. Keeping either button pressed continuously
advances the still pictures one by one until you
release the button.
≥If you leave the Movie Camera in the Still Playback
Mode for more than 6 minutes, it switches over to the
Stop Mode to protect the video heads against
excessive wear.
≥During Still Advance Playback, the Time Code
Indication may not be accurate.
≥During Still Playback, adjusting the sound volume is
not possible.
ZOOM
INDEX INDEX
SELECT
STORE
STOP
KL
∫
OSD
COUNTER
V
/REW
STILL ADV
OFF/ON
P.B.DIGITAL
DATE/
TIME
RESET
TITLE
T
W
s
VOL
r
¥REC
MULTI
P-IN-P
PHOTO
SHOT
START/
STOP
VIDEO CAMERA
A.DUB
PLAY
PAUSE
FF/
W
STILL ADV
MENU
ITEM
SET
61 5
;
ED
VAR.
SEARCH
P.B.
ZOOM
PUSH
W.B/SHUTTER/IRIS/VOL/JOG
12
PLAY
1
STILL ADV
E
STILL ADV
D
PAUSE
;
12
forwardreverse
PLAY
1
PLAY
1
STILL ADV
E
STILL ADV
D
PLAY
1

Basic Operations
3938
Title Procedure Remarks, etc.
PUSH
BATT.
EJECT
Playing Back on a TV
By connecting the Movie Camera to a TV, you can
watch playback of the recorded scenes on the TV
screen.
After Use
Attaching the Lens Cap
After use, attach the supplied Lens Cap to the Lens to
protect it.
1
Connect the [AV IN/OUT] Socket on the Movie
Camera with the Video and Audio Input Sockets on
the TV.
≥Use the AV Cable to connect to the TV.
If your TV is equipped with an S-Video Socket, also
connect the S-Video Cable.
1
Take out the cassette.
(p. 12)
2
Set the [OFF/ON/MODE]
Switch to [OFF].
3
Remove the Battery (p. 11) and retract the
Viewfinder.
≥Before connecting, turn off both the Movie Camera
and the TV.
≥If a cassette recorded with copyright protection signal
is played back, the screen becomes black. However,
scenes recorded with this Movie Camera do not
contain a copyright protection signal.
≥When inserting a title during playback of the picture
recorded in the Cinema Mode, the display mode will
no longer be automatically identified, and black bars
will appear at the top and bottom of the screen even if
the images are viewed on the wide TV screen.
(NV-MX5, NV-MX7 only)
≥If you set [AV JACK] on the [AV IN/OUT SETUP]
Sub-Menu to [IN/OUT] on the NV-MX7, nothing will
appear on the TV screen except during playback.
≥If your TV is not equipped with AV Input Sockets, the
21-pin Adaptor (purchase separately) is necessary.
Consult your dealer.
Selecting the Sound
The sound can be selected using the [AUDIO OUT]
setting on the [PLAYBACK FUNCTIONS] Sub-Menu.
STEREO: Stereo sound (main sound and sub sound)
The setting is usually kept at [STEREO].
L: Left channel sound (main sound)
R: Right channel sound (sub sound)
≥If an attempt was made to perform audio dubbing for
what was recorded with [12bit] selected as the
[AUDIO REC] setting, the sound played back will be
set to stereo regardless of the [AUDIO OUT] setting if
[12bit AUDIO] is set to [MIX].
OPEN / EJECT
ZOOM
INDEX INDEX
SELECT
STORE
STOP
:9
∫
OSD
COUNTER
V
/REW
STILL ADV
OFF/ON
P.B.DIGITAL
DATE/
TIME
RESET
TITLE
T
W
s
VOL
r
¥
REC
MULTI
P-IN-P
PHOTO
SHOT
START/
STOP
VIDEO CAMERA
A.DUB
PLAY
PAU SE
FF/
W
STILL ADV
MENU
ITEM
SET
61 5
;
ED
VAR.
SEARCH
P. B .
ZOOM
1
21-pin Adaptor
[VIDEO IN]
AV Cable
S-Video Cable
[AV IN/OUT]
[S-VIDEO IN/OUT]
[AUDIO IN]
[S-VIDEO IN]
AV IN/OUT
PHONES
S-VIDEO
IN/OUT
AV IN/OUT
PHONES
S-VIDEO
IN/OUT
MODE
ON
OFF
Listening to the Playback Sound via
Headphones
If you want to use headphones to listen to the
playback sound, connect headphones to the
[PHONES] Socket on the Movie Camera. In this
case, no sound (including beep and shutter click
sounds) is reproduced from the Movie Camera’s
built-in speaker.
≥
Set [AV JACK] on the [AV IN/OUT SETUP] Sub-
Menu to [OUT/PHONES]
. If you set [AV JACK] to
[IN/OUT], the right channel sound alone will no
longer be heard. (NV-MX7 only)
≥If you want to use headphones to listen to the
playback sound when inputting via the S-Video
Cable, disconnect the cable, set [AV JACK] on
the [AV IN/OUT SETUP] Sub-Menu to
[OUT/PHONES], and then connect the
headphones. (Otherwise, noise may be heard
in the playback sound.) (NV-MX7 only)
≥When music data is played, the headphones
can be used regardless of this setting.
(NV-MX5, NV-MX7 only)
Making the Indications Appear on the TV
Screen
Press the [OSD] Button 1 on the Remote
Controller.
The On-Screen Indications also appear on the
TV screen.
/