Page is loading ...

ADJUSTABLE
COMFORT
ASSEMBLY INSTRUCTIONS

ADJUSTABLE
COMFORT
ASSEMBLY INSTRUCTIONS
STEP 1: Carefully open the carton and remove all boxes then lay out
the top and the bottom of the base as one unit as shown. Cut all zip
ties and remove.
STEP 2: Attach the center tube with the two center legs and tighten the
four center leg bolts with the allen wrench.
STEP 3: Attach each motor by sliding the pins through motor slot at-
tached to the frame. The head motor will have a longer shaft than the
foot motor.
STEP 4: The label on the motor should be facing up when you are at-
taching the motor.
For customer service call 1-877-707-7533
or email azcustomerservic[email protected]g

ADJUSTABLE
COMFORT
STEP 5: Before plugging each cable into the control box, remove the
plug lock that is located between the ports for the cables and the color
stickers on the control box. Use your forefinger and thumb to press on
the sides of each plug lock to pull o. Plug the cables in the appropri-
ate color ports and replace the plug lock. This lock will hold the cables
in tightly.
STEP 8: Insert the mattress retainer bar into the grommets as shown.
STEP 6: For the remaining legs, choose the leg height that works for
you. To attach the corner bed legs, rotate the end bolts into the holes in
the corner brackets. Rotate the center legs into the hole in the pre-at-
tached leg.
STEP 7: Put remaining legs on the base and tighten. When ready to flip
the base over, make sure you do not use the legs as leverage as they
may damage the legs and/or base.
ASSEMBLY INSTRUCTIONS
For customer service call 1-877-707-7533
or email azcustomerservic[email protected]g

ADJUSTABLE
COMFORT
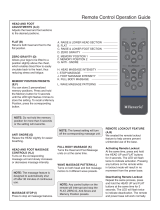
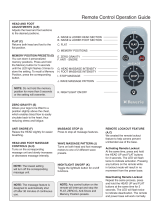
TV:
Press to move the bed to TV position.
HEAD:
Press and hold to raise or
lower the head section.
M1, M2, M3:
Press and hold for 5 seconds to
program your favorite position.
Press M1, M2, and M3 buttons
to recall positions.
MASSAGE TIMER:
Press once to turn on for 10 minutes.
Press twice to turn on for 20 minutes.
MASSAGE MODE:
Press once to turn on consistent mode.
Press twice to turn on slow pulse mode.
Press three times to turn on fast pulse mode.
Press four times to turn on slow wave mode.
Press five times to turn on fast wave mode.
HEAD AND FOOT DOWN:
Press and hold to lower the head
and foot section at the same time.
FOOT:
Press and hold to raise or
lower the foot section.
HEAD AND FOOT UP:
Press and hold to raise the head
and foot section at the same time.
ZERO GRAVITY:
Press to move
the bed to
zero-gravity
position.
ANTI-SNORE:
Press to move the bed to
anti-snore position.
FLAT:
Press to move head and foot
section to flat position.
LIGHT:
Press to turn on flashlight,
press again to turn o flashlight.
FOOT MASSAGE:
Press once to turn on low intensity.
Press twice to turn on medium intensity.
Press three times to turn on high intensity.
Press four times to turn o.
HEAD MASSAGE:
Press once to turn on low intensity.
Press twice to turn on medium intensity.
Press three times to turn on high intensity.
Press four times to turn o.
SYNCING TWO TXL BASES FROM ONE REMOTE:
Each base comes synced to its own remote. You can use only one remote
so put the 2nd remote away for safekeeping. Bed “A” is already synced.
Step 1: Unplug bed “A” and take the “A” remote and sync it to bed “B”
Step 2: On the “A” remote press and hold the “head down” button and
the “foot up” button at the same time for 10 seconds
Step 3: Push the button on the side of the control box underneath bed “B”
where it indicates reset coding. Do not press and hold the side button,
just press and release.
Step 4: Once you hear a beep on bed “B”, plug in bed “A” and they will
function as one base.
SYNCING ONE REMOTE:
Each base comes factory synced to its own remote. If not
synced follow these instructions:
Step 1: On the remote press and hold the “head down” button
and the “foot up” button and at the same time push the
button on the side of the control box underneath the bed
where it indicates reset coding. Do not press and hold the
side button, just press and release.
Step 2: Once you hear a beep that will indicate that the re-
mote is synced
HINT: To sync, press
all three buttons at
the same time.
/