Page is loading ...

Installers and Inspectors Guide for
making Exothermic Connections
•Grounding
•LightningProtection
•CathodicProtection
•Rail
®

®
www.harger.com
®
www.harger.com
This handbook was written to give installers and
inspectorsintheeldaguideformakinghigh
quality Ultraweld connections.
The tips for using NUWTube
®
and UltraShot
®
have
been developed based on testing done by Harger
aswellasmanyyearsofexperienceintheeldof
exothermic welding.
If you have any questions about this guide or
any methods or tips described herein, please
don’t hesitate to contact either your Harger
Representativeortheexperiencedtechnicalhelp
personnelattheHargermainofce,800.842.7437
or www.harger.com.
contents
What is Ultraweld.................................................. 2
The Ultraweld Connection .................................... 3
Tips for Making Quality Connections .................... 3
Making an UltraShot Connection .......................... 4
Making a NUWTube Connection .......................... 6
Inspecting an Ultraweld Mold ............................... 8
Inspecting Ultraweld Welds .................................. 9
Troubleshooting Tips .......................................... 14
1
®
www.harger.com
What is Ultraweld
The Ultraweld processes (NUWTube and UltraShot) use
the same, time proven way to connect conductors at
the molecular level. This process involves the reduction
of copper oxide by aluminum which creates Aluminum
Oxide and enough heat to provide molten copper for the
connection.
The reaction is encapsulated by a graphite mold that is
designedforspecicconductors.Thesemoldsprovidea
portable and economical way to make the best electrical
connection.
2

®
www.harger.com
®
www.harger.com
®
www.harger.com 3
The Ultraweld Connection
An Ultraweld connection produces an electrical connection
superior in performance to any known mechanical or
pressure type connection. These connections are made
inseveralapplicationsincluding;Grounding,Lightning
Protection,CathodicProtection,andRail.
The molecular bond formed when making an Ultraweld
between two or more conductors has the following
advantages:
•Willnotloosen
•Currentcarryingcapacitygreaterthantheconductors
•Noincreaseinresistanceovertime
•Willlastlongerthantheconductorbeingwelded
•Madewithmaterialsthatareinexpensive,portable,and
require little training
•Easilyinspectedthroughnondestructivemeans
Tips for Making Quality
Connections
As with all products, there are tips to make the Ultraweld
process easier and to insure a quality connection. Some of
these tips are as follows:
•Readallinstructionsthataccompanythemold.Thetype
of mold can be found on the mold tag. This will indicate
which drawing should be viewed to understand the
placement of the conductors in the weld cavity.
•Drythemoldwithatorchtoremoveanymoistureinthe
mold.Moldshouldbeheatedabove220degreesF.
•Cleananddryallconductorstobewelded.Allmetal
surfaces should be cleaned down to bright metal.
•Makesuremoldcanstayintheverticalpositionwhile
making the weld as this process is a gravity fed system.
•Makesurehandleclosesmoldtightlyandhandleslock
properly.
•Checkallconductorholesinthegraphitetomakesure
they aren’t worn or cracked.
•Makesureconductorstsnuginthemoldtosealinthe
weld metal.
•Cleanmoldwithanaturalbristlebrush.Donotusea
metal or plastic brush on the mold.
®
www.harger.com 4
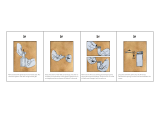
step 1
DryandCleanthemoldandconductor.
step 2
PlaceconductorsandUltraShot
®
cartridge into
mold.
step 3
ClosethelidandattachDRONEcordtothe
UltraShot
®
igniter.
Making an UltraShot
Connection (drop-in steps)

®
www.harger.com
®
www.harger.com
®
www.harger.com 5
step 4
Pushandholdbothigniterbuttonsatthesametime.
step 5
Open mold and remove connection, remove
slag and clean mold before making the next
connection.
A Completed UltraShot
®
connection
®
www.harger.com 6
Making a NUWTube
Connection (pour-in steps)
Step 1:
Torch dry the mold before
making the rst connection.
Step 2:
Clean and dry conductors, insert
conductor into mold, close
handle clamp and lock mold.
Step 4:
Remove Clear plastic cap from
NUWTube, pour weld metal into
mold.
Step 3:
Insert disk into mold.

®
www.harger.com
®
www.harger.com
®
www.harger.com 7
Step 6:
Ignite material located on top
of the lid using a int igniter
(FLTIG).
Step 7:
After the connection is
complete, open the mold and
remove the connection, remove
slag and clean mold before
making the next connection.
Complete NUWTUBE connection
Step 5:
Close lid, remove Orange cap
from starting powder chamber
and sprinkle next to ignition
hole.
®
www.harger.com
Inspecting an Ultraweld
Mold
An Ultraweld graphite mold is designed to last an average
ofatleast50shotsbutcanlastlongerwithpropercareand
cleaning. Using the UltraShot system has proven to more
than double the life of the mold.
Inspect the mold regularly for the following items:
1. Conductor Openings–Theconductorsshouldttight
tokeepthemoldfromleakingwhenred.
2. Weld Cavity–Theweldcavityshouldbewelldened
without large chips or cracks that may effect the weld.
3. Tap Hole–Shouldbewelldenedwithoutmajorchips.
4. Disk Seat –Shouldbewelldenedandcapableof
sealing the weld metal in the crucible area while the
reaction is taking place.
5. Mold Parting Surface–Needstobewithoutmajor
chips or cracks and capable of sealing the reaction in
the mold.
6. Crucible – Should be able to safely hold the reaction.
8

®
www.harger.com
®
www.harger.com
Inspecting Ultraweld Welds
In order to properly inspect an Ultraweld connection, you
mustrstfamiliarizeyourselfwiththetermsusedforthe
different parts of the mold and the different parts of the weld.
The mold was described in the previous section. The weld is
detailed below.
Weld
Sleeve
Riser
Weld Body
Conductor
Weld Sleeve – The area of the weld that comes out from the
weld body and helps give mechanical strength to the area
where the molecular bond is made.
Conductor – The metal materials that are to be welded
together.
Riser – The area on top of the weld that is used for excess
weld material and slag.
Weld Body – The area under the tap where the conductors
are welded or melted together at the molecular level.
9
An exothermic weld can conduct more current than a
mechanical connection because the cross section of weld
body is greater than the cross section of the conductor being
welded.
To have a quality weld you must have a solid weld body with
a cross section greater than the conductors, the sleeves
must be complete, there should be limited slag in the weld,
and there should be limited signs of contamination in the
riser. The riser should be higher than the level of the highest
conductor.
Good Welds
®
www.harger.com
Good Welds continued
Inspecting Ultraweld Welds
10

®
www.harger.com
®
www.harger.com
Inspecting welds to steel, cast iron, galvanized steel and
copper bar.
1. Make sure the surface is ground down to bright metal
with all coatings and oxide removed.
2. Inmostcases,youwillbeabletoseeadiscolorationof
the metal surface around the weld.
3. Tapweldwitha12to16oz.ballpeenhammerat
90degreestoweldandinsuchawaythatyoudonot
damage the conductor or hard enough that you deform
the weld. A bad weld will pop off if not made properly.
Inspecting Ultraweld Welds
11
®
www.harger.com
Weld has too much slag in the weld that may compromise
theresistanceoftheconnection.Sleevesnotlledout
whichmayaffectthestrengthoftheweld.Disknotproperly
placed or a leak in the mold are possible causes.
Badweldduetounderlling.Bodyofweldistoolow,itis
lowerthanthetopoftheconductors.Sleevesarenotlled
out. It could compromise the resistance. Wrong weld metal
used or there was a leak in the mold.
Inspecting Ultraweld Welds
Bad Welds
12
Bad weld due to gas in the weld. This is usually apparent by
the color of the weld which will be lighter in color, the riser
will be high with a mushroom top, and there will be pin holes
apparent in top of the riser.

®
www.harger.com
The above weld cut in half reveals the amount of voids in
the weld. These can be caused by contaminates in the mold,
conductor or weld metal.
Note:Asmallnumberpinholesareacceptable,upto20%.
Inspecting Ultraweld Welds
Bad Welds
13
Weld was not closed properly or it was worn out and leaked
signicantly.Alsothereistoomuchslagintheweld.Replace
mold if needed.
®
www.harger.com
®
www.harger.com
UltraShot Troubleshooting
Tips
Problem Possible Cause Suggested Corrections
UltraShot did not
re
Battery not charged
Charge battery and retry.
Try different battery pack if available.
Igniter not properly connected
to plug
Pushigniterallthewayintoplug.
NUWTube Starting
Powderwouldnot
ignite
Oldintgun Replaceintgun.
Starting powder being used
improperly
Sprinkle starting powder on the side of the lid’s ignition pocket.
Weld cavity under
lls
Wrongsizecartridgeformold CheckIDplateonmoldforpropersizeweldmaterialtobeused.
Mold leaked too much molten
copper to make proper weld
Wornmold.Openinginmoldistoolargetosealthemoldproperly.Replacemold.
Wrong mold used for the conductors being welded. Buy correct mold.
Molddidnotclosecompletely.Adjusthandleclampsasneededtogetmoldclosedcompletely.
Wrong mold being used Buy correct mold.
14

®
www.harger.com
UltraShot Troubleshooting
Tips
Problem Possible Cause Suggested Corrections
Weld not sticking
to steel or cast iron
surface
Surface not prepared properly Clean surface down to bright metal by either grinding or using tools suggested in the instructions.
Cable not placed in mold
according to instructions
Be sure to follow the mold instruction on the placement of the conductors in the mold to make sure
sufcientheatistransferredtothesteelsurfacetomaketheweld.
Not using cast iron powder when
welding to cast iron surface
Order cast iron powder.
Problemsweldingto
ground rod
Surface not prepared properly Clean and prepare surfaces according to instructions.
Mold not supported during welding Placevicegripsorclampundermoldtosupportitduringweldingprocess.
Cable not placed in mold according to
instructions
Be sure to follow the mold instructions on the placement of the conductors in the mold to make sure
sufcientheatistransferredtothegroundrodtomaketheweld.
Mold does not close
all the way or handle
clamps won’t lock
Handleclampisnotadjustedproperly Followinstructionsonadjustinghandleclamptoadjustthemproperly.
Dirt,slagorothermaterialstuckinthe
parting line or on the dowel pins
Clean off all material to get a good seal.
Bent or out of round conductors Straighten conductors or cut out bad sections and retry.
Mold gets stuck on
weld
Mold left on weld too long
Removemoldfromweldwithinabout30secondstoweldbeingmade,especiallyonweldstosteel.
15
®
www.harger.com
®
www.harger.com
Problem Possible Cause Suggested Corrections
Excessively high weld
or excessive gas in
weld
Moisture or foreign substance on the
mold or conducturs
Preheatmoldsandconductorswithatorchtoatemperaturethatwillburnoffanywaterororganic
material.Usesteelbrushtoremoveanyresidualmaterialfromconductors.Donotusesteelbrushon
graphite mold.
Wrongsizecartridgeused DoublecheckthemoldIDplatetomakesuretheproperweldcartridgeisbeingused.
Moisture in weld metal Replacewithnewweldmetal.
Ductsealinweldcavity
Ductsealistobeusedontheoutsideportionofthemoldonlyasalastresort.Ifithastobeuseddo
not let it migrate into the weld cavity.
Conductors pull out of
mold during process
Conductors are under tension RemovetensionfromconductorsorusewireclampGRCCtoremovetensionfromconductors.
Mold wearing out
too fast
Improper cleaning of molds
Only use soft bristle brush or cotton rag to clean out the mold. Use of metal brushes, screw
driver,orothermetalobjectswillscratchthemold.Also,donotuseplasticonthemoldasit
will melt and cause gassy welds.
Bent, burred, or out of round
conductors
Closing the mold on conductors that are bent, burred, or out of round will crack and chip the
molds. Try removing the damaged sections if possible.
Inserting conductors after mold is
closed
Try to close the mold with the conductors already inserted. This will reduce the wear on the
conductor openings.
UltraShot Troubleshooting
Tips
16

HargerLightning&Grounding
301ZieglerDrive•Grayslake,IL•60030
800.842.7437•847.548.8700
www.harger.com
IG-3.17
Ultraweld
®
Exothermic Welding Certication
Training by Harger
This training is hands-on and provides your team with
understanding of Harger’s Ultraweld exothermic welding
process.
The tools required to make a connection as well as the
inspection process, safety and troubleshooting are also
discussed.
Attendees become certied!
How Do You Get Started?
•WorkwithyourHargerSalesRepresentativetopicka
date and time that works best for you and your team.
•Hargerwillprovidethetrainingmaterialsandtrain
yourteamatyourdesignatedlocation,ex;jobsiteorat
yourofce.
•Attendeesmustsign-inandpassatestpriorto
certication.
•Individualcerticationcardswillbesentfordistribution
after successful class completion.
•Dependingonclasssize,trainingtypicallytakes
1to3hours.
/