
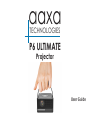
aaxa
TECHNOLOGIES
User Guide
P6 ULTIMATE
Projector

Caution!
WARNING: Please use this product as instructed. Misuse may cause
injury or death.
• DO NOT use while driving.
• DO NOT expose to water or wet surfaces. Electric shock may occur.
• DO NOT expose the projected LED image to your eyes or the eyes of others.
• DO NOT block or restrict airow from ventilation holes as this may cause the
projector to overheat.
• Keep the projector, battery, or charger away from any heat sources.

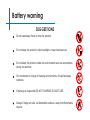
Battery warning
This product includes a large array of lithium ion batteries. AAXA Technologies employs
only premium lithium ion batteries, the same type used in high-end Electric Vehicles.
Additionally we pay careful attention to battery design safety. That said Lithium Ion
batteries contain a tremendous amount of energy and must be handled with care!
WARNING: Large battery products contain a tremendous amount of energy.
WARNING: Users must handle this product with care. Battery systems are susceptible to
shock damage, vibration damage, punctures, and overheating.
WARNING: Please respect the internal large lithium ion battery. Please remember it
contains a tremendous amount of energy.

Battery warning
Do not keep the product in direct sunlight or near heat sources.
Do not keep the product inside hot environments such as automobiles
during the summer.
Do not attempt to charge in freezing environments, this will damage
batteries.
If damage is suspected DO NOT CHARGE, DO NOT USE.
Always Charge on safe, no-ammable surfaces, away from ammable
objects.
Do not carelessly throw or drop the product.
SUGGESTIONS

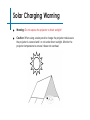
Solar Charging Warning
Warning: Do not expose the projector to direct sunlight!
Caution: When using a solar panel to charge the projector makes sure
the projector is covered and / or not under direct sunlight. Monitor the
projector temperature to ensure it does not overheat.

Table of Contents
Chapter 1: P6U at a Glance
P6U Introduction
Remote & KeypadRemote & Keypad
Accessories
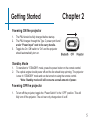
Chapter 2: Getting Started
Powering On / O
Charging the P6U
Focus Adjustment / Throw Distance
Bluetooth Mode / Lantern Mode
Connecting to Speakers/Headphone
Loading External Content
Chapter 3: Menu Screens
Main Menu
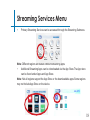
Streaming Services Menu
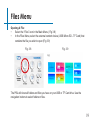
Files Menu
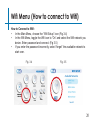
Wi Menu
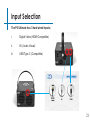
Input Selection
Oce Menu
Mirroring Menu
3D Function
Browser Menu
Apps Menu
Chapter 4: Settings Menu
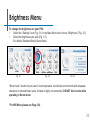
Brightness Menu
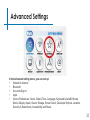
Advanced Settings
Language Settings
Display Settings
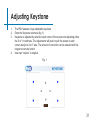
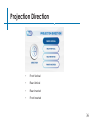
Keystone & Projection Direction
Bluetooth Menu
Upgrade/Reset
About Menu
Notes
1
3
4
5
6
7
8
11
12
16
17
19
20
21
22
24
27
28
29
30
31
32
33
34
35
39
40
41
42

1
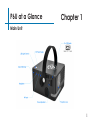
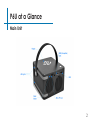
P6U at a Glance Chapter 1
Main Unit

1 2
P6U at a Glance
Main Unit

2 3
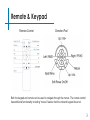
Remote & Keypad
Direction Pad
Both the keypad and remote can be used to navigate through the menus. The remote control
has additional functionality including “mouse” feature that the onboard keypad does not.
Remote Control

4
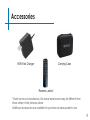
Accessories
*Under various circumstances, the actual accessories may be dierent from
those shown in the pictures above.
Additional accessories are available for purchase at www.aaxatech.com
65W Fast Charger Carrying Case
Remote Control

4 5
Getting Started Chapter 2
Powering ON the projector
Powering OFF the projector
Standby Mode
1. To transition to “STANDBY” mode, press the power button on the remote control.
2. The optical engine should power o and the fan should stop spinning. The projector
is now in “STANDBY” mode and can be turned on using the remote control.
*Note: Standby mode will still consume a small amount of power.
1. To turn o the projector, toggle the “Power Switch” to the “OFF” position. This will
fully turn o the projector. The unit can only charge when it is o.
1. The P6U should be fully charged before startup.
2. The P6U charges through the Type C power port found
under “Power Input” next to the carry handle.
3. Toggle the On / O switch to “On” and the projector
should automatically turn on.

6
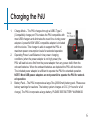
Charging the P6U
1. Charge Mode – The P6U charges through a USBC Type C
(Compatible) charge port.This makes the P6U compatible with
most USB chargers and eliminates the need for a clunky power
adapter. A powerful 65W USBC compatible adapter is included
with the device. This charger is able to support the P6U at
maximum power consumption levels for extended operation.
2. Operating Power Load Balance In low power charging
conditions (when the power adapter is not high power) the
P6U will load bal ance rst from the power adapter then any power decit from the
onboard batteries. When the onboard batteries are depleted the P6U will shut down.
T h e i n c l u d e d p o w e r a d a p t e r i s s u c i e n t t o o p e r a t e t h e P 6 U f o r e x t e n d e d o p e r a t i o n .
NOTE: Most USB power adapters are not powerful to operate the P6U for extend-
ed operation.
3. Battery Pack – The P6U incorporates a large 74w (20000mah) battery pack. Please see
battery warnings for cautions. The battery system charges at 0.3C (3+ hours for a full
charge). The P6U incorporates a large battery. PLEASE SEE BATTERY WARNINGS

7
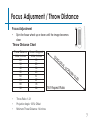
Focus Adjusment / Throw Distance
• Spin the focus wheel up or down until the image becomes
clear.
Focus Adjustment
DIAGONAL SCREEN SIZE
16:9 Aspect Ratio
Throw Distance
Units: Inches
20
30
40
50
60
70
80
90
Screen Diagonal
Units: Inches
19
29
38
48
57
67
76
86
Throw Distance Chart
• Throw Ratio: 1.2:1
• Projection Angle: 100% Oset
• Minimum Throw Distance: 14 inches

8
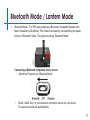
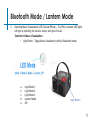
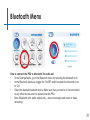
Bluetooth Mode / Lantern Mode
1. Bluetooth Mode – The P6U can operate as a Bluetooth Compatible Speaker and
Music Visualizer (LED eects). This mode is activated by hard-switching the power
button to “Bluetooth” mode. The projector will say “Bluetooth Mode”.
Connecting a Bluetooth compatible music source:
• Switch the Projector into “Bluetooth Mode”
• Select “AAXA Tech” in your Bluetooth connection screen on your device.
The devices should pair automatically.

9
Bluetooth Mode / Lantern Mode
2. Selecting Music Visualization (LED Special Eects) – The P6U’s onboard LED lights
will light up matching the volume, tempo, and type of music.
Controls for Music Visualization:
• Light Button - Toggle Music Visualization (while in Bluetooth mode)
a. Light Mode 1
b. Light Mode 2
c. Light Mode 3
d. Lantern Mode
e. O
Light Button

10
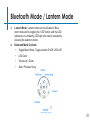
Bluetooth Mode / Lantern Mode
3. Lantern Mode: Lantern mode can be activated in Blue-
tooth mode and by toggling the “LED” button until the LED
lights stay on constantly. LED light color can be selected by
pressing the selection button.
4. Bluetooth Mode Controls:
• Toggle Music Mode, Toggle Lantern On/O, LEDs O
• LED Color
• Volume Up / Down
• Next / Previous Song

11
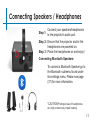
Connecting Speakers / Headphones
*CAUTION:Prolonged use of headphones
at a high volume may impair hearing.
To connect a Bluetooth Speaker go to
the Bluetooth submenu found under
the settings menu. Please see page
(37) for more information.
Connect your speakers/headphones
to the projector’s audio port.
Step 1:
Step 2:
Step 3:
Ensure that the projector and/or the
headphones are powered on.
Connecting Bluetooth Speakers:
Place the headphones on and enjoy!

12
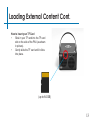
Loading External Content
The P6U can read les directly from
both a TF Card and USB Drive.
Supported le types include:
MP3 / WMA / OGG / WAV
AVI / JPG / GIF/ BMP
(up to 64 GB)
(up to 64 GB)

12 13
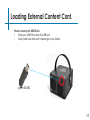
Loading External Content Cont.
How to insert your TF Card
• Slide in your TF card into the TF card
slot on the side of the P6U (as shown
in picture).
• Gently slide the TF card until it clicks
into place.
(up to 64 GB)

14
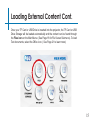
Loading External Content Cont.
How to insert your USB Drive
• Slide your USB Drive into the USB port.
• Gently slide the drive until it cannot go in any further.
(up to 64 GB)
Page is loading ...
Page is loading ...
Page is loading ...
Page is loading ...
Page is loading ...
Page is loading ...
Page is loading ...
Page is loading ...
Page is loading ...
Page is loading ...
Page is loading ...
Page is loading ...
Page is loading ...
Page is loading ...
Page is loading ...
Page is loading ...
Page is loading ...
Page is loading ...
Page is loading ...
Page is loading ...
Page is loading ...
Page is loading ...
Page is loading ...
Page is loading ...
Page is loading ...
Page is loading ...
Page is loading ...
Page is loading ...
Page is loading ...
-
 1
1
-
 2
2
-
 3
3
-
 4
4
-
 5
5
-
 6
6
-
 7
7
-
 8
8
-
 9
9
-
 10
10
-
 11
11
-
 12
12
-
 13
13
-
 14
14
-
 15
15
-
 16
16
-
 17
17
-
 18
18
-
 19
19
-
 20
20
-
 21
21
-
 22
22
-
 23
23
-
 24
24
-
 25
25
-
 26
26
-
 27
27
-
 28
28
-
 29
29
-
 30
30
-
 31
31
-
 32
32
-
 33
33
-
 34
34
-
 35
35
-
 36
36
-
 37
37
-
 38
38
-
 39
39
-
 40
40
-
 41
41
-
 42
42
-
 43
43
-
 44
44
-
 45
45
-
 46
46
-
 47
47
-
 48
48
-
 49
49


Ask a question and I''ll find the answer in the document
Finding information in a document is now easier with AI