Page is loading ...

WARNING
!
FAILURE TO FOLLOW INSTRUCTIONS AND WARNINGS COULD RESULT IN SERIOUS INJURY OR DEATH.
To reduce the risk of injury:
• Read and understand all the instructions, review all other accompanying documents, and inspect the equipment before use. It is your responsibility to
familiarize yourself with the proper use of this equipment and the inherent risks of inversion if these instructions are not followed, such as falling on your
head or neck, pinching, entrapment, equipment failure or aggravating a pre-existing medical condition. It is the responsibility of the owner to ensure that all
users of the product are fully informed about the proper use of the equipment and all safety precautions.
• ALWAYS read and understand the instructions and warnings associated with and accompanying any supplementary equipment, such as Teeter EZ-Up
Inversion & Chin-up Rack, Teeter Inversion Table, Adapter Kit, or bar.
• DO NOT use until approved by a licensed physician. Inversion is contraindicated in any medical or health condition that may be made more severe by an
elevation of blood pressure, intracranial pressure or mechanical stress of the inverted position, or that may impact your ability to operate the equipment.
This may include injury or illness, but also the side effects of any drug or supplement (prescribed or over-the-counter). Specific conditions may include, but
not be limited to:
· Any condition, neurological or otherwise, which results in unexplained tingling, weakness or neuropathy, seizure, sleep disorder, lightheadedness,
dizziness, disorientation, or fatigue, or impacts strength, mobility, alertness, or cognitive ability;
· Any brain condition, such as trauma, history of intracranial bleed, history or risk of TIA or stroke, or severe headaches;
· Any condition of the heart or circulatory system, such as high blood pressure, hypertension, increased risk of stroke, or use of anticoagulants (including
high doses of aspirin);
· Any bone, skeletal or spinal cord condition or injury, such as significant spinal curvature, acutely swollen joints, osteoporosis, fractures, dislocations,
medullary pins or surgically implanted orthopedic supports;
· Any eye, ear, nasal or balance condition, such as trauma, history of retinal detachment, glaucoma, optic hypertension, chronic sinusitis, middle or inner
ear disease, motion sickness, or vertigo;
· Any digestive or internal condition, such as severe acid reflux, hiatal or other hernia, gallbladder or kidney disease;
· Any condition for which exercise is specifically directed, limited or prohibited by a physician, such as pregnancy, obesity, or recent surgery.
• ALWAYS be certain the equipment is properly adjusted and tested, and that your ankles are secure before using the equipment. Ensure that the Gravity Boots are
snug, close fitting and secure EVERY TIME you use the equipment.
• ALWAYS wear securely tied lace-up shoes, such as normal style tennis shoes. DO NOT wear clothing or footwear that can interfere with securing the Gravity
Boots, such as high-tops or any shoes that extend above the ankle bones.
• ALWAYS ensure that the Gravity Boots are put on the correct leg so that the buckle levers are on the outside of the leg, versus on the inside where they can rub
against each other and unlatch or sustain potential damage.
• This Owner's Manual covers proper use of the Gravity Boots with Teeter products. DO NOT attempt to use the Gravity Boots with other brand inversion tables. If you
opt to use the Gravity Boots with other bars, ALWAYS ensure the bar meets the diameter, height, and weight requirements for use with Gravity Boots. Failure to do
so could result in serious injury of death.
• Gravity Boots are only compatible with certain Teeter model inversion tables (to verify compatibility, go to teeter.com/product-support). DO NOT use with these
inversion tables until the standard ankle clamps have been modified with the Adapter Kit.
• When using the Gravity Boots with the EZ-Up Rack or other inversion bars, ALWAYS install the EZ-Up Strap to assist with dismount.
• DO NOT use Gravity Boots with a bar that exceeds 1.25 in (3.2 cm) in diameter. Bars that are too large will stress the hook and could result in equipment failure.
• DO NOT use Gravity Boots with a bar that is not weight tested by two persons with a combined weight equal to or greater than 1.5 times the user's weight
hanging from one side of the bar then the other while bouncing vigorously.
• DO NOT use Gravity Boots with the EZ-Up Rack if you are over 250 lbs (113.6 kg). DO NOT use Gravity Boots with Teeter Inversion Tables if you are over 300 lbs (136
kg) or 6 ft 6 in (198 cm). Structural failure could occur or head/neck may impact the floor during inversion.
• DO NOT use Gravity Boots on a bar that is not mounted tall enough to allow your head to hang clear of the ground. ALWAYS ensure that the EZ-Up Rack upper
bar or non-Teeter brand bar is above the head of the tallest user in the household.
• New users will require the assistance of a spotter possessing the physical strength to lift and return the user to the upright position.
• DO NOT continue using the equipment if you feel pain or become light-headed or dizzy. If this occurs while inverting, immediately return to the upright position for
recovery and eventual dismount by following the dismounting instructions.
• DO NOT allow children to use the equipment. Keep children, bystanders, and pets away from the equipment while in use. The equipment is not intended for use by
persons with reduced physical, sensory or mental capabilities.
• DO NOT modify the equipment or use accessory attachments that are not recommended by the manufacturer. Utilize the equipment for its intended purpose only.
• DO NOT use the equipment at excessive heights more than 10 ft off the ground, above stairs, water, or other unsafe dismount environments.
• DO NOT use aggressive movements, bounce or swing excessively while inverting with the EZ-Up Gravity Boots. While inverted, DO NOT use weights, elastic bands,
any other exercise or stretching device or non-Teeter attachments. Use the Gravity Boots only for its intended use as described in these instructions.
• DO NOT exercise to the point of fatigue while inverted, otherwise returning upright or dismounting may be difficult.
• DO NOT use in any commercial, rental or institutional setting. This product is intended for indoor, home-use only. DO NOT store outdoors.
• DO NOT operate equipment while under the influence of drugs, alcohol, or medication that may cause drowsiness or disorientation.
• ALWAYS inspect the equipment prior to use. Make sure all fasteners and Locking Brackets are secure.
• ALWAYS replace defective components immediately and/or keep the equipment out of use until repair.
• Refer to additional warning notices posted on the equipment. If a product label should become lost, damaged or illegible, contact Customer Service for
a replacement.
DO NOT REMOVE. REPLACE IF DAMAGED OR REMOVED.
To download and print instructions, visit the product support page at teeter.com/product-support.
IMPORTANT SAFETY INSTRUCTIONS
READ ALL INSTRUCTIONS BEFORE USING THE EZ-UP™ GRAVITY BOOTS
For gravity-assisted stretching and decompression
EZ-Up™ Gravity Boots Owner’s Manual

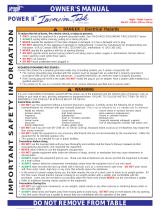
Calf loops are an optional feature designed to place a 2° bend in the knees (Figure 1), helping to reduce loads on
the ankles and prevent the front edge of the boot from placing uncomfortable pressure on the tops of your feet.
Calf Loops only accompany the standard size Gravity Boots, as the extra height of the XL Gravity Boots provide the
same function during inversion.
To Attach Calf Loops
Insert the base of the Calf Loop into the Calf Loop slot (Figure 2A). Make sure you hear the Calf Loop snap into
place for secure attachment. Repeat on other boot.
To Detach Calf Loops
Press your finger onto the Calf Loop Release Tab to disengage from the slot (Figure 2B).
EZ-Up™ Gravity Boots Owner’s Manual - 2
User Instructions
Using Calf Loops
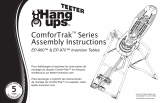
Securing EZ-Up™ Gravity Boots
Rotate the Gravity Boot so the hook is
positioned at the front of the leg, with
the strap locks on the inside of the leg.
Push down to seat the Gravity Boot on
top of the foot, wrapped around the
smallest part of the ankle.
4.
3.
Insert the strap ends into the strap locks
for two clicks, so that at least one full
“v-notch” is visible on the other side.
DO NOT tighten yet.
TO RELEASE: Lift up on the buckle lever
and push down on the strap lock tab to
disengage the strap.
For continued smooth use, keep buckles
latched when not in use.
5.
Adjust the straps to a snug, close fit
around the ankle. Close the buckle levers
so they snap shut completely.
Match the left and right Gravity Boot to
the correct leg. Insert foot through the
calf loop (left foot shown in this series).
1. 2.
Wrap the Gravity Boots around the ankle
with the strap locks toward the front
inside of the foot. Ensure that the blue
tabs under the buckle levers overlap the
strap lock side.
Figure 1
Figure 2A
Prior to Inverting
Employ the method of “HEAR, FEEL, SEE, TEST” every time prior to inverting with the Gravity Boots:
HEAR the strap locks on the Gravity Boots click into place.
FEEL that the Gravity Boots are snug and close-fitting around the smallest part of the ankles.
SEE that the buckles are secured.
TEST the Gravity Boots: Ensure they are snug, close-fitting and secure by holding onto the calf loop or top of the Gravity Boot
and wiggling and attempting to pull your feet through the Gravity Boots. Ensure that you CANNOT slide free from the Gravity
Boots each time before attempting to invert.
WARNING Calf Loop Slot
FAILURE TO PROPERLY SECURE THE ANKLES COULD RESULT IN SERIOUS INJURY OR DEATH!
ALWAYS check that the Gravity Boot straps are fully engaged in the strap locks in a setting that brings the
Gravity Boots to a snug, close fit around the smallest part of the ankles. ALWAYS wear securely tied, lace-up
shoes with a flat sole, such as a tennis shoe. DO NOT wear shoes with thick soles, boots, high-tops or any shoe
that extends above the anklebone, as this type of footwear could interfere with properly securing your ankles.
ALWAYS secure the Boots the correct corresponding leg, the Right Boot is marked as Right,
so that the buckle levers are on the backside of the leg.
Strap
Locks
Figure 2B
!
Buckle
Levers

For use with EZ-Up Inversion & Chin-Up Rack EZ-Up™ Gravity Boots Owner’s Manual - 3
WARNING
!
ALWAYS ensure the EZ-Up Strap is attached, and store it properly when not in use. ALWAYS work with a spotter until you are fully
confident in your ability to mount and dismount from the EZ-Up Rack. ALWAYS inspect the integrity of the door and equipment,
ensure that the Locking Brackets are secure and ALWAYS ensure the Gravity Boot Hooks are properly seated over the bar, or you could
fall while inverted, resulting in serious injury or death!
EZ-Up Strap
Figure 5
Figure 6
Figure 7
BEFORE USING THE EZ-UP RACK
Employ the method of “HEAR, FEEL, SEE, TEST” on page 2 when securing the Gravity Boots every time
prior to inverting on the EZ-Up Rack. Also, SEE and TEST the EZ-Up Rack or bar:
SEE that the locking brackets on the EZ-Up Rack are closed.
TEST the EZ-Up Rack before first use: Ensure that it is secure by having the user and another adult
person, with a combined weight equal to or greater than 1.5 times the user's weight, hang by their
hands from one end (one person on the Upper Bar and one on the Lower Bar) and bounce several
times applying their full weight. Repeat the test on the other end.
Mounting
1. Grasp the foam grips on the lower bar. Swing one leg up and place the sole of your foot on the Upper
Bar (Figure 5).
2. Raise the other leg up and hook the Gravity Boot on the Upper Bar. Shift your weight to the leg with
the hooked Gravity Boot (Figure 6).
3. Reposition the leg with the unhooked Gravity Boot and then proceed to hook that Gravity Boot on
the Upper Bar (Figure 7).
4. Slowly lower your body, using the EZ-Up Handles or Strap for assistance.
Dismounting
1. Grasp the foam grips on the Lower Bar. Use the EZ-Up Handles or Strap for assistance (Figure 7).
TIP: to reduce the chance of dizziness, pause for 30 seconds with both hands on the lower bar while the
boots are still hooked.
2. Shift your weight to one leg and unhook the Gravity Boot on the other leg (Figure 6).
3. Place the sole of that foot on the Upper Bar. Unhook the Gravity Boot on the other leg (Figure 5).
4. Lower both feet to the ground in a controlled manner.
Using the EZ-Up Strap
Before using Gravity Boots with the EZ-Up Rack or any other inversion bar, it's important to attach the
EZ-Up Strap to assist with returning upright. DO NOT use the EZ-Up Strap with the Teeter Inversion Table.
Assembly
Loop the EZ-Up Strap over the Lower Bar. Feed the large-looped end of the strap through the
small-looped end and pull until the fit is snug around the lower bar (Figure 4A).
Storage
Store the EZ-Up Strap between uses to prevent entanglement. Loop the entire length of the strap around
the bar and secure the end loop by tucking it behind the fully looped Strap to ensure that the Strap does
not unravel (Figure 4B).
Figure 4A
Figure 4B
Access the EZ-Up Inversion & Chin-Up
Rack Instructions by scanning with
your smartphone.
Attaching Owner's Manual
Thread the provided metal chain through the pre-punched hole in the upper corner of the Owner’s
Manual. Secure the chain around one of the EZ-Up Handles, out of the way when the EZ-Up Rack is in
use (Figure 3).
IMPORTANT: Once attached, DO NOT remove the Owner’s Manual. It should remain permanently attached
to your EZ-Up Rack to serve as a reference for all users in regards to proper use of the equipment.
Figure 3

For use with Teeter Inversion Table EZ-Up™ Gravity Boots Owner’s Manual - 4
Figure 10 CORRECT Figure 11 INCORRECT
Figure 8
Figure 12
Figure 13
Mounting
This section is to replace the “Secure Your Ankles” section in the Inversion Table Owner’s Manual if you
opt to utilize Gravity Boots with your Teeter instead of the standard ankle lock system. Prior to inverting,
properly hook the Gravity Boots to the Adapter Kit on the Inversion Table by following these steps:
1. With your back to the Table Bed, and using the handle to steady yourself, carefully step with one
leg inside the A-Frame (the A-Frame Crossbar will be behind you). Lift the other leg over the
installed Adapter Kit and place it on the floor on the opposite side, to straddle the
Main Shaft (Figure 8).
2. To balance yourself, rest only your lower body against the lower portion of the Table Bed. Lift one
foot so that the Gravity Boot Hook wraps around the Adapter Kit. Slide the hook along the Adapter
Kit until your foot is able to rest flat on the Ankle Comfort Dial (Figure 9). Repeat with other side.
3. Ensure that the hooks are secure around the Adapter Kit, with the bar touching or nearly touching
the base of the hook (Figure 10 & 11). If there is too much or not enough space between the base
of the hooks and the bar, you may need to adjust the Ankle Comfort Dial up or down to find your
correct setting (see Inversion Table Owner's Manual).
Employ the method of “HEAR, FEEL, SEE, TEST” on page 2 when securing the Gravity Boots every time
prior to inverting on the Inversion Table. Also, SEE and TEST the Gravity Boots and Adapter Kit:
SEE that the Gravity Boot Hooks are securely hooked to the Adapter Kit with the bar touching
or nearly touching the base of the hook.
TEST the Gravity Boots and Adapter Kit: Ensure that they are secure by wiggling and attempting
to pull your feet away from the Bar. Ensure that you CANNOT disengage the Boot Hooks from the
Adapter Kit each time before attempting to invert.
Dismounting
This section is to replace the “Dismounting” section in the Inversion Table Owner’s Manual. Properly
unhook the Gravity Boots from the Adapter Kit by following these steps:
1. Keep your lower body supported against the Table Bed as you slide each Gravity Boot hook
along the Adapter Kit to the outside edge. Unhook the Gravity Boots and step onto
the floor (Figure 13).
2. Carefully stand up and ensure that you have your balance before stepping over the Main
Shaft and finishing your dismount.
WARNING
!
Figure 9
4. Verify that no part of your footwear or garments touch or interfere with the EZ-Up Gravity Boots
and Adapter Kit in any way during inversion.
Access the Teeter Adapter Kit
Instructions by scanning
with your smartphone.
Thread the provided metal chain through the pre-punched hole in the upper corner of the Gravity Boots Owner's Manual and secure
through the hinge plate, or attach to the existing Teeter Inversion Table Owner's Manual chain.
IMPORTANT: Once attached, DO NOT remove the Owner’s Manual. It should remain permanently attached to your Teeter Inversion Table
to serve as a reference for all users in regards to proper use of the equipment.
Attaching Owner's Manual
Gravity Boots are only compatible with certain Teeter model Inversion Tables (to verify compatibility, go to teeter.com/product-support).
DO NOT use with these inversion tables until the standard ankle clamps have been modified with the Adapter Kit. ALWAYS ensure the
Gravity Boot Hooks are properly seated around the bar, or you could fall while inverted, resulting in serious injury or death!
ALWAYS refer to the Inversion Table Owner’s Manual prior to use.

Get the Most Out of Your Teeter EZ-Up™ Gravity Boots Owner’s Manual - 5
Get Started
Determine the Duration:
Begin with short 1-2 minute sessions to allow your body to adapt to
inversion. Stay inverted only as long as you are comfortable, even if only for a few seconds at first. Over
time, as you feel comfortable, gradually work up to a duration that allows your muscles to fully relax and
release so your back can decompress. This should typically take about 3-5 minutes.
Make it a Habit:
Most users will find better results with shorter, more frequent sessions than longer
sessions done infrequently. Ideally, work it into your routine so that you are able to invert several
times a day.
Realize Benefits
Relax & Release:
Close your eyes, take deep breaths and elongate your body. Focus on un-tensing
your muscles to allow your spine and joints to decompress. The better you are able to relax, the more
benefits you will feel.
Add Stretching & Movement:
Beginners can gently stretch and twist while inverted to help
maximize the benefits for joints and ligaments as well as promote muscle relaxation during inversion.
More advanced users can perform inverted squats, sit-ups, and crunches to maximize benefits and
build muscle tone.
Give it Time:
Like starting any new exercise program, it can take some time to see the results.
Some people feel the benefits immediately and some take longer. Be patient, stick with it and
invert often.
Maximize Comfort
Increase Ankle Comfort:
Wear socks with lace-up shoes – the material will provide added
cushion and support for the ankles. Use the Calf Loops with standard size Gravity Boots.
Reduce Muscle Soreness:
As with any exercise program, you may experience mild soreness
when you first get started. While you're relaxed, your body is making huge changes as your skeleton and
muscles adapt. Don't do too much, too soon - begin with a modest angle and shorter duration to reduce
the likelihood of soreness.
Listen to Your Body:
Respond to any signs of discomfort by making changes: reduce the duration,
try different times of day, take deep breaths, and add movement and stretching. When you feel like
you've had enough, return upright! Inversion is all about relaxation and enjoyment.
Dismount Slowly:
After inverting, be sure to allow your body to readjust and your back to gradually
re-compress before dismounting. On the Teeter Inversion Table, rotate up and rest at just past horizontal (0)
for 15-30 seconds or more. On the EZ-Up Rack, reach with your hands to the EZ-Up Handles or EZ-Up Strap
and rest for 15-30 seconds or more. Dizziness after a session is a sign that you have come up too fast.
Understand the Equipment:
Watch the Getting Started DVD for more inverted stretching and
exercise tips. Read and always follow the Owner's Manual.

Feel Better. Move Better. Live Better.
Specifications subject to change without notice. Teeter and Teeter logo are registered trademarks of Teeter.
© 2019 Teeter. International law prohibits any copying. LE1019 0319-4
EN
Teeter Decompression Devices are 510(k) registered with the FDA and are multiple user, reusable medical devices for home use, intended to provide traction to the spine while
stretching the para-spinal muscle and soft tissues. The devices provide non-powered traction and are meant for use by adults.
Teeter Decompression Devices are indicated for the following conditions: back pain, muscle tension, degenerative disc disease, spinal degenerative joint disease, spinal stenosis,
herniated disc, spinal curvature due to tight muscles, sciatica, muscle spasm, and facet syndrome.
Inversion Has Changed My Life and
I Believe it will Change Yours.
In 1981, my wife and I started this company out of our family home
with one goal: to help people who suffer from back pain find natural,
sustainable relief. I understand what it is like to struggle with back
pain and the limitations it places on one’s lifestyle. I tried practically
everything to find relief, and nothing actually targeted the source of
the ache rather than deal with just the symptoms ... Until I tried
inversion therapy.
Thank you for trusting in Teeter®. You may have seen other
inversion tables on the market, but they can’t compare to Teeter’s
workmanship and durability. My name is my promise to you - with a
Teeter, you know that you are investing in quality and a product that
is truly built for the benefits.
Join the legacy of 3+ million Teeter users
teeter.com | 800.847.0143
WATCH
ROGER'S
FULL STORY
/TeeterFitness @TeeterFitness /TeeterTV
#MyTeeterStory
Share Your Story!
Has Teeter improved your quality
of life? We want to hear from
you! Simply use the hashtag
#MyTeeterStory on Facebook,
Twitter, or Instagram and be sure
to write a review on our website
at teeter.com/reviews.
Jenny & Roger Teeter
Founder & Innovator
I'm 65 and have experienced two serious back
injuries in my life. I have been using Teeter
Gravity Boots for
more than
15 years
and I've lived virtually
without back issues my entire life.
I primarily
credit
inversion
to
that fact. - Lloyd
After suffering long enough, I finally
bought the Teeter Inversion System and I
am thrilled by the results... It's
instant
relief!
I can't believe how great I feel.
I wish I purchased this system years ago.
- Elizabeth
“I can truly say that these Gravity Boots are
awesome! After a 2 hour workout, I hang
upside down for 5 minutes and it helps
relieve the stress in my back
.
I would recommend these boots to anyone
and everyone I know.
Thanks Teeter!
- Roberto
/