Gecko in.k300 Control Panel User guide

Category
Numeric keypads
Type
User guide

Gecko in.k300 Control Panel brings spa control to your fingertips with its user-friendly interface. It allows you to effortlessly start or stop accessories like pumps and blowers, and monitor spa functions through its bright LCD screen. Adjust water temperature, set filter cycles, activate energy-saving modes, and customize settings to your liking. The in.k300 also features a Smart Winter Mode to protect your spa from freezing, and intuitive error messages to assist with troubleshooting.

Gecko in.k300 Control Panel brings spa control to your fingertips with its user-friendly interface. It allows you to effortlessly start or stop accessories like pumps and blowers, and monitor spa functions through its bright LCD screen. Adjust water temperature, set filter cycles, activate energy-saving modes, and customize settings to your liking. The in.k300 also features a Smart Winter Mode to protect your spa from freezing, and intuitive error messages to assist with troubleshooting.

in.k300
the essential spa keypad
TechBook
Bright LCD screen
Spa function icons
Affordable
1
Warnings ������������������������������������������������������������������������������������������������������������������������������������������������������������������������� 2
Introduction ��������������������������������������������������������������������������������������������������������������������������������������������������������������������� 3
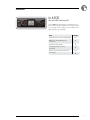
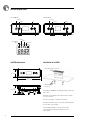
in�k300 keypad layout ����������������������������������������������������������������������������������������������������������������������������������������������������� 4
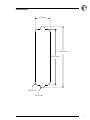
in�k300 dimensions ��������������������������������������������������������������������������������������������������������������������������������������������������������� 4
Installation of in�k300 ������������������������������������������������������������������������������������������������������������������������������������������������������ 4
Drilling template ��������������������������������������������������������������������������������������������������������������������������������������������������������������� 5
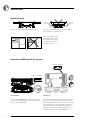
Installation notes �������������������������������������������������������������������������������������������������������������������������������������������������������������� 6
Connecting in�k300 keypad to the spa pack ������������������������������������������������������������������������������������������������������������������� 6
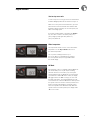
Keypad functions ������������������������������������������������������������������������������������������������������������������������������������������������������������� 7
-Start or stop accessories ������������������������������������������������������������������������������������������������������������������������������������� 7
-Water temperature ��������������������������������������������������������������������������������������������������������������������������������������������� 7
-Off Mode ������������������������������������������������������������������������������������������������������������������������������������������������������������ 7
Programming steps ��������������������������������������������������������������������������������������������������������������������������������������������������������� 8
-Program menu ��������������������������������������������������������������������������������������������������������������������������������������������������� 8
-Setting the clock ������������������������������������������������������������������������������������������������������������������������������������������������� 8
-Programming the filter/ purge cycles ������������������������������������������������������������������������������������������������������������������ 8
-Setting filter or purge cycle start time ������������������������������������������������������������������������������������������������������������������ 9
-Setting filter cycle duration ��������������������������������������������������������������������������������������������������������������������������������� 9
-Setting filter or purge cycle frequency ���������������������������������������������������������������������������������������������������������������� 9
-Setting economy mode* ������������������������������������������������������������������������������������������������������������������������������������� 9
-Setting economy start time* ������������������������������������������������������������������������������������������������������������������������������� 9
-Setting economy duration* ������������������������������������������������������������������������������������������������������������������������������� 10
-Setting temperature unit ����������������������������������������������������������������������������������������������������������������������������������� 10
-Smart Winter Mode ����������������������������������������������������������������������������������������������������������������������������������������� 10
-Cooldown ��������������������������������������������������������������������������������������������������������������������������������������������������������� 10
-Water temperature regulation ��������������������������������������������������������������������������������������������������������������������������� 10
Error messages �������������������������������������������������������������������������������������������������������������������������������������������������������������� 11
Specifications ���������������������������������������������������������������������������������������������������������������������������������������������������������������� 12
Table des matières
2
WARNINGS:
Before installing or connecting the unit, please read the following�
FAILURE TO COMPLY WITH THE FOLLOWING WARNINGS MAY SIGNIFICANTLY SHORTEN THE PRODUCT’S
LIFE TIME, AND LEAD TO FAILURES AS WELL AS HAZARDOUS CONDITIONS*. COMMON SENSE MUST
ALWAYS PREVAIL WHEN EVALUATING THE INSTALLATION AND/OR USE OF ANY ELECTRONIC CONTROL IN
A FINAL APPLICATION.
RESPECT ENVIRONMENTAL CONDITIONS LISTED AT END OF TECHBOOK�
THIS UNIT MUST BE INSTALLED BY QUALIFIED PERSONNEL�
ONLY QUALIFIED PERSONNEL ARE TO SERVICE THIS UNIT�
THERE ARE NO USER SERVICEABLE PARTS INSIDE�
THIS UNIT SHOULD BE INSTALLED ON A CLEAN FLAT SURFACE�
THE GASKET ON THE BACK OF THE UNIT WILL PREVENT WATER INFILTRATION INSIDE, BEHIND THE
MOUNTED SURFACE� IF THE GASKET IS DAMAGED, SEAL THE BACK OF THE UNIT WITH SILICONE TO AVOID
ANY LEAKAGE BEHIND THE MOUNTED SURFACE�
THIS UNIT MUST BE MOUNTED ON THE OUTSIDE EDGE OF THE SPA� SEE INSTALLATION SECTION FOR
DETAILS�
THE BACK OF THIS UNIT SHOULD NOT BE ENCLOSED IN A WAY THAT CAUSES WATER TO COLLECT�
SEE INSTALLATION SECTION FOR DETAILS�
* HAZARDOUS CONDITION:
A CONDITION THAT IS POTENTIALLY DAMAGING AND/OR DANGEROUS TO THE OPERATOR OR
SURROUNDINGS� THIS INCLUDES, BUT IS NOT LIMITED TO: FIRE, FLOODING OR OTHER WATER DAMAGE,
DIELECTRIC BREAKDOWNS (PRESENCE OF HIGH VOLTAGE), ETC�
MAINTENANCE
If you have problems, do not attempt to repair the unit yourself� Return it to your dealer or service station for servicing
ACCESSORY PARTS
Be sure to use only the specified accessory parts� Use of other than designated parts may damage this unit internally or
may not securely install the unit in place� This may cause parts to become loose resulting in hazards or product failure�
DISPOSAL OF THE PRODUCT
The appliance (or the product) must be disposed of separately
in accordance with the local waste disposal legislation in force�
Compatible spa packs:
in�xm2, in�xe, in�yt, in�yj, and in�ye with compatible software revision�
Aeware®, Gecko®, and their respective logos are Registered Trademarks of Gecko Alliance Group�
in�k300™, in�xm2™, in�xe™, in�yt™, in�ye™, and in�yj™ and their respective logos are trademarks of
Gecko Alliance Group�
All other product or company names that may be mentioned in this publication are tradenames,
trademarks or registered trademarks of their respective owners�
Warnings
3
in�k300
the essential spa keypad
The in�k300 brings all the features you really need to one
keypad� Compact, with a big LCD screen; bright enough to
be seen in day, simple enough to use in the middle of the
night; affordable, yet solidly built�
Item in.k300
Static LCD size (as measured diagonally) 1�5"
Optional mounting with wing-nuts
and spacers
Double-sided bezel gasket
Icons giving instant spa status
information
Number of pumps/blowers supported 1 or 2
Time display
Introduction
4
6�30"
(160�02 mm)
in.k300 dimensions Installation of in.k300
To install the in�k300, use the drilling template provided in
this section�
Determine the mounting location and stick the template
on chosen location�
Cut out an opening according to the template�
Clean the installation surface and peel the adhesive gasket
from the back of the keypad�
Insert keypad and align it correctly, then ensure it
is properly glued by gently pressing evenly on the
entire surface�
Gasket with or without adhesive
Optional wing nuts
and spacers
2�25"
(57�15 mm)
1�87"
(47�45 mm)
Up
Down
Light
Pump 1
Indicator lights Up / DownIndicator lights
Light
Pump 2
Pump 1
1 Pump Model 2 Pump Model
Set Point
Smart Winter
Mode
Heater
Filter
in.k300 keypad layout
5
Drilling template
36,58 mm
144,02 mm
131,32 mm
R 6,35 mm
R 6,35 mm
6
It is recommended to install
the in�k300 on the outside
edge of the hot tub, so that
it is not subject to moisture
trapped by the cover�
The back of the in�k300 should not be enclosed where
water can gather, but instead cut out�
Keypad placement
Connecting in.k300 keypad to the spa pack
Vent hole on back of keypad should not be blocked�
Installation notes
Main keypad in�k300
Main keypad in�k300
in.xe & in.xm 2
To connect the in�k300 keypad, simply insert its in�link
connector into the appropriate keypad connector of the
pack enclosure (as illustrated)�
in.ye & in.yt
To connect the keypad, remove the cover, then insert the
in�link connector into the appropriate keypad connector
(as illustrated)� Route the cable through one of the molded
strain relief channels on the bottom right side of the spa
pack (as illustrated)� Fill the remaining space with the
foam gaskets supplied� Don’t forget to replace the cover
and all screws (torque to 8 in� lb max (0�9 N�m))�
7
Start or stop accessories
To start or stop an accessory, press the associated button�
Indicators will light up when the associated accessory is on�
When an accessory has more than two states, press the
button until it reaches the desired state� Indicators will
flash when dual speed pumps are on at low speed, and
will be solid at high speed�
If you have a blower it will be controlled by the Pump 2
key� The order of actions is as follows: pump 2 on;
pump 2 high speed (if applicable); blower on;
pump 2 off; blower off�
Keypad functions
Water temperature
The temperature shown on screen is the current water
temperature� Use the Up and Down buttons to set
the desired temperature�
The set point icon will appear at the top of
the screen� After 3 seconds without any change to
the set temperature value, the keypad will resume
the normal display�
Off Mode
Pressing Pump 1 for 5 seconds will enable the Off mode�
This mode allows you to stop all outputs including
automatic functions such as filter cycle, heat request
and smart winter mode for 30 minutes to perform quick
spa maintenance� When Off mode is active, the display
will toggle between the “OFF” message, the clock and
the water temperature� The spa light will flash for a few
seconds before the end of the 30 minutes to warn you that
the system is about to resume its normal operation� Press
Pump 1 or Pump 2 (if available) to restart the system
before the expiration of the 30 minute delay� When the
system resumes its normal operation, the display shows
“On“ for 3 seconds�
8
Program menu
The program menu is accessible by holding down the
Light key for 5 seconds� In the program menu the following
parameters can be set: clock, filter or purge cycles, economy
mode and temperature units� While in the program menu,
use the Up or Down key to adjust the parameters and use
the Light key to jump to the next parameter� The changes will
be saved after the confirmation of the last parameter only�
If there is no action taken for 10 seconds, the system will exit
the program menu without saving any changes�
Setting the clock
Enter the program menu by holding down the Light key
for 5 seconds� The display will show the current clock setting
with the hour flashing�
Depending on factory settings your system may be set
to 24-hour time or 12-hour time�
Setting the hour: Use the arrow keys to adjust the hour� Press
the Light key to jump to the next parameter, the minutes�
Setting the minutes: Use the arrow keys to adjust the
minutes� Press the Light key to jump to the next parameter,
the filter or purge start time (FS)�
Programming the filter/ purge cycles
Depending on system configuration your spa will
perform either a filter or a purge cycle� The filter cycle
menu consists of the following parameters: the start time
(FS), the duration (Fd) and the frequency (FF)� The purge
cycle menu consists of the following parameters: the start
time (FS) and the frequency (FF)�
A filter cycle consists of starting all the pumps and blower
in high speed for 1 minute (purge step) then, the pump
associated with the filter will run in low speed for the
remaining duration of the filter cycle (clean step)�
A purge cycle is used when the spa is equipped with a
24 hour circulation pump which provides a continuous
clean step� It consists of starting all the pumps and blower
in high speed for 1 minute�
Programming steps
9
Setting filter or purge cycle start time
The display will show FSxx, “xx” representing the starting
hour of the cycle� Use the arrow keys to adjust the hours�
Use the Light key to jump to the next parameter,
filter duration (Fd)�
Setting filter or purge cycle frequency
The display will show FFxx, “xx” representing the number of
cycles per day� Use the arrow keys to adjust the frequency�
Use the Light key to jump to the next parameter, economy
mode (EP)�
The “Filter” indicator lights up when filter is on
and flashes when suspended�
Setting filter cycle duration
(not available on purge systems)
The display will show Fdxx, “xx” representing the duration
in hours of the filter cycle� Use the arrow keys to adjust the
duration� Use the Light key to jump to the next parameter,
filter or purge frequency (FF)�
0 = no filtration
24 = continuous filtration
It is not recommended to set this to "0"�
Setting economy mode*
This mode allows you to lower the temperature set point of
the spa by 20 °F (11 °C) during a certain period of the day�
The display will show EPx, “x” representing the state of
the programmed economy (0 = disabled, 1 = enabled)�
Use the arrow keys to enable or disable economy mode�
Use the Light key to jump to the next parameter,
economy start time (ES)�When the Economy mode is ON,
the display will toggle between the “Eco” message, the
time, and the water temperature�
Setting economy start time*
The display will show ESxx, “xx” representing the hour
at which the economy mode will become active� Use the
arrow keys to adjust the hour� Use the Light key to jump
to the next parameter, economy duration (Ed)�
* Note that the parameters for the economy mode settings are associated to specific low level configuration of the system that are not
present in all software revisions.
Programming steps
10
Setting economy duration*
The display will show Edxx, “xx” representing the duration in
hours of the economy mode� Use the arrow keys to adjust
the hour� Use the Light key to jump to the next parameter,
temperature unit�
24 = continuous economy
Setting temperature unit
Water temperature can be displayed in either Fahrenheit (°F)
or Celsius (°C)� The display will show °F or °C�
Use the arrow keys to change the setting�
Use the Program or Light key to save all the parameters�
Smart Winter Mode
Our Smart Winter Mode protects your system from the
cold by turning pumps on several times a day to prevent
water from freezing in pipes�
The “SWM” indicator lights up when freezing is
detected and flashes when the purge is active�
Water temperature regulation
Every 15 to 90 minutes the pump will run to ensure
accurate water temperature readings as well as avoid
heater activation in dry conditions� After verifying pump
activation and taking a water temperature reading if
required, the system automatically turns the heater on to
reach and maintain water temperature at Set Point�
Indicator flashes when taking water
temperature reading�
Cooldown
After heating the spa water to the desired Set Point, the
heater is turned off, but its associated pump (Pump 1
low-speed or CP) remains on for a predetermined period
of time to ensure adequate cooling of the heating element,
prolonging its useful life�
*
Note that the parameters for the economy mode settings are associated to specific low level configuration of the system that are not present in
all software revisions.
Programming steps
11
Error messages
Code Message
HL Warning! HL Error
FLO No flow for more than 2 hours
FLO No flow condition
HR Danger! Relay stuck
OH Warning! Spa temp� high
Prr Warning! Temp� probes defective
AOH Internal pack temp� high
FLC Flow switch closed
SP in Input voltage issue
FrEr The input frequency is out of range
RH NC Comm� error in�xm2 - in�therm
RH ID in�xm2 - in�therm incompatible
SC ER Learning mode error
F1 in�xm2 Fuse # 1 is blown
F2 in�xm2 Fuse # 2 is blown
F3 in�xm2 Fuse # 3 is blown
Hr Danger! Thermal fuse error
UPL The spa pack does not have valid software� Please insert valid in�stick to reprogram spa pack�
BL The spa pack does not have valid software� Please insert valid in�stick to reprogram spa pack�
The list below shows the different error messages that can appear on the home screen�
Refer to the troubleshooting and error codes section of the TechBook for your spa pack for more details�
12
Specifications and design are subject to change without prior notice�
Part number
1 pump model: 0607-008036
2 pump model: 0607-008037
Model
IN�K300-CL-GE1
Environmental
Operating temperature: -68°F (-20°C) to 149°F (65°C)
Storage temperature: -22°F (-30°C) to 185°F (85°C)
Humidity: Up to 70% condensing
Water ingress protection: IPX-5
Mechanical
Weight: 0�69 lb (313 g)
Dimensions (W x H x D): 2�25” x 6�30” x 1�87” (57�15 mm x 106�02 mm x 47�45 mm)
Compatibility
in�yj, in�yt, in�ye, in�xe, or in�xm2 spa packs with appropriate software revision
Specifications
Gecko Alliance
450 des Canetons, Québec (Qc), G2E 5W6 Canada, 1.800.78.GECKO
www.geckoalliance.com Printed in Canada
9919-101218-D
Rev. 02-2018
© Groupe Gecko Alliance Inc., 2018
All trademarks or registered trademarks
are the property of their respective owners.
  • Page 1 1
  • Page 2 2
  • Page 3 3
  • Page 4 4
  • Page 5 5
  • Page 6 6
  • Page 7 7
  • Page 8 8
  • Page 9 9
  • Page 10 10
  • Page 11 11
  • Page 12 12
  • Page 13 13
  • Page 14 14

Gecko in.k300 Control Panel User guide

Category
Numeric keypads
Type
User guide

Gecko in.k300 Control Panel brings spa control to your fingertips with its user-friendly interface. It allows you to effortlessly start or stop accessories like pumps and blowers, and monitor spa functions through its bright LCD screen. Adjust water temperature, set filter cycles, activate energy-saving modes, and customize settings to your liking. The in.k300 also features a Smart Winter Mode to protect your spa from freezing, and intuitive error messages to assist with troubleshooting.

Ask a question and I''ll find the answer in the document

Finding information in a document is now easier with AI