49-80804 3
READ AND SAVE THESE INSTRUCTIONS
IMPORTANT SAFETY INFORMATION
READ ALL INSTRUCTIONS BEFORE USING THE APPLIANCE
SAFETY INFORMATION
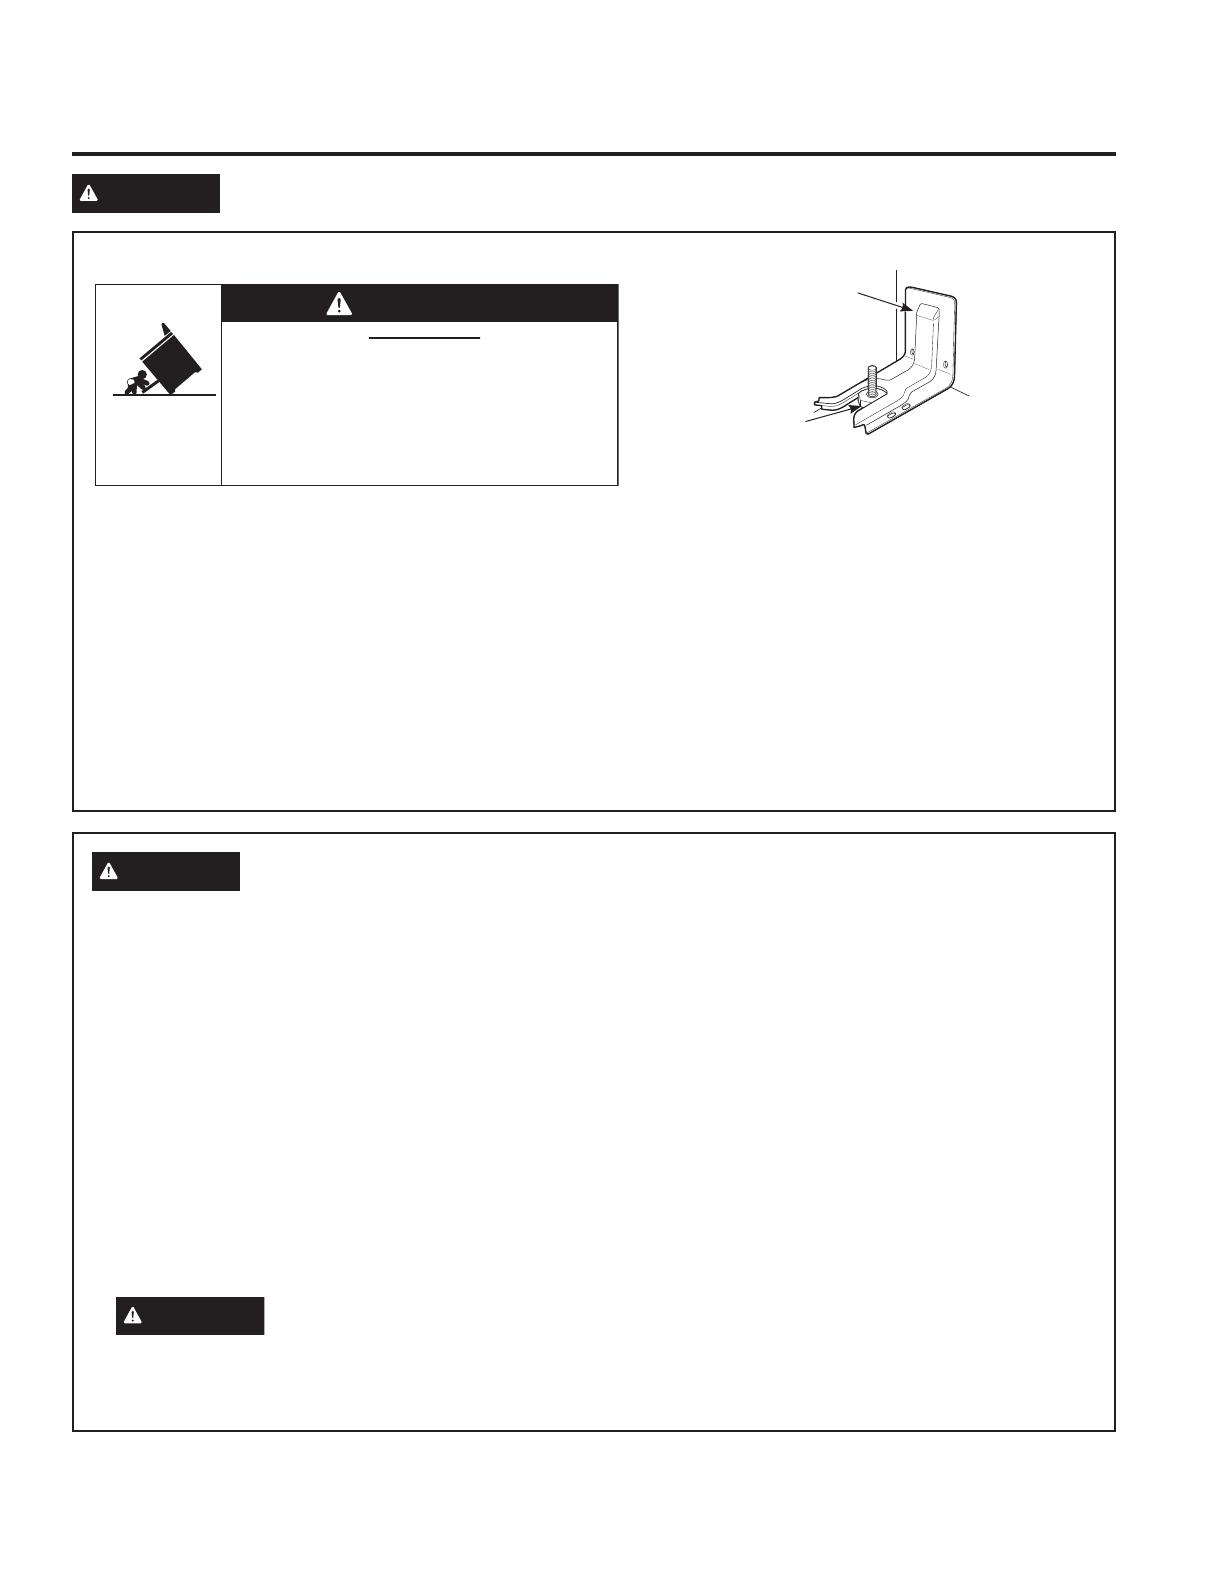
ANTI-TIP DEVICE
To reduce the risk of tipping the range, the range must
be secured by a properly installed anti-tip bracket. See
installation instructions shipped with the bracket for
complete details before attempting to install.
For Free-Standing and Slide-In Ranges
To check if the bracket is installed and engaged
properly, look underneath the range to see that the
rear leveling leg is engaged in the bracket. On some
models, the storage drawer or kick panel can be
removed for easy inspection. If visual inspection is not
possible, slide the range forward, confirm the anti-tip
bracket is securely attached to the floor or wall, and
slide the range back so the rear leveling leg is under
the anti-tip bracket.
If your range is removed for cleaning, servicing or
any reason, be sure the anti-tip device is reengaged
properly when the range is replaced. Failure to take
this precaution could result in tipping of the range
and can result in death or serious burns to children or
adults.
Never completely remove the leveling legs or the
range will not be secured to the anti-tip device
properly.
WARNING
Read all safety instructions before using the product. Failure to follow these instructions may result
in fire, electrical shock, serious injury or death.
• A child or adult can tip the range and be killed.
• Install the anti-tip bracket to the wall or floor.
• Engage the range to the anti-tip bracket by sliding the
range back such that the foot is engaged.
• Re-engage the anti-tip bracket if the range is moved.
• Failure to do so can result in death or serious burns
to children or adults.
Tip-Over Hazard
WARNING
Anti-Tip
Bracket
Leveling Leg
Free-Standing and Slide-In Ranges
WARNING
GENERAL SAFETY INSTRUCTIONS
Ŷ 8VHWKLVDSSOLDQFHRQO\IRULWVLQWHQGHGSXUSRVHDV
described in this Owner’s Manual.
Ŷ %HVXUH\RXUDSSOLDQFHLVSURSHUO\LQVWDOOHGDQG
grounded by a qualified installer in accordance with
the provided installation instructions.
Ŷ 'RQRWDWWHPSWWRUHSDLURUUHSODFHDQ\SDUWRI\RXU
range unless it is specifically recommended in this
manual. All other servicing should be transferred to
a qualified technician.
Ŷ %HIRUHSHUIRUPLQJDQ\VHUYLFHXQSOXJWKHUDQJH
or disconnect the power supply at the household
distribution panel by removing the fuse or switching
off the circuit breaker.
Ŷ 'RQRWOHDYHFKLOGUHQDORQH²FKLOGUHQVKRXOGQRW
be left alone or unattended in an area where an
appliance is in use. They should never be allowed
to climb, sit or stand on any part of the appliance.
Ŷ
CAUTION
'RQRWVWRUHLWHPVRILQWHUHVWWR
children above a range or on the backguard of a
UDQJH²FKLOGUHQFOLPELQJRQWKHUDQJHWRUHDFK
items could be seriously injured.
Ŷ 8VHRQO\GU\SRWKROGHUV²PRLVWRUGDPSSRW
holders on hot surfaces may result in burns from
VWHDP'RQRWOHWSRWKROGHUVWRXFKKRWVXUIDFH
XQLWVRUKHDWLQJHOHPHQWV'RQRWXVHDWRZHORU
other bulky cloth in place of pot holders.
Ŷ 1HYHUXVH\RXUDSSOLDQFHIRUZDUPLQJRUKHDWLQJ
the room.
Ŷ 'RQRWWRXFKWKHVXUIDFHXQLWVWKHKHDWLQJHOHPHQWV
or the interior surface of the oven. These surfaces
may be hot enough to burn even though they are
GDUNLQFRORU'XULQJDQGDIWHUXVHGRQRWWRXFK
or let clothing or other flammable materials contact
the surface units, areas nearby the surface units or
any interior area of the oven; allow sufficient time
for cooling first. Other surfaces of the appliance
may become hot enough to cause burns. Potentially
hot surfaces include the cooktop, areas facing the
cooktop, oven vent opening, surfaces near the
opening and crevices around the oven door.
Ŷ 'RQRWKHDWXQRSHQHGIRRGFRQWDLQHUV3UHVVXUH
could build up and the container could burst,
causing an injury.