JVC KD-G821 User manual

Category
Car media receivers
Type
User manual
ENGLISHDEUTSCH
РУCCKИЙ
CD RECEIVER
CD-RECEIVER
РЕСИВЕР С ПРОИГРЫВАТЕЛЕМ КОМПАКТ-ДИСКОВ
KD-G821
For installation and connections, refer to the separate manual.
Für den Einbau und die Anschlüsse siehe das eigenständige Handbuch.
Указания по установке и выполнению соединений приводятся в отдельной инструкции.
INSTRUCTIONS
BEDIENUNGSANLEITUNG
ИНСТРУКЦИИ ПО ЭКСПЛУАТАЦИИ
GET0362-006A
[EY]
For canceling the display demonstration, see page 6.
Zum Abbrechen der Displaydemonstration siehe Seite 6.
Информацию об отмене демонстрации функций дисплея см. на стр. 6.
Cover_KD-G821_006A_1.indd 2Cover_KD-G821_006A_1.indd 2 15/12/05 5:25:50 pm15/12/05 5:25:50 pm
2
ENGLISH
How to forcibly eject a disc
“Please Eject” appears on the display.
If this does not work, reset your unit.
Be careful not to drop the disc when it ejects.
Thank you for purchasing a JVC product.
Please read all instructions carefully before operation, to ensure your complete understanding and to
obtain the best possible performance from the unit.
IMPORTANT FOR LASER PRODUCTS
1. CLASS 1 LASER PRODUCT
2. CAUTION: Do not open the top cover. There are no user serviceable parts inside the unit; leave
all servicing to qualified service personnel.
3. CAUTION: Visible and invisible laser radiation when open and interlock failed or defeated.
Avoid direct exposure to beam.
4. REPRODUCTION OF LABEL: CAUTION LABEL, PLACED OUTSIDE THE UNIT.
How to reset your unit
Your preset adjustments will also be erased.
How to use the MODE/SEL button
If you use MODE or SEL (select), the display
and some controls (such as the number buttons,
4/¢ buttons, 5/ buttons, and the
control dial) enter the corresponding control
mode.
Ex.: When you press number button 1 after
pressing MODE, to operate the FM tuner.
Works as time countdown indicator.
To use these controls for original functions
again, wait for 15 seconds without pressing any
of these buttons until the control is cleared.
Pressing MODE again also restores original
functions. However, pressing SEL makes the
unit enters a different mode.
Caution:
If the temperature inside the car is below 0°C, the movement of animation and text scroll will be
halted on the display to prevent the display from being blurred.
appears on the display.
When the temperature increases, and the operating temperature is resumed, these functions will
start working again.
EN02-05KD-G821[EX_EU]f.indd 2EN02-05KD-G821[EX_EU]f.indd 2 22/12/05 6:53:55 pm22/12/05 6:53:55 pm
ENGLISH
3
CONTENTS
Control panel ................................... 4
Remote controller —
RM-RK50 ................. 5
Getting started ................................. 6
Basic operations ................................................... 6
Radio operations .............................. 7
FM RDS operations ............................ 9
Searching for your favorite FM RDS programme ....... 10
Disc/USB memory operations ............. 12
Playing a disc in the unit ...................................... 12
Playing discs in the CD changer ............................ 12
Playing a USB memory ......................................... 13
Sound adjustments ........................... 17
General settings — PSM ................... 19
Title assignment ............................... 28
iPod®/D. player operations ................ 28
Other external component operations ... 30
DAB tuner operations ........................ 31
More about this unit ......................... 35
Maintenance .................................... 39
Troubleshooting ............................... 40
Specifications ................................... 43
For safety...
Do not raise the volume level too much, as
this will block outside sounds, making driving
dangerous.
Stop the car before performing any
complicated operations.
Temperature inside the car...
If you have parked the car for a long time in hot
or cold weather, wait until the temperature in
the car becomes normal before operating the
unit.
For security reasons, a numbered ID card is provided with this unit, and the same ID number is
imprinted on the unit’s chassis. Keep the card in a safe place, as it will help the
authorities to identify
your unit if stolen.
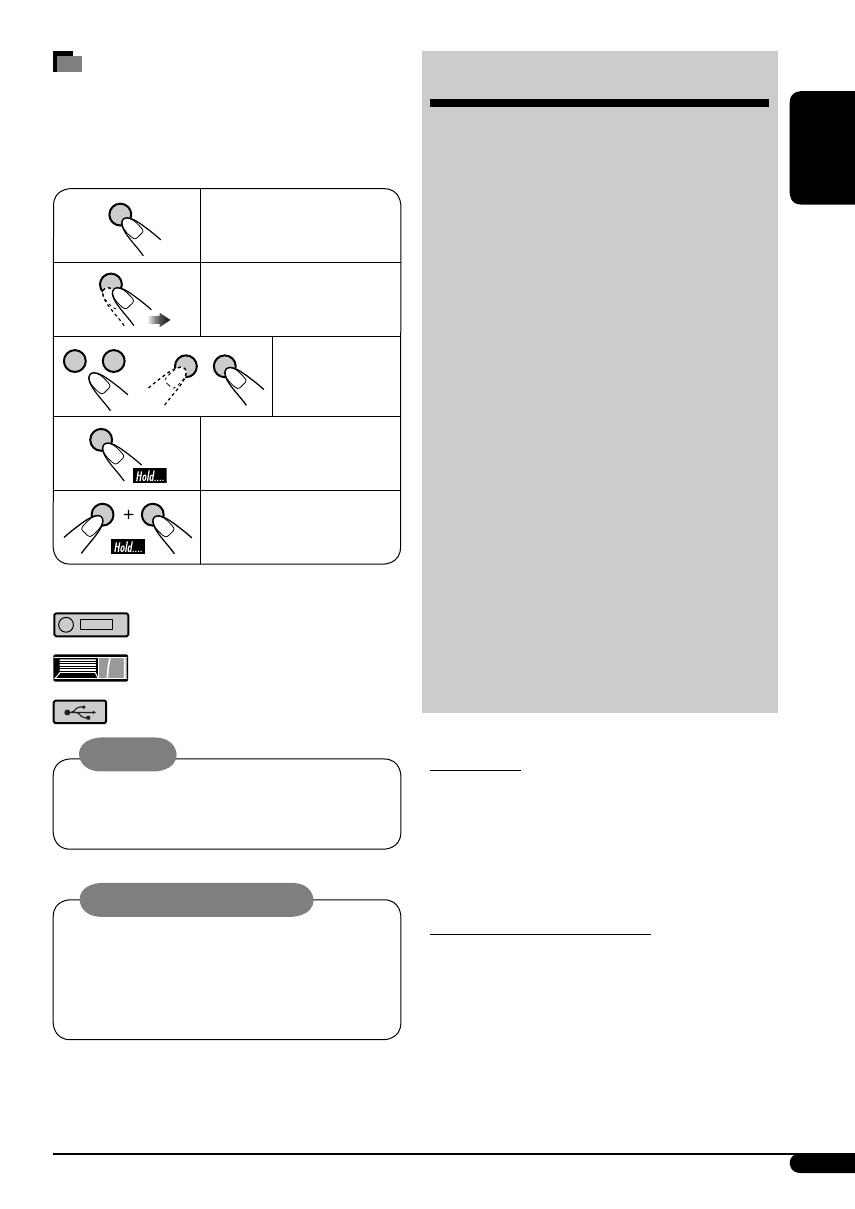
How to read this manual
Button operations are mainly explained with
the illustrations in the table below.
Some related tips and notes are explained in
“More about this unit” (see pages 35 – 39).
Press briefly.
Press repeatedly.
Press either
one.
Press and hold until your
desired response begins.
Press and hold both
buttons at the same time.
The following marks are used to indicate...
: Built-in CD player operations.
: External CD changer operations.
: External USB memory operations.
Warning:
If you need to operate the unit while driving,
be sure to look ahead carefully or you may be
involved in a traffic accident.
Caution on volume setting:
Discs produce very little noise compared
with other sources. Lower the volume
before playing a disc to avoid damaging
the speakers by the sudden increase of the
output level.
EN02-05KD-G821[EY]f.indd 3EN02-05KD-G821[EY]f.indd 3 12/28/05 10:52:34 AM12/28/05 10:52:34 AM
4
ENGLISH
1 BAND button
2 Control dial
(standby/on attenuator) button
3 DISP (display) button
4 Remote sensor
DO NOT expose the remote sensor to
strong light (direct sunlight or artificial
lighting).
5 Display window
6 5 (up) / (down) buttons
Parts identification
Control panel
7 T/P (traffic programme/programme type)
button
8 0 (eject) button
9 USB (Universal Serial Bus) input terminal
p SRC (source) button
q
(control panel release) button
w SEL (select) button
e MODE button
r Number buttons
t
4/¢ buttons
How to detach/attach the control panel
Detaching... Attaching...
Lever
CAUTION:
The lever comes out if you pressed the 0 button while
the panel is detached. If this happens, push the lever back
into lock position before attaching the panel.
EN02-05KD-G821[EX_EU]2.indd 4EN02-05KD-G821[EX_EU]2.indd 4 9/12/05 3:51:48 pm9/12/05 3:51:48 pm
ENGLISH
5
Remote controller — RM-RK50
Installing the lithium coin battery
(CR2025)
Aim the remote controller directly at the
remote sensor on the unit. Make sure there is
no obstacle in between.
Caution:
Main elements and features
1 (standby/on/attenuator) button
Turns the power on if pressed briefly or
attenuates the sound when the power is on.
Turns the power off if pressed and held.
2 5 U (up) / D (down) buttons
• Changes the FM/AM/DAB bands with 5 U.
Changes the preset stations (or services)
with D .
Changes the folder of the MP3/WMA/
USB.
While playing an MP3 disc on an
MP3-compatible CD changer:
Changes the disc if pressed briefly.
Changes the folder if pressed and held.
While listening to an Apple iPod
® or a
JVC D. player:
Pauses/stops or resumes playback with
D .
Enters the main menu with 5 U. (Now
5 U/D /2 R/F 3 work as the menu
selecting buttons.)*
3 VOL – / VOL + buttons
Adjusts the volume level.
4 SOUND button
Selects the sound mode (i-EQ: intelligent
equalizer).
* 5 U: Returns to the previous menu.
D : Confirms the selection.
Warning:
Do not install any battery other than
CR2025 or its equivalent; otherwise, it may
explode.
Store the battery in a place where children
cannot reach to avoid risk of accident.
To prevent the battery from over-heating,
cracking, or starting a fire:
– Do not recharge, short, disassemble,
heat the battery, or dispose of it in a fire.
– Do not leave the battery with other
metallic materials.
– Do not poke the battery with tweezers or
similar tools.
– Wrap the battery with tape and insulate
when throwing away or saving it.
Continued on next page...
EN02-05KD-G821[EX_EU]2.indd 5EN02-05KD-G821[EX_EU]2.indd 5 9/12/05 3:51:49 pm9/12/05 3:51:49 pm
6
ENGLISH
5 SOURCE button
Selects the source.
6 2 R (reverse) / F (forward) 3 buttons
Searches for stations (or services) if
pressed briefly.
Searches for ensembles if pressed and
held.
Fast-forwards or reverses the track if
pressed and held.
Changes the tracks if pressed briefly.
While listening to an iPod or a D. player
(in menu selecting mode):
Selects an item if pressed briefly. (Then,
press D to confirm the selection.)
Skips 10 items at a time if pressed and
held.
The unit is equipped with the steering wheel
remote control function.
See the Installation/Connection Manual
(separate volume) for connection.
Getting started
Basic operations
~ Turn on the power.
Ÿ
* You cannot select these sources if they
are not ready or not connected.
!
For FM/AM tuner
For DAB tuner
Adjust the volume.
@ Adjust the sound as you want. (See
pages 17 – 19.)
To drop the volume in a moment (ATT)
To restore the sound, press it
again.
To turn off the power
Basic settings
See also “General settings — PSM” on pages
19 – 22.
1
2
-1 Canceling the display
demonstrations
Turn the control dial to set “Demo/Link”
to “Off.”
EN06-17KD-G821[EX_EU]2.indd 6EN06-17KD-G821[EX_EU]2.indd 6 9/12/05 3:58:16 pm9/12/05 3:58:16 pm
7
ENGLISH
2-2 Setting the clock
1 Press number button 4 ( ).
“Clock Hr” (hour) appears. Then,
turn the control dial to adjust the
hour.
2 Press ¢
to select “Clock Min”
(minute). Then, turn the control
dial to adjust the minute.
3 Press ¢ to select “24H/12H.”
Then, turn the control dial to select
“24Hours” or “12Hours,” time
display mode.
3 Exit from the setting.
To check the current clock time when the
power is turned off
Changing the display pattern
Ex.: When tuner is selected as the source
Source operation display
“SMALL” (CD jacket image) graphic*
1
is displayed.
“LARGE” (full display size) graphic*
1
is displayed.
Audio level meter is displayed (see “LevelMeter” on page 20).
Goes back to the initial display pattern.
*
1
You can use your edited file for graphic screen
(see pages 23 – 26).
Depending on a downloaded file, it may take
a longer time to show it on the display.
*
2
The information bar will disappear if no
operation is performed for five seconds.
Radio operations
~
Ÿ
!
Start searching for a station.
When a station is received, searching
stops.
When receiving an FM stereo broadcast
with sufficient signal strength,
lights up on the display.
To stop searching, press the same button
again.
*
2
Continued on next page...
EN06-17KD-G821[EX_EU]f.indd 7EN06-17KD-G821[EX_EU]f.indd 7 21/12/05 5:36:32 pm21/12/05 5:36:32 pm
8
ENGLISH
To tune in to a station manually
In step ! on page 7...
1
2 Select a desired station frequency.
When an FM stereo broadcast is hard to
receive
1
2
3 Exit from the setting.
lights up on the display.
Reception improves, but stereo effect will
be lost.
To restore the stereo effect, select “Mono Off”
in step 2.
goes off.
Storing stations in memory
You can preset six stations for each band.
FM station automatic presetting
SSM (Strong-station Sequential
Memory)
1 Select the FM band (FM1 – FM3) you
want to store into.
2
3
Select “SSM.”
4
Local FM stations with the strongest signals are
searched and stored automatically in the FM
band.
Manual presetting
Ex.: Storing FM station of 92.5 MHz into preset
number 4 of the FM1 band.
Using the number buttons
1
2
3
Using the Preset Station List
When appears on the display, you can
move back to the previous display by pressing
number button 3.
EN06-17KD-G821[EX_EU]f.indd 8EN06-17KD-G821[EX_EU]f.indd 8 22/12/05 6:55:16 pm22/12/05 6:55:16 pm
9
ENGLISH
Listening to a preset station
Using the number buttons
1
2
Select the preset station (1 – 6) you
want to listen to.
Using the Preset Station List
1 Display the Preset Station List, then
select the preset station you want to
listen to.
2 Change to the selected station.
FM RDS operations
What you can do with RDS
RDS (Radio Data System) allows FM stations
to send an additional signal along with their
regular programme signals.
By receiving the RDS data, this unit can do the
following:
Programme Type (PTY) Search (see page 10)
TA (Traffic Announcement) and PTY
Standby Receptions (see page 11)
Tracing the same programme automatically
—Network-Tracking Reception (see page 12)
Programme Search (see page 21)
1 Follow steps 1 and 2 of “Using the
number buttons” on page 8.
By holding 5 / , the Preset Station List
will appear (go to step 4).
2
3
Display the Preset Station List.
4 Select the preset number you want to
store into.
You can move to the lists of the other FM
bands by pressing number button 5
(
) or 6 ( ) repeatedly.
5 Store the station.
Continued on next page...
EN06-17KD-G821[EX_EU]f.indd 9EN06-17KD-G821[EX_EU]f.indd 9 21/12/05 5:36:43 pm21/12/05 5:36:43 pm
10
ENGLISH
Start searching for your favorite
programme.
If there is a station broadcasting a
programme of the same PTY code as you
have selected, that station is tuned in.
Storing your favorite
programme types
You can store six favorite programme types.
When
appears on the display, you can
move back to the previous display by pressing
number button 3.
1
2 Select “Memory.”
3 Select a preset number (“Preset1”–
“Preset6”) you want to store into.
4 Select one of the PTY codes.
Searching for your favorite
FM RDS programme
You can tune in to a station broadcasting your
favorite programme by searching for a PTY
code.
When
appears on the display, you can
move back to the previous display by pressing
number button 3.
~
Ÿ
Select “Search.”
The PTY Preset List including six preset
PTY codes appears on the display.
! Select a PTY code (see page 12).
You can select one from 35 PTY codes
including the first 6 preset codes
which can be preset as you like (see the
following).
To display the other PTY Preset Lists,
press number button 5 (
) or 6
(
) repeatedly.
EN06-17KD-G821[EX_EU]2.indd 10EN06-17KD-G821[EX_EU]2.indd 10 16/12/05 11:20:55 am16/12/05 11:20:55 am
11
ENGLISH
To deactivate the TA Standby Reception
goes off.
PTY Standby Reception
PTY Standby Reception allows the unit to
switch temporarily to your favorite programme
type from any source other than AM.
This function also takes effect for the DAB
tuner.
To activate the PTY Standby Reception and
select the PTY codes
1
2 Activating the PTY Standby Reception.
Display the currently selected PTY code.
3 Selecting a PTY code.
4 Exit from the setting.
either lights up or flashes on the display.
If
lights up, PTY Standby Reception is
activated.
If
flashes, PTY Standby Reception is not
yet activated.
To activate PTY Standby Reception, tune in
to another station (or service) providing the
related signals.
will stop flashing and
remain lit.
To deactivate the PTY Standby Reception
Select “PTY Off” in step 2 above.
goes off.
5 Store the selected PTY code.
EX.: When “Classics” is selected in step 4 on page 10
6 Repeat steps 3 to 5 to store other PTY
codes into other preset numbers.
7 Exit from the setting.
Using the standby receptions
TA Standby Reception
TA Standby Reception allows the unit to switch
temporarily to Traffic Announcement (TA)
from any source other than AM.
If a station starts broadcasting a traffic
announcement, “Traffic News” appears on the
display, and this unit temporarily tunes in to
the station. The volume changes to the preset
TA volume level if the current level is lower
than the preset level (see page 21).
To activate the TA Standby Reception
either lights up or flashes on
the display.
If
lights up, TA Standby Reception is
activated.
If
flashes, TA Standby Reception is not
yet activated. (This occurs when you are
listening to an FM station without the RDS
signals required for TA Standby Reception.)
To activate TA Standby Reception, tune in
to another station (or service) providing the
related signals.
will stop flashing and
remain lit.
EN06-17KD-G821[EX_EU]2.indd 11EN06-17KD-G821[EX_EU]2.indd 11 9/12/05 3:58:32 pm9/12/05 3:58:32 pm
12
ENGLISH
Tracing the same programme—
Network-Tracking Reception
When driving in an area where FM reception
is not sufficient enough, this unit automatically
tunes in to another FM RDS station of the
same network, possibly broadcasting the same
programme with stronger signals (see the
illustration below).
When shipped from the factory, Network-
Tracking Reception is activated.
To change the Network-Tracking Reception
setting, see “AF-Regn’l” on page 21.
Programme A broadcasting on different frequency areas
(01 – 05)
PTY codes
News, Affairs, Info, Sport, Educate, Drama,
Culture, Science, Varied, Pop M (music),
Rock M (music), Easy M (music), Light M
(music), Classics, Other M (music), Weather,
Finance, Children, Social, Religion, Phone In,
Travel, Leisure, Jazz, Country, Nation M
(music), Oldies, Folk M (music), Document
Disc/USB memory
operations
Playing a disc in the unit
All tracks will be played repeatedly until you
change the source or eject the disc.
To stop playback and eject the disc
Playing discs in the CD changer
All discs in the magazine will be played
repeatedly until you change the source.
Ejecting the magazine will also stop playback.
~
* If you have changed the external input
setting to “Ext In” (see page 22), you
cannot select the CD changer.
Ÿ Select a disc.
For disc number from 01 – 06:
For disc number from 07 – 12:
EN06-17KD-G821[EX_EU]2.indd 12EN06-17KD-G821[EX_EU]2.indd 12 9/12/05 3:58:36 pm9/12/05 3:58:36 pm
13
ENGLISH
Track and folder information (CD/CD Text/
MP3/WMA/USB)
Once you insert a disc or attach a USB
memory, the total track number/total
playing time (for CD/CD Text) and total
folder number/total track number (for MP3/
WMA/USB) appears, then the following
information appears...
Ex.: When “CD-CH” is selected as the source
For the audio CD or CD Text:
Disc name*
4
and Track name*
5
For the MP3/WMA/USB:
Folder name and File name, or
Album/performer*
6
and Track name*
6
When playing CD changer, the total
numbers will not appear.
*
1
Displayed only when an MP3/WMA
track is played back.
*
2
Displayed only when “CD-CH” is selected
as the source.
*
3
Either MP3 or WMA indicator lights up
depending on the detected file.
*
4
Appears only for CD Texts and CDs if
it has been recorded or assigned. (“No
Name” appears if no name is recorded or
assigned.)
*
5
Appears only for CD Texts. (“No Name”
appears if no name is recorded.)
*
6
Appears only when “Tag” is set to “On”
(see page 21).
Playing a USB memory
This unit can play MP3/WMA tracks stored in a
USB memory.
All tracks in the USB memory will be played
repeatedly until you change the source.
Removing the USB memory will also stop
playback.
~
Ÿ
If a USB memory has been attached...
Playback starts from where it has been stopped
previously.
If a different USB memory is currently
attached, playback starts from the beginning.
To detach the USB memory, straightly pull it
out from the unit.
Cautions:
Avoid using the USB memory if it might
hinder your safety driving.
Make sure all the important data has been
backed up to avoid losing the data.
USB input terminal
USB memory
File type*
1
*
3
Current disc number*
2
Current folder number*
1
Current track number
Elapsed playing time
EN06-17KD-G821[EX_EU]2.indd 13EN06-17KD-G821[EX_EU]2.indd 13 15/12/05 3:02:03 pm15/12/05 3:02:03 pm
14
ENGLISH
About MP3 and WMA tracks
MP3 and WMA “tracks” (words “file” and
“track” are used interchangeably) are recorded
in “folders.”
When an MP3/WMA folder in an MP3/
WMA disc includes an image <jtw> file
edited by Image Converter (Ver 3.0)—
supplied in the CD-ROM, you can show the
image on the display while the tracks in the
folder are played back—Image Link. (See
pages 20 and 37 for details.)
About the CD changer
It is recommended to use a JVC MP3-
compatible CD changer with your unit.
You can also connect MP3-incompatible
CD changers. These units, however, are not
compatible with MP3 discs.
You cannot use the CH-X99, CH-X100, and
KD-MK series CD changers with this unit.
You cannot play any WMA disc in the CD
changer.
Disc text information recorded in the CD
Text can be displayed when a JVC CD Text
compatible CD changer is connected.
For connection, see Installation/Connection
Manual (separate volume).
To fast-forward or reverse the track
To go to the next or previous tracks
To go to the next or previous folders (only for
MP3/WMA/USB)
For MP3 tracks:
For WMA tracks:
For the main unit:
Holding either of the buttons can display the
Folder List (see page 15).
For CD changer:
Holding either of the buttons can display the
Disc List (see page 15).
To locate a particular track (for CD) or folder
(for MP3/WMA/USB) directly
To select a number from 01 – 06:
To select a number from 07 – 12:
To use direct folder access on MP3/WMA/
USB, it is required that folders are assigned
with 2-digit numbers at the beginning of their
folder names—01, 02, 03, and so on.
To select a particular track in a folder (for
MP3/WMA/USB):
EN06-17KD-G821[EX_EU]2.indd 14EN06-17KD-G821[EX_EU]2.indd 14 9/12/05 3:58:43 pm9/12/05 3:58:43 pm
15
ENGLISH
5 Change to the selected item.
The list disappears and playback starts.
Skipping tracks quickly during play
Only possible on JVC
MP3-compatible CD changer
For MP3/WMA/USB, you can skip tracks
within the same folder.
Ex.: To select track 32 while playing a track
whose number is a single digit (1 to 9).
1
2
Each time you press the button, you can
skip 10 tracks.
After the last track, the first track will be
selected and vice versa.
3
Other main functions
Selecting a disc/folder/track on the list
When appears on the display, you can
move back to the previous display by pressing
number button 3.
1
2
Select “LIST.”
3 Select the list type.
*
1
Selectable only when the source is
“CD-CH.”
*
2
Selectable only when the media is MP3,
WMA, or USB.
4 Select an item.
EX.: When “File” is selected in step 3
You can move to the other lists by
pressing number button 5 (
) or
6 (
) repeatedly.
EN06-17KD-G821[EX_EU]2.indd 15EN06-17KD-G821[EX_EU]2.indd 15 9/12/05 3:58:46 pm9/12/05 3:58:46 pm
16
ENGLISH
Prohibiting disc ejection
You can lock a disc in the loading slot.
“No Eject” appears on the display.
To cancel the prohibition, repeat the same
procedure.
“Eject OK” appears on the display.
Selecting the playback modes
You can use only one of the following playback
modes at a time.
1
2
Select your desired playback mode.
7 Intro play
Mode Plays beginning 15 seconds of...
Track: All tracks of the current disc or
USB memory [
].
Folder*
1
: First tracks of all folders
[
].
Disc*
2
: First tracks of all the inserted
discs [
].
Off: Cancels.
7 Repeat play
Mode Plays repeatedly
Track: The current track [ ].
Folder*
1
: All tracks of the current folder
[
].
Disc*
2
: All tracks of the current disc
[
].
Off: Cancels.
7 Random play
Mode Plays at random
Folder*
1
: All tracks of the current folder,
then tracks of the next folder
and so on [
].
Disc
*
3
: All tracks of the current disc
[
].
All*
4
: All tracks of the inserted discs
or USB memory [
].
Off: Cancels.
*
1
Only while playing a media (MP3/WMA/
USB).
*
2
Only while playing discs in the CD
changer.
*
3
Only while playing a disc.
*
4
Only while playing discs in the CD
changer or playing a USB memory.
You can also cancel the playback mode by
pressing number button 4 (
) in step 2.
EN06-17KD-G821[EX_EU]f.indd 16EN06-17KD-G821[EX_EU]f.indd 16 20/12/05 5:17:14 pm20/12/05 5:17:14 pm
17
ENGLISH
Sound adjustments
Adjusting the sound
You can adjust the sound characteristics to your
preference.
When
appears on the display, you can
move back to the previous display by pressing
number button 3.
1
2
For “EQ” setting, see the following.
3 Adjust the selected setting item.
A Fad/Bal (Fader/Balance)
1 Press number button 1 (
) to
move to the “Fad/Bal” adjustment
display.
2 Adjust the speaker output balance
by pressing:
5 / : between the front and rear
speakers. [F06 to R06]
4/¢ :
between the left and right
speakers. [L06 to R06]
B Subwoofer
1 Press number button 1
( )
to
move to the “Subwoofer” adjustment
display.
2 Use 4/¢ to select a
cutoff frequency to the subwoofer.
80Hz: Frequencies higher than
80 Hz are cut off.
120Hz: Frequencies higher than
120 Hz are cut off.
160Hz: Frequencies higher than
160 Hz are cut off.
3 Turn the control dial to adjust the
subwoofer output level. [0 to 8]
C VolAdjust
Turn the control dial to adjust the input
level of each source (except FM).
[–5 to +5]
Adjust to match the input level of the
FM sound level.
Before making an adjustment, select a
source you want to adjust.
D Loudness
Turn the control dial to activate or
deactivate the loudness to produce a
well-balanced sound at low volume
levels. [Off or On]
4 Exit from the setting.
Selecting preset sound modes
(i-EQ: intelligent equalizer)
You can select a preset sound mode suitable to
the music genre.
Available sound modes
FLAT (No sound mode is applied), H.ROCK
(Hard rock), R & B (Rhythm & blues),
POP, JAZZ, DANCE, COUNTRY, REGGAE,
CLASSIC, USER 1, USER 2, USER 3
When
appears on the display, you can
move back to the previous display by pressing
number button 3.
Continued on next page...
EN06-17KD-G821[EX_EU]2.indd 17EN06-17KD-G821[EX_EU]2.indd 17 17/12/05 3:24:41 pm17/12/05 3:24:41 pm
18
ENGLISH
1
2
Select a sound mode.
To display the rest
3 Exit from the setting.
Storing your own sound modes
You can adjust the sound modes and store your
own adjustments in memory.
When
appears on the display, you can
move back to the previous display by pressing
number button 3.
1 Follow steps 1 and 2 above.
2 Select a frequency range.
3 Adjust the sound elements of the
selected frequency range.
1 Use 5 / to adjust the level.
2 Press number button 2 (
),
then turn the control dial to select the
frequency.
3 Press number button 2 (
), then
turn the control dial to select the band
width.
Sound
elements
Range/selectable items
Low Mid High
Level –06 to
+06
–06 to
+06
–06 to
+06
FREQ
(Frequency)
60 Hz
80 Hz
100 Hz
200 Hz
500 Hz
1 kHz
1.5kHz
2.5kHz
10 kHz
12.5kHz
15 kHz
17.5kHz
Q (Band
width)
Q1.0
Q1.25
Q1.5
Q2.0
Q0.5
Q0.75
Q1.0
Q1.25
Fix
4 Repeat steps 2 and 3 to adjust other
frequency ranges.
5 Store the adjustments.
EN18-27KD-G821[EX_EU]f.indd 18EN18-27KD-G821[EX_EU]f.indd 18 20/12/05 5:20:59 pm20/12/05 5:20:59 pm
ENGLISH
19
The list below shows the preset value setting for each sound mode:
Sound
modes
Preset values
Low Mid High
Level FREQ
(Frequency)
Q (Band
width)
Level FREQ
(Frequency)
Q (Band
width)
Level FREQ
(Frequency)
Q (Band
width)
FLAT 00 60 Hz Q1.25 00 1 kHz Q1.25 00 10 kHz
Fix
H.ROCK +03 100 Hz Q1.0 00 1 kHz Q1.25 +02 10 kHz
R & B +03 80 Hz Q1.25 +01 1 kHz Q1.25 +03 15 kHz
POP +02 100 Hz Q1.25 +01 1 kHz Q1.25 +02 10 kHz
JAZZ +03 80 Hz Q1.25 00 1 kHz Q1.25 +03 10 kHz
DANCE +04 60 Hz Q1.0 -02 1 kHz Q1.0 +01 10 kHz
COUNTRY +02 60 Hz Q1.0 00 1 kHz Q1.0 +02 12.5kHz
REGGAE +03 60 Hz Q1.25 +02 1 kHz Q1.25 +02 12.5kHz
CLASSIC +01 80 Hz Q1.25 00 1 kHz Q1.25 +03 10 kHz
General settings — PSM
Basic procedure
You can change PSM (Preferred Setting Mode)
items listed in the table that follows.
1
An item previously selected appears on the
display.
2 Select a PSM category.
To display the rest
3 Select a PSM item.
By pressing either of the buttons
repeatedly, you can also move to the item
of the other categories.
4 Adjust the selected PSM item.
5 Repeat steps 2 to 4 to adjust other
PSM items if necessary.
6 Exit from the setting.
Continued on next page...
EN18-27KD-G821[EX_EU]f.indd 19EN18-27KD-G821[EX_EU]f.indd 19 20/12/05 5:21:03 pm20/12/05 5:21:03 pm
20
ENGLISH
Category Indications Selectable settings, [reference page]
MOVIE
Demo/Link
Display
demonstration
Demo: [Initial]; Display demonstration will be
activated automatically, [6].
Image Link: To show a still image while playing MP3/
WMA tracks, [14, 37].
Off: Cancels.
Still image appears if no operation is done for about
20 seconds.
LevelMeter
Audio level meter
You can select the different level meter patterns.
Meter 1 [Initial] O Meter 2
Press DISP repeatedly to show the selected level meter.
Pict
Pictures
Download: [Initial]; Download files, [24].
Set: Activate the stored files, [26]
Delete: Delete the stored files, [24].
CLOCK
Clock Hr
Hour adjustment
0 23 (1 12AM/1 12PM), [7]
[Initial: 0 (0:00)]
Clock Min
Minute adjustment
00 59, [7]
[Initial: 00 (0:00)]
24H/12H
Time display mode
12Hours 24Hours, [7]
[Initial: 24Hours]
Clock Adj
Clock adjustment
Auto: [Initial]; The built-in clock is automatically
adjusted using the CT (clock time) data in
the RDS signal.
Off: Cancels.
DISPLAY
Scroll
Scroll
Once: [Initial]; For disc information: scrolls the
disc information only once.
For DAB text: scrolls the detailed DAB text.
Auto: For disc information: repeats the scroll (in
5-second intervals).
For DAB text: scrolls the detailed DAB text.
Off: For disc information: cancels.
For DAB text: shows only headline if any.
Pressing DISP for more than one second can scroll the
display regardless of the setting.
Dimmer
Dimmer
From – To*
1
:
Auto: [Initial]; Dims the display when you turn on
the headlights.
Off: Cancels.
On: Activates dimmer.
Time Set: Set the timer for dimmer, [26].
Any hour – Any hour
[Initial: 18 – 7]
EN18-27KD-G821[EX_EU]f.indd 20EN18-27KD-G821[EX_EU]f.indd 20 20/12/05 5:21:05 pm20/12/05 5:21:05 pm
  • Page 1 1
  • Page 2 2
  • Page 3 3
  • Page 4 4
  • Page 5 5
  • Page 6 6
  • Page 7 7
  • Page 8 8
  • Page 9 9
  • Page 10 10
  • Page 11 11
  • Page 12 12
  • Page 13 13
  • Page 14 14
  • Page 15 15
  • Page 16 16
  • Page 17 17
  • Page 18 18
  • Page 19 19
  • Page 20 20
  • Page 21 21
  • Page 22 22
  • Page 23 23
  • Page 24 24
  • Page 25 25
  • Page 26 26
  • Page 27 27
  • Page 28 28
  • Page 29 29
  • Page 30 30
  • Page 31 31
  • Page 32 32
  • Page 33 33
  • Page 34 34
  • Page 35 35
  • Page 36 36
  • Page 37 37
  • Page 38 38
  • Page 39 39
  • Page 40 40
  • Page 41 41
  • Page 42 42
  • Page 43 43
  • Page 44 44
  • Page 45 45
  • Page 46 46
  • Page 47 47
  • Page 48 48
  • Page 49 49
  • Page 50 50
  • Page 51 51
  • Page 52 52
  • Page 53 53
  • Page 54 54
  • Page 55 55
  • Page 56 56
  • Page 57 57
  • Page 58 58
  • Page 59 59
  • Page 60 60
  • Page 61 61
  • Page 62 62
  • Page 63 63
  • Page 64 64
  • Page 65 65
  • Page 66 66
  • Page 67 67
  • Page 68 68
  • Page 69 69
  • Page 70 70
  • Page 71 71
  • Page 72 72
  • Page 73 73
  • Page 74 74
  • Page 75 75
  • Page 76 76
  • Page 77 77
  • Page 78 78
  • Page 79 79
  • Page 80 80
  • Page 81 81
  • Page 82 82
  • Page 83 83
  • Page 84 84
  • Page 85 85
  • Page 86 86
  • Page 87 87
  • Page 88 88
  • Page 89 89
  • Page 90 90
  • Page 91 91
  • Page 92 92
  • Page 93 93
  • Page 94 94
  • Page 95 95
  • Page 96 96
  • Page 97 97
  • Page 98 98
  • Page 99 99
  • Page 100 100
  • Page 101 101
  • Page 102 102
  • Page 103 103
  • Page 104 104
  • Page 105 105
  • Page 106 106
  • Page 107 107
  • Page 108 108
  • Page 109 109
  • Page 110 110
  • Page 111 111
  • Page 112 112
  • Page 113 113
  • Page 114 114
  • Page 115 115
  • Page 116 116
  • Page 117 117
  • Page 118 118
  • Page 119 119
  • Page 120 120
  • Page 121 121
  • Page 122 122
  • Page 123 123
  • Page 124 124
  • Page 125 125
  • Page 126 126
  • Page 127 127
  • Page 128 128
  • Page 129 129

JVC KD-G821 User manual

Category
Car media receivers
Type
User manual

Ask a question and I''ll find the answer in the document

Finding information in a document is now easier with AI