ii GPSMAP 2106/2110 Owner’s Manual
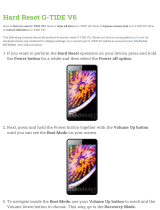
INTRODUCTION > TABLE OF CONTENTS
TABLE OF CONTENTS
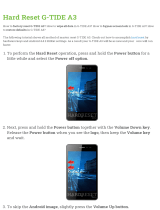
Introduction ............................................................................................... i
Installing Your GPSMAP 2106/2110 ............................................................... i
About This Manual .......................................................................................... i
Manual Conventions ....................................................................................... i
Product Registration ...................................................................................... v
Contact Garmin .........................................................................................................v
Software License Agreement ........................................................................ v
Warning .......................................................................................................... iv
Caution ........................................................................................................... iv
Getting Started ......................................................................................... 1
Unit Overview ................................................................................................. 1
Using the GPSMAP 2106/2110 Keypad ......................................................... 2
Using Soft Keys ........................................................................................................3
Using Data Entry/Shortcut Keys ..............................................................................3
Status Bar ..................................................................................................................3
Turning on the GPSMAP 2106/2110 .............................................................. 4
Adjusting the Backlight ............................................................................................4
Initializing the GPS Receiver ......................................................................... 5
Receiver Status and Accuracy ..................................................................................6
GPS Setup .................................................................................................................6
Using Simulator Mode ................................................................................... 7
Basic Operation ....................................................................................... 8
Using the GPSMAP 2106/2110 ....................................................................... 8
Selecting Options and Entering Data ........................................................................9
Using Additional Map Data ....................................................................................10
Using the Map Pointer ............................................................................................10
Finding an Item ............................................................................................. 12
Creating and Using Waypoints ................................................................... 13
Creating Waypoints Using the ENTER/MARK Key .............................................13
Creating Waypoints Using the Map ........................................................................13
Creating Waypoints Manually ................................................................................14
Reviewing and Editing Waypoints .............................................................. 15
Moving a Waypoint ................................................................................................16
Using Waypoint Lists .............................................................................................17
User Waypoints .......................................................................................................17
Proximity Waypoints ..............................................................................................18
Navigating to a Destination ......................................................................... 19
Selecting a Map Item Go To Destination ...............................................................20
Follow Track and TracBack Navigation .................................................................20
TracBack Tips .........................................................................................................22
Man OverBoard (MOB) ................................................................................. 23
Creating and Using Routes ......................................................................... 23
Creating a New Route .............................................................................................23
Navigating a Saved Route ......................................................................................24
Creating a Quick NAV Route .................................................................................25
Copying a Route .....................................................................................................25
Deleting a Route .....................................................................................................26
Editing a Route .......................................................................................................26
Planning Routes ......................................................................................................29
Main Pages ............................................................................................. 30
Configuring Main Pages .............................................................................. 31
Using Function Windows ............................................................................ 33
Function Window Adjustments ..............................................................................33
Viewing a Main Page in Full-Screen Mode ............................................................34
Map Page ....................................................................................................... 34
Selecting Map Ranges ............................................................................................35
Cartography ............................................................................................................36
Map Page Options ..................................................................................................37