Black Box 11N 2T2R User manual
- Category
- WLAN access points
- Type
- User manual
This manual is also suitable for

724-746-5500 | blackbox.com
About Black Box
Black Box Network Services is your source for more than 118,000 networking and infrastructure products. You’ll find everything
from cabinets and racks and power and surge protection products to media converters and Ethernet switches all supported by
free, live 24/7 Tech support available in 20 seconds or less.
©
Copyright 2009. All rights reserved.
BLACK BOX
®
Black Box Tech Support: FREE! Live. 24/7.
Tech support the
way it should be.
Great tech support is just 20 seconds away at 724-746-5500 or blackbox.com.

BL A C K B OX
®
Connect 802.11N Draft-N compatible computers
and wireless devices to an existing wired Ethernet
network.
Operates at speeds up to 300 Mbps.
802.11N 2T2R Wireless Access Point
Order toll-free in the U.S.: Call 877-877-BBOX (outside U.S. call 724-746-5500) •
FREE technical support 24 hours a day, 7 days a week: Call 724-746-5500 or fax 724-746-0746
• Mailing address: Black Box Corporation, 1000 Park Drive, Lawrence, PA 15055-1018 •
Web site: www.blackbox.com • E-mail: info@blackbox.com
Customer
Support
Information
September 2009
WAP-300BGN

724-746-5500 | blackbox.com
Page 2
11N 2T2R Wireless Access Point
Trademarks Used in this Manual
Black Box and the Double Diamond logo are registered trademarks of BB Technologies, Inc.
Any other trademarks mentioned in this manual are acknowledged to be the property of the trademark owners.
We‘re here to help! If you have any questions about your application
or our products, contact Black Box Tech Support at 724-746-5500
or go to blackbox.com and click on “Talk to Black Box.”
You’ll be live with one of our technical experts in less than 20 seconds.

724-746-5500 | blackbox.com
Page 3
Table of Contents
1. Specifications .......................................................................................................................................................................................... 8
2. Overview ................................................................................................................................................................................................. 9
2.1 Introduction ........................................................................................................................................................................................ 9
2.2 Features .............................................................................................................................................................................................. 9
2.3 Safety Information .............................................................................................................................................................................. 9
2.4 System Requirements ........................................................................................................................................................................ 10
2.5 What’s Included ................................................................................................................................................................................ 10
2.6 Front Panel ........................................................................................................................................................................................ 10
2.7 Back Panel ..........................................................................................................................................................................................11
3. Installation and Configuration ............................................................................................................................................................... 12
3.1 Installation......................................................................................................................................................................................... 12
3.2 Using a Web Browser to Configure the Wireless Access Point ............................................................................................................ 12
3.2.1 Windows 95/98/Me IP Address Setup ...................................................................................................................................... 12
3.2.2 Windows 2000 IP Address Setup ............................................................................................................................................. 14
3.2.3 Windows XP IP Address Setup .................................................................................................................................................. 16
3.2.4 Windows Vista IP Address Setup .............................................................................................................................................. 18
3.2.5 Connnecting to the Web Management Interface ...................................................................................................................... 19
3.3 View System Status and Information ................................................................................................................................................. 20
3.4 Select an Operating Mode for the Wireless Access Point ................................................................................................................... 22
3.4.1 AP Mode .................................................................................................................................................................................. 22
3.4.2 Station Infrastructure ............................................................................................................................................................... 25
3.4.3 AP Bridge-Point to Point Mode ................................................................................................................................................ 27
3.4.4 AP Bridge-Point to Multipoint Mode ........................................................................................................................................ 28
3.4.5 AP Bridge-WDS Mode .............................................................................................................................................................. 30
3.4.6 Universal Repeater ................................................................................................................................................................... 31
3.5 WPS Setting ...................................................................................................................................................................................... 33
3.6 Advanced Wireless Settings ............................................................................................................................................................... 35
3.7 Wireless Security ............................................................................................................................................................................... 37
3.7.1 Disable Security ........................................................................................................................................................................ 38
3.7.2 WEP ......................................................................................................................................................................................... 39
3.7.3 WPA Pre-shared Key ................................................................................................................................................................. 40
3.7.4 WPA RADIUS ............................................................................................................................................................................ 41
3.7.5 802.1x Authentication .............................................................................................................................................................. 43
3.8 Radius Server .................................................................................................................................................................................... 44
3.9 MAC Filtering .................................................................................................................................................................................... 45

724-746-5500 | blackbox.com
Page 4
11N 2T2R Wireless Access Point
3.10 System Utilities ................................................................................................................................................................................ 47
3.10.1 Change Password ................................................................................................................................................................... 47
3.10.2 IP Address of the Wireless Access Point .................................................................................................................................. 48
3.10.3 DHCP Server ........................................................................................................................................................................... 49
4. Advanced Configuration ....................................................................................................................................................................... 51
4.1 Configuration Backup and Restore .................................................................................................................................................... 51
4.2 Firmware Upgrade ............................................................................................................................................................................ 52
4.3 System Reset ..................................................................................................................................................................................... 52
Appendix A. Troubleshooting .................................................................................................................................................................... 54
A.1 Problems/Solutions ........................................................................................................................................................................... 54
A.2 Calling Black Box .............................................................................................................................................................................. 55
A.3 Shipping and Packaging .................................................................................................................................................................... 55
Appendix B. Glossary ................................................................................................................................................................................ 56

724-746-5500 | blackbox.com
Page 5
FCC and IC RFI Statements
Federal Communications Commission and Industry Canada Radio Frequency Interference
Statements
Class B Digital Device. This equipment has been tested and found to comply with the limits for a Class B computing device pur-
suant to Part 15 of the FCC Rules. These limits are designed to provide reasonable protection against harmful interference in a
residential installation. However, there is no guarantee that interference will not occur in a particular installation. This equipment
generates, uses, and can radiate radio frequency energy, and, if not installed and used in accordance with the instructions, may
cause harmful interference to radio communications. If this equipment does cause harmful interference to radio or telephone
reception, which can be determined by turning the equipment off and on, the user is encouraged to try to correct the interfer-
ence by one of the following measures:
• Reorient or relocate the receiving antenna.
• Increase the separation between the equipment and receiver.
• Connect the equipment into an outlet on a circuit different from that to which the receiver is connected.
• Consult an experienced radio/TV technician for help.
Caution:
Changes or modifications not expressly approved by the party responsible for compliance could void the user’s authority to oper-
ate the equipment.
To meet FCC requirements, shielded cables and power cords are required to connect this device to a personal computer or other
Class B certified device.
This digital apparatus does not exceed the Class B limits for radio noise emission from digital apparatus set out in the Radio
Interference Regulation of Industry Canada.
Le présent appareil numérique n’émet pas de bruits radioélectriques dépassant les limites applicables aux appareils numériques de
classe B prescrites dans le Règlement sur le brouillage radioélectrique publié par Industrie Canada.

724-746-5500 | blackbox.com
Page 6
11N 2T2R Wireless Access Point
Instrucciones de Seguridad
(Normas Oficiales Mexicanas Electrical Safety Statement)
1. Todas las instrucciones de seguridad y operación deberán ser leídas antes de que el aparato eléctrico sea operado.
2. Las instrucciones de seguridad y operación deberán ser guardadas para referencia futura.
3. Todas las advertencias en el aparato eléctrico y en sus instrucciones de operación deben ser respetadas.
4. Todas las instrucciones de operación y uso deben ser seguidas.
5. El aparato eléctrico no deberá ser usado cerca del agua—por ejemplo, cerca de la tina de baño, lavabo, sótano mojado o cerca
de una alberca, etc..
6. El aparato eléctrico debe ser usado únicamente con carritos o pedestales que sean recomendados por el fabricante.
7. El aparato eléctrico debe ser montado a la pared o al techo sólo como sea recomendado por el fabricante.
8. Servicio—El usuario no debe intentar dar servicio al equipo eléctrico más allá a lo descrito en las instrucciones de operación.
Todo otro servicio deberá ser referido a personal de servicio calificado.
9. El aparato eléctrico debe ser situado de tal manera que su posición no interfiera su uso. La colocación del aparato eléctrico
sobre una cama, sofá, alfombra o superficie similar puede bloquea la ventilación, no se debe colocar en libreros o gabinetes
que impidan el flujo de aire por los orificios de ventilación.
10. El equipo eléctrico deber ser situado fuera del alcance de fuentes de calor como radiadores, registros de calor, estufas u otros
aparatos (incluyendo amplificadores) que producen calor.
11. El aparato eléctrico deberá ser connectado a una fuente de poder sólo del tipo descrito en el instructivo de operación, o como
se indique en el aparato.
12. Precaución debe ser tomada de tal manera que la tierra fisica y la polarización del equipo no sea eliminada.
13. Los cables de la fuente de poder deben ser guiados de tal manera que no sean pisados ni pellizcados por objetos colocados
sobre o contra ellos, poniendo particular atención a los contactos y receptáculos donde salen del aparato.
14. El equipo eléctrico debe ser limpiado únicamente de acuerdo a las recomendaciones del fabricante.
15. En caso de existir, una antena externa deberá ser localizada lejos de las lineas de energia.
16. El cable de corriente deberá ser desconectado del cuando el equipo no sea usado por un largo periodo de tiempo.
17. Cuidado debe ser tomado de tal manera que objectos liquidos no sean derramados sobre la cubierta u orificios de ventilación.
18. Servicio por personal calificado deberá ser provisto cuando:
A: El cable de poder o el contacto ha sido dañado; u
B: Objectos han caído o líquido ha sido derramado dentro del aparato; o
C: El aparato ha sido expuesto a la lluvia; o
D: El aparato parece no operar normalmente o muestra un cambio en su desempeño; o
E: El aparato ha sido tirado o su cubierta ha sido dañada.

724-746-5500 | blackbox.com
Page 7
Compliance
R&TTE Compliance Statement
This equipment complies with all the requirements of DIRECTIVE 1999/5/EC OF THE EUROPEAN PARLIAMENT AND THE
COUNCIL of March 9, 1999 on radio equipment and telecommunication terminal Equipment and the mutual recognition of their
conformity (R&TTE).
The R&TTE Directive repeals and replaces the directive 98/13/EEC (Telecommunications Terminal Equipment and Satellite Earth
Station Equipment) as of April 8, 2000.
Safety
This equipment is designed with the utmost care for the safety of those who install and use it. However, special attention must be
paid to the dangers of electric shock and static electricity when working with electrical equipment. All guidelines for this equip-
ment must therefore be followed at all times to ensure the safe use of the equipment.
EU Countries Intended for Use
The ETSI version of this device is intended for home and office use in Austria, Belgium, Denmark, Finland, France, Germany,
Greece, Ireland, Italy, Luxembourg, the Netherlands, Portugal, Spain, Sweden, and the United Kingdom.
The ETSI version of this device is also authorized for use in EFTA member states: Iceland, Liechtenstein, Norway, and Switzerland.
EU Countries Not Intended for Use
None.

______________________________________________________________________________________
Page 8

724-746-5500 | blackbox.com
Chapter 2: Overview
2. Overview
2.1 Introduction
Use the 11N 2T2R Access Point to connect computers and wireless devices that are compatible with 802.11n/g/Draft-N to an exist-
ing wired Ethernet network at speeds of up to 300 Mbps.
Even inexperienced users can setup a network environment in a very short time (within minutes). Simply follow the setup proce-
dure described in Section 3.2.
2.2 Features
• Compatible with IEEE 802.11b/g/Draft-N wireless network standard, so it works with other 802.11b/g/Draft-N wireless devices.
• High speed wireless network runs six times faster than a conventional 802.11g wireless network (up to 300Mbps).
• Allows wireless devices to connect to an existing wired network and share network resources.
• Supports DHCP server function.
• Supports 64/128-bit WEP, WPA, and WPA2 wireless data encryption.
• Supports MAC address filtering (only allows a specific wireless device of your choice to connect to this access point).
• Supports RADIUS server (only allows users listed in your authorization server to use the wireless network).
• Supports WPS (Wi-Fi Protected Setup) and simplifies wireless client setup procedures. Even an inexperienced user can set up a
wireless network without a network technician’s help.
• Easy to use web-based GUI (Graphical User Interface) for network configuration and management purposes.
2.3 Safety Information
For safety, follow these instructions:
1. This access point is designed for indoor use only; DO NOT place this access point outdoors.
2. DO NOT put this access point in or near hot or humid places, such as a kitchen or bathroom. Also, do not leave this access
point in the car in summer.
3. DO NOT pull any connected cable with force; disconnect it from the access point first.
4. If you want to place this access point in high places or hang it on the wall, make sure the access point is firmly secured. Falling
from high places would damage the access point and its accessories, and void its warranty.
5. The access point contains small parts, so keep it out of reach of children under 3 years old.
6. The access point will become hot when being used for long time (this is normal and is not a malfunction). DO NOT put this
access point on paper, cloth, or other flammable materials.
7. There are no user-serviceable parts inside the access point. If the access point is not working properly, contact Black Box
Technical Support at 724-746-5500. DO NOT disassemble the access point, or its warranty will be void.
8. If the access point falls into water when it’s powered, DO NOT pick it up with your hand. Switch the electrical power off before
you do anything, or contact an experienced electrical technician for help.
9. If you smell something strange or see smoke coming out from the access point or power supply, remove the power supply or
switch the electrical power off immediately, and call Black Box Technical Support at 724-746-5500.
Page 9

724-746-5500 | blackbox.com
Page 10
11N 2T2R Wireless Access Point
2.4 System Requirements
• Computer or network devices with wired or wireless network interface card
• Web browser (Microsoft Internet Explorer 4.0 or above, Netscape Navigator 4.7 or above, Opera Web browser, or Safari Web
browser)
• An available AC power socket (100–240 V, 50/60Hz)
2.5 What’s Included
Your package should include the following items. If anything is missing or damaged, please contact Black Box Technical Support
at 724-746-5500.
• Wireless Access Point
• 3-dBi dipole antenna (2 pcs)
• AC power adapter
• This user’s manual
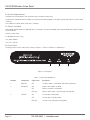
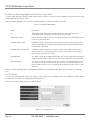
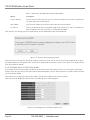
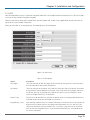
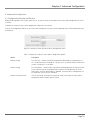
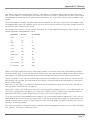
2.6 Front Panel
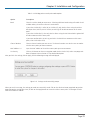
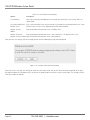
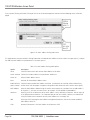
The Wireless Access Point’s front panel is shown in Figure 2-1. Table 2-1 describes its components.
3
1
2
Figure 2-1. Front panel.
Table 2-1. Front panel components.
Number Component Light Status Description
1 PWR LED ON The access point is switched on and correctly powered.
2 WLAN LED ON Wireless WPS mode is enabled.
OFF Wireless network is switched off.
Flashing Wireless access point is transferring or receiving data.
3 LAN LED ON The LAN port is connected.
OFF The LAN port is not connected.
Flashing The LAN is transferring or receiving data.

724-746-5500 | blackbox.com
Page 11
Chapter 2: Overview
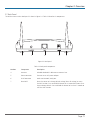
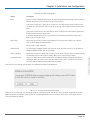
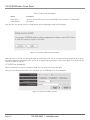
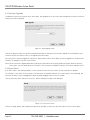
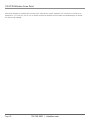
2.7 Back Panel
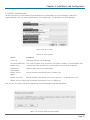
The Wireless Access Point’s back panel is shown in Figure 2-2. Table 2-2 describes its components.
4
4
6
5
7
Figure 2-2. Back panel.
Table 2-2. Back panel components.
Number Component Description
4 Antennas Included detachable 3-dBi antennas connect here.
5 Power connector Connects to an A/C power adapter.
6 RJ-45 connector Local Area Network (LAN) port.
7 Reset/WPS Resets the router to its factory default settings (clears all settings), or starts
the WPS function. Press and hold this button for 10 seconds to restore all set-
tings to factory defaults. Press and hold this button for less than 5 seconds to
start the WPS function.

724-746-5500 | blackbox.com
Page 12
11N 2T2R Wireless Access Point
3. Installation and Configuration
3.1 Installation
Please follow these instructions to connect the wireless access point to your computers and network devices:
1. Using an Ethernet cable, connect the access point to an ADSL modem, router, or switch/hub in your network.
2. Connect the A/C power adapter to the wall socket, and then connect it to the access point’s power socket.
3. Check all the LEDs on the front panel. The PWR LED should be steadily on, and the LAN LEDs should be on if the access point
is correctly connected to the ADSL modem, router, or switch/hub. If PWR LED is not on, or if any LED you expected to be on is
not on, recheck the cabling, or go to Appendix A, Troubleshooting, for possible causes and solutions.
3.2 Using a Web Browser to Configure the Wireless Access Point
After connecting the access point to the network, you will set up the access point’s network parameters so that it can work prop-
erly in your network environment.
Before you can connect to the access point and start configuration procedures, your computer must be able to get an IP address
automatically (use dynamic IP address). If it’s set to use a static IP address, or you’re unsure, follow the instructions below to con-
figure your computer to use a dynamic IP address:
If your computer’s operating system is:
• Windows 95/98/Me, go to Section 3.2.1
• Windows 2000, go to Section 3.2.2
• Windows XP, go to Section 3.2.3
• Windows Vista, go to Section 3.2.4
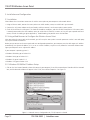
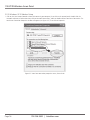
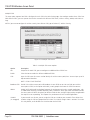
3.2.1 Windows 95/98/Me IP Address Setup
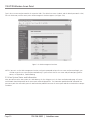
1. Click on the Start button (located at lower-left corner of your computer), then click on control panel. Double-click the Network
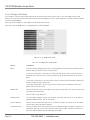
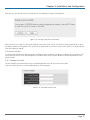
icon, and the Network window will appear. Select TCP/IP, then click on Properties. See Figure 3-1.
Figure 3-1. Network screen, Configuration tab, TCP/IP, Properties selected.

724-746-5500 | blackbox.com
Page 13
Chapter 3: Installation and Configuration
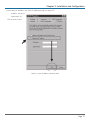
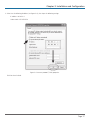
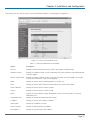
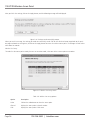
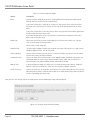
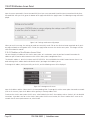
2. Select Specify an IP address, then input the following settings (see Figure 3-2):
IP address: 192.168.2.2
Subnet Mask: 255.255.255.0
Click OK when finished.
Figure 3-2. Input IP address and subnet mask.

724-746-5500 | blackbox.com
Page 14
11N 2T2R Wireless Access Point
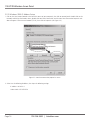
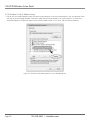
3.2.2 Windows 2000 IP Address Setup
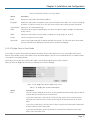
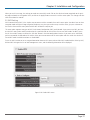
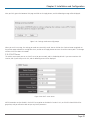
1. Click on the Start button (located at the lower-left corner of your computer), then click on control panel. Double-click on the
Network and Dial-up Connections icons, double click Local Area Connection, and the Local Area Connection Properties win-
dow will appear. Select Internet Protocol (TCP/IP), then click on Properties (see Figure 3-3).
Figure 3-3. Local area connection properties screen.
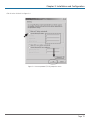
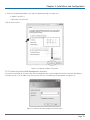
2. Select Use the following IP address, then input the following settings:
IP address: 192.168.2.2
Subnet Mask: 255.255.255.0

724-746-5500 | blackbox.com
Page 15
Chapter 3: Installation and Configuration
Click OK when finished. See Figure 3-4.
Figure 3-4. Internet protocol (TCP/IP) properties screen.

724-746-5500 | blackbox.com
Page 16
11N 2T2R Wireless Access Point
3.2.3 Windows XP IP Address Setup
1. Click on the Start button (located at lower-left corner of your computer), then click on the control panel. Double-click the
Network and Internet Connections icon, click on Network Connections, and then double-click on Local Area Connection. The
Local Area Connection Properties window will appear (see Figure 3-5). Then click on Properties.
Figure 3-5. Local area connection properties screen, General tab.

724-746-5500 | blackbox.com
Page 17
Chapter 3: Installation and Configuration
2. Select Use the following IP address (see Figure 3-6), then input the following settings:
IP address: 192.168.2.2
Subnet Mask: 255.255.255.0
Figure 3-6. Internet protocol (TCP/IP) properties.
Click OK when finished.

724-746-5500 | blackbox.com
Page 18
11N 2T2R Wireless Access Point
3.2.4 Windows Vista IP Address Setup
1. Click on the Start button (located at lower-left corner of your computer), then click on control panel. Click View Network Status
and Tasks, then click Manage Network Connections. Right-click Local Area Network, then select Properties. The Local Area
Connection Properties window will appear. Select Internet Protocol Version 4 (TCP / IPv4), and then click on Properties.
Figure 3-7. Local Area Connection Properties screen, Networking tab.

724-746-5500 | blackbox.com
Page 19
Chapter 3: Installation and Configuration
2. Select Use the following IP address, then input the following settings (see Figure 3-8):
IP address: 192.168.2.2
Subnet Mask: 255.255.255.0
Click OK when finished.
Figure 3-8. Properties window, General tab.
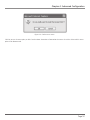
3.2.5 Connecting to the Web Management Interface
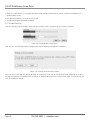
All functions and settings of this access point must be configured via the web management interface. Start your Web browser,
and input 192.168.2.1 in the address bar, then press the Enter key. The following message appears (see Figure 3-9):
Figure 3-9. Connect to web management interface screen.
Page is loading ...
Page is loading ...
Page is loading ...
Page is loading ...
Page is loading ...
Page is loading ...
Page is loading ...
Page is loading ...
Page is loading ...
Page is loading ...
Page is loading ...
Page is loading ...
Page is loading ...
Page is loading ...
Page is loading ...
Page is loading ...
Page is loading ...
Page is loading ...
Page is loading ...
Page is loading ...
Page is loading ...
Page is loading ...
Page is loading ...
Page is loading ...
Page is loading ...
Page is loading ...
Page is loading ...
Page is loading ...
Page is loading ...
Page is loading ...
Page is loading ...
Page is loading ...
Page is loading ...
Page is loading ...
Page is loading ...
Page is loading ...
Page is loading ...
Page is loading ...
Page is loading ...
-
 1
1
-
 2
2
-
 3
3
-
 4
4
-
 5
5
-
 6
6
-
 7
7
-
 8
8
-
 9
9
-
 10
10
-
 11
11
-
 12
12
-
 13
13
-
 14
14
-
 15
15
-
 16
16
-
 17
17
-
 18
18
-
 19
19
-
 20
20
-
 21
21
-
 22
22
-
 23
23
-
 24
24
-
 25
25
-
 26
26
-
 27
27
-
 28
28
-
 29
29
-
 30
30
-
 31
31
-
 32
32
-
 33
33
-
 34
34
-
 35
35
-
 36
36
-
 37
37
-
 38
38
-
 39
39
-
 40
40
-
 41
41
-
 42
42
-
 43
43
-
 44
44
-
 45
45
-
 46
46
-
 47
47
-
 48
48
-
 49
49
-
 50
50
-
 51
51
-
 52
52
-
 53
53
-
 54
54
-
 55
55
-
 56
56
-
 57
57
-
 58
58
-
 59
59


Black Box 11N 2T2R User manual
- Category
- WLAN access points
- Type
- User manual
- This manual is also suitable for
Ask a question and I''ll find the answer in the document
Finding information in a document is now easier with AI
Related papers
-
Black Box User manual
-
Black Box USB to RS-232 DB9 Converter User manual
-
Black Box TAB16CS User manual
-
Black Box KVT319A-WIDE User manual
-
-
-
-
-
-
Other documents
-
Edimax EW-7228APn User manual
-
-
AirLink N300 User manual
-
-
Longshine LCS-WA3-50 User manual
-
Intellinet Wireless 300N Outdoor PoE Access Point User manual
-
Abocom Systems MQ4WAP5502 User manual
-
Comtrend WAP-EN1750R User manual
-
Uniden WNP1000 User manual
-
Repotec RP-WRE300 Owner's manual