Page is loading ...

1
11b/g Wireless SOHO Router
User’s Manual
Version: 1.0

2
Table of Contents
1 INTRODUCTION....................................................................................................................................4
1.1 F
EATURES & BENEFITS...............................................................................................................4
1.2 P
ACKAGE CONTENTS..................................................................................................................5
1.3 W
IRELESS SOHO ROUTER DESCRIPTION....................................................................................5
1.4 S
YSTEM REQUIREMENTS ............................................................................................................6
1.5 A
PPLICATIONS ...........................................................................................................................6
1.6 N
ETWORK CONFIGURATION.........................................................................................................7
2 UNDERSTANDING THE HARDWARE..................................................................................................8
2.1 H
ARDWARE INSTALLATION...........................................................................................................8
2.2 IP
ADDRESS CONFIGURATION......................................................................................................8
3 WEB CONFIGURATION......................................................................................................................10
3.1 L
OGGING IN.............................................................................................................................10
3.2 M
ANAGEMENT .........................................................................................................................11
3.2.1 S
TATUS ...................................................................................................................................12
3.2.2 S
TATISTICS..............................................................................................................................13
3.2.3 D
YNAMIC DNS........................................................................................................................13
3.2.4 T
IME ZONE SETTING ................................................................................................................14
3.2.5 D
ENIAL OF SERVICE (DOS).......................................................................................................15
3.2.6 L
OG........................................................................................................................................16
3.2.7 U
PGRADE FIRMWARE ...............................................................................................................17
3.2.8 S
AVE CONFIGURATION TO A FILE................................................................................................17
3.2.9 R
ESTORE THE CONFIGURATION FROM A FILE...............................................................................18
3.2.10 R
ESTORE SETTINGS TO FACTORY DEFAULTS...............................................................................18
3.2.11 A
DMINISTRATOR SETTINGS .......................................................................................................19
3.3 TCP/
IP SETTINGS ..................................................................................................................19
3.3.1 LAN
SETTINGS – STATIC IP......................................................................................................20
3.3.2 LAN
SETTINGS – DHCP CLIENT...............................................................................................21
3.3.3 LAN
SETTINGS – DHCP SERVER .............................................................................................22
3.3.4 WAN
SETTINGS – STATIC IP.....................................................................................................23
3.3.5 WAN
SETTINGS – PPPOE.......................................................................................................24
3.3.6 WAN
SETTINGS – PPTP..........................................................................................................25
3.4 W
IRELESS...............................................................................................................................27
3.4.1 W
IRELESS BASIC SETTINGS......................................................................................................27
3.4.2 W
IRELESS ADVANCED SETTINGS ...............................................................................................28
3.4.3 W
IRELESS SECURITY ...............................................................................................................29
3.4.3.1 W
IRELESS SECURITY - DISABLED ..............................................................................................29
3.4.4 W
IRELESS SECURITY - WEP.....................................................................................................30
3.4.5 W
IRELESS SECURITY – WPA / WPA2-MIXED .............................................................................31
3.4.6 W
IRELESS ACCESS CONTROL ...................................................................................................32
3.4.7 WDS
(WIRELESS DISTRIBUTION SYSTEM)..................................................................................33
3.4.7.1 WDS
SECURITY ......................................................................................................................34
3.4.7.1.1 WDS
SECURITY - NONE...........................................................................................................34
3.4.7.1.2 WDS
SECURITY – WEP 64/128...............................................................................................34
3.4.7.1.3 WDS
SECURITY – WPA (TKIP), WPA2 (AES)..........................................................................35
3.5 F
IREWALL................................................................................................................................37
3.5.1 P
ORT FILTERING......................................................................................................................37
3.5.2 IP
FILTERING...........................................................................................................................38
3.5.3 MAC
FILTERING ......................................................................................................................39
3.5.4 P
ORT FORWARDING .................................................................................................................40
3.5.5 URL
FILTERING .......................................................................................................................41
3.5.6 DMZ......................................................................................................................................42
APPENDIX A – SPECIFICATIONS................................................................................................................43
APPENDIX B – FCC INTERFERENCE STATEMENT...................................................................................44

3
Revision History
Version Date Notes
1.0 November 6, 2006 Initial Version

4
1 Introduction
The Wireless SOHO Router operates seamlessly in the 2.4 GHz frequency spectrum
supporting the 802.11b (2.4GHz, 11Mbps) and the newer, faster 802.11g (2.4GHz,
54Mbpswireless standard.
High output power and high sensitivity can extend range and coverage to reduce the
roaming between APs to get more stability wireless connection. It also can reduce
the expense of equipment in the same environment.
To protect your wireless connectivity, this device can encrypt all wireless
transmissions through 64/128-bit WEP data encryption and also supports
WPA2/WPA/802.1x for powerful security authentication. The MAC addresses filter
lets you select exactly which stations should have access to your network.
This chapter describes the features & benefits, package contents, applications, and
network configuration.
1.1 Features & Benefits
Features Benefits
High Speed Data Rate Up to 54Mbps Capable of handling heavy data payloads such as
MPEG video streaming
IEEE 802.11b/g Compliant Fully Interoperable with IEEE
802.11b/IEEE802.11g compliant devices with
legacy protection
NAT Router Multiple computer Internet Access, also act as
natural firewall
WEP/WPA/WPA2/ IEEE 802.1x support Securing network from malicious access
Hide SSID Avoid free-rider stealing your bandwidth
DHCP Simplify network configuration and management
MAC address filtering Ensures secure network connection
UPnP(Universal Plug and Play) Friendly to special application e.g. instant
messenger, VoIP
Port forwarding Set up application server (FTP, Web, Email, …) on
LAN
Access control WLAN/LAN-to-WAN access control (allow/disallow),
prevent users from access unwanted content
Firewall with SPI (Stateful Packet Inspection) Prevent malicious access from Internet
DoS (Denial of Service) protection Prevent from well-known DoS attack
Built-in 4-port Switch automatically detects
cable type
Easy local connectivity
Web-based configuration Simple and intuitive network management
Firmware change via the Web-based
configuration screen
Allow easy upgrade/restore/dump system
configuration via web interface
System log Logging critical event according to network
manager’s criteria

11b/g Wireless SOHO Router Version 1.0
5
1.2 Package Contents
Open the package carefully, and make sure that none of the items listed below are
missing. Do not discard the packing materials, in case of return; the unit must be
shipped in its original package.
h One Wireless SOHO Router
h One Power Adapter
h One CAT5 UTP Cable
h One Omni-directional antenna
h One CD-ROM with User’s Manual
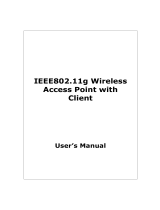
1.3 Wireless SOHO Router Description
Step Label Description
1 LAN Ports (1 – 4) Use an Ethernet cable to connect each port to a computer
on your Local Area Network (LAN).
2 WAN Port Use an Ethernet cable to connect this port to your WAN
router.
3 DC Connector Use the power cable and connect the adapter to the power
socket on the wall, and the DC inlet into the DC connector.
4 Antenna Connector Connect the omni-directional antenna to the SMA connector.
Connection / Activity
LED
This LED will light up once an Ethernet cable is connected
to one of the LAN ports or the WAN port.
LAN Ports (1-4) WAN Port DC Connector
Connection/Activity LED
Power LED
Front Panel
Rear Panel
WLAN LED WAN LED
Reset button
Antenna
Connector

11b/g Wireless SOHO Router Version 1.0
6
WAN LED This LED will light up once an Ethernet cable is connected
to WAN (Internet) port.
WLAN LED This LED will light up once the RF (wireless LAN) feature is
enabled
Power LED This LED will light up once the power cable is connected to
the DC connector.
1.4 System Requirements
The following are the minimum system requirements in order configure the
device.
h PC/AT compatible computer with a Ethernet interface.
h Operating system that supports HTTP web-browser
1.5 Applications
The wireless LAN products are easy to install and highly efficient. The following list
describes some of the many applications made possible through the power and
flexibility of wireless LANs:
a) Difficult-to-wire environments
There are many situations where wires cannot be laid easily. Historic
buildings, older buildings, open areas and across busy streets make the
installation of LANs either impossible or very expensive.
b) Temporary workgroups
Consider situations in parks, athletic arenas, exhibition centers, disaster-
recovery, temporary offices and construction sites where one wants a
temporary WLAN established and removed.
c) The ability to access real-time information
Doctors/nurses, point-of-sale employees, and warehouse workers can
access real-time information while dealing with patients, serving
customers and processing information.
d) Frequently changed environments
Show rooms, meeting rooms, retail stores, and manufacturing sites where
frequently rearrange the workplace.
e) Small Office and Home Office (SOHO) networks
SOHO users need a cost-effective, easy and quick installation of a small
network.
f) Wireless extensions to Ethernet networks
Network managers in dynamic environments can minimize the overhead
caused by moves, extensions to networks, and other changes with
wireless LANs.
g) Wired LAN backup
Network managers implement wireless LANs to provide backup for
mission-critical applications running on wired networks.
h) Training/Educational facilities
Training sites at corporations and students at universities use wireless
connectivity to ease access to information, information exchanges, and
learning.

11b/g Wireless SOHO Router Version 1.0
7
1.6 Network Configuration
To better understand how the wireless LAN products work together to create a
wireless network, it might be helpful to depict a few of the possible wireless LAN PC
card network configurations. The wireless LAN products can be configured as:
a) Ad-hoc (or peer-to-peer) for departmental or SOHO LANs.
b) Infrastructure for enterprise LANs.
a) Ad-hoc (peer-to-peer) Mode
This is the simplest network configuration with several computers
equipped with the PC Cards that form a wireless network whenever they
are within range of one another. In ad-hoc mode, each client is peer-to-
peer, would only have access to the resources of the other client and
does not require an access point. This is the easiest and least expensive
way for the SOHO to set up a wireless network. The image below depicts
a network in ad-hoc mode.
b) Infrastructure Mode
The infrastructure mode requires the use of an access point (AP). In this
mode, all wireless communication between two computers has to be via
the AP. It doesn’t matter if the AP is stand-alone or wired to an Ethernet
network. If used in stand-alone, the AP can extend the range of
independent wireless LANs by acting as a repeater, which effectively
doubles the distance between wireless stations. The image below
depicts a network in infrastructure mode.

11b/g Wireless SOHO Router Version 1.0
8
2 Understanding the Hardware
2.1 Hardware Installation
1. Place the unit in an appropriate place after conducting a site survey.
2. Plug one end of the Ethernet cable into the LAN port of the device and another
end into your PC/Notebook.
3. Plug one end of another Ethernet cable to WAN port of the device and the other
end into you cable/DSL modem (Internet)
4. Insert the DC-inlet of the power adapter into the port labeled “DC-IN” and the
other end into the power socket on the wall.
This diagram depicts the hardware configuration
2.2 IP Address Configuration
This device can be configured as a Bridge/Router or Access Point. The default IP
address of the device is 192.168.1.1 In order to log into this device, you must first
configure the TCP/IP settings of your PC/Notebook.
1. In the control panel, double click Network Connections and then double click on
the connection of your Network Interface Card (NIC). You will then see the
following screen.
WLAN Route
r
PC
Power Outlet
Ethernet
AC/DC cable
Ethernet
Cable / DSL
Modem

11b/g Wireless SOHO Router Version 1.0
9
2. Select Internet Protocol (TCP/IP) and then click on the Properties button. This
will allow you to configure the TCP/IP settings of your PC/Notebook.
3. Select Use the following IP Address radio button and then enter the IP address
and subnet mask. Ensure that the IP address and subnet mask are on the same
subnet as the device.
For Example: Device IP address: 192.168.1.1
PC IP address: 192.168.1.10
PC subnet mask: 255.255.255.0
4. Click on the OK button to close this window, and once again to close LAN
properties window.

11b/g Wireless SOHO Router Version 1.0
10
3 Web Configuration
3.1 Logging In
To configure the device through the web-browser, enter the IP address of the Bridge
(default: 192.168.1.1) into the address bar of the web-browser and press Enter.
Make sure that the device and your computers are configured on the same subnet.
Refer to Chapter 2 in order to configure the IP address of your computer.
After connecting to the IP address, the web-browser will display the login page.
Specify the User Name and Password. The User name and password are set to
admin by default, click on the Login or OK button.
After logging in you will graphical user interface (GUI) of the device. The navigation
drop-down menu on left is divided into four main sections:
1. Management: This menu includes the administrator settings, advanced wireless
settings such as wireless MAC clone and RTS/fragmentation threshold. Also
included are other system related settings such as firmware upgrade, reset to
factory defaults, and system date/time configuration.
2. TCIP/IP: This menu includes the configuration of the LAN port and settings for the
LAN IP, subnet mask, default gateway and DHCP client. Also, included are the
settings for the WAN connection
3.
Wireless: This menu includes the settings such as network type (infrastructure/ad-
hoc), data rate, and security.
4.
Firewall: This menu displays the security settings such as MAC filter, content filter,
port blocking and DoS protection.

11b/g Wireless SOHO Router Version 1.0
11
3.2 Management
Click on the Management link on the navigation
drop-down menu. You will then see nine
options: Status, Statistics, DDNS, Time Zone
Setting, Denial-of-Service, Log, Upgrade
Firmware, Save/Reload Settings and Password.
Each option is described below.

11b/g Wireless SOHO Router Version 1.0
12
3.2.1 Status
Click on the Status link under the Management menu. The device status page is
also displayed once you have logged in. This includes details about the system
uptime and firmware, LAN IP address and MAC address and the wireless settings
such as the radio status, MAC address, SSID, RF channel, as well as WAN settings.

11b/g Wireless SOHO Router Version 1.0
13
3.2.2 Statistics
Click on the Statistics link on the navigation drop-down menu. This page displays
the transmitted and received packet statistics of the wired and wireless interface.
Click on the Refresh button to refresh the statistics.
3.2.3 Dynamic DNS
Click on the DDNS link on the navigation drop-down menu. This feature allows you to
maintain your Internet domain name even if you IP address supplied by your ISP is a
dynamic one.
Enable DDNS: Place a check in this box to enable the DDNS feature.
Service Provider: Select a DDNS service provider from the drop-down list. DynDNS
is a free service while TZO offers a 30 day free trial.
Domain Name: Specify the website URL.
User Name: Specify the user name for the DDNS service.
Password: Specify the password for the DDNS service.

11b/g Wireless SOHO Router Version 1.0
14
Click on the Apply Change to save the changes or the Reset button to clear the
fields.
3.2.4 Time Zone Setting
Click on the Time Zone Setting link in the navigation menu. This feature allows you
to configure, update, and maintain the correct time on the device’s internal system
clock as well as configure the time zone. The date and time of the device can be
configured manually or by synchronizing with a time server.
Note: If the device losses power for any reason, it will not be able to keep its clock
running, and will not display the correct time once the device has been restarted.
Therefore, you must re-enter the correct date and time.
Current Time: You may specify the date and time manually, if you choose not to use
the Network Timing Protocol (NTP)
Time Zone: Select a time zone from the drop-down list
Enable NTP client update: Place a check in this box if you choose to enable the
NTP client service.
NTP Server: Select a service IP address from the drop-down list or manually assign
the IP address of the NTP server.
Click on the Apply Change to save the changes or the Reset button to clear the
fields.

11b/g Wireless SOHO Router Version 1.0
15
3.2.5 Denial of Service (DoS)
Click on the Denial of Service link in the navigation menu. This is a security feature
that blocks intrusions from the Internet that may disrupt the network service.
Enable DoS protection: Place a check in this box to enable the DoS features. You
may also enable the other DoS protection features listed below. If you are not sure
what the DoS protection feature is used for, it is recommend keeping the feature
disabled.
Click on the Apply Change to save the changes or the Reset button to clear the
fields.

11b/g Wireless SOHO Router Version 1.0
16
3.2.6 Log
Click on the Log link on the navigation drop-down menu. Logs display a list of events
that are triggered on the Ethernet and Wireless interface. This log can be referred
when an unknown error occurs on the system or when a report needs to be sent to
the technical support department for debugging purposes.
Enable Log: Place a check in this box to enable the system logging feature. You
may also click on system all, which will log wireless and DoS events.
Enable Remote Log: You may also enable remote logging by placing a check in this
box and then specifying the IP address of the log server.
Click on the Apply Change to save the changes. You may also use the Refresh and
Clear button.

11b/g Wireless SOHO Router Version 1.0
17
3.2.7 Upgrade Firmware
Click on the Upgrade Firmware link on the navigation drop-down menu. This page
allows you to upgrade the firmware of the device in order to improve the functionality
and performance.
Ensure that you have downloaded the appropriate firmware from the vendor’s
website. Connect the device to your PC using an Ethernet cable, as the firmware
cannot be upgraded using the wireless interface.
Click on the Browse button to select the firmware and then click on the Upload
button.
Note: Do not un-plug the device during this process. Some firmware upgrades may
restore the configuration back to the factory default settings. Therefore you may need to
restore a configuration from a file. Refer to the next two sections for details on saving
and restoring configurations.
3.2.8 Save Configuration to a File
Click on the Save / Reload Settings link on the navigation drop-down menu. This
option allows you to save the current configuration of the device into a file. Click on
the Save button to begin.
Save the file on your local disk by using the Save or Save to Disk button in the
dialog box.

11b/g Wireless SOHO Router Version 1.0
18
3.2.9 Restore the Configuration from a File
Click on the Save / Reload Settings link on the navigation drop-down menu. This
option allows you to restore a backup configuration from a file to the device. Click on
the Browse button to select the file and then click on Upload button.
A page indicating the reloading process will be displayed. Please wait while the
system restarts and load the configuration page based on the pervious IP address.
3.2.10 Restore Settings to Factory Defaults
Click on the Save / Reload Settings link on the navigation drop-down menu. This
option allows you to restore the configuration back to the factory default settings.
Click on the Reset button to restore the configuration.
Click on the Restart button to reboot the device using the current settings.

11b/g Wireless SOHO Router Version 1.0
19
3.2.11 Administrator Settings
Click on the Password link on the navigation drop-down menu. This page allows you
to configure the password to access this device from the web-browser.
Note: The default user name and password of the device is admin
User Name: Specify a user name that will be used to connect to the device.
New Password: Specify a password.
Confirmed Password: Re-type the password.
Click on the Apply Change to save the changes.
3.3 TCP/ IP Settings
Click on the TCP/IP Settings link on the
navigation drop-down menu. You will then
see two options. You this menu you may
configure the LAN IP address, DHCP,
Static or Dynamic WAN IP and PPPoE.
Each option is described below.

11b/g Wireless SOHO Router Version 1.0
20
3.3.1 LAN Settings – Static IP
Click on the LAN link on the navigation drop-down menu. This feature allows you to
configure the LAN interface using a static IP address or as a DHCP server/client.
This IP address is also used to access the web-based interface.
IP Address: Enter an IP address for this device.
Subnet Mask: Enter the subnet mask for this IP address.
Default Gateway: Enter the IP address of the default gateway.
DHCP: Since you have specified a static IP address, select Disabled from the drop-
down list.
802.1d: You may enable this option if you would like to use the spanning tree feature
for bridging. (optional)
Clone MAC Address: Specify a MAC address if you would like to use a different
MAC address on this device. (optional)
Click on the Apply Change to save the changes.
Note: If you change the IP address here, you may need to adjust your PC’s network
settings to access the network again.
/