Remington IPL6500 Troubleshooting guide
- Category
- Light depilation
- Type
- Troubleshooting guide

ENGLISHENGLISH
IPL6500
PRO - IPL HAIR REMOVAL
Register online for
£10,000 prize draw
EXTRA year guarantee
FREE rewards gallery
Visit www.productregister.co.uk/remington
.
You must register within 28 days
of purchase.

2
SKIN CHART
A
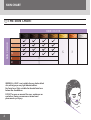
THE SKIN CHART
WARNING: i-LIGHT is not suitable for very dark or black
skin, white/grey or very light blonde/red hair.
For facial use: Only suitable for female facial use
below the cheekbone.
DO NOT use on or around the eyes, eyebrows or
eyelashes. Doing so can cause serious and
permanent eye injury.
I
II
III
IV
V
VI
HAIR COLOUR
SKIN COLOUR

3
Thank you for buying your new Remington® product.
Please read these instructions carefully and keep them safe. Remove all packaging before use.
A
IMPORTANT SAFETY INSTRUCTIONS
1 WARNING – TO REDUCE THE RISK OF BURNS, ELECTROCUTION, FIRE, OR INJURY TO PERSONS:
2 Use this appliance only for its intended use described in this manual.
3 Do not use if it is damaged or malfunctions.
4 Do not leave the appliance unattended while plugged in.
5 Keep the power plug and cord away from heated surfaces.
6 Do not use the product with a damaged cord. A replacement can be obtained via our International
Service Centres.
7 Store the product at a temperature between 15° and 35°C.
8 Only use the parts supplied with the appliance.
9 Do not twist or kink the cable and don’t wrap it around the appliance.
10 The body of this appliance is not washable or water resistant. Do not put the appliance in
liquid; do not use it near water in a bath tub, basin or other vessel; and don’t use it outdoors.
11 Make sure the power cable and adaptor do not get wet. Do not reach for your unit if it has
fallen into water - immediately unplug it from the electrical outlet.
12 Do not plug or unplug the appliance with wet hands.
13 This appliance can be used by children aged from 8 years and above and persons with reduced
physical, sensory or mental capabilities or lack of experience and knowledge if they have been
supervised/instructed and understand the hazards involved. Children shall not play with the appliance.
Cleaning and user maintenance shall not be made by children unless they are older than 8 and
supervised.
14 Keep the appliance and cable out of reach of children under 8 years.
15 This appliance is not intended for commercial or salon use.
16 This appliance should be supplied with approved safety isolating adaptors SW-120060EU (for Europe
and SW-120060BS (for United Kingdom) with the output capacity of 12 dc; 600mA (adaptor output).

4
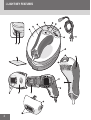
i-LIGHT KEY FEATURES
Figure1
20
19
1
18
10
11
17
12
13
14
2
3
4
4
5
6
7
8
9
16
12
15
14
4
13
13

5
C
KEY FEATURES
1 Power Switch
2 Power Inlet
3 Base Unit
4 Hand Piece
5 Flash Button
6 Energy Level Selection Button
7 Cool Down Mode Indicator
8 Bulb Status Indicator Display
9 Energy Level Indicator
10 Skin Tone Sensor
11 Hand Piece Cord
12 Flash Window
13 Skin Contact Sensors
14 Attachment Release Buttons
15 Bulb
16 Body Attachment
17 Power Cord
18 Lint Free Cloth
19 Facial Attachment
C
GETTING STARTED
Be patient when rst using your i-LIGHT, as with any new product, it may take a little while to familiarise
yourself with the product. Take the time to acquaint yourself with your i-LIGHT as we are condent you will
receive years of enjoyable use and complete satisfaction.

6
C
GETTING ACQUAINTED WITH i-LIGHT
, What is i-
LIGHT
?
The i-
LIGHT
system is a revolutionary light-based device designed for the removal of unwanted body hair and
female facial hair at home.
i-
LIGHT
utilises similar clinically-proven technology that professional dermatologists and salons use, optimised
for personal treatment.
, What is Intense Pulse Light (IPL) and how does i-
LIGHT
work?
IPL - (Intense Pulsed Light) is a well-established technology used worldwide for over 15 years. i-
LIGHT
uses this
technology to ash your skin with an intense pulse of light.
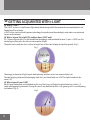
The pulse works under the skin’s surface to target hairs at the root, helping to stop their growth. (Fig 1)
The energy in the pulse of light targets dark colouring, and best results are seen on darker hair.
To avoid targeting (and possibly damaging) dark skin, you should only use i-
LIGHT
on light to medium skin
tones (I-IV).
, What to expect from i-LIGHT
Results aren’t immediate, and individual results vary. Most users will begin to notice fewer hairs within 1-2
weeks after beginning treatment. During this time it may look like the hair is still growing, but it is actually being
‘pushed out’ (Fig. 2).
Fig. 1
Fig. 2

7
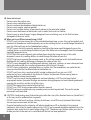
Hair grows in a cycle of 3 dierent phases which lasts 18-24 months (Fig. 3). Only hairs in the active growth
phase are susceptible to treatment, which is why multiple treatments are required for optimal results.
It’s important to continue with the full treatment regime and top-up treatments to ensure that every active
hair is treated.
, Treatment Regime
A full treatment regime is once every two weeks for three treatments.
Individual results may vary, so multiple treatments may be required for optimal results.
Some hair growth will occur that is less dense, ner and lighter in colour than the original hair. This regrowth
is perfectly normal and should be expected.
After completing the initial treatment regime, top-up treatments will provide even better results.
Continuous regular weekly use will give good results within 6-12 weeks (darker skin tones may take longer).
, NOTE: You should avoid treating the same area multiple times in one session, as it will not improve
ecacy but increases the risk of skin irritation
A
WARNINGS AND SAFETY PRECAUTIONS
F IMPORTANT SAFETY CAUTIONS
Before you start using i-LIGHT:
Be sure to read all Warnings and Safety Information. Before you begin, check to see if i-LIGHT is
suitable for you.
Use the skin and hair chart at the front of this manual and the integrated skin sensor to determine if this
device is right for you.
Consult the hair chart at the front of this manual to ensure the device is right for you.
, Skin Type
• Donotuseonnaturallydarkskin,asitmayresultinburns,blistersandchangesinskincolour.
• Donotuseontannedskinorafterrecentsunexposure,asitmaycauseburnsorskininjury.
• i-
LIGHT
is not eective on naturally white, grey, blonde or red body or facial hair.
Anagen Phase Catagen Phase Telogen Phase
Fig. 2 Fig. 3 Fig. 4
Anagen Phase Telogen PhaseCatagen Phase
Active Growth
Fig. 3

8
, Areas not to treat:
• Donotuseonthescalporears.
• Donotuseonmalefaceorneck.
• Donotuseabovethecheekbone(femalefacialuse).
• Donotuseonnipples,areolaorgenitals.
• Donotuseifyouhavetattoosorpermanentmakeupintheareatobetreated.
• Donotuseondarkbrownorblackspotssuchasmoles,birthmarksorfreckles.
• Donotuseonanareaofrecentsurgery,deeppeel,laserresurfacing,scarsorskinthathasbeen
damaged with burns or scalds.
, When not to use/When to avoid using i-LIGHT
• DONOTuseifyouhavetannedskinintheintendedtreatmentarea,asyourskinmaybetoodarkand
treatment in tanned areas could temporarily cause skin swelling, blisters, or could change the colour of
yourskin.Waituntilyourtanhasfadedbeforetreating.
• DONOTuseonskinwithcosmeticsapplied,astreatinginthoseareascouldtemporarilycauseskin
swelling, blisters or could change the colour of your skin. Make sure to thoroughly clean the intended
treatment area prior to use.
• DONOTashthesametreatmentspotmultipletimesduringthesamesession,asthiscould
temporarily cause skin swelling, blisters, or could change the colour of your skin.
• DONOTtreatanyareamorethanonceperweek,asthiswillnotspeedupresults,butcouldincrease
likelihood of skin swelling, blistering or changing the colour of your skin.
• DONOTuseondamagedskin,includingopenwounds,coldsores,sunburns,orareaswhereyouhave
had a skin peel or other skin resurfacing procedure within the last 6-8 weeks.
• DONOTuseonirritatedskin,includingrashesorswollenskin.Theseconditionscanmaketheskin
more sensitive. Wait for the aected area to heal before use.
• DONOTuseifyourskinissensitivetolight.Inordertodetermineifyoucanusei-
LIGHT
,
perform a test on a small patch of skin and wait 24 hours to determine if there are any adverse
reactions before treating more broadly.
• DONOTuseifyouareormaybepregnantorarebreast-feeding.i-
LIGHT
has not been tested
on pregnant women. Hormonal changes are common during pregnancy or breast-feeding and could
increase skin sensitivity and the risk of skin injury.
• DONOTashagainstanymaterialotherthanskin.
• DONOTusei-
LIGHT
for any purpose other than hair removal.
• DONOTtreatanyareawhereyoumaysomedaywantyourhairtogrowback.Theresultsmaybe
permanent and irreversible.
, CAUTION: Avoid treating areas that contain only vellus hairs (very thin, ne hair known as “peach fuzz”)
as this may result in undesired hair re-growth.
• DONOTuseonthefaceifyouhaveahistoryofcoldsores;useofIPLoranytreatmentthatirritates
skin can cause a recurrence of cold sores.
• Ifyou’vehadprofessionalorclinicalorself-administeredlaserorIPLorelectrolysishairremoval
treatments, wait at least 6 months before using i-
LIGHT
. If you’ve waxed, plucked or epilated hair in the
treatment area, wait at least 6 weeks before using i-
LIGHT
. The device uses the hair under your skin to
disable your hair at the root, so it is not eective if the hair has been pulled out.

9
• DONOTusedirectlyoverornearActiveImplantableMedicalDevicessuchasimplantablepacemaker,
internal debrillator, or insulin devices. Although no problems associated with the use of this device
have been reported during clinical studies, it is recommended to observe all active implantable
medical device warnings regarding the use of electronic devices to prevent any failure or interruption
of an active implantable device.
• Donotuseoverornearanythingarticialsuchassiliconimplants,Implanoncontraceptiveimplants,
pacemakers, subcutaneous injection ports (insulin dispenser) or piercings.
• Wirelesscommunicationsequipmentmayaectthei-
LIGHT
device and should be kept at least 3.3 m
away.
• Donotuseoverornearllingsordentalimplants.
C
PREPARING FOR USE
, Familiarise yourself with the features of your new i-LIGHT device.
, Flash Window with built-in UV skin protection
• WARNING: always inspect the Flash Window before use to ensure there is no damage to the lens.
• WARNING:alwayscleantheFlashWindowbeforeusewiththelint-freeclothprovidedtoensurethere
is no oil or debris on the lens.
, Skin Contact Sensors
• This safety mechanism prevents accidental flashing. The device will not flash unless both Skin Contact
Sensors are in full contact with the skin.

10
, Flash Button
• The Flash Button is located on the hand piece. This is used to activate a flash.
, Skin Tone Sensor
• Will only allow usage on suitable skin tones.
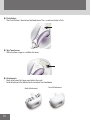
, Attachments:
• Bodyattachmentforlargeareasbelowtheneck.
• Facialattachmentforfemalefacialusebelowthecheekbone.
Body Attachment
Facial Attachment

11
, Attachment Release Buttons
• Press both buttons and gently pull to remove the attachment.
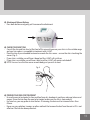
, CHECK YOUR SKIN TONE
• Consult the skin and hair chart at the front of this manual to ensure your skin is in the suitable range
and your hair colour is susceptible to treatment with i-LIGHT.
• Placetheskinofyourintendedtreatmentareaontotheskinsensor–ensuretheskinistouchingthe
sensor. (Fig. 4)
• Ifyourskinissuitable,youwillheara‘beep’andthei-LIGHTwillswitchon.
• Ifyourskinisunsuitable,youwillheara‘buzz’andthei-LIGHTwillremainswitchedoff.
, NOTE: You must use the skin sensor on each body part you wish to treat.
, PREPARE YOUR SKIN FOR TREATMENT
• Ensure the area to be treated is clean and free from oils, deodorants, perfume, make up, lotions and
creams. Shave the hair from the area to be treated, and ensure the skin is clean and dry.
• Forfacialuse,youmayprefertotrimthehair.Iftrimming;thehairmustbetrimmedtolessthan
0.5mm.
• Neverusewax,epilation,tweezersorothermethodsthatremovethehairfromtherootasIPLisnot
effective if the hair has been pulled out.
Fig. 4

12
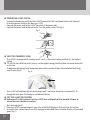
, PREPARE THE i-LIGHT FOR USE
• Unwrap the hand piece cord from the i-LIGHT base and rest the hand piece back on the base unit.
• EnsurethepowerswitchonthebaseunitisOFF.
• Connectthepowercordtothei-LIGHTbaseunitatthepowerinlet.
• Connectthepowercordtothewalloutlet.TurnthepowerswitchON.(fig.5)
, SELECTING THE ENERGY LEVEL
• The i-LIGHT is equipped with 5 energy levels. Level 1 is the lowest setting and level 5 is the highest
setting.
, TIP: For the most effective results, always use the highest energy level that does not cause discomfort
on the skin.
• Todeterminetheenergylevelbeingused,observethenumberoflightsilluminatedontheEnergy
Level Display (fig. 6).
• Youri-
LIGHT
will automatically be set to Energy Level 1 each time the device is powered ON. To
change the level, press the Energy Level Selection Button.
, TEST THE i-LIGHT ON YOUR SKIN
, Before your first full treatment, test the i-LIGHT on a small patch of skin and wait 24 hours to
ensure there are no adverse reactions.
• Start at energy level 1.
1 Place the i-
LIGHT
hand piece against your skin so the Flash Window is flush with the skin surface.
2 Ensure the Skin Contact Sensors are fully engaged and the Bulb Status Indicator Display is illuminated
green (Fig. 7).
Fig. 5
Fig. 6

13
3 Press the Flash Button to deliver a flash.
• Mildtomoderatediscomfortisnormal.IfaflashdeliveredatEnergyLevel1feelstolerable,increaseto
Energy Level 2. Move the device to a different spot and flash the i-LIGHT one more time. Repeat this
process until you find the setting that feels right for you.
• Wait24hoursandthenlookatthetestarea.Iftheskinappearsnormal,proceedwithyourfirstfull
treatment at the energy level you determined is right for you.
, NOTE: You must test the device on each area of the face or body you wish to treat.
C
TREATMENT
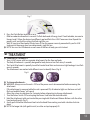
, CHANGING ATTACHMENTS
• Your i-LIGHT comes with two separate attachments for the face and body.
• TheBodyAttachmentisspeciallydesignedforbodyhairandcanflashevery3seconds.
• TheFacialAttachmentisspeciallytunedforFemaleFacialHairandminimiseslightleakage,itcanflash
every 4 seconds.
• Theattachmentsaremarkedwithdifferenticonstoidentifythem(Fig.8)
, To change attachments:
, WARNING: Always ensure the unit is OFF and the power cord is disconnected before removing the
attachment.
• IftheattachmentisremovedwhiletheunitispoweredON,allindicatorlightsonthebaseunitwill
flash and audible “beeps” will sound.
• Allowthesystemtocooldownfor5minutesbeforeattemptingtochangeattachments.
1 Turn the Power Switch OFF and unplug the Power Cord from the electrical outlet.
2 Hold the attachment with one hand while pressing both Attachment Release Buttons with the other
hand and pull gently (Fig. 9).
3 Gently push the other attachment back into the Hand Piece making sure both side tabs click into
place.
, NOTE: the longer tab (with gold circuits) must be on top to properly fit.
Fig. 8
Fig. 7

14
• Storetheunusedattachmentinasafelocation(suchasinthepackaging)takingcarenottodamage
the Flash Window and other components.
• Thei-LIGHTisequippedwithtwooperatingmodes:SingleFlashModeandMulti-FlashMode.
Your i-
LIGHT
device will automatically be set to Single Flash Mode each time the device is powered ON.
• SingleFlashMode:Thei-LIGHTwillasheachtimetheFlashButtonispressed.Thismodeisidealfor
precision treatments of the face and small areas.
• Multi-FlashMode:Thei-LIGHTdevicewillashwhentheFlashButtonispressedandwillcontinueto
ash every 3 seconds when the skin contact sensors are fully engaged. The Multi-Flash mode allows
you to quickly treat large areas by simply gliding the hand piece over the skin after each ash.
, How to treat:
• Place the Flash Window rmly against the skin - ensure the Skin Contact Sensors are fully engaged.
, NOTE: When the Skin Contact Sensors are fully engaged you will hear a ‘chirp’ and the Bulb Status
Indicator Display will illuminate green.
2 Press the ash button to deliver a ash. You should expect to see a bright ash of light (similar to a
camera ash), and you should feel a mild sensation of warmth.
3 Move to the next area and treat in a grid like pattern to ensure full coverage of the treatment area.
• ForSingle-FlashMode,presstheFlashButtoneachtimeyoumovetothenextarea.
• ForMulti-FlashMode,keepyourngerontheFlashButtontokeepitdepressedandglidetothenext
area being sure to keep the Skin Contact Sensors fully engaged. The next ash will be delivered
automatically after 3 seconds.
, NOTE: During Multi-Flash Mode if you let go of the Flash Button or lose skin contact, simply resume
treatment by repeating the above steps.
, Facial Treatment (female use only)
• Facial hair can be very dierent to body hair and the skin on the face tends to be
sensitive and more likely to be exposed to the sun’s UV rays; therefore treating
unwantedfacialhairisdierenttotreatingthebody–pleasebesuretoreadthe
Warnings and Safety Precautions carefully before beginning a facial treatment.
, IMPORTANT: The Facial Attachment has been specially designed to treat the unique
characteristics of female facial hair. DO NOT use the Body Attachment on the face.
See section ‘Changing Attachments’ for more information.
Fig. 9
Fig. 10

15
• TheFacialAttachmentisonlyintendedforuseonfemalefacialhairbelowthecheekbone(Fig.10).
• DONOTuseonmalebeardsorfacialhairastheresultsmaybepermanentorunevenwhichmay
produce changes in facial hair characteristics which may not be desirable.
C
TREATMENT TIPS
, Body Treatment
• For best results, avoid overlapping ashes. This helps prevent exposure to more energy than is
necessary to suppress hair growth. It also ensures that you get the maximum use of the Bulb.
• Forthemosteectiveresults,alwaysusethehighestintensitylevelthatdoesnotcausediscomforton
the skin. The level you use should feel warm on your skin, but should never cause discomfort.
• Youmaynoticethatbonyareas,suchaselbows,shinsandankles,aremoresensitiveduring
treatment.
• Thisisnormalandshouldnotbecauseforalarm.Toavoidthissensitivity,trystretchingtheskinaway
from the bony area during treatment.
, Facial Treatment
• TestonaPatchofSkin–sincefacialskintendstobemoresensitive,makesureyoutestonasmall
patch before proceeding. See section ‘Test the i-LIGHT on your skin’ for more details.
• UseaMirrortoGuideyourTreatments–usingamirrorforagoodviewoftheareatobetreatedandto
help ensure you avoid treating the lips or any other dark spots. If the reected light is unpleasant, you
may want to close your eyes before each ash.
• StretchSkinforBetterSkinContact–thecontoursoftheskinmaymakeitdicultfortheskincontact
sensors to be fully depressed in certain areas. You may nd it easier to try and wrap your upper lip over
your teeth or use your tongue to stretch your cheeks for better skin contact.
C
POST-TREATMENT CARE
After treatment, you may experience slight redness or a warm sensation on your skin. This is normal and
will disappear quickly. To avoid irritation to your skin after a treatment, take the following precautions:
• Avoidsunexposurefor24hoursafteratreatment.ProtecttheskinwithSPF30for2weeksaftereach
treatment.
• Donotprolongsunexposuresuchassunbathing,usingatanningbed,orself-tanforatleast2weeks
after the last treatment.
• Aftertreatment,keeptheareacleananddryanddrinkplentyofwatertokeepskinhydrated.
• Donottakehotbaths,showers,orusesteamroomsandsaunasfor24hoursaftertreatment.
• Donottakepartincontactsportsfor24hoursaftertreatment.
• Donotdepilate(waxing,plucking,threadingorcreams)duringthetreatment–shavingisacceptable
as long as you avoid shaving 24 hours after each treatment.
• Donotusebleachingcreamsorperfumedproductsfor24hoursaftertreatment.

16
C
INFINITY BULB
• The innity bulb means no replacement parts are needed.
• Thebulbinthisdeviceisguaranteedtolastfortheentireguaranteeperiodas
communicated on the guarantee card supplied with this product.
• Intheextremelyunlikelyeventthatyourbulbbecomesempty,pleasecontactyour
local Remington Service centre who will provide you with a replacement.
, Signs that the bulb needs replacing:
• BulbStatusIndicatorisilluminatedyellow:150Flashesremaininthebulb
• Bulbstatusindicatorisashingyellow:Bulbisempty.
C
CLEANING YOUR i-LIGHT DEVICE
F CAUTION: Before cleaning your i-
LIGHT
, make sure that the device is switched OFF and the power cord
is disconnected from the device.
• Regularcleaninghelpstoensureoptimalresultsandalonglifeforthei-
LIGHT
device.
• TocleantheFlashWindow,useonlythelint-freeclothincludedwithyouri-
LIGHT
device. Take care not
to scratch or chip the Flash Window. Scratches and chips can reduce the eectiveness of the unit.
• Forstubbornstainsontheashwindow,dampenacottonswabwithsurgicalspiritorrubbingalcohol,
apply to the ash window and clean gently with the lint-free cloth provided.
Use a small hand-held vacuum to remove dust and debris from the hand piece vents.
F WARNING: If the Flash Window is cracked or broken, the unit must not be used. Never scratch the lter
glass or the metallic surface inside the Treatment Head.
F CAUTION: The i-
LIGHT
is a high voltage device. Never immerse in water. Never clean the unit or any of
its parts under a tap or in a dishwasher.
, Storage
• Switchotheunit,unplugandallowtocoolfor10minutesbeforestorage.
• Storetheunitinadryplaceatatemperaturebetween15ºCand35ºC
E
TROUBLESHOOTING
• Always read these instructions fully before using i-LIGHT
• Refertothistroubleshootingguideifyouexperienceanyproblemswithi-
LIGHT
, as this section
addresses the most common problems you could encounter with i-LIGHT. If you have followed the
instructions in this section and continue to experience problems, please contact the Remington®
Service Centre for further assistance.
, The power switch is ON, but the unit is not working.
• Makesuretheunitispluggedintoaworkingelectricaloutlet.
• Tryswitchingtoadifferentoutlet.
I
N
F
I
N
I
T
Y

17
, The unit appears to have cracks or is broken.
• Donotuseiftheunitisdamaged.Ifyouhaveconcernsaboutusingtheunit,discontinueuseand
contact the Remington® Service Centre for further assistance.
, I have switched the unit ON, but I cannot increase or decrease the energy level.
• Tryresettingtheunitbyturningitoffandwaitingseveralsecondsbeforeturningitbackon.
, The Bulb Status Indicator Light turns green but the unit does not flash when the button is pressed.
• MakesuretheSkinContactSensorisinfullcontactwiththeskin.
• Tryresettingtheunitbyturningitoffandwaitingseveralsecondsbeforeturningitbackon.
, There is a strange smell.
• Besuretheareaiscompletelyshavedbeforetreatment.
, The treated areas become red after treatment.
• Thisisnormalandtherednessshouldsubside.Ifnot,tryusingalowerenergylevel.
, BE AWARE: If the unit is used over an extended period of time, the unit might automatically disable
momentarily (estimated 40 seconds) to cool down. Once the unit has cooled down, it will be ready to
use again.
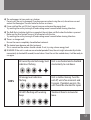
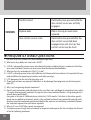
LED’s
All currently selected energy level
indicators ashing
Unit is overheated and is disabled
momentarily to cool down.
All energy level indicators
ashing
Unit is malfunctioning. Turn the
unit o, wait a few moments and
try again. If problem persists, the
unit should be returned for repair.
All LED’s ashing with warning
beep
Treatment head is removed or
loose.

18
SOUNDS
Not full contact. Flash button was pressed while the
skin contact sensor was not fully
engaged.
Replace bulb. Bulb is missing or needs to be
replaced.
Skin contact sensors stuck. Flash button was pressed after the
skin contact sensor had been
engaged since unit start up. Skin
contact sensor may be stuck.
E
FREQUENTLY ASKED QUESTIONS
• ForafulllistofFAQs,pleasevisit(www.remington-ilight.com)
Q. WhatareasofmybodycanItreatwithi-LIGHT?
A. i-LIGHT is designed for unisex use on areas below the neck, including the legs, underarms, bikini line,
arms, chest and back. Females can also use on facial hair below the cheekbone.
Q. Whataretherisksinvolvedwithi-LIGHT.Isitsafe?
A. i-LIGHT is clinically proven to be safe & eective, but like any electronic device it is important that you
read and follow the operating instructions and safety warnings.
Q. IsIPLdangerousfortheskinafterlongtermuse?
A. There have not been any reported side eects or skin damage from long term use of intense pulse
light (IPL)
Q. Whyismyhairgrowingdespitetreatments?
A. Results aren’t immediate, and individual results vary. Most users will begin to notice fewer hairs within
1-2 weeks after beginning treatment. During this time it may look like the hair is still growing, but it is
actually being ‘pushed out’.
Hair grows in a cycle of 3 dierent phases which lasts 18-24 months. Only hairs in the active growth
phase are susceptible to treatment, which is why multiple treatments are required for optimal result.
Another reason for continued growth could be that the area was missed during a treatment. Repeat
the treatment regime when you notice regrowth.
Q. Whycan’tIusei-LIGHTafterrecentsunexposure?
A. Sun exposure causes high levels of melanin to be present and exposes the skin to higher risk of burns
or blisters following treatment.

19
Q. DoIneedeyeprotectionwhileusingi-
LIGHT
?
A. No, it is not harmful to the eyes. i-LIGHT features a safety system which prevents unintentional
ashing when the device is not in contact with the skin. The small amount of light emitted during
treatment is similar to that of a camera ash and is not harmful to the eyes. The specially designed
Facial Attachment minimises light leakage. If the reected light is unpleasant, you may want to close
your eyes before each ash.
H
ENVIRONMENTAL PROTECTION
To avoid environmental and health problems due to hazardous substances in electrical and
electronic goods, appliances marked with this symbol must not be disposed of with unsorted
municipal waste, but recovered, reused or recycled.
E SERVICE AND GUARANTEE
Defects aecting product functionality appearing within the guarantee period will be corrected by
replacement or repair at our option provided the product is used and maintained in accordance with the
instructions.
Defects from repair by an unauthorized dealer are not covered.
Consumables are excluded.
Your statutory rights are not aected.
If you call the Service Centre, please have the Model No. to hand, as we won’t be able to help you without
it. The Model No. can be found on the rating plate of the appliance.
Replacement parts and accessories are available to buy at
www.remington.co.uk/parts-accessories

20
E SERVICE CENTRE
United Kingdom
G Tel 0800 212 438 (free call mainland UK)
G +44 161 947 3111 (call outside the UK)
Spectrum Brands (UK) Ltd
Fir Street, Failsworth, Manchester
M35 0HS, UK
www.remington.co.uk
Ireland
G Tel 142 951 40
Remington Consumer Products,
Unit B12, Ballymount Corporate Park,
Ballymount, Dublin 12.
www.remington.co.uk
Model No. IPL6500
14/UK/ IPL6500 T22-0002741 Version 08 / 14
Remington® is a Registered Trade Mark of Spectrum Brands, Inc., or one of its subsidiaries.
Spectrum Brands (UK) Ltd
Fir Street,
Failsworth,
Manchester
M35 0HS
www.remington.co.uk
-
 1
1
-
 2
2
-
 3
3
-
 4
4
-
 5
5
-
 6
6
-
 7
7
-
 8
8
-
 9
9
-
 10
10
-
 11
11
-
 12
12
-
 13
13
-
 14
14
-
 15
15
-
 16
16
-
 17
17
-
 18
18
-
 19
19
-
 20
20


Remington IPL6500 Troubleshooting guide
- Category
- Light depilation
- Type
- Troubleshooting guide
Ask a question and I''ll find the answer in the document
Finding information in a document is now easier with AI
Related papers
-
Remington i-LIGHT PRO+ Face & Body IPL6500AU User manual
-
Remington IPL6000 I-LIGHT PRO Owner's manual
-
-
-
Remington IPL 2000 Owner's manual
-
-
-
Remington AS404 Operating instructions
-
-
Remington AS7051 Operating instructions
Other documents
-
Unbranded 67128 Installation guide
-
Hasbro Hydroblade Operating instructions
-
Panasonic ESEW90 Owner's manual
-
-
Beurer IPL 7500 SatinSkin Pro Owner's manual
-
Philips SC1981/50 User manual
-
Braun Pro 3 User manual
-
-
-
HoMedics IPL-HH180 Instruction book