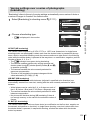
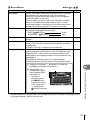
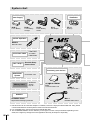
Olympus E-M5 + M.ZUIKO DIGITAL ED 12-50mm + HLD-6 + BLN-1 User manual
- Category
- Bridge cameras
- Type
- User manual

Basic guide
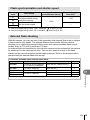
Quick task index
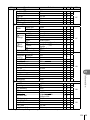
Table of Contents
1.
Basic photography/frequently-
used options
2. Other shooting options
3. Flash shooting
4. Shooting and viewing movies
5. Playback options
6. Sending and receiving images
7. Using OLYMPUS Viewer 2
8. Printing pictures
9. Camera setup
10. Customizing camera settings
11. Information
12. SAFETY PRECAUTIONS
System chart
Index
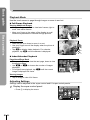
Thank you for purchasing an Olympus digital camera. Before you start to use your new camera,
please read these instructions carefully to enjoy optimum performance and a longer service life.
Keep this manual in a safe place for future reference.
We recommend that you take test shots to get accustomed to your camera before taking important
photographs.
The screen and camera illustrations shown in this manual were produced during the development
stages and may differ from the actual product.
The contents in this manual are based on firmware version 1.0 for this camera. If there are
additions and/or modifications of functions due to firmware update for the camera, the contents will
differ. For the latest information, please visit the Olympus website.
Instruction Manual
DIGITAL CAMERA

2
EN
Indications used in this manual
The following symbols are used throughout this manual.
#
Cautions
Important information on factors which may lead to a malfunction
or operational problems. Also warns of operations that should be
absolutely avoided.
$
Notes
Points to note when using the camera.
%
Tips
Useful information and hints that will help you get the most out of
your camera.
g
Reference pages describing details or related information.
■
This notice concerns the supplied flash unit and is chiefly directed to users in
North America.
Information for Your Safety
IMPORTANT SAFETY
INSTRUCTIONS
When using your photographic equipment, basic safety precautions should always be
followed, including the following:
• Read and understand all instructions before using.
• Close supervision is necessary when any flash is used by or near children. Do not leave
flash unattended while in use.
• Care must be taken as burns can occur from touching hot parts.
• Do not operate if the flash has been dropped or damaged - until it has been examined by
qualified service personnel.
• Let flash cool completely before putting away.
• To reduce the risk of electric shock, do not immerse this flash in water or other liquids.
• To reduce the risk of electric shock, do not disassemble this flash, but take it to qualified
service personnel when service or repair work is required. Incorrect reassembly can
cause electric shock when the flash is used subsequently.
• The use of an accessory attachment not recommended by the manufacturer may cause a
risk of fire, electric shock, or injury to persons.
SAVE THESE INSTRUCTIONS

3
EN
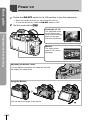
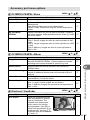
Unpack the box contents
The following items are included with the camera.
If anything is missing or damaged, contact the dealer from whom you purchased the
camera.
Camera
• Flash case
• Computer software
CD-ROM
• Instruction manual
• Warranty card
Body cap Strap USB cable
CB-USB6
AV cable
(Monaural)
CB-AVC3
Flash
FL-LM2
Lithium ion
battery
BLN-1
Lithium ion
charger
BCN-1
Attaching the strap
1
Thread the strap in the direction of
the arrows.
2
Lastly, pull the strap tight making
sure that it is fastened securely.
3
2
1
4
• Attach the other end of the strap to the other eyelet in the same way.

4
EN
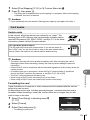
Basic guide
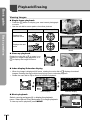
Preparations for shooting
1
Charging the battery.
Charging indicator
Charging in
progress
Lights orange
Charging
complete
Off
Charging error Blinks orange
(Charging time: Up to
approximately 4 hours)
1
2
3
AC wall outlet
Lithium
ion battery
(BLN-1)
Charging
indicator
AC cable
SDirection
indicating
mark
Lithium ion
charger
(BCN-1)
# Cautions
• Unplug the charger when charging is complete.
2
Loading the battery.
2
1
3
Direction
indicating
mark
Battery compartment
cover
Battery
compartment
lock
3
Closing the battery compartment cover.
Removing the battery
Turn off the camera before opening or closing the
battery compartment cover.
To remove the battery, first push the battery lock
knob in the direction of the arrow and then remove.
# Cautions
• Contact an authorized distributor or service center if you are unable to remove the
battery. Do not use force.
$ Notes
• It is recommended to set aside a backup battery for prolonged shooting in case the
battery in use drains.
Charging and inserting the battery

5
EN
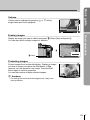
Preparations for shooting
Basic guide
1
Loading the card.
• Open the card slot cover.
• Slide the card in until it is locked into place.
g “Card basics” (P. 103)
# Cautions
• Turn off the camera before loading or
removing the card.
2
3
1
Card slot
2
Closing the card slot cover.
• Close the cover until you hear a click.
# Cautions
• Be sure the card slot cover is closed before using the camera.
Removing the card
Press the inserted card lightly and it will be ejected.
Pull out the card.
# Cautions
• Do not remove the battery or card while the card
write indicator (P. 31) is displayed.
Eye-Fi Cards
• Use the Eye-Fi card in compliance with the laws and regulations of the country where
the camera is used.
• Remove the Eye-Fi card from the camera or select [Off] for [Eye-Fi] (P. 93) in airplanes
and other locations in which use is prohibited.
• Eye-Fi cards may become hot during use.
• The drain on the battery may increase when Eye-Fi cards are used.
• Camera response may slow when Eye-Fi cards are used.
Inserting and removing cards

6
EN
Basic guide
Preparations for shooting
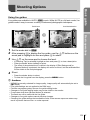
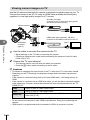
Attaching a lens to the camera
1
Attach a lens to the camera.
1
2
Rear cap
2
1
• Align the lens attachment mark (red) on the camera with the alignment mark (red) on
the lens, then insert the lens into the camera’s body.
• Rotate the lens in the direction indicated by the arrow until you hear it click.
# Cautions
• Make sure the camera is turned off.
• Do not press the lens release button.
• Do not touch internal portions of the camera.
2
Remove the lens cap.
2
1
1
Using lenses with an UNLOCK switch
Retractable lenses with an UNLOCK switch can not
be used while retracted.
Turn the zoom ring in the direction of arrow (
1
) to
extend the lens (
2
).
To store, turn the zoom ring in the direction of arrow
(
4
) while sliding the UNLOCK switch (
3
).
4
1
2
3
Removing the lens from the camera
While pressing the lens release button, rotate the
lens in the direction of the arrow.
g “Interchangeable lenses” (P. 104)
2
1
Lens release button

7
EN
Preparations for shooting
Basic guide
1
Remove the terminal cover from the fl ash unit and attach the fl ash to the
camera.
• Slide the flash unit all the way in, stopping when it contacts the back of the shoe and
is securely in place.
2
1
UNLOCK switch
2
To use the flash, raise the flash head.
• Lower the flash head when the flash is not in
use.
Removing the Flash Unit
Press the UNLOCK switch while removing the flash
unit.
2
1
UNLOCK switch
Attaching the flash unit

8
EN
Basic guide
Preparations for shooting
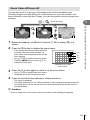
Power on
1
Rotate the ON/OFF switch to the ON position to turn the camera on.
• When the camera is turned on, the monitor will turn on.
• To turn the camera off, rotate the ON/OFF switch to OFF.
2
Set the mode dial to A.
Viewfinder (P. 30)
The viewfinder turns
on and the monitor
turns off automatically
when you put your
eye to the viewfinder.
250 F5.6
ee
01:02:03
1023
ISO-A
200
ISO-A
200
Monitor
The super control
panel (P. 22) will be
displayed.
250250 F5.6
Normal
i
2012.05.01 12:30
NORM
ISO
AUTO
AUTO
WB
AUTO
4:3
AEL/AFL
01:02:0301:02:03
10231023
Adjusting Viewfinder Focus
Look through the viewfinder and rotate the dial until
the display is in sharp focus.
Using the Monitor
You can adjust the angle of the monitor.
1
2

9
EN
Preparations for shooting
Basic guide
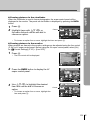
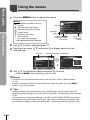
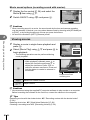
Date and time information is recorded on the card together with the images. The file
name is also included with the date and time information. Be sure to set the correct
date and time before using the camera.
1
Display the menus.
• Press the MENU button to display the menus.
MENU button
j
4:3
D
1
2
Shooting Menu 1
Card Setup
Reset/Myset
Picture Mode
Image Aspect
Back
Set
Digital Tele-converter Off
2
Select [X] in the [d] (setup) tab.
• Use FG to select [d] and press I.
• Select [X] and press I.
--.--.-- --:--X
W
j
±0
k
±0
2
1
Setup Menu
English
5sec
c
/
#
Menu Display
Firmware
Rec View
Back
Set
[d] tab
3
Set the date and time.
• Use HI to select items.
• Use FG to change the selected item.
• Use FG to select the date format.
X
2012
YMD Time
Cancel
Y/M/D
The time is displayed
using a 24-hour clock.
4
Save settings and exit.
• Press Q to set the camera clock and exit to the main menu.
• Press the MENU button to exit the menus.
Setting the date/time

10
EN
Basic guide
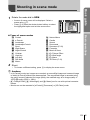
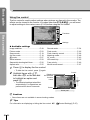
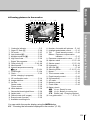
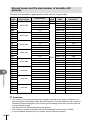
Names of parts and functions
Names of parts
Camera
1
2
3
5
6
4
8
7
g
f
e
d
5
h
i
c
9
b
a
0
j
l
m
o
n
k
Remove when using the
HLD-6 battery holder.
1 Main dial* (o) ...................P. 16, 57 – 59
2 Shutter button ...............P. 13, 14, 44, 96
3 R (Movie) button....P. 13, 15, 67, 69, 93
4 Fn2 button ..........................P. 25, 69, 93
5 Strap eyelet.......................................P. 3
6 Sub dial* (r) .....................P. 16, 57 – 59
7 Lens attachment mark ......................P. 6
8 Mount (Remove the body cap before
attaching the lens.)
9 Stereo microphone ...................P. 68, 73
0 Hot shoe cover
a Diopter adjustment dial .....................P. 8
b Mode dial ....................................P. 8, 12
c Self-timer lamp/
AF illuminator ..................................P. 56
d Connector cover
e Speaker
f Lens release button ..........................P. 6
g Lens lock pin
h Multi-connector ...................P. 74, 78, 82
i HDMI micro connector (type D) ......P. 74
j Tripod socket
k PBH cover
l Battery compartment cover...............P. 4
m Battery compartment lock .................P. 4
n Card slot cover..................................P. 5
o Card slot ...........................................P. 5
* In this manual, the o and r icons
represent operations performed using
the main and sub dials.

11
EN
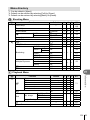
Names of parts and functions
Basic guide
2
4
1
5
6
7
9
8
0
e
a
b
d
c
3
1 Accessory port ................................P. 76
2 Viewfinder ..................................P. 8, 30
3 Eye sensor
4 Eyecup
5 Monitor (Touch screen) .......P. 27, 31, 32
6 Hot shoe
7 u (LV) button ........................P. 15, 92
8 q (Playback) button ................P. 16, 69
9 Fn1 button ................................P. 69, 93
0 MENU button .................................P. 26
a INFO (Information display) button
...........................................P. 39 – 41, 69
b
Q button ............................P. 23, 24, 26
c Arrow pad (FGHI)
d ON/OFF switch ................................P. 8
e D (Erase) button ......................P. 17, 69

12
EN
Basic guide
Basic operations
Camera controls
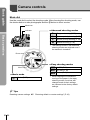
Mode dial
Use the mode dial to select the shooting mode. After choosing the shooting mode, use
the shutter button to take photographs and the R button to shoot movies.
■ Easy shooting modes
A
iAUTO (P. 21)
ART
Art filter (P. 18)
SCN
Scene (P. 19)
• When rotating the mode dial or
turning off the power in the easy
shooting modes, functions with
changes made to their settings
are restored to the factory default
settings.
■ Advanced shooting modes
P
Program shooting (P. 57)
A
Aperture priority shooting (P. 57)
S
Shutter priority shooting (P. 58)
M
Manual shooting (P. 58)
• The settings made in the advanced
shooting modes are retained even if
the camera is turned off.
■ Movie mode
n
Movie (P. 67)
Photo zone
Movie zone
Mode icon
Indicator
% Tips
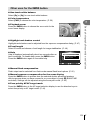
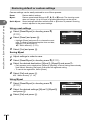
Resetting camera settings. g “Restoring default or custom settings” (P. 42)

13
EN
Basic operations
Basic guide
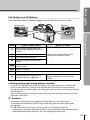
The Shutter and R Buttons
Use the shutter button to take photographs and the R button record movies.
Shutter button
R button
Mode Photos: shutter button Movies: R button
P
Aperture and shutter speed are
automatically adjusted for optimal
results.
The camera automatically adjusts
settings and records a movie.
A
You control aperture.
S
You control shutter speed.
M
You control aperture and shutter
speed.
A
A full auto mode in which the camera automatically optimizes settings for the
current scene.
ART Select an art filter.
SCN Select a scene.
n
Photographs are recorded at the
settings selected in [nMode].
Shoot movies using shutter speed and
aperture effects and movie special
effects.
■ Taking photographs during movie recording
• To take a photograph during movie recording, press the shutter button. Press the R
button to end recording. Three files will be recorded to the memory card: the movie
footage preceding the photograph, the photograph itself, and the movie footage following
the photograph.
• Only one photograph can be taken at a time during movie recording; the self-timer and
flash can not be used.
# Cautions
• Image size and quality for photographs are independent of movie frame size.
• The autofocus and metering used in movie mode may differ from that used to take
photographs.
• The R button can not be used to record movies in the following instances:
shutter button pressed halfway/during bulb or time photography/Sequential shooting/
PANORAMA/3D/multiple exposure, etc. (still photography also ends)

14
EN
Basic guide
Basic operations
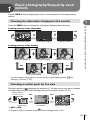
Taking photographs/shooting movies
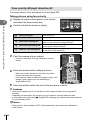
1
Frame a picture in the viewfi nder.
• The monitor turns off and the display in the viewfinder lights up.
• Be careful that your fingers or the camera strap do not obstruct the lens.
Horizontal grip Vertical grip
Viewfinder
250 F5.6
Shutter speed Aperture value
250 F5.6
ee
01:02:03
1023
ISO-A
200
ISO-A
200
2
Adjust the focus.
• Lightly press the shutter button down to the first position (press the shutter button
halfway).
Press the shutter
button halfway.
250 F5.6
ee
01:02:03
1023
ISO-A
200
ISO-A
200
AF confirmation
mark
AF target
• The AF confirmation mark (( or n) will be displayed and focus will lock.
(
Lenses that supports Hi-Speed Imager AF*
n
Lenses with other Four Thirds mounts
* Visit our website for more information.
• The shutter speed and aperture value that have been set automatically by the
camera are displayed.
• If the in-focus indicator blinks, the subject is not in focus. (P. 98)
Pressing the shutter button halfway and all the way down
The shutter button has two positions. The act of lightly pressing the shutter button to the
first position and holding it there is called “pressing the shutter button halfway,” that of
pressing it all the way
down to the second
position “pressing the
shutter button all (or the
rest of) the way down.”
Press halfway
Press the rest of
the way down

15
EN
Basic operations
Basic guide
3
Release the shutter.
Taking photographs
Press the shutter button all the way (fully).
• The shutter sounds and the picture is taken.
Recording movies
Release the shutter button and press the R button to begin
recording.
Press the R button again to end recording.
00:02:18
n
Framing subjects in the monitor
Press the u button to display the subject in the monitor. Press the u
button again to switch back to the original display.
$ Notes
• The camera can be configured to switch between the viewfinder and
monitor displays either automatically or manually. Press and hold the
u button until the automatic display toggle menu is displayed and
select an option using FG. Pressing the u button toggles between the monitor and
viewfinder displays.
• If no operations are performed for a minute, the camera enters “sleep” (stand-by) mode to
turn off the monitor and to cancel all actions. The camera activates again when you touch
any button (the shutter button, q button, etc.). The camera will turn off automatically if
left in sleep mode for 4 hours. Turn the camera on again before use.
• Automatic display selection is not available in the following instances.
3D photography/During live bulb photography
# Cautions
• If the camera is used for extended periods, the temperature of the image pickup
device will rise and noise and colored fog may appear in images recorded at high ISO
sensitivities. Choose a lower ISO sensitivity or turn the camera off for a short period.
% Tips
Changing the delay before the camera enters sleep mode. g [Sleep] (P. 88)/
Choosing a viewfinder display style. g [Built-in EVF Style] (P. 92)
u button

16
EN
Basic guide
Basic operations
Playback/Erasing
Viewing Images
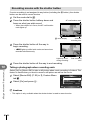
Single-frame playback
• Press the q button to display your most recent photograph
or movie.
• Use the sub dial or arrow pad to view other pictures.
Sub dial Arrow pad
Displays the
previous frame
Displays the next
frame
2012.05.01 12:30 20
100-0020
L
N
Still image
2012.05.01 12:30 4
100-0004
WB
AUTO
WBWBWB
AUTOAUTOAUTO
P
HD
Movie
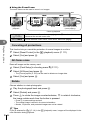
Close-up playback
Rotate the main dial to a to zoom in on
a picture in single-image playback, or to
G
to display the image full frame.
2x
Index display/Calendar display
• When the image is displayed full frame, rotating the main dial to
G
displays thumbnail
images. Rotating the dial multiple times brings you to calendar playback.
• Rotate the main dial to a to return to full-frame playback.
2012.05.01 12:30 21
Index display
2012.5
Sun Mon Tue Wed Thu Fri Sat
29 30 1 2 3 4 5
6 7 8 9 10 11 12
13 14 15 16 17 18 19
20 21 22 23 24 25 26
27 28 29 30 31
29 30 1 2 3 4 5
6 7 8 9 10 11 12
13 14 15 16 17 18 19
20 21 22 23 24 25 26
27 28 29 30 31
Calendar display
Movie playback
Select a movie and press Q to display the playback
menu. Select [Movie Play] and press Q to begin playback.
To interrupt movie playback, press MENU.
m
Movie
Back
Movie Play
Erase
Set

17
EN
Basic operations
Basic guide
Volume
Volume can be adjusted by pressing F or G during
single-frame and movie playback.
00:00:02/00:00:14
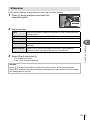
Erasing images
Display an image you want to delete and press D. Select [Yes] and press Q.
You can also select multiple images for deletion.
D button
Erase
Back
Yes
No
Set
Protecting images
Protect images from accidental deletion. Display an image
you wish to protect and press the Fn2 button; a 0
(protect) icon will appear on the image. Press the Fn2
button again to remove protection.
You can also protect multiple selected images.
# Cautions
• Formatting the card erases all images even if they have
been protected.
2012.05.01 12:30 20
100-0020
L
N
4
:
3

18
EN
Basic guide
Basic operations
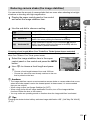
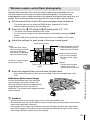
1
Rotate the mode dial to ART.
• A menu of art filters will be displayed. Select a filter
using FG.
• Press Q or press the shutter button halfway to select
the highlighted item and exit the art filter menu.
ART 1
1
7
Pop Art
Exit
Set
Types of art filters
j Pop Art s Diorama
k Soft Focus t Cross Process
l Pale&Light Color u Gentle Sepia
m Light Tone v Dramatic Tone
n Grainy Film Y Key Line
o Pin Hole u ART BKT (ART bracketing)
2
Shoot.
• To choose a different setting, press Q to display the art filter menu.
ART bracketing
Each time the shutter is released, the camera creates copies for all art filters. Use the
[
v
] option to choose filters.
Art effects
Art filters can be modified and effects can be added. Pressing I in the art filter menu
displays additional options.
Modifying filters
Option I is the original filter, while options II and on add effects that modify the original
filter.
Adding effects*
Soft focus, pin-hole, frames, white edges, starlight
* The effects available vary with the selected filter.
# Cautions
• If [RAW] is currently selected for image quality, image quality will automatically be set to
[YN+RAW]. The art filter will be applied to the JPEG copy only.
• Depending on the subject, tone transitions may be ragged, the effect may be less
noticeable, or the image may become more “grainy.”
• Some effects may not be visible in live view or during movie recording.
• Playback may differ according to the filters, effects, or movie quality settings applied.
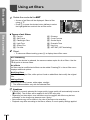
Using art filters

19
EN
Basic operations
Basic guide
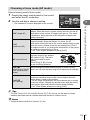
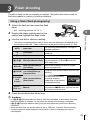
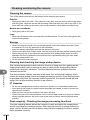
Shooting in scene mode
1
Rotate the mode dial to SCN.
• A menu of scene menu will be displayed. Select a
scene using FG.
• Press Q or press the shutter button halfway to select
the highlighted option and exit the scene menu.
SCN 1 Portrait
Exit
Set
Types of scene modes
O Portrait r Nature Macro
P e-Portrait Q Candle
L Landscape R Sunset
K Landscape+Portrait T Documents
J
Sport s Panorama (P. 60)
G Night Scene
(
Fireworks
U Night+Portrait g Beach & Snow
G
Children fn Fisheye Effect
H
High Key wn Wide-angle
I
Low Key mn Macro
q DIS Mode T 3D Photo (P. 61)
J
Macro
2
Shoot.
• To choose a different setting, press Q to display the scene menu.
# Cautions
• In [e-Portrait] mode, two images are recorded: an unmodified image and a second image
to which [e-Portrait] effects have been applied. The unmodified image is recorded using
the option currently selected for image quality, the modified copy at an image quality of
JPEG (X-quality (2560 × 1920)).
• [n Fisheye Effect], [n Wide-angle], and [n Macro] are for use with optional converter
lenses.
• Movies can not be recorded in [e-Portrait], [Panorama], or [3D Photo] mode.

20
EN
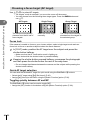
Basic guide
Basic operations
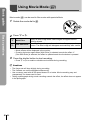
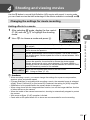
Using Movie Mode (n)
Movie mode (n) can be used to film movies with special effects.
1
Rotate the mode dial to n.
2
Press G or I.
G
Multi Echo
Apply an after-image effect. After-images will appear behind
moving objects.
I
One Shot Echo
An after-image will appear for a short time after you press the
button. The after-image will disappear automatically after a while.
• Movie effects will be displayed in the monitor.
• Pressing the button again when [Multi Echo] is selected cancels the effect. If
[One Shot Echo] is selected, the effect is updated each time the button is pressed.
3
Press the shutter button to start recording.
• Press G or I to enable or disable movie effects during recording.
# Cautions
• The frame rate will drop slightly during recording.
• The 2 effects can not be applied simultaneously.
• Use a memory card with an SD speed class of 6 or better. Movie recording may end
unexpectedly if a slower card is used.
• Taking a photograph during movie recording cancels the effect; the effect does not appear
in the photograph.
Page is loading ...
Page is loading ...
Page is loading ...
Page is loading ...
Page is loading ...
Page is loading ...
Page is loading ...
Page is loading ...
Page is loading ...
Page is loading ...
Page is loading ...
Page is loading ...
Page is loading ...
Page is loading ...
Page is loading ...
Page is loading ...
Page is loading ...
Page is loading ...
Page is loading ...
Page is loading ...
Page is loading ...
Page is loading ...
Page is loading ...
Page is loading ...
Page is loading ...
Page is loading ...
Page is loading ...
Page is loading ...
Page is loading ...
Page is loading ...
Page is loading ...
Page is loading ...
Page is loading ...
Page is loading ...
Page is loading ...
Page is loading ...
Page is loading ...
Page is loading ...
Page is loading ...
Page is loading ...
Page is loading ...
Page is loading ...
Page is loading ...
Page is loading ...
Page is loading ...
Page is loading ...
Page is loading ...
Page is loading ...
Page is loading ...
Page is loading ...
Page is loading ...
Page is loading ...
Page is loading ...
Page is loading ...
Page is loading ...
Page is loading ...
Page is loading ...
Page is loading ...
Page is loading ...
Page is loading ...
Page is loading ...
Page is loading ...
Page is loading ...
Page is loading ...
Page is loading ...
Page is loading ...
Page is loading ...
Page is loading ...
Page is loading ...
Page is loading ...
Page is loading ...
Page is loading ...
Page is loading ...
Page is loading ...
Page is loading ...
Page is loading ...
Page is loading ...
Page is loading ...
Page is loading ...
Page is loading ...
Page is loading ...
Page is loading ...
Page is loading ...
Page is loading ...
Page is loading ...
Page is loading ...
Page is loading ...
Page is loading ...
Page is loading ...
Page is loading ...
Page is loading ...
Page is loading ...
Page is loading ...
Page is loading ...
Page is loading ...
Page is loading ...
Page is loading ...
Page is loading ...
Page is loading ...
Page is loading ...
Page is loading ...
Page is loading ...
Page is loading ...
Page is loading ...
Page is loading ...
Page is loading ...
Page is loading ...
Page is loading ...
Page is loading ...
Page is loading ...
Page is loading ...
Page is loading ...
Page is loading ...
-
 1
1
-
 2
2
-
 3
3
-
 4
4
-
 5
5
-
 6
6
-
 7
7
-
 8
8
-
 9
9
-
 10
10
-
 11
11
-
 12
12
-
 13
13
-
 14
14
-
 15
15
-
 16
16
-
 17
17
-
 18
18
-
 19
19
-
 20
20
-
 21
21
-
 22
22
-
 23
23
-
 24
24
-
 25
25
-
 26
26
-
 27
27
-
 28
28
-
 29
29
-
 30
30
-
 31
31
-
 32
32
-
 33
33
-
 34
34
-
 35
35
-
 36
36
-
 37
37
-
 38
38
-
 39
39
-
 40
40
-
 41
41
-
 42
42
-
 43
43
-
 44
44
-
 45
45
-
 46
46
-
 47
47
-
 48
48
-
 49
49
-
 50
50
-
 51
51
-
 52
52
-
 53
53
-
 54
54
-
 55
55
-
 56
56
-
 57
57
-
 58
58
-
 59
59
-
 60
60
-
 61
61
-
 62
62
-
 63
63
-
 64
64
-
 65
65
-
 66
66
-
 67
67
-
 68
68
-
 69
69
-
 70
70
-
 71
71
-
 72
72
-
 73
73
-
 74
74
-
 75
75
-
 76
76
-
 77
77
-
 78
78
-
 79
79
-
 80
80
-
 81
81
-
 82
82
-
 83
83
-
 84
84
-
 85
85
-
 86
86
-
 87
87
-
 88
88
-
 89
89
-
 90
90
-
 91
91
-
 92
92
-
 93
93
-
 94
94
-
 95
95
-
 96
96
-
 97
97
-
 98
98
-
 99
99
-
 100
100
-
 101
101
-
 102
102
-
 103
103
-
 104
104
-
 105
105
-
 106
106
-
 107
107
-
 108
108
-
 109
109
-
 110
110
-
 111
111
-
 112
112
-
 113
113
-
 114
114
-
 115
115
-
 116
116
-
 117
117
-
 118
118
-
 119
119
-
 120
120
-
 121
121
-
 122
122
-
 123
123
-
 124
124
-
 125
125
-
 126
126
-
 127
127
-
 128
128
-
 129
129
-
 130
130
-
 131
131
-
 132
132
-
 133
133


Olympus E-M5 + M.ZUIKO DIGITAL ED 12-50mm + HLD-6 + BLN-1 User manual
- Category
- Bridge cameras
- Type
- User manual
Ask a question and I''ll find the answer in the document
Finding information in a document is now easier with AI
Related papers
-
Olympus V204041BU000 User manual
-
Olympus XZ-10 User guide
-
-
-
-
-
-
-
Olympus E-PM2 User manual
-
Olympus V104190BU000 User manual