Page is loading ...

01
CroozerKid-Kid20-ENG-10-19
OWNER’S MANUAL
WWW.CROOZER.COM
124 000 320
EN

02
CroozerKid-Kid20-ENG-10-19
IMPRINT
Published by: Croozer GmbH
Oskar-Jäger-Str. 125
D-50825 Cologne
Germany
Copyright © 2020 Croozer GmbH. All rights reserved.
No part of this manual may be reproduced or transmitted in any form for any
purpose other than the purchaser’s personal use.
Additional manuals and instructions on the use of this product can be ordered
from Croozer GmbH or downloaded from the website www.croozer.com.
Every effort has been made to ensure the accuracy of this manual. However,
if you do nd an error, we would appreciate hearing about it so that we can
correct it.
Planning, text, graphic design and editing:
W. Piontek, www.technik-transparent.de
Photos: W. Piontek and Croozer GmbH

1
CroozerKid-Kid20-ENG-10-19
Table of Contents
Description . . . . . . . . . . . . . . . . .2
What’s what?. . . . . . . . . . . . . . . . . . . . . . 2
What are the Croozer Kid Vaaya and Croozer
Kid Keeke? . . . . . . . . . . . . . . . . . . . . . . . 4
How should the Croozer Kid Vaaya and
Croozer Kid Keeke be used?. . . . . . . . . . . . . . 4
How shouldn’t the Croozer Kid Vaaya and
Croozer Kid Keeke be used?. . . . . . . . . . . . . . 4
Orientation and wording . . . . . . . . . . . . . . . . 4
Applicable standards . . . . . . . . . . . . . . . . . . 4
Materials tested for harmful substances . . . . . . . . 4
Safety Guidelines . . . . . . . . . . . . . .5
Symbols and warnings . . . . . . . . . . . . . . . . . 5
Read and observe this manual. . . . . . . . . . . . . 5
Who can ride in the Croozer Kid? . . . . . . . . . . . 5
Who can ride the towing bicycle? . . . . . . . . . . . 5
Requirements for the towing bicycle . . . . . . . . . . 5
Legal requirements for transporting children. . . . . . 6
Before your rst ride... . . . . . . . . . . . . . . . . . 6
Pulling the Croozer as a Bicycle Trailer . . . . . . . . 6
Usage, storage and transport . . . . . . . . . . . . . 7
Assembly, maintenance and repair . . . . . . . . . . 7
Initial Assembly and Unfolding the
Croozer . . . . . . . . . . . . . . . . . . .8
Checking package contents . . . . . . . . . . . . . . 8
Unfolding the Croozer . . . . . . . . . . . . . . . . . 9
Mounting the bumper. . . . . . . . . . . . . . . . . 10
Checking and adjusting the parking brakes . . . . . 11
Attaching and removing the wheels . . . . . . . . . 12
Installing and removing the handlebar . . . . . . . . 13
Converting the Croozer to a Bicycle
Trailer . . . . . . . . . . . . . . . . . . . 14
Installing and removing the hitch arm . . . . . . . . 14
Installing the axle hitch to the towing bicycle. . . . . 15
Installing the safety ag . . . . . . . . . . . . . . . 18
Converting the Croozer to a Stroller. . .19
Installing the Stroller wheel. . . . . . . . . . . . . . 19
Using your Croozer . . . . . . . . . . . 20
Engaging and disengaging the parking brake . . . . 20
Opening and closing the cover. . . . . . . . . . . . 21
Loading and unloading passengers . . . . . . . . . 21
Hitching the Croozer to the towing bicycle . . . . . . 22
Unhitching the Croozer from the towing bicycle . . . 23
Fastening and unfastening the safety harness. . . . 24
Adjusting the safety harness . . . . . . . . . . . . . 25
Adjusting the head pads to the child’s height . . . . 25
Transporting cargo . . . . . . . . . . . . . . . . . . 26
Using a lighting system. . . . . . . . . . . . . . . . 28
Special features of the Croozer suspension system . 28
Special features of the Kid Vaaya seat material . . . 29
Special considerations when riding with the Bicycle
Trailer . . . . . . . . . . . . . . . . . . . . . . . . 30
Special considerations when using the Stroller or
Jogger (accessory). . . . . . . . . . . . . . . . . . 32
Transporting Your Croozer . . . . . . . .34
Croozer Inspections and
Maintenance. . . . . . . . . . . . . . . .35
Inspection intervals . . . . . . . . . . . . . . . . . 35
Service intervals . . . . . . . . . . . . . . . . . . . 35
Inspecting the hitch arm, axle hitch, hitch connector,
Stroller Kit and Jogger Kit (accessory) . . . . . . . . 36
Inspecting the fabric body . . . . . . . . . . . . . . 36
Inspecting and servicing the wheels . . . . . . . . . 36
Checking tyre pressure and treads. . . . . . . . . . 36
Servicing the lock cylinder on the hitch connector . . 36
Cleaning and lubricating the wheel axles . . . . . . 37
Inspecting the bicycle trailer after an accident . . . . 37
Croozer Cleaning, Maintenance,
Storage and Disposal. . . . . . . . . . .38
How do I clean and maintain my Croozer?. . . . . . 38
How do I store my Croozer? . . . . . . . . . . . . . 38
Preparing the Croozer for disposal. . . . . . . . . . 39
Technical Data . . . . . . . . . . . . . . 40
Accessories . . . . . . . . . . . . . . . .41
Tested for Safety and Harmful
Substances . . . . . . . . . . . . . . . . 42
EU Declaration of Conformity . . . . . . 42
Warranty . . . . . . . . . . . . . . . . . .43
Dealers. . . . . . . . . . . . . . . . . . .44
Table of Contents

Front bumper
Attachment socket
for Stroller wheel
Front reector
Attachment bracket
for Jogger wheel arm (accessory kit)
2-in-1 cover
Reective sidewalls
Description
What’s what? 5-point
safety harness
Handlebar
Low position
Safety ag
Cargo compartment cover
Lever for parking brake
Rear reectors
Handlebar with integrated lighting system
High position
Push button for
quick-release wheels
Mounting loops
for battery-powered tail light
Attachment site for handlebar
Cargo compartment
Maintenance-free
AirPad
®
suspension with
Sylomer
®
Quick-release
wheels
Rear bumper
Attachment bracket
for hitch arm and
Jogger wheel arm (accessory kit)
Click & Flash
®
Sensor-Activated Lighting System
(Kid Vaaya)Battery-powered tail light
(Kid Keeke)
Description
climatex
®
seats
(Kid Vaaya)

3
CroozerKid-Kid20-ENG-10-19
Description
=
Cycling Kit
Hitch arm with
hitch and
safety ag
Click & Crooz
®
fastening system
Simply insert, automatic locking, press button for removal
Front bumper
Croozer Kid Jogger
=
Jogger Kit
Wheel arms,
Jogger wheel,
safety wrist strap
+
3-in-1 System
Croozer Kid Chassis
+
Croozer Kid Bicycle Trailer
+
=
Stroller Kit
Stroller wheel
Croozer Kid Stroller
Fastening Systems
for hitch connector for Stroller wheel for hitch arm
Ball lock pin
(magnetic)
Snap-on locking pin
Accessory
for handle bar

4
CroozerKid-Kid20-ENG-10-19
Description
What are the Croozer Kid Vaaya and Croozer
Kid Keeke?
The Croozer Kid Vaaya and Croozer Kid Keeke are
vehicles for transporting children. They consist of a chas-
sis that can be quickly and easily converted to a Bicycle
Trailer, a swivel-wheel Stroller or a xed-wheel Jogger (ac-
cessory kit). No longer will you need a eet of vehicles be-
cause, with the Croozer, you can take your child on a bike
ride, a walk in the park or a trek through the countryside.
How should the Croozer Kid Vaaya and
Croozer Kid Keeke be used?
The Croozer Kid is intended for private use for carrying
children in daylight hours on roads and other smooth,
well-surfaced paths as a Bicycle Trailer, a swivel-wheel
Stroller or a xed-wheel Jogger (accessory kit) for walking
and hiking. The instructions and safety guidelines provided
in this manual must be followed at all times. Only children
who are able to sit upright unassisted and are within the
specied age range should ride in the Croozer Kid Vaaya
or Croozer Kid Keeke. If a child is unable to sit upright
unassisted, the Croozer Baby Seat must be used. Be sure
to secure all cargo and take-along items in the designated
pockets and compartments and observe the weight limits
specied in the table below. It is vitally important that all
cargo be secured to prevent it from shifting while the vehi-
cle is in use. It is the user’s responsibility to ensure that the
transported cargo does not compromise the safety of the
passengers.
Maximum Load* (Passengers + Cargo)
One-seater
Two-seater
35 kg (77 lb), max. 1 child
45 kg (100 lb), max. 2 children
Of which in rear cargo compartment max. 5 kg (11 lb)
Of which in Handlebar Bag
(accessory)
max. 2 kg (4.4 lb)
Minimum Age of Passengers
Without Baby Seat 6 months
(if the child can sit upright
unassisted)
With Baby Seat (accessory) 1 month
Maximum Age of Passengers
Without Baby Seat 6 years
With Baby Seat (accessory) 10 months
Maximum Height of Passengers 117 cm (46 inch)
Hitch-Arm Load (Nose Weight) 3 to 8 kg (6.6 to 17.6 lb)
* Weight limits only apply if the hitch-arm load is within the speci-
ed range of 3–8 kg (6.6 to 17.6 lb). See page 27.
When in use as a Bicycle Trailer in poor visibility conditions
or at night, dusk or dawn, the Croozer must be equipped
with a lighting system that complies with the applicable
laws and regulations in the country of use. The handlebar
of the Croozer Kid Vaaya comes with an integrated Click
& Flash® lighting system. The Croozer Kid Keeke comes
with a battery-powered light that must be mounted to the
light-attachment loop on the cover of the rear cargo com-
partment. Any spare parts or accessories used for either
Croozer model must be approved by Croozer GmbH and
properly installed, ideally by a professional bicycle me-
chanic.
How shouldn’t the Croozer Kid Vaaya and
Croozer Kid Keeke be used?
The Croozer Kid Vaaya and Croozer Kid Keeke may not be
used in any manner other than as specied above. Never
transport animals together with children in the Croozer.
Never use the Croozer as a cargo trailer. Never use the
Stroller for jogging or skating. For more information, see
page 32. Commercial use, overloading, excessive speeds,
improper repairs and use on unsurfaced roads or paths
are not permitted. Never install a car seat or other seating
device not approved by Croozer GmbH. Never use the
handlebar for carrying loads, such as children’s vehicles
or bags (other than the Handlebar Bag available as an
accessory).
Never pull the Croozer with a motorised vehicle, such as a
moped or scooter. This also applies to motorised bicycles
with a maximum speed of more than 25 km/h (15 mph).
Do not mount the hitch to a bicycle with a rear-wheel hub
motor, unless this modication is approved by the manu-
facturer. Croozer GmbH will not be liable for any damages
resulting from non-compliance with these requirements.
Orientation and wording
Unless otherwise indicated, the terms “right” and “left”
in this manual refer to the passenger’s right or left when
seated in the Bicycle Trailer, facing forward (i.e. relative to
the direction of travel).
For simplicity, this manual generally refers to the child or
passenger in singular form. It is understood, however, that
a two-seater will be carrying up to two children, and a one-
seater, only one child.
This Owner’s Manual is intended for use with both the
Croozer Kid Vaaya and Croozer Kid Keeke. In sections
that apply equally to both models, the name “Croozer” is
used for simplicity, and the Croozer Kid Vaaya is pictured
in the respective illustrations. In sections where the two
models differ, the instructions and/or information for both
models are given separately and marked as follows:
For the sake of clarity, the Croozer two-seater is shown
in most of the photos and graphics used in this manual.
However, all descriptions and instructions also apply to the
one-seater version.
Applicable standards
The following standards were taken into
consideration:
EN 15918:2011+A2:2017,
EN 1888-1/2:2019-05
Materials tested for harmful sub-
stances
The materials used for producing the Croozer
Kid Vaaya and Croozer Kid Keeke pose no
threat to the health of your children. All ma-
terials are tested for harmful substances to
achieve standards over and above the legal
requirements.
Croozer Kid Vaaya
Croozer Kid Keeke

5
CroozerKid-Kid20-ENG-10-19
Safety Guidelines
Safety Guidelines
Symbols and warnings
DANGER indicates a hazardous situation which, if not
avoided, will result in death or serious injury.
WARNING indicates a hazardous situation which, if not
avoided, could result in death or serious injury.
CAUTION indicates a hazardous situation which, if not
avoided, could result in minor or moderate injury.
NOTICE indicates a situation which, if not avoided, could
result in damage to the Croozer or the environment.
Tip: In this manual, “Tip” indicates helpful advice about
the use or maintenance of the Croozer.
Read and observe this manual
This manual contains information that is extremely
important for the safe transport of your child. Therefore,
it is essential that you read the entire manual carefully
and follow the instructions closely. If you should experi-
ence difculties understanding any of the information or
instructions, please contact your Croozer dealer. Keep this
manual handy at all times for future reference. If you loan
or sell your Croozer, pass on this manual to the new user.
It is also vitally important that you read and observe the
instructions provided in the manual of the towing bicycle.
Who can ride in the Croozer Kid?
The Croozer Kid can transport children from approx. 6
months to approx. 6 years of age, with a maximum height
of 117 cm (46 inch). All child passengers must be able
to sit upright unassisted. Children who are not able to
sit upright without support do not have fully developed
muscles and could therefore experience injury when riding
in the Croozer. These children may only be transported in
the Baby Seat that is available as an accessory. The two-
seater versions of the Croozer Kid Vaaya and Croozer Kid
Keeke can carry one or two children, and the one-seater
versions of the Croozer Kid Vaaya and Croozer Kid Keeke,
only one child.
Who can ride the towing bicycle?
The minimum age for the rider of the towing bicycle in
most countries of the EU is 16 years.
In case of doubt, be sure to familiarise yourself with the
legal requirements of the country in which you plan to use
the Croozer.
Requirements for the towing bicycle
The towing bicycle must be approved by its manufacturer
for pulling a trailer. This information can be found in the
owner’s manual of the bicycle. Furthermore, the towing
bicycle must be in perfect working order and have strong,
properly functioning brakes. Keep in mind that braking
distance is increased when pulling a bicycle trailer. The
rear wheel of the towing bicycle must be equipped with
an effective mudguard with mudap. Otherwise, the child
could be injured by stones or other debris thrown up from
the road. Motorised vehicles may not be used for pulling
child trailers. The only exception to this rule is a pedelec.
This special type of e-bicycle has an electric motor that
delivers assist only when the rider pedals. In many coun-
tries, pedelecs legally qualify as bicycles. However, e-bikes
with a maximum speed of more than 25 km/h (15 mph)
may not be used for pulling the trailer. The towing bicycle
should be equipped with a sturdy rear-mount kickstand to
ensure safety when passengers are getting into or out of
the trailer.
Be sure to familiarise yourself with the legal requirements
for towing bicycles in the country or region where you plan
to use the Croozer.
The towing bicycle must have a 26” to 29” (559- to 635-
mm) rear wheel. This information can be found on the tyre
sidewalls. The numbers 42-622, for example, indicate that
the tyre has a width of 42 mm and a bead-seat diameter of
622 mm (28 inch).

6
CroozerKid-Kid20-ENG-10-19
Safety Guidelines
Legal requirements for transporting children
Be sure to observe all laws that apply to the transport
of children in child trailers. Some countries prohibit the
transport of children in child trailers, and others prescribe
certain age limits. In case of doubt, familiarise yourself with
the legal requirements of the country or region where you
plan to use the Croozer.
Before your rst ride...
It is vitally important that you familiarise yourself with the
Croozer before you use it for transporting children. Prior to
your rst trip, Croozer GmbH recommends taking a prac-
tice ride without your child(ren) in a calm, trafc-free area.
Load the bicycle trailer with cargo of approximately the
same weight as your child(ren), for example, by strapping
a loaded backpack into the cabin. This is a great way to
acquaint yourself with the handling of the bicycle and the
dimensions of the trailer.
Buckle up!
Children riding in the Croozer must be strapped into the
safety harnesses at all times. Follow the instructions pro-
vided in this manual for adjusting and fastening the safety
harnesses correctly. Children who are not properly secured
in a safety harness could sustain life-threatening injuries in
the case of accidents or sudden braking.
Adult supervision
Never leave children in the Croozer unattended. It is
the adult’s responsibility to ensure that the ventilation
and temperature conditions in the Croozer are safe and
comfortable for the child at all times. Check on the child’s
well-being frequently.
Keep handlebar attached
Leave the handlebar attached to the Croozer at all times.
In the event of an accident, it acts as a roll bar, protecting
the passengers.
Pinching hazard
When folding and unfolding the Croozer, keep ngers
and hands clear of all possible pinch points (e.g. movable
frame parts and locking mechanisms).
Pulling the Croozer as a Bicycle Trailer
Before each ride, check the following:
• Are the wheels securely attached?
• Are the locking mechanisms on both vertical frame
tubes securely engaged?
• Are all attached components correctly inserted and
secured (i.e. the respective fastening/locking mecha-
nisms engaged)? Check that none of the security pins
are hanging freely from their straps.
• Are the tyres inated to the recommended pressure?
The actual tyre pressure should never be higher or
lower than the maximum and minimum ination pres-
sures marked on the tyre sidewall. (See also page 36.)
Never use compressed air, e.g. from a petrol station,
to inate your tyres. The quick ow and high pressure
can over-inate the tyres, causing the tube and/or tyre
to burst.
Using the parking brake
When loading or unloading children, or when passengers
are getting into or out of the trailer, the parking brake of the
Croozer must be engaged to prevent unintentional rolling.
Turning
Always reduce your speed to a walking pace when mak-
ing turns with the Bicycle Trailer. Keep in mind that riding
speed is often underestimated, especially on bikes with
electric assist (i.e. pedelecs). When turning at high speeds,
the increased centrifugal force could cause the Trailer to
skid or tip over, which can result in accidents with serious
injury or death.
Riding downhill
Always reduce your speed when riding downhill. Riding at
excessive speeds could cause the Trailer to skid, which
can result in accidents with serious injury or death.
Riding over kerbs or uneven surfaces
Riding over a kerb or other obstacle with only one wheel
of the trailer could cause the Trailer to tip over, resulting in
accidents with serious injury or death. Empty trailers are
especially susceptible to tipping. Therefore, if you have
to ride over a kerb or similar obstacle, always use ex-
treme caution and ride at very low speeds. Never use the
Croozer on stairs or escalators.
Risk of injury from rotating parts
Always make sure that the child cannot reach the wheels
of the Croozer or the rear wheel of the towing bicycle.
Touching wheels that are in motion could result in serious
injuries.
Close the cover
When riding with the Bicycle Trailer, always close the front
mesh cover (with the plastic window either open or closed)
in order to protect the passengers from potential injuries
caused by ying insects or small stones thrown up from
the rear wheel of the towing bicycle.
The plastic windows have a UPF (Ultraviolet Protection
Factor) rating of 80+, and the Croozer’s fabric body has a
UPF rating of 50+.
Being visible to others
Never use your Croozer as a Bicycle Trailer in road trafc
without its safety ag mounted. The safety ag makes it
easier for other road users to see you.
If you plan to use the Croozer as a Bicycle Trailer at night,
dusk or dawn – or when visibility is in any way reduced –
the trailer must be equipped with a fully functional light-
ing system. Be sure to familiarise yourself with the legal
requirements of the country or region where you plan to
use the Croozer.
Carrying cargo
Never transport cargo items together with children on the
seat or in the foot area. Cargo must be well secured in
the rear cargo compartment to ensure that it cannot shift
during transport. Loose cargo and overloading can change
the handling of the Croozer, making the vehicle more dif-
cult to control. Furthermore, cargo items can fall against
the seatback and injure the child. Never transport animals
together with children in the Croozer.
Never use the handlebar for carrying loads, such as
children’s vehicles or bags (other than the Handlebar Bag
available as an accessory). Cargo attached to the outside
of the Croozer can drastically affect its handling and stabil-
ity, potentially resulting in accidents with serious injury or
death.

7
CroozerKid-Kid20-ENG-10-19
Safety Guidelines
Usage, storage and transport
Never transport the Croozer – even when folded – on the
roof of a motor vehicle.
Never use or store the Croozer at temperatures below
-20°C (-4°F). Temperature extremes can cause the plastic
windows to become brittle.
Assembly, maintenance and repair
Purchased condition and initial assembly
If you purchased your Croozer from a shop, the retailer
should have installed the front bumper to the Croozer and
the hitch to the towing bicycle. If you ordered your Croozer
from an online or mail-order catalogue, we recommend
having the initial assembly performed by a professional
bicycle mechanic. Furthermore, dealers are required to
provide their customers with all important information on
the use of the Croozer. To nd an authorised dealer in your
area, visit the Croozer website at www.croozer.com.
Technical condition
Never use the Croozer if it is not in perfect working order.
The Croozer must be periodically inspected for damage
and/or wear to the wheels, hitch arm, hitch connector, axle
hitch, frame, fabric body, fastening/locking mechanisms
and safety harnesses, as well as the components of the
Stroller Kit and Jogger Kit (accessory). If any of these parts
are found to be damaged, the Croozer may not be used
until the damage has been properly repaired, ideally by a
professional bicycle mechanic.
It is critical that all maintenance work specied in this
manual be performed in the specied intervals.
Using the Croozer when it is not in perfect working order
can result in accidents with serious injury or death.
Proper installation and repair
The Croozer must be properly assembled to professional
standards. Be sure to follow the assembly instructions in
this manual. When in doubt, contact your Croozer dealer.
All repairs must be carried out to professional standards
using only original Croozer parts, ideally by a professional
bicycle mechanic. Incorrect installation or repair work could
result in accidents with serious injury or death.
Suitable accessories and original spare parts
Only use original spare parts and accessories that have
been approved by Croozer GmbH. These are the only
components that can be used safely with the Croozer.
When in doubt, consult a Croozer dealer. The use of non-
approved accessories or incompatible spare parts could
result in accidents with serious injury or death. Croozer
GmbH will not be liable for any damage resulting from the
use of non-approved accessories or incompatible spare
parts.
Changes and modications
For safety reasons, no modications or changes can be
made to the Croozer.
Do not install additional components, such as luggage
racks etc. Do not use a car seat or any type of seat or seat
support that has not been approved by Croozer GmbH. Do
not install electric drive systems. Making modications or
changes to your Croozer can result in accidents with seri-
ous injury or death. Furthermore, changes or modications
to the vehicle will void any warranty claims. Croozer GmbH
will not be liable for any damage resulting from changes or
modications that have been made to the Croozer.

8
CroozerKid-Kid20-ENG-10-19
Initial Assembly and Unfolding the Croozer
Initial Assembly and Unfolding the
Croozer
If you have purchased your Croozer from a shop, the
retailer should have installed the front bumper and sold the
Croozer “ready to use”. If you ordered your Croozer from
an online or mail-order catalogue, we recommend having
the initial assembly performed by a professional bicycle
mechanic. Furthermore, dealers are required to provide
their customers with all important information on the use
of the Croozer. If the initial assembly has been performed,
you can skip the rst few steps of this section.
If your Croozer was not assembled prior to sale, then have
the initial assembly performed by a professional bicycle
mechanic or follow the assembly instructions below. Vari-
ous tools are required for the assembly. Your Croozer
comes with a 6mm Allen key.
The Croozer must be properly assembled to professional
standards. Improper assembly can result in accidents
with serious injury or death.
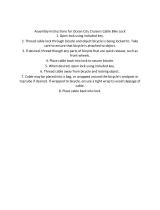
Checking package contents
The Croozer is packaged in a box for shipment. In order
to minimise package size, the Croozer is shipped in its
folded state. All removable parts are included in the scope
of delivery, either attached or in one of the plastic bags. In
addition, the front bumper is removed for shipping.
1. Remove all packaging materials from the Croozer and
from individual parts. Recycle all packaging materials
if possible. It may be wise to keep the box, e.g. for
storage or later transport.
2. Using a pair of diagonal cutting pliers or other cutting
tool, cut the cable ties with which the frame of the
Croozer is secured and other parts are prevented from
shifting.
3. Remove all individual parts from inside the Croozer.
These parts include
• two side wheels (1),
• either a handlebar with integrated Click & Flash
®
light-
ing system (2) (for the Croozer Kid Vaaya) or a han-
dlebar without integrated lighting (3) (for the Croozer
Keeke),
• (if Croozer Kid Vaaya) a charging cable with instruc-
tion manual (4) for the Click & Flash
®
sensor-activated
lighting system,
• (if Croozer Kid Keeke) a tail light with instruction
manual (5),
• a safety ag (6),
• a Stroller wheel (7),
• a lockable hitch arm with three keys and an axle hitch
(8),
• a front bumper (9),
• a package (10) with a knurled barrel nut, a 6mm Allen
key and this manual.
Unfold the Croozer before mounting these parts.
6 mm
6
9
1
4
8
5
1
7
Included with every Croozer
10
Croozer Kid Vaaya
Croozer Kid Keeke
2
3
Croozer Kid Vaaya Croozer Kid Keeke

9
CroozerKid-Kid20-ENG-10-19
Initial Assembly and Unfolding the Croozer
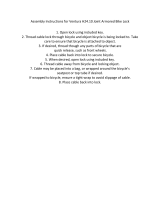
Unfolding the Croozer
1. Press down on the hook (1) of the transport safety strap
at the rear of the Croozer in order to release the tension
on the transport safety strap (2). Then take the hook (1)
out of the loop (3). Tuck the transport safety strap into
the special strap-storage pocket (4) under the cover.
2. Brace the lower part of the Croozer frame with one
hand while using your other hand to lift the top part of
the frame.
3. Holding the upper frame tube in the raised position, pull
the seat frame slowly and carefully back and towards
you until the locking pins (5) of both locking mecha-
nisms (4) engage with audible clicks in the holes (6) of
the frame tubes.
Pinching hazard! There are pinch points between the
seat frame and Croozer frame, as well as in the locking
mechanism, that could cause painful injuries. Use caution
to avoid these points when folding or unfolding the trailer.
Use caution and slow movements when pulling back the
seat frame. If the seat frame is pulled back too quickly or
with excessive force, the frame tube and locking mecha-
nisms could be damaged.
Tip: A new Croozer will be slightly more difficult to unfold
because the canvas is still stiff.
4. Check to make sure that both locking mechanisms are
securely engaged. There should be no movement in
the seat frame when you press against it.
If the locking mechanisms are not properly engaged, the
frame of the Croozer could collapse while riding, poten-
tially resulting in serious injuries for the passenger(s).
5. Fasten the cargo-compartment separator (7) by at-
taching the Velcro to the rear surface of the seat (8).
6. To fold the Croozer, follow the above steps in the
reverse order. Disengage the two locking mechanisms
(9) by pushing the red slide button towards the rear
of the trailer and pulling the two locking mechanisms
inwards (4), away from the frame tubes.
Be sure to remove the safety flag before folding the
Bicycle Trailer. Otherwise, the rod of the safety flag could
break.
4
6
5
4
5
6
3
9
3
9
7
8
1
2
1
4
3

10
CroozerKid-Kid20-ENG-10-19
Initial Assembly and Unfolding the Croozer
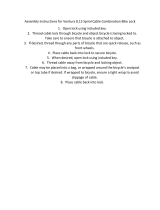
Mounting the bumper
Because packaging size is limited, the bumper (1) of the
Croozer is shipped unattached. The bumper is included in
the packaging and must be properly installed.
An M6 knurled socket head barrel nut (2) is used for fas-
tening the front bumper (1). This barrel nut can be found in
the plastic bag that contains the 6mm Allen key (3).
1. Holding the bumper (1) with both hands, guide the
bolt (6) in the centre of the bumper from the front into
the respective opening in the Croozer frame while
pressing the ends of the bumper (4) as far as they will
go onto the pins (5) protruding from each side of the
frame. You should be able to hear and feel the ends
lock into place on the pins (5).
Tip: When the bolt (6) is positioned in the middle of the
hole, it is easier to screw on the knurled socket head
barrel nut (2).
2. Position the bolt (6) in the middle of the hole by press-
ing on the bumper. Then guide the knurled socket
head barrel nut (2) into the hole, and screw it onto the
end of the bolt, tightening it by hand.
3. Use a 6mm Allen key to secure the barrel nut (2) as
tightly as possible.
4. To remove the bumper, follow these instructions in the
reverse order.
6
5
4
1
2
6 mm
3
2
6

11
CroozerKid-Kid20-ENG-10-19
Initial Assembly and Unfolding the Croozer
Checking and adjusting the parking brakes
To ensure that the parking brakes are in perfect working
order, they must be checked and, if necessary, adjusted.
The parking brakes must be correctly adjusted! If the
parking brakes have not been correctly adjusted, the
parked Croozer could roll away unexpectedly, resulting in
accidents with serious injuries or death.
1. Pull back the brake lever (1) as far as it will go. The
brake pins (2 and 4) on both sides of the Croozer will
move upwards and engage in the locking plates on
the side wheels. For a better view of the parking-brake
mechanism, the photo on the right shows the Croozer
with the side wheel removed.
Tip: It might be necessary to roll the Croozer an inch or
two forwards or backwards so that the brake pins
can engage in the locking plates.
2. If the brake pins (2 and 4) on one or both sides of the
Croozer fail to engage fully in the locking plate(s) on
the side wheels, then adjustment is necessary.
3. If the brake pin (2) on the left side of the Croozer does
not engage fully in the locking plate, then loosen the
respective locknut and turn the barrel adjuster (3) on
the brake lever anticlockwise until the brake pin (2)
is engaged fully in the locking plate. Re-tighten the
locknut to secure the position of the barrel adjuster.
4. If the brake pin (4) on the right side of the Croozer
does not engage fully in the locking plate, then loosen
the respective locknut and turn the barrel adjuster (5)
on the brake lever anticlockwise until the brake pin (4)
is engaged fully in the locking plate. Re-tighten the
locknut to secure the position of the barrel adjuster.
5. After adjustment, check the function of the parking
brakes by pulling back the brake lever and trying
to move the Croozer forwards or backwards with
gentle pressure. It should not be possible to move the
Croozer when the parking brakes are engaged.
Tip: Using barrel adjusters with locknuts:
Loosening: Use an 8mm spanner to brace the bar-
rel adjuster (7) while rotating the locknut (8) several
turns anticlockwise using a 10mm spanner.
Adjusting: The barrel adjuster (7) can now be
turned to adjust the length of the cable.
Tighten: Brace the barrel adjuster (7) with an 8mm
spanner while using a 10mm spanner to turn the
locknut (8) as far as it will go clockwise.
0–11 mm
(0”–7/16”)
3
2
1
1
4
3
2
1
11–12 mm
(7/16”–15/32”)
4
4
5
0–11 mm
(0”–7/16”)
1
2
3
2
1
11–12 mm
(7/16”–15/32”)
1
2
3
2
3
0–11 mm
(0”–7/16”)
11–12 mm
(7/16”–15/32”)
1
2
1
2
3
4
11–12 mm
(7/16”–15/32”)
7
8
turn
brace
7
8
turn
brace
Loosen locknut Tighten locknut

12
CroozerKid-Kid20-ENG-10-19
Initial Assembly and Unfolding the Croozer
Attaching and removing the wheels
The wheels of the Croozer are equipped with push-button
axles. When you press the dust cap (1), the retaining balls
(2) will retract within the axle to permit the attachment or
removal of the wheel. The wheels cannot be attached or
removed unless the dust cap is pressed in.
1. Check that the brake lever (3) is in the disengaged
position. If not, move the brake lever (3) forwards to
disengage the mechanism.
2. Use one hand to lift up the back of the Croozer.
3. Press the dust cap (1) of the wheel hub.
4. Insert the wheel axle (4) all the way into the socket
(5) in the suspension swing arm of the Croozer, and
release the dust cap.
5. Check whether the wheel is locked securely in the
socket by pulling rmly on the wheel without pressing
the dust cap. It should not be possible to remove the
wheel without pressing on the dust cap.
6. Repeat steps 2-5 to attach the second wheel.
After the wheels have been attached, be sure to check
that they are both locked securely in the axle receivers.
This can be done by pulling on the wheels without press-
ing on the dust caps. It should not be possible to remove
the wheels unless you are pressing on the dust caps.
Wheels that are not securely locked in the axle receivers
could fall off while riding, resulting in accidents with seri-
ous injury or death.
7. After the wheels have been attached, check the func-
tion of the parking brakes by pulling back on the brake
lever (3). When the parking brakes are engaged, it
should not be possible to move the wheels.
8. Before using your Croozer for the rst time, be sure
to inate both tyres. The actual tyre pressure should
never be higher or lower than the maximum and mini-
mum ination pressures marked on the tyre sidewall.
Never use compressed air, e.g. from a petrol station,
to inate your tyres. The quick ow and high pressure
can overinate the tyres, causing the tube and/or tyre
to burst.
9. To remove the wheels, follow these instructions in the
reverse order. Press the dust caps (1) and pull the
wheels off.
3
1
4
5
2
2
1

13
CroozerKid-Kid20-ENG-10-19
Initial Assembly and Unfolding the Croozer
Installing and removing the handlebar
The handlebar has two functions. Firstly, it is used for
pushing the Croozer as a swivel-wheel Stroller or xed-
wheel Jogger (kit available as accessory). For this pur-
pose, the handlebar can be mounted in either a high or a
low position, depending on the height and preferences of
the user. Secondly, the handlebar functions as a roll bar,
protecting the passengers should the Bicycle Trailer tip
over in the rare event of an accident. On the Croozer Kid
Vaaya, the Click & Flash
®
sensor-activated lighting system
is mounted to the handlebar.
1. Decide whether you would prefer to use the handlebar
in the high (1) or low (2) position.
2. Insert both ends of the handlebar simultaneously into
the upper frame tubes (3), taking care to avoid jam-
ming.
Tip: The ends of the new handlebar may stick somewhat
when inserting them into the frame tubes for the first
time. In this case, a little silicone spray lubricant can
help.
3. Push the back edge of the cover slightly forward until
you nd the hole in the upper frame tube.
4. Guide the end of the snap-on locking pin (4) through
the hole on the inner side of the frame tube, pushing
it all the way in until the pin extends through the outer
hole and the sides (5) snap onto the tube.
5. Repeat steps 3 and 4 for the other side of the han-
dlebar, ensuring that both locking pins are locked
securely onto the tubes.
The handlebar must be securely fastened with both lock-
ing pins at all times. Otherwise, the handlebar could fall
off when you are pushing it, and the Croozer could roll
away unintentionally, resulting in accidents with serious
injury or death.
When the Croozer is being used as a Bicycle Trailer, the
handlebar must remain securely attached at all times.
If the Bicycle Trailer should ever tip over, the handlebar
acts as a roll bar, helping to prevent injuries.
6. To remove the handlebar, follow these instructions in
the reverse order. Pull on the strap (7) to remove the
respective locking pin.
1
2
5
4
7
3

14
CroozerKid-Kid20-ENG-10-19
Converting the Croozer to a Bicycle Trailer
Converting the Croozer to a Bicycle
Trailer
If the Stroller wheel or Jogger Kit (accessory) has been
mounted to the Croozer, remove these components.
Installing and removing the hitch arm
The hitch arm is installed on the left side of the Croozer
(relative to the direction of travel). The Croozer is hitched
to the left side of the towing bicycle (relative to the direc-
tion of travel).
Tip: The first time you install the hitch arm, we recom-
mend tipping the Croozer onto its back end (resting
on the handlebar) in order to have a better view of the
parts while familiarising yourself with the procedure.
Make sure that your working surface is clean and
smooth to avoid soiling and/or damaging the fabric
body. Later, once you are familiar with the installation
and removal procedures, you can install the hitch arm
with the front of the Croozer slightly raised.
1. Lift the front of the Croozer, or tip the frame onto its
back end.
2. Pull out the security pin (1).
3. Hold the hitch arm (2) with the hole (4) facing upwards
and the hitch arm at an approx. 45° angle to the at-
tachment bracket (3).
4. Guide the retaining bolts (5) at the end of the hitch
arm gently into the slots of the hitch-arm attachment
bracket.
5. Then fold the hitch arm upwards into the hitch-arm
attachment bracket until the retaining bolts (5) of the
hitch arm are fully engaged in the slots of the attach-
ment bracket.
Do not let the strap of the security pin get caught
between the hitch arm and attachment bracket, as this
could damage the strap.
6. Insert the security pin (1) as far as it will go through
both holes of the hitch-arm attachment bracket. The
head of the security pin is magnetic and will adhere to
the hitch-arm attachment bracket.
Always check that the security pin has been inserted as
far as it will go through both holes and that it cannot fall
out. If the security pin is not properly inserted, the hitch
arm could fall off while in use, resulting in accidents with
serious injury or death.
7. To remove the hitch arm, follow these steps in the
reverse order.
After removing the hitch arm, always lock the security pin
back into the holes in the bracket. Never leave the secu-
rity pin hanging freely from its strap. It could get caught
on passing objects and be pulled off, damaging parts of
the vehicle.Never allow the magnetic security pin to come
in contact with the ground. Otherwise, it could attract and
accumulate magnetic particles.
1
3
2
5
4
1

15
CroozerKid-Kid20-ENG-10-19
Converting the Croozer to a Bicycle Trailer
Installing the axle hitch to the towing bicycle
The hitch assembly is always mounted to the left side of
the bicycle (relative to the direction of travel) and consists
of two parts: a hitch connector (1), which is attached to the
hitch arm, and an axle hitch (2), which must be mounted to
the rear axle of the towing bicycle.
Before installing the axle hitch, you must rst check
whether the bicycle is suitable for towing a trailer. This
information can be obtained from the bicycle manufacturer,
a bicycle shop or the owner’s manual of the bicycle.
It is vitally important to confirm that the towing bicycle is
suitable for pulling trailers. Pulling a trailer with a bicycle
that has not been approved by its manufacturer for use
as a towing bicycle can result in frame breakage or other
material damage. Breakages of this kind could cause ac-
cidents with serious injury or death.
If you are not completely condent about your ability to
install the axle hitch correctly, please consult with, or
have the installation performed by, a professional bicycle
mechanic.
It is vitally important that the axle hitch be properly
installed. An improperly installed axle hitch could come
loose while riding and cause accidents with serious injury
or death.
Installing the axle hitch to a bicycle with a quick-
release axle
Tip: If the bicycle wheel is equipped with a thru axle
(with quick release lever) instead of a conventional
quick-release skewer, the thru axle must be re-
placed with the Croozer Thru Axle available as an
accessory. Other hitch axles are also available as
accessories.
The quick-release lever must be positioned on the right
side of the bicycle (relative to the direction of travel). If the
lever is on the left side, the quick-release skewer must be
removed and reinserted from the right side. Be sure to fol-
low the applicable instructions in the owner’s manual of the
bicycle and/or consult a professional bicycle mechanic.
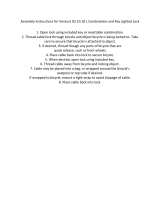
1. Open the quick-release lever (1) on the rear wheel
of the towing bicycle or loosen the Allen bolt (5 mm),
depending on the type of quick-release skewer. Often,
the open position is indicated on the lever by the word
“OPEN”. In this case, when the word “OPEN” can be
seen, the lever is in the open position.
2. Remove the axle nut (2) of the quick-release skewer
by turning the nut anticlockwise. Use caution: the
spring located just beneath the nut is under tension
and could y off when removing the nut.
3. Fit the axle hitch (3) over the end of the quick-release
skewer without removing the spring.
4. Thread the axle nut (2) back onto the skewer. Tighten
the axle nut at least ve full turns (clockwise).
The axle nut must engage the threads for at least five
full turns in order to ensure adequate clamping force for
holding the rear wheel securely. Failure to tighten the
2
1
1
2
3
2
3
min. 5 x

16
CroozerKid-Kid20-ENG-10-19
Converting the Croozer to a Bicycle Trailer
axle nut adequately may result in accidents with serious
injury or death. If it is not possible to tighten the axle nut
five full turns, then the quick-release skewer is too short
and must be replaced. Consult a professional bicycle
mechanic for the appropriate parts and assistance.
5. Check that the rear wheel of the towing bicycle is
properly aligned, adjusting the position if necessary;
then close the quick-release lever or tighten the Allen
bolt, depending on the type of quick-release skewer.
Often, the closed position is indicated on the lever
by the word “CLOSE”. In this case, when the lever
side marked “CLOSE” can be seen, the lever is in the
closed position. If the axle nut has been tightened the
proper amount, you will be able to feel the resistance
increase when the lever is about halfway closed, i.e.
parallel to the axle. The adjustment is correct if you
can fully close the lever but with considerable force. In
the closed position, the lever should be parallel to the
frame, i.e. it should not stick out to the side.
6. Check whether the quick-release skewer is securely
engaged by trying to rotate the quick-release skewer
without opening the lever.
If the quick-release is loose enough to rotate, then the
clamping force is inadequate. In this case, open the
lever, and tighten the axle nut half a turn clockwise.
Repeat steps 5 and 6.
If it is impossible to push the quick-release lever into
the closed position, then open the lever, and unscrew
the axle nut half a turn anticlockwise. Repeat steps 5
and 6. Keep in mind that the axle nut must engage the
threads of the quick-release skewer for at least ve full
turns.
The axle nut must engage the threads for at least five
full turns in order to ensure adequate clamping force for
holding the rear wheel securely. Failure to tighten the
axle nut adequately may result in accidents with serious
injury or death. If it is not possible to tighten the axle nut
five full turns, then the quick-release skewer is too short
and must be replaced. An extra-long quick-release axle is
available as an accessory. Consult a professional bicycle
mechanic for the appropriate parts and assistance.
Tip: If there is not enough space for mounting the axle
hitch or if the skewer threads are too short, then you
can replace the original skewer with a Croozer Click
& Crooz® Quick Release Skewer with integrated
hitch, which is available as an accessory.
7. Finally, hold the rear wheel with both hands and try to
rock it back and forth to check that the wheel is held
securely in the dropouts.
The rear wheel of the towing bicycle must be properly
installed after the axle hitch has been mounted. Riding
with an improperly installed rear wheel can result in acci-
dents with serious injury or death. Follow the instructions
and warnings given in the owner’s manual of the towing
bicycle. There are many different types of axles. When in
doubt, consult a professional bicycle mechanic.
1
Accessory
www.croozer.com
www

17
CroozerKid-Kid20-ENG-10-19
Converting the Croozer to a Bicycle Trailer
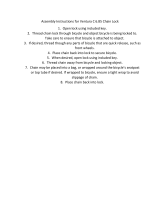
Installing the axle hitch to a bicycle with a solid axle
1. Remove the axle nut (1) on the left side of the rear
wheel by turning it anticlockwise.
It is vitally important that you leave the retaining washer
(2) on the axle. This washer prevents the axle from rotat-
ing in the dropouts. Riding without the retaining washer
can result in accidents with serious injury or death.
2. Without removing the retaining washer, feed the end of
the axle through the hole in the axle hitch (3).
3. Screw the axle nut (1) back onto the axle, tightening at
least ve full turns.
The nut must engage the threads for at least five full
turns in order to ensure adequate clamping force for
holding the rear wheel securely. Failure to tighten the nut
adequately may result in accidents with serious injury or
death. If it is not possible to tighten the nut at least 5 full
turns, then the axle is too short, and the axle hitch cannot
be used! Consult a professional bicycle mechanic for the
appropriate parts and assistance.
4. Check that the rear wheel of the towing bicycle is
properly centred, adjusting the position if necessary;
then tighten the axle nut (1) using the tightening torque
specied in the owner’s manual of the bicycle. Be sure
to hold the axle hitch in place while tightening the nut.
5. Finally, hold the rear wheel with both hands and try to
rock it back and forth to check that the wheel is held
securely in the dropouts.
The rear wheel of the towing bicycle must be properly
installed after the axle hitch has been mounted. Riding
with an improperly installed rear wheel can result in ac-
cidents with serious injury or death. Be sure to follow the
instructions and warnings given in the owner’s manual of
the towing bicycle. When in doubt, consult a professional
bicycle mechanic.
Tip: If there is not enough space for mounting the axle
hitch or if the threads of the axle are too short, then
you can replace the original axle nut with a Croozer
Click & Crooz
®
Axle Nut Hitch, which is available as
an accessory.
min. 5 x
N-m
3
1
2
1
Accessory
www.croozer.com
www

18
CroozerKid-Kid20-ENG-10-19
Converting the Croozer to a Bicycle Trailer
Installing the safety ag
The safety ag makes it easier for other road users to see
the Croozer, increasing your child’s safety, as well as your
own. Therefore, never use the Croozer as a Bicycle Trailer
without the safety ag installed.
The safety ag slides into a canvas sleeve that is attached
to the left rear frame tube with two Velcro straps.
1. Assemble the ag pole (1) by connecting the two sec-
tions of the pole.
2. Slide the ag pole through the opening (2) where the
handlebar passes through the fabric cover.
3. Guide the pole of the safety ag into the canvas
sleeve (3) attached to the rear frame tube.
When pulling the Croozer as a Bicycle Trailer, the safety
flag must be properly installed at all times. If the safety
flag is not properly installed, other road users may fail to
see the Croozer, which could result in accidents with seri-
ous injury or death.
Be sure to remove the safety flag before folding the
Bicycle Trailer. Otherwise, the rod of the safety flag could
break.
Tip: When you are using the Croozer in countries with
left-hand traffic, the safety flag must be used on the
right side of the Croozer. To move the flag, the can-
vas sleeve can be easily removed and reattached to
the right rear frame tube using the Velcro straps.
2
3
3
1
/