TechniSat TECHNIRADIO 40 User manual
- Category
- Alarm clocks
- Type
- User manual
Page is loading ...
Page is loading ...
Page is loading ...
Page is loading ...
Page is loading ...
Page is loading ...
Page is loading ...
Page is loading ...
Page is loading ...
Page is loading ...
Page is loading ...
Page is loading ...
Page is loading ...
Page is loading ...
Page is loading ...
Page is loading ...
Page is loading ...
Page is loading ...
Page is loading ...
Page is loading ...
Page is loading ...
Page is loading ...
Page is loading ...
Page is loading ...
Page is loading ...
Page is loading ...
Page is loading ...
Page is loading ...
Page is loading ...
Page is loading ...
Page is loading ...
Page is loading ...
Page is loading ...
Page is loading ...
Page is loading ...
Page is loading ...
Page is loading ...
Page is loading ...
Page is loading ...
Page is loading ...
Page is loading ...
Page is loading ...
Page is loading ...
Page is loading ...
Page is loading ...
Page is loading ...
Page is loading ...
Page is loading ...
Page is loading ...
Page is loading ...
Page is loading ...
Page is loading ...
Page is loading ...
Page is loading ...
Page is loading ...
Page is loading ...

Instruction manual
TECHNIRADIO 40
DAB+ / FM clock radio

58
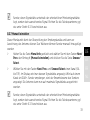
Preface
Dear Customers,
Thank you for choosing the TECHNIRADIO 40 from TechniSat.
This instruction manual is intended to help you get to know the functions that your
new unit oers, and to make the best use of them.
It will help you to use the TECHNIRADIO 40 as intended and safely.
It is intended for anyone concerned with installing, connecting, operating, cleaning or
disposing of the unit. Keep the instruction manual in a safe place for future reference.
You can find an up-to-date version of the instruction manual on the TechniSat
homepage www.technisat.de.
We have kept the operating instructions as brief as possible and have used
terminology that everybody can understand.
We hope you enjoy your
TechniSat TECHNIRADIO 40!
Your
Your TechniSat Team
Page is loading ...

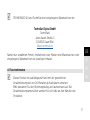
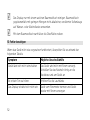
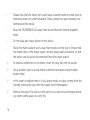
60
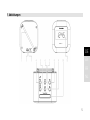
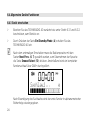
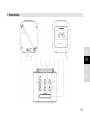
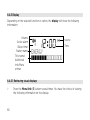
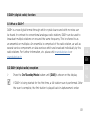
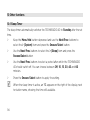
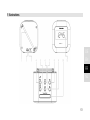
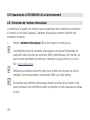
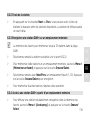
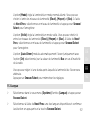
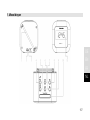
1 Telescopic antenna
2 USB port (5V / 1 A)
3 Power adapter (DC IN 5V / 1.5 A)
4 On/Standby/Mode
5 Menu/Info
6 Next
7 Prev.
8 Vol.+
9 Vol.-
10 Snooze/Select
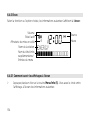
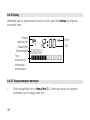
11 Display

61
DE
EN
FR
NL
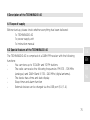
2 Index
1 Illustrations ...............................................................................................................59
2 Index ........................................................................................................................... 61
3 Safety instructions ..................................................................................................65
3.1 Signs and symbols used ........................................................................................................65
3.2 Intended use ...............................................................................................................................67
3.3 Target group for this instruction manual ....................................................................... 67
3.4 Using the TECHNIRADIO 40 safely ...................................................................................67
4 Legal notices ............................................................................................................70
4.1 Service instructions ...................................................................................................................71
5 Seing up the device ............................................................................................. 73
6 Description of the TECHNIRADIO 40 ................................................................. 75
6.1 Scope of supply .........................................................................................................................75
6.2 Special features of the TECHNIRADIO 40 ......................................................................75
6.3 Preparing the TECHNIRADIO 40 for operation ........................................................... 76
6.3.1 Aligning the telescopic antenna ........................................................................................76
6.3.2 Connecting the mains adapter ...........................................................................................77

62
6.4 General device functionality ................................................................................................78
6.4.1 Switching on the device ........................................................................................................78
6.4.2 Switching o the device ........................................................................................................79
6.4.3 Selecting the source ................................................................................................................79
6.4.4 Seing the volume ...................................................................................................................79
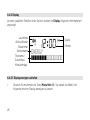
6.4.5 Display ........................................................................................................................................... 80
7 Menu navigation ...................................................................................................... 81
8 DAB+ (digital radio) function ...............................................................................83
8.1 What is DAB+? ...........................................................................................................................83
8.2 DAB+ (digital radio) reception ............................................................................................ 83
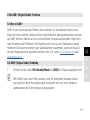
8.2.1 Performing a full scan ............................................................................................................ 84
8.2.2 Selecting the station ................................................................................................................ 85
8.2.3 Saving DAB+ stations to a favourites memory slot ..................................................85
8.2.4 Retrieving DAB+ stations from a memory slot ...........................................................85
8.2.5 Overwriting/deleting a station memory slot ................................................................86
8.2.6 Signal strength ...........................................................................................................................86
8.2.7 Manual seing ............................................................................................................................87
8.2.8 Volume adjustment (DRC) ....................................................................................................88
8.2.9 Deleting inactive stations ......................................................................................................88

63
DE
EN
FR
NL
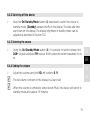
9 FM mode ....................................................................................................................89
9.1 Switching on FM radio mode ..............................................................................................89
9.2 FM reception with RDS information ................................................................................ 90
9.3 Automatic station scan ......................................................................................................... 90
9.4 Manual station scan ................................................................................................................. 91
9.5 Scan seings ............................................................................................................................... 91
9.6 Saving UKW stations to a favourites memory slot ................................................... 92
9.7 Retrieving FM stations from a memory slot ................................................................ 92
9.8 Overwriting/deleting a station memory slot ................................................................93
10 Other functions ........................................................................................................94
10.1 Sleep Timer ................................................................................................................................. 94
10.2 Alarm ..............................................................................................................................................95
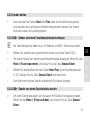
10.2.1 Seing the alarm .......................................................................................................................95
10.2.2 Switching o the alarm aer being woken up ........................................................... 96
11 System seings ........................................................................................................98
11.1 Date and time seings .......................................................................................................... 99
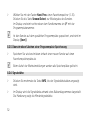
11.1.1 Manually seing the date/time ......................................................................................... 99
11.1.2 Time update .............................................................................................................................100
11.1.3 Seing the time format .......................................................................................................100
11.1.4 Seing the date format ......................................................................................................100

64
11.2 Display seings ....................................................................................................................... 102
11.3 Language ....................................................................................................................................103
11.4 Factory seings ....................................................................................................................... 104
11.5 System info ................................................................................................................................105
12 Cleaning ...................................................................................................................105
13 Troubleshooting ....................................................................................................106
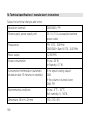
14 Technical specifications / manufacturer’s instructions..............................108
15 Notes ......................................................................................................................... 110

65
DE
EN
FR
NL
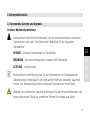
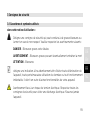
3 Safety instructions
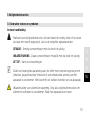
3.1 Signs and symbols used
In this instruction manual:
Indicates a safety instruction which can lead to severe injuries or death if not
observed. Note the following signal words:
DANGER - Severe injury with fatal consequences
WARNING - Severe injury, with possibly fatal consequences
CAUTION - Injury
Indicates a note that you must observe to avoid equipment defects, data loss/
misuse or unintended operation. It also describes additional functions of your
unit.
Beware of electrical voltage. Follow all safety instructions to avoid electric
shock. Do not open the unit under any circumstances.

66
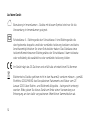
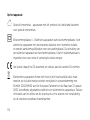
On the unit:
Indoor use - units with this symbol are only suitable for indoor use.
Protection class II - Electrical appliances in protection class II are electrical
appliances that have continuous double and/or reinforced insulation and no
connection options for a protective conductor. The housing of an insulation-
enclosed electrical appliance of protection class II may partially or completely
form the additional or reinforced insulation.
Your unit bears the CE symbol and complies with all the requisite EU
standards.
Electronic appliances do not belong in household waste, but must be
disposed of properly - in accordance with Directive 2002/96/EG of the
European Parliament and Council dated 27 January 2003 on waste electrical
and electronic equipment. Please return this unit to the designated public
collection point for disposal at the end of its service life.

67
DE
EN
FR
NL
3.2 Intended use
The device is designed to receive radio broadcasts via DAB+ and FM. The device has
been designed for private use and not for commercial purposes.
3.3 Target group for this instruction manual
The instruction manual is intended for anyone concerned with installing, operating,
cleaning or disposing of the device.
3.4 Using the TECHNIRADIO 40 safely
Please take note of the following information to minimise safety risks, to prevent
damage to the device, and to make a contribution to environmental protection.
Please read all safety instructions carefully and keep them for future reference.
Always follow all the warnings and instructions in this instruction manual and on the
back of the unit.
WARNING!
Do not open the unit under any circumstances.
Touching live parts endangers life!

68
Observe all of the following instructions for the intended use of the unit and to
prevent defects and personal injury.
- Do not repair the device yourself. Repairs to be carried out only by trained
specialist personnel. Contact our customer service department.
- The device must only be operated under the stated environmental conditions.
- Do not expose the device to dripping or splashing water. If water has
penetrated the device, disconnect it from the mains and inform Service
- Do not expose the device to heat sources which could heat it up more than
normal use will.
- If you detect a device defect, odour or smoke, a major malfunction, or damage
to the housing, inform Service immediately.

69
DE
EN
FR
NL
- The device must only be operated at the mains voltage printed on the power
supply unit. Never try to operate the device at any another voltage.
- If the device shows signs of damage, it must not be put into operation.
- Do not put the device into operation in the vicinity of bath tubs, showers,
swimming pools or running/splashing water. There is a risk of electric shock
and/or device defects.
- Foreign bodies, e.g. nails, coins, etc. must not be allowed to fall inside the
device. Do not touch the connection contacts with metal objects or your
fingers. This could lead to short-circuits.
- This device is not intended to be used by people (including children) with
limited physical, sensoryormentalcapacities or lackof experienceand/or
knowledge,unless they are supervised by a person responsible for their safety
or they have been instructed by them as to how to use the device. Never
allow children to use the device unsupervised.
- Modifications to the device are prohibited.

70
4 Legal notices
TechniSat herewith declares that the radio system model TECHNIRADIO 40
corresponds to Directive2014/53/EU. The complete text of the EU Declaration
of Conformity is available at the following web address:
hp://konf.tsat.de/?ID=22681
TechniSat is not liable for product damage due to external influences, wear
and tear or improper handling, unauthorised repair, modifications or accidents.
Subject to alterations and printing errors. Version 10/20.
Duplication and reproduction only with the publisher's approval. The respective
current version of the instructions can be downloaded in PDF format from the
download area of the TechniSat Homepage at www.technisat.de.

71
DE
EN
FR
NL
TECHNIRADIO 40 and TechniSat are registered trademarks of:
TechniSat Digital GmbH
TechniPark
Julius-Saxler-Strasse 3
D-54550 Daun/Vulkaneifel, Germany
Www.technisat.de
Names of companies, institutions or brands mentioned are trademarks or registered
trademarks of their respective owners.
4.1 Service instructions
This product is quality-tested and provided with the legally-specified warranty
period of 24 months from the date of purchase. Please keep your receipt as
proof of purchase. In the event of warranty claims, please contact the product
dealer.

72
Note!
For questions and information or if there is a problem with this unit, our
Technical Hotline is available:
Mon. - Fri. 8:00 am - 6:00 pm at tel.:
+49 (0) 3925 9220 1800.
Repairs can also be requested directly online at
www.technisat.de/reparatur.
If you need to return the unit, please use the following address only:
TechniSat Digital GmbH
Service-Center
Nordstr. 4a
39418 Stassfurt, Germany

73
DE
EN
FR
NL
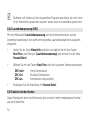
5 Seing up the device
> Place the device on a firm, secure and horizontal surface. Make sure the area
is well ventilated.
Note:
- Do not place the radio on so surfaces such as carpets and blankets, or
near to curtains and wall hangings. These could obstruct the ventilation
openings. The necessary flow of air could be interrupted as a result. This could
potentially lead to fire in the device.
- Do not place the radio near to sources of heat, such as radiators. Avoid direct
sunlight and very dusty environments.
- Do not select a location for the device with high air humidity, e.g. a kitchen or
sauna, since condensation could damage the device. The device is intended
for use in a dry environment and in a moderate climate and must not be
exposed to dripping or splashing water.

74
- Please note that the device feet could leave coloured marks on some types of
furniture surfaces in certain situations. Place a protective layer between your
furniture and the device.
- Keep the TECHNIRADIO 40 away from devices that emit intense magnetic
fields.
- Do not place any heavy objects on the device.
- Route the mains cable in such a way that nobody can trip over it. Ensure that
the mains cable or the power supply unit are always easily accessible, so that
the device can be quickly disconnected from the power supply!
> To ensure a connection to the mains, insert the plug fully into the socket.
> Use a suitable, easy-to-access mains connection and avoid using multiple
socket strips!
> In the event of malfunctions or if you detect smoke or odour coming from the
housing, remove the plug from the power outlet immediately!
> Remove the plug if the device is not going to be used for a prolonged period,
e.g. before going away on a long trip.

75
DE
EN
FR
NL
6 Description of the TECHNIRADIO 40
6.1 Scope of supply
Before start-up, please check whether everything has been delivered:
1 x TECHNIRADIO 40
1 x power supply unit
1 x instruction manual
6.2 Special features of the TECHNIRADIO 40
The TECHNIRADIO 40 is comprised of a DAB+/FM receiver with the following
functions:
- You can store up to 10 DAB+ and 10 FM stations.
- The radio can receive the following frequencies: FM 87.5 - 108 MHz
(analogue) and DAB+ Band III 174 - 240 MHz (digital antenna).
- The device has a time and date display.
- Sleep timer and alarm function
- External devices can be charged via the USB port (5 V, 1 A).

76
6.3 Preparing the TECHNIRADIO 40 for operation
6.3.1 Aligning the telescopic antenna
The number and quality of the stations to be received depend on the reception
conditions at the installation location. Excellent reception can be achieved using the
telescopic antenna.
> Release the telescopic antenna (1) from its holder, align it and extend it.
The exact alignment of the telescopic antenna is oen important, in particular
at the fringes of the DAB+ reception area. On the Internet you can quickly find
the location of the nearest transmission tower by visiting “www.dabplus.de”.
Start the first scan at a window pointing in the direction of the transmission
mast. If the weather conditions are poor, DAB+ reception may be limited.
Do not touch the telescopic antenna during station playback. This could
reduce the reception and lead to sound drop-outs.

77
DE
EN
FR
NL
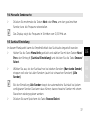
6.3.2 Connecting the mains adapter
Ensure that the operating voltage of the power supply unit matches the mains
voltage before you insert it into the wall socket.
WARNING!
Do not touch the mains plug with wet hands; electric shock hazard!
CAUTION!
Route the mains cable in such a way that nobody can trip over it.
> Connect the power supply unit to the port marked DC IN (3) on the back of
the TECHNIRADIO 40. Then connect the power supply to the mains.
Page is loading ...
Page is loading ...
Page is loading ...
Page is loading ...
Page is loading ...
Page is loading ...
Page is loading ...
Page is loading ...
Page is loading ...
Page is loading ...
Page is loading ...
Page is loading ...
Page is loading ...
Page is loading ...
Page is loading ...
Page is loading ...
Page is loading ...
Page is loading ...
Page is loading ...
Page is loading ...
Page is loading ...
Page is loading ...
Page is loading ...
Page is loading ...
Page is loading ...
Page is loading ...
Page is loading ...
Page is loading ...
Page is loading ...
Page is loading ...
Page is loading ...
Page is loading ...
Page is loading ...
Page is loading ...
Page is loading ...
Page is loading ...
Page is loading ...
Page is loading ...
Page is loading ...
Page is loading ...
Page is loading ...
Page is loading ...
Page is loading ...
Page is loading ...
Page is loading ...
Page is loading ...
Page is loading ...
Page is loading ...
Page is loading ...
Page is loading ...
Page is loading ...
Page is loading ...
Page is loading ...
Page is loading ...
Page is loading ...
Page is loading ...
Page is loading ...
Page is loading ...
Page is loading ...
Page is loading ...
Page is loading ...
Page is loading ...
Page is loading ...
Page is loading ...
Page is loading ...
Page is loading ...
Page is loading ...
Page is loading ...
Page is loading ...
Page is loading ...
Page is loading ...
Page is loading ...
Page is loading ...
Page is loading ...
Page is loading ...
Page is loading ...
Page is loading ...
Page is loading ...
Page is loading ...
Page is loading ...
Page is loading ...
Page is loading ...
Page is loading ...
Page is loading ...
Page is loading ...
Page is loading ...
Page is loading ...
Page is loading ...
Page is loading ...
Page is loading ...
Page is loading ...
Page is loading ...
Page is loading ...
Page is loading ...
Page is loading ...
Page is loading ...
Page is loading ...
Page is loading ...
Page is loading ...
Page is loading ...
Page is loading ...
Page is loading ...
Page is loading ...
Page is loading ...
Page is loading ...
Page is loading ...
Page is loading ...
Page is loading ...
Page is loading ...
Page is loading ...
Page is loading ...
Page is loading ...
Page is loading ...
Page is loading ...
Page is loading ...
Page is loading ...
Page is loading ...
Page is loading ...
Page is loading ...
Page is loading ...
Page is loading ...
Page is loading ...
Page is loading ...
Page is loading ...
Page is loading ...
Page is loading ...
Page is loading ...
Page is loading ...
Page is loading ...
Page is loading ...
Page is loading ...
Page is loading ...
Page is loading ...
Page is loading ...
Page is loading ...
Page is loading ...
Page is loading ...
Page is loading ...
Page is loading ...
Page is loading ...
Page is loading ...
Page is loading ...
Page is loading ...
-
 1
1
-
 2
2
-
 3
3
-
 4
4
-
 5
5
-
 6
6
-
 7
7
-
 8
8
-
 9
9
-
 10
10
-
 11
11
-
 12
12
-
 13
13
-
 14
14
-
 15
15
-
 16
16
-
 17
17
-
 18
18
-
 19
19
-
 20
20
-
 21
21
-
 22
22
-
 23
23
-
 24
24
-
 25
25
-
 26
26
-
 27
27
-
 28
28
-
 29
29
-
 30
30
-
 31
31
-
 32
32
-
 33
33
-
 34
34
-
 35
35
-
 36
36
-
 37
37
-
 38
38
-
 39
39
-
 40
40
-
 41
41
-
 42
42
-
 43
43
-
 44
44
-
 45
45
-
 46
46
-
 47
47
-
 48
48
-
 49
49
-
 50
50
-
 51
51
-
 52
52
-
 53
53
-
 54
54
-
 55
55
-
 56
56
-
 57
57
-
 58
58
-
 59
59
-
 60
60
-
 61
61
-
 62
62
-
 63
63
-
 64
64
-
 65
65
-
 66
66
-
 67
67
-
 68
68
-
 69
69
-
 70
70
-
 71
71
-
 72
72
-
 73
73
-
 74
74
-
 75
75
-
 76
76
-
 77
77
-
 78
78
-
 79
79
-
 80
80
-
 81
81
-
 82
82
-
 83
83
-
 84
84
-
 85
85
-
 86
86
-
 87
87
-
 88
88
-
 89
89
-
 90
90
-
 91
91
-
 92
92
-
 93
93
-
 94
94
-
 95
95
-
 96
96
-
 97
97
-
 98
98
-
 99
99
-
 100
100
-
 101
101
-
 102
102
-
 103
103
-
 104
104
-
 105
105
-
 106
106
-
 107
107
-
 108
108
-
 109
109
-
 110
110
-
 111
111
-
 112
112
-
 113
113
-
 114
114
-
 115
115
-
 116
116
-
 117
117
-
 118
118
-
 119
119
-
 120
120
-
 121
121
-
 122
122
-
 123
123
-
 124
124
-
 125
125
-
 126
126
-
 127
127
-
 128
128
-
 129
129
-
 130
130
-
 131
131
-
 132
132
-
 133
133
-
 134
134
-
 135
135
-
 136
136
-
 137
137
-
 138
138
-
 139
139
-
 140
140
-
 141
141
-
 142
142
-
 143
143
-
 144
144
-
 145
145
-
 146
146
-
 147
147
-
 148
148
-
 149
149
-
 150
150
-
 151
151
-
 152
152
-
 153
153
-
 154
154
-
 155
155
-
 156
156
-
 157
157
-
 158
158
-
 159
159
-
 160
160
-
 161
161
-
 162
162
-
 163
163
-
 164
164
-
 165
165
-
 166
166
-
 167
167
-
 168
168
-
 169
169
-
 170
170
-
 171
171
-
 172
172
-
 173
173
-
 174
174
-
 175
175
-
 176
176
-
 177
177
-
 178
178
-
 179
179
-
 180
180
-
 181
181
-
 182
182
-
 183
183
-
 184
184
-
 185
185
-
 186
186
-
 187
187
-
 188
188
-
 189
189
-
 190
190
-
 191
191
-
 192
192
-
 193
193
-
 194
194
-
 195
195
-
 196
196
-
 197
197
-
 198
198
-
 199
199
-
 200
200
-
 201
201
-
 202
202
-
 203
203
-
 204
204
-
 205
205
-
 206
206
-
 207
207
-
 208
208
-
 209
209
-
 210
210
-
 211
211
-
 212
212
-
 213
213
-
 214
214
-
 215
215
-
 216
216
-
 217
217
-
 218
218
-
 219
219
-
 220
220


TechniSat TECHNIRADIO 40 User manual
- Category
- Alarm clocks
- Type
- User manual
Ask a question and I''ll find the answer in the document
Finding information in a document is now easier with AI
in other languages
- français: TechniSat TECHNIRADIO 40 Manuel utilisateur
- Deutsch: TechniSat TECHNIRADIO 40 Benutzerhandbuch
- Nederlands: TechniSat TECHNIRADIO 40 Handleiding
Related papers
-
TechniSat TECHNIRADIO Solar Owner's manual
-
TechniSat TECHNIRADIO 3 User manual
-
-
-
TechniSat TECHNIRADIO 5 IR User manual
-
TechniSat DIGITRADIO 52 User manual
-
-
-
-