Page is loading ...

Below Shown Actual Size
1. Axel Support Tabs
2. Wheels
3. A-Frame Right Hand
4. A-Frame Le Hand
5. Chain with Hooks
6. Post Clamp
7. Top A-Frame Brace with Handle
8. Boom A-Frame Brace
9. Coer Pins
10. Bolts (Qty 6)
11. Large Washers (Qty 6)
12. Nuts (Qty 6)
13. Axel
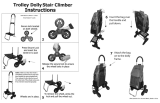
Package Contents (Puller Frame)

Stand a-frame right hand (3) up making sure that axel support tabs (1) are facing towards the outside of the
frame. Posion top a-frame brace with handle (7), insert two long bolts (10) and hand ghten a nut (12) on
each. Repeat step for le side of a-frame.
Slide axel (13) through axel support tabs (1) so that an even amount protrudes out both sides. Slide two large
washers (11) on the axel unl they hit the axel support tabs (1). Then slide on one wheel (2) and one large
washer (11). Next insert one coer pin (9) through the hole in the end of the axel (13). Bend the coer pin (9)
so that it cannot slide out of the hole. Repeat step for other wheel (2).
Posion boom a-frame brace (8) so that the holes line up with a-frame right hand (3) and a-frame le hand
(4), insert two long bolts (10) and hand ghten a nut (12) on each. Repeat step for le side of a-frame boom
brace. Tighten ALL bolts rmly.
Assembly Instrucons (Puller Frame)
3. 4.
1.
13.
3.
1.
3.
13.
1.
11.
11.
13.
2.
13.
9.
2.
9.
2.
13.
13.
2.
3.
11.
13.
11.
13.
2.
3. 4.
13.
8.
3. 4.
7.
10.
12.
10.
12.

Below Shown Actual Size
Package Contents (48″ Farm Jack)
1. Jack Assembly
2. Jack Support Tabs (Qty 4)
3. Long Bolts & Nuts (Qty 9)
4. Short Bolts & Nuts (Qty 2)
5. Top A-Frame Brace (separate box)
6. Boom A-Frame Brace (separate box)

Safety & Operaon Safety
Wear safety equipment when operang this tool including goggles, gloves, and work boots. Check all components for wear and
replace parts as necessary. Keep jack and its associated moving parts well oiled and free from dirt and debris. Make sure that
all hardware and bolts are ght and in good working order. Replace worn or broken bolts and nuts. Inspect chain and hooks for
fague and cracks. Replace if necessary. Inspect post clamp for broken or bent parts, bolts or nuts. Replace if necessary. Keep
res inated to recommended pressure. Check wheels for damage and replace if necessary. DO NOT under any circumstances
extend or modify jack handle. Extending the handle will result in overloading and damage to this tool. Serious injury could
result if this tool is overloaded. This tool is designed for one adult operator. If the post will not dislodge, the earth around the
post must be loosened with shovels, water or other appropriate means. Do not pull handle with two people as damage to the
tool and injury to the operators may result. Always hold handle rmly when raising and lowering the jack. Keep head and body
clear of the path of the handle. The handle can abruptly rise under a heavy load and cause serious injury. Never leave puller
unaended with load applied. Always store the puller on a at hard surface with jack assembly in the lowest posion. The puller
is top heavy and if a hard at surface is not available there is a risk that it will p over if le unaended. This could cause serious
injury. If there is not any suitable level ground lay the puller on its side to prevent the risk of it pping over. Be careful not to use
the jack handle as the primary handle for moving the removed post. The jack handle can be bent if used in this manner. Keep
clear of the jack handle when leaning the removed post back as a pinch point can be created between the handle and the top
a-frame brace. Always keep a rm grip on the handle when rising and lowering the load. It is best to cut the top of the wooden
post about 8” from the ground and aach the post clamp so that it is pulling the post vercally. Aaching the post clamp on the
side of the post is ok for light liing. Heavy loads will bend the post clamp. Keep a watch on the post clamp when using the side
mounng opon to assure that it does not bend. If you are pulling a steel post that is rmly installed it is recommended to wrap
the post in the chain instead of the post clamp. This will increase the pulling strength and prevent damage to the post clamp. It
is recommended that the removed post and concrete be secured to the puller with rope or similar before leaning the puller back
for transport. Use the handle on the top a-frame brace handle when transporng the removed post. To prevent the potenal of
p over always move the removed post straight up and down grades and not on an angle.
Jack support tabs (2) must be aached to both the top and boom a-frame braces (5) & 6) with 4 long bolts & nuts (3). Leave
bolts loose unl jack assembly is in posion. Hand ghten bolts ONLY.
Aach jack assembly (1) to the frame by posioning between jack support tabs (2) as shown and inserng two short bolts & nuts
(4) through the jack support tabs (2) aached to the top and boom braces (5) & (6). Tighten ALL bolts.
Insert one short bolt (3) in the 4th hole from the boom on the jack rail. This bolt must be installed to prevent the jack assembly
from booming out on the boom a-frame base (6).
3.
4.
6.
2.
5.
2.
2. 2.
2. 2.
2.
5.
2.
1.
1.
4.
4.
3.
3.
6.
5.
1.
3.
4.
Assembly Instrucons (48″ Farm Jack)
/