Page is loading ...

OPERATOR’S MANUAL
MANUAL DEL OPERADOR
500 CFM/700 CFM PORTABLE
EVAPORATIVE COOLER
REFRIGERADOR EVAPORATIVO
PORTÁTIL DE 500 / 700 PIES CÚB./MIN.
EVC500/EVC700
WARNING:
To reduce the risk of injury, the user must read and
understand the operator’s manual before using this
product.
ADVERTENCIA:
Para reducir el riesgo de lesiones, el usuario debe leer
y comprender el manual del operador antes de usar
este producto.
Important Safety Instructions ..................................... 2
Evaporative Cooler Safety Warnings .......................... 3
Symbols ...................................................................... 4
Electrical ..................................................................... 5
Features ...................................................................... 6
Assembly .................................................................... 7
Operation ................................................................. 8-9
Maintenance ............................................................. 10
Accessories .............................................................. 11
Troubleshooting ........................................................ 11
Illustrations ................................................................ii-v
Parts Ordering And Service ......................... Back page
Instrucciones de seguridad importantes .................... 2
Advertencias de seguridad de refrigerador
evaporativo ................................................................. 3
Símbolos ..................................................................... 4
Aspectos eléctricos .................................................... 5
Características ............................................................ 6
Armado ....................................................................... 7
Funcionamiento .......................................................8-9
Mantenimiento .......................................................... 10
Accesorios ................................................................ 11
Corrección de problemas ......................................... 11
Ilustraciones ..............................................................ii-v
Pedidos de repuestos/servicio ...............Pág. posterior
INCLUDES: Evaporative Cooler, Casters (4), Remote
Control, AAA Batteries (2), and Operator’s Manual
****************
TABLE OF CONTENTS
INCLUYE: Refrigerador evaporativo, rueda pivotante (4),
control remoto, baterías AAA (2), y manual del operador
****************
ÍNDICE DE CONTENIDO
SAVE THIS MANUAL FOR
FUTURE REFERENCE
GUARDE ESTE MANUAL
PARA FUTURAS CONSULTAS
POWER
FAN
SWING
TIMER
COOL
8
8
POWER
COOL
FAN
TIMER
SWING

ii
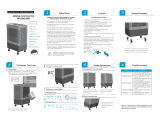
See this fold-out section for all of the figures
referenced in the operator’s manual.
Consulte esta sección desplegable
para ver todas las figuras a las que se hace
referencia en el manual del operador.

iii
8
8
POWER
COOL
FAN
TIMER
SWING
POWER
FAN
SWING
TIMER
COOL
POWER
FAN
SWING
TIMER
COOL
POWER
FAN
SWING
TIMER
COOL
8
8
POWER
COOL
FAN
TIMER
SWING
Fig. 6
A - Water container (tanque de llenado de agua)
B - Water tank access door (puerta de acceso al
tanque de agua)
A - Grounding pin (patilla de conexión a tierra)
B - 120V grounded outlet (toma de corriente con
tierra de 120 V)
A - Grommet (ojal)
B - Casters (rueda pivotante)
B
A
Fig. 1 Fig. 3
Fig. 4
Fig. 5
A - Remote control (control remoto)
B - AAA batteries (baterías AAA)
C - Battery compartment (compartimiento de la
batería)
B
A
A - Remote control (control remoto)
B - Remote control storage area (área de
almacenamiento del control remoto)
B
A
Fig. 2
A - Fan louvers (alerones del ventilador)
B - Control panel (panel de control)
C - Remote control (control remoto)
D - Water flow control compartment (compar-
timiento de control del caudal de agua)
E - Sight glass (visor ventana)
F - Water tank access door (puerta de acceso al
tanque de agua)
G - Casters (rueda pivotante)
H - Locking casters (ruedas con trabas)
I - Filter media (filtro)
J - Drain plug (tapón de drenaje)
C
B
D
E
H
G
i
F
A
A
B
B
C
A
J

iv
POWER
FAN
SWING
TIMER
COOL
POWER
FAN
SWING
TIMER
COOL
8
8
POWER
COOL
FAN
TIMER
SWING
POWER
FAN
SWING
TIMER
COOL
8
8
POWER
COOL
FAN
TIMER
SWING
POWER
FAN
SWING
TIMER
COOL
8
8
POWER
COOL
FAN
TIMER
SWING
8 8
POWER
COOL
FAN
TIMER
SWING
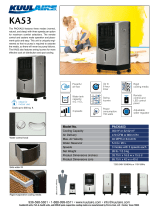
Fig. 10
Fig. 11
A - Water flow control knob (perilla de control
del caudal de agua)
B - Compartment door (puerta del compar-
timiento)
C - To increase (para aumentar)
D - To decrease (para disminuir)
B
A
B
C
POWER
FAN
SWING
TIMER
COOL
Fig. 9
A - Control panel (panel de control)
B - Swing button (botón de giro)
C - Timer button (botón de temporización)
D - Fan button (botón del ventilador)
E - Cool button (botón de frío)
F - Power button (botón de encendido)
G - Remote control (télécommande, control remoto)
H - Low water icon (ícono de nivel de agua)
I - Swing icon (ícono de giro)
J - Fan icon (ícono del ventilador)
K - Cool icon (ícono de frío)
L - Timer (chronomètre, cronómetro)
M- Remote sensor (sensor de control remoto)
B
H
A
L
D
F
E
K
J
I
G
C
F
B
C
E
D
Fig. 7
A - Drain plug (tapón de drenaje)
Fig. 8
A - Ice (hielo)
B - Water flow control compartment (compar-
timiento de control del caudal de agua)
C - Water distribution holes (orificios de
distribución de agua)
D - Compartment door (puerta del compar-
timiento)
A
B
A
C
D
M
E
C
D
A - Casters (rueda pivotante)
B - Locking casters (ruedas con trabas)
C - Wheel lock (traba de la rueda)
D - To lock (para asegurar)
E - Unlock (para desbloquear)
A
D

v
POWER
FAN
SWING
TIMER
COOL
8
8
POWER
COOL
FAN
TIMER
SWING
POWER
FAN
SWING
TIMER
COOL
POWER
FAN
SWING
TIMER
COOL
8
8
POWER
COOL
FAN
TIMER
SWING
Fig. 13
POWER
FAN
SWING
TIMER
COOL
Fig. 14
Fig. 15
A - Filter media (filtro)
B - Tabs (orejetas)
C - Filter media door (puerta del filtro)
D - This end up (este extremo hacia arriba)
A - Filter screen (pantalla del filtro)
B - Tabs (orejetas)
C - Soft brush (cepillo suave)
D - Filter media door (puerta del filtro)
C
D
C
B
B
A
A
A - Fan louvers (alerones del ventilador)
B - Air flow (corriente de aire)
B
B
B
B
A
Fig. 12
A - Fan louvers (alerones del ventilador)
B - Air flow (corriente de aire)
B
B
A
D

2 — English
IMPORTANT SAFETY INSTRUCTIONS
Make sure your extension cord is in good condition.
When using an extension cord, be sure to use one heavy
enough to carry the current your product will draw. A wire
gauge size (A.W.G.) of at least 14 is recommended for an
extension cord 50 feet or less in length. A cord exceeding
100 feet is not recommended. If in doubt, use the next
heavier gauge. The smaller the gauge number, the heavier
the cord. An undersized cord will cause a drop in line
voltage resulting in loss of power and overheating.
Inspect appliance cords periodically and, if damaged,
have repaired at your nearest authorized service center.
Constantly stay aware of cord location. Following this
rule will reduce the risk of electric shock or fire.
Carefully position the power cord during use. A power
cord in your walking path can be a tripping hazard.
Protect the power cord from being walked on or pinched
particularly at plugs, convenience receptacles, and the
point where they exit from the product.
To reduce the risk of serious personal injury, never use
this appliance in the presence of open flame.
Do not operate this appliance in explosive atmospheres,
such as in the presence of flammable liquids, gases, or
dust.
Do not operate near any heat sources such as radiators,
heat registers, stoves, or other apparatus (including
amplifiers) that produce heat.
Unplug the appliance from the power supply and empty
the water tank when the unit is not in use and before
servicing or cleaning.
Unplug this product during lightning storms or when when
not in use.
Dress properly. Do not wear loose clothing or jewelry.
Contain long hair. Keep your hair, clothing, and gloves
away from moving parts. Loose clothes, jewelry, or long
hair can be caught in moving parts.
If the power supply cord is damaged, it must be replaced
only by the manufacturer or by an authorized service
center to avoid risk.
WARNING!
READ, UNDERSTAND, AND SAVE ALL INSTRUCTIONS.
Failure to follow all instructions listed below, may result in
electric shock, fire and/or serious personal injury.
To reduce the risk of injury, close supervision is necessary
when an appliance is used near children.
Do not allow children to operate this appliance. It is not
a toy.
To avoid the risk of injury or electric shock, do not immerse
the appliance or power cord in water.
Do not use the appliance if the switch does not turn it
on and off. Any appliance that cannot be controlled with
the switch is dangerous and must be repaired by an
authorized service center.
Disconnect the plug from the power source before making
any adjustments, servicing, or storing appliances. Such
preventive safety measures reduce the risk of starting the
appliance accidentally.
Keep all parts of your body away from any moving part.
Do not defeat the safety purpose of the polarized or
grounding-type plug. A polarized plug has two blades
with one wider than the other. A grounding-type plug
has two blades and a third grounding prong. The wide
blade or the third prong are provided for your safety. If
the provided plug does not fit into your outlet, consult a
qualified electrician for replacement of the obsolete outlet.
Do not attempt to defeat this safety feature.
Do not expose appliance to rain or wet conditions. Water
entering the circuitry of the appliance will increase the
risk of electric shock.
Do not abuse the cord. Never use the cord for carrying,
pulling or unplugging the appliance. Keep cord away
from heat, oil, sharp edges or moving parts. Damaged
or entangled cords increase the risk of electric shock.
For indoor use only.

3 — English
EVAPORATIVE COOLER SAFETY WARNINGS
Evaporative cooler service must be performed only
by qualified repair personnel. Service or maintenance
performed by unqualified personnel may result in a risk
of injury.
When servicing an evaporative cooler, use only identical
replacement parts. Follow instructions in the Maintenance
section of this manual. Use of unauthorized parts or failure
to follow Maintenance Instructions may create a risk of
shock or injury.
When filling or draining water from the water tank, be
careful not to spill water. Ensure drain plug is securely in
place before filling water tank. Spilled or leaking water
can result in a slippery surface and create a slip and fall
hazard and/or cause property damage.
Only move appliance in the complete upright position on
all four casters. Do not tilt or tip over appliance; tilting or
tipping unit can cause water to spill, resulting in possible
electric shock, slip and fall hazard, or property damage.
To reduce the risk of fire or electric shock, do not use this
fan with any solid-state speed control device.
Save these instructions. Refer to them frequently and use
them to instruct others who may use this product. If you
loan someone this product, loan them these instructions
also.
Do not block the flow of air to or from the unit during use.
Keep the unit unobstructed to allow proper ventilation.
Do not insert fingers or objects into fan assembly during
use. Following this rule will reduce the risk of electric
shock or serious injury.
Never leave product running unattended. Turn the pump
and the fan off and disconnect unit from power supply.
Don’t leave appliance until it comes to a complete stop.
Exercise caution to avoid slipping or falling.
To reduce the risk of electric shock, always disconnect
the cooler from the power supply before adding water to
the water tank.
ONLY use clean cold water. The evaporative cooler is not
an air conditioner. It does not have a refrigeration system.
Do not use the evaporative cooler to disperse liquid
medicines, chemicals, or any liquids other than clean
water. Dispersing these substances could result in serious
injury or illness to the operator or bystanders.
Do not operate the cooler in “cool mode” without water
in the water tank as this may damage the pump.
Use caution when positioning the product for use. Never
direct air flow toward any electrical wiring or devices.
Never operate the evaporative cooler pump without a
filter media installed, as this may cause serious damage
to the unit.
WARNING:
This product and substances that may become airborne from its use may contain chemicals, including lead, known to
the State of California to cause cancer, birth defects, or other reproductive harm. Wash hands after handling.
CALIFORNIA PROPOSITION 65

4 — English
SYMBOLS
The following signal words and meanings are intended to explain the levels of risk associated with this product.
SYMBOL SIGNAL MEANING
DANGER:
Indicates an imminently hazardous situation, which, if not avoided, will result
in death or serious injury.
WARNING:
Indicates a potentially hazardous situation, which, if not avoided, could result
in death or serious injury.
CAUTION:
Indicates a potentially hazardous situation, which, if not avoided, may result in
minor or moderate injury.
NOTICE:
(Without Safety Alert Symbol) Indicates important information not related to an
injury hazard, such as a situation that may result in property damage.
Some of the following symbols may be used on this product. Please study them and learn their meaning. Proper
interpretation of these symbols will allow you to operate the product better and safer.
Safety Alert Indicates a potential personal injury hazard.
Read Operator’s Manual
To reduce the risk of injury, user must read and understand
operator’s manual before using this product.
Electrocution/Electric Shock
Keep water and mist discharge pointed away from all electrical
devices to reduce the risk of electrocution or electric shock.
Wet Conditions Alert Do not expose to rain or use in damp locations.
Slippery Surface
Improper drain plug installation, overfilling water tank, and/or water
spills can result in a slip and fall hazard.
Long Hair
Failure to keep long hair away from the air inlet could result in
personal injury.
Fan Blades
Contact with moving fan blades can cause serious personal injury.
Do Not Tilt/Tip Over
Do not tilt or tip over appliance; tilting or tipping unit can cause
water to spill, resulting in possible electric shock, slip and fall
hazard, or property damage.
SYMBOL NAME
DESIGNATION/EXPLANATION

5 — English
ELECTRICAL
EXTENSION CORDS
Use only 3-wire extension cords that have 3-prong grounding
plugs and 3-pole receptacles that accept the product’s plug.
When using an appliance at a considerable distance from
the power source, use an extension cord heavy enough to
carry the current that the product will draw. An undersized
extension cord will cause a drop in line voltage, resulting in
a loss of power and causing the motor to overheat. Use the
chart provided below to determine the minimum wire size
required in an extension cord. Only round jacketed cords
listed by Underwriter’s Laboratories (UL) should be used.
**Ampere rating (on product data plate)
0-2.0 2.1-3.4 3.5-5.0 5.1-7.0 7.1-12.0 12.1-16.0
Cord Length Wire Size (A.W.G.)
25´ 16 16 16 16 14 14
50´ 16 16 16 14 14 12
100´ 16 16 14 12 10 —
**Used on 12 gauge - 20 amp circuit
NOTE: AWG = American Wire Gauge
Before using an extension cord, inspect it for loose or
exposed wires and cut or worn insulation.
WARNING:
Check extension cords before each use. If damaged
replace immediately. Never use the product with a
damaged cord since touching the damaged area could
cause electrical shock resulting in serious injury.
ELECTRICAL CONNECTION
This product is powered by a precision-built electric motor. It
should be connected to a power supply that is 120 V, AC only
(normal household current), 60 Hz. Do not operate this
product on direct current (DC). A substantial voltage drop
will cause a loss of power and the motor will overheat. If
the product does not operate when plugged into an outlet,
double check the power supply.
GROUNDING INSTRUCTIONS
This product must be grounded. In the event of a malfunction
or breakdown, grounding provides a path of least resistance
for electric current to reduce the risk of electric shock.
This product is equipped with an electric cord having an
equipment-grounding conductor and a grounding plug. The
plug must be plugged into a matching outlet that is properly
installed and grounded in accordance with all local codes
and ordinances.
Do not modify the plug provided. If it will not fit the outlet,
have the proper outlet installed by a qualified electrician.
WARNING:
Improper installation of a grounded plug can result in a
risk of electric shock. When repair or replacement of the
cord or plug is required, take the tool to an authorized
service center.
Check with a qualified electrician or service personnel if the
grounding instructions are not completely understood, or if
in doubt as to whether the product is properly grounded.
Repair or replace a damaged or worn cord immediately.
This product is for use on a nominal 120 V circuit and has
a grounding plug similar to the plug illustrated in figure 1.
Only connect the product to an outlet having the same
configuration as the plug. Do not use an adaptor with this
product.

6 — English
PRODUCT SPECIFICATIONS
EVC500:
Air Volume (CFM) ...........................................500 ft
3
/min
Cooling Zone ........................................................ 350 ft
2
Water Capacity .......................................................4 gal.
Fan Type .................................................Centrifugal Fan
Filter Media Size ............................. 16 in. x 14 in. x 2 in.
Input ............................120 V, AC only, 60 Hz, 1.1 Amps
KNOW YOUR EVAPORATIVE COOLER
See Figure 2.
The safe use of this product requires an understanding of the
information on the appliance and in this operator’s manual as
well as a knowledge of the project you are attempting. Before
use of this product, familiarize yourself with all operating
features and safety rules.
CONTROL PANEL AND REMOTE CONTROL
The control panel and the remote control can be used to
adjust fan speed, start and stop the pump, set the timer,
start and stop the movement of the vertical louvers, and
turn the unit on and off.
DIGITAL DISPLAY
The modes of the evaporative cooler can be viewed on the
digital display which illuminates when the unit is turned on.
DRAIN PLUG
Remove the drain plug to allow water to drain from the tank.
FILTER MEDIA
When the pump is running, the filter media exposes the water
flow to the air flow for evaporative cooling.
LOW WATER PROTECTION
If the water in the water tank becomes low while the pump
is running, the low water alert will beep and the low water
icon ( ) will flash in the digital display. If the water supply
is insufficient for pump operation, the pump will shut off
automatically.
SIGHT GLASS
The sight glass lets you check to see if water should be
added to the water tank.
THREE-SPEED FAN
The speed of the fan can be adjusted to high, medium, and
low speeds.
WATER FLOW CONTROL KNOB
The water flow control knob controls the flow of water from
the pump to the filter media.
WATER TANK
The water tank is used to hold water in the unit for cooling.
Water is added through the tank access door located on the
side of the evaporative cooler.
FEATURES
EVC700:
Air Volume (CFM) .......................................... 700 ft
3
/min
Cooling Zone ....................................................... 500 ft
2
Water Capacity ......................................................5 gal.
Fan Type ................................................ Centrifugal Fan
Filter Media Size .............................16 in. x 14 in. x 2 in.
Input ...........................120 V, AC only, 60 Hz, 0.9 Amps

7 — English
WARNING:
Do not connect to power supply until assembly is
complete. Failure to comply could result in accidental
starting and possible serious personal injury.
INSTALLING THE CASTERS
See Figure 3.
Carefully lower the evaporative cooler until it rests on its
back or side.
Push casters into the grommets located at the base of
the unit until they snap into place.
NOTE: The locking casters should be installed in the
front grommets, which are on the side closest to the fan
louvers.
Make sure the casters are secure, and then return the
evaporative cooler to the upright position.
INSTALLING BATTERIES INTO REMOTE
CONTROL
See Figures 4 - 5.
Remove the battery cover from the remote control.
Install AAA batteries according to the polarity indicators
(+ or –) inside the battery compartment.
Replace and secure the battery cover.
NOTE: If the remote becomes difficult to use or will not
work at all, the batteries may need to be replaced.
Place the remote control into the remote storage area.
UNPACKING
This product requires assembly.
Carefully remove the product and any accessories from
the box. Make sure that all items listed in the packing list
are included.
WARNING:
Do not use this product if any parts in the Includes list
are already assembled to your product when you unpack
it. Parts on this list are not assembled to the product by
the manufacturer and require customer installation. Use
of a product that may have been improperly assembled
could result in serious personal injury.
Inspect the product carefully to make sure no breakage
or damage occurred during shipping.
Do not discard the packing material until you have
carefully inspected and satisfactorily operated the
product.
If any parts are damaged or missing, please call
1-877-297-8911 for assistance.
WARNING:
If any parts are damaged or missing do not operate this
product until the parts are replaced. Use of this product
with damaged or missing parts could result in serious
personal injury.
WARNING:
Do not attempt to modify this product or create
accessories not recommended for use with this product.
Any such alteration or modification is misuse and could
result in a hazardous condition leading to possible serious
personal injury.
ASSEMBLY

8 — English
OPERATION
WARNING:
Do not allow familiarity with products to make you
careless. Remember that a careless fraction of a second
is sufficient to inflict serious injury.
WARNING:
Do not route cord under carpets, rugs, runners, furniture,
or appliances and always route cord away from traffic
areas to prevent a tripping hazard.
UNDERSTANDING THE BASICS
The evaporative cooler is not an air conditioner. It does not
have a compressor and does not require refrigerant.
The unit works by pumping water away from the water tank
and distributing it across the filter media. The fan pulls warm
air from the rear of the unit and through the filter media. As
the air goes through the filter media, its warmth is absorbed
into the water. The fan then propels the cool and humidified
air through the front of unit and into the desired area.
FILLING THE WATER TANK
See Figures 6 - 7.
Disconnect the evaporative cooler from the power supply.
Ensure the drain plug is securely in place.
Press and release the tank access door to open. The door
is located on the side of the evaporative cooler.
Add water until the fluid level rises to the max fill line in
the sight window.
NOTE: Although tap water can be used, we recommend
using distilled or filtered water to reduce mineral deposits
which can clog the filter media.
Close the tank access door.
NOTE: Always completely drain the water tank when the
evaporative cooler is not in use.
To drain:
Move the evaporative cooler to an appropriate area where
any remaining water in the unit can be drained.
Remove the drain plug and allow any water remaining in
the unit to drain out.
Reinstall the drain plug.
WARNING:
When filling or draining tank, be careful not to spill water.
Ensure drain plug is securely in place when filling tank
and do not overfill. Spilled or leaking water can result in a
slippery surface, create a slip and fall hazard, and cause
property damage.
OPERATING THE EVAPORATIVE COOLER
See Figure 8 - 13.
WARNING:
Only move appliance in the complete upright position on
all four casters. Do not tilt or tip over appliance; tilting or
tipping unit can cause water to spill, resulting in possible
electric shock, slip and fall hazard, or property damage.
WARNING:
Keep water and mist discharge pointed away from all
electrical devices to reduce the risk of electrocution or
electric shock.
WARNING:
Do not use the evaporative cooler to disperse liquid
medicines, chemicals, or any liquids other than clean
water. These substances could result in serious injury or
illness to the operator or bystanders.
Connect the evaporative cooler to the power supply.
To allow for proper ventilation and optimal cooling, place
the unit in front of an open window and leave the door to
the room slightly open.
NOTE: When the unit is in the desired position, press
down on the wheel lock to secure the casters in place
and prevent the unit from moving during use.
To turn the evaporative cooler on/off:
Press the POWER button on the control panel or remote
control. When the unit is on, the digital display will be
illuminated.
To turn the unit off, press the POWER button again.
NOTE: It is normal for odor to be emitted from the filter
media during first use. The smell will dissipate after a few
hours of operation.
To adjust the fan speed:
Press the FAN button on the control panel or remote
control. Each time the FAN button is pressed, bars will
appear above the fan icon ( ) in the digital display
indicating high ( ), medium ( ), and low ( ) speeds.
To turn the pump on and off:
Press the COOL button on the control panel or remote
control. The cool icon ( ) will appear in the digital display.
NOTE: When the pump is on, water will be pumped into
the filter media, which will have a cooling effect on the
air flow.

9 — English
OPERATION
NOTICE:
Do not operate the evaporative cooler without the filter
media while the pump is running. Doing so could damage
the motor and reduce performance.
For better cooling, open the compartment door and place
ice in the water flow control compartment.
NOTE: Do not place ice directly over the water distribution
holes as this may obstruct the flow of water to the filter
media.
Press the COOL button again to turn the pump off.
WARNING:
After turning the pump off, run the evaporative cooler
fan for 15 to 30 minutes to dry the filter media. Always
thoroughly dry the filter media to prevent the possible
formation of bacteria or mold. Circulating air through a
filter media that contains bacteria or mold can result in
serious personal injury or illness.
WARNING:
Always completely drain water tank when not in use
to prevent the possible formation of bacteria or mold.
Using a cooler that contains bacteria or mold can result
in serious personal injury or illness.
To adjust water flow from the pump:
The flow of water from the pump to the filter media can be
controlled by using the water flow control knob. For cooler
air, increase the flow of water. For warmer air, decrease the
flow.
Turn the pump on as described earlier.
Open the compartment door.
Turn the water flow control knob counterclockwise to
increase the flow of water from the pump and clockwise
to decrease it.
Close the compartment door.
Changing the distribution of air flow:
The distribution of air flow can be adjusted by changing
the position of the fan louvers. To change the direction of
horizontal airflow, adjust the vertical louvers:
Press the SWING button on the control panel or remote
control to make the vertical louvers move from left to
right automatically. The swing icon ( ) will appear in the
digital display.
Press the SWING button again to stop louver movement.
To change the direction of vertical airflow, manually adjust
the horizontal louvers.
Setting the timer:
The evaporative cooler can be set to function automatically
for intervals of 30 minutes up to 8 hours. To set the time for
the evaporative cooler:
Press the TIMER button to cycle through the available
settings.
The evaporative cooler will run until the allotted time has
expired.
LOW WATER ALERTS
As the evaporative cooler’s pump is running, the amount of
water in the water tank will dissipate. When the water level
becomes low, the low water alert will beep and the low water
icon ( ) will flash in the digital display. If the water supply
becomes insufficient to operate the pump, the pump will
shut off automatically. The fan will continue to operate even
when the pump is off.
To resolve the low water alert, disconnect the evaporative
cooler from the power supply and fill the water tank as
described earlier. Then restart the unit and resume normal
operation.

10 — English
MAINTENANCE
WARNING:
When servicing, use only identical replacement parts.
Use of any other parts can create a hazard or cause
product damage.
WARNING:
To avoid serious personal injury, always disconnect the
unit from the power supply when cleaning or performing
any maintenance.
GENERAL MAINTENANCE
Avoid using solvents when cleaning plastic parts. Most
plastics are susceptible to damage from various types of
commercial solvents and may be damaged by their use. Use
clean cloths to remove dirt, dust, oil, grease, etc.
WARNING:
Do not at any time let brake fluids, gasoline, petroleum-
based products, penetrating oils, etc., come in contact
with plastic parts. Chemicals can damage, weaken or
destroy plastic which can result in serious personal injury.
WARNING:
Always completely drain water tank when not in use
to prevent the possible formation of bacteria or mold.
Using a cooler that contains bacteria or mold can result
in serious personal injury or illness. Be careful not to spill
water when draining tank, which can create a slip and
fall hazard.
CLEANING THE FILTER MEDIA
See Figure 14.
For better air quality, inspect and clean the filter media once
a month. Replace if damaged.
WARNING:
With the pump off, run the evaporative cooler fan for 15
to 30 minutes to dry the media. Always thoroughly dry
the media to prevent the possible formation of bacteria
or mold. Circulating air through a media that contains
bacteria or mold can result in serious personal injury or
illness.
With the pump off, run the evaporative cooler fan for 15
to 30 minutes to dry the filter media.
Once the filter media is dry, turn the evaporative cooler
off and disconnect it from the power supply.
Press down on latches to unlock the filter media door.
Lower the filter media door and remove the filter media.
Use a clean dry cloth to remove dirt and debris from the
filter media.
Reinstall the filter media. Make sure the filter media is
seated properly inside the filter media door.
NOTE: Be sure to orient the filter media as illustrated.
NOTICE:
Do not operate the evaporative cooler without the filter
media while the pump is running. Doing so could damage
the motor and reduce performance.
To secure the filter media door, insert the latch into the
notch. Close the filter media door and push the latch until
it snaps into place.
CLEANING THE FILTER SCREEN
See Figure 15.
Disconnect the evaporative cooler from the power supply.
Press down on latches to unlock the filter media door.
Lower the filter media door and remove the filter media.
Locate the tabs on the side of the filter screen and pull it
up and away from the filter media door.
Using a soft brush, clean away any dirt or debris.
When clean, replace the filter screen and filter media and
close the filter media door.
NOTICE:
Do not operate the evaporative cooler without the filter
screen in place. Doing so will allow contaminates to enter
the filter media.

11 — English
TROUBLESHOOTING
This product has a one year Limited Warranty.
For Warranty details go to www.arcticcove.com
PROBLEM POSSIBLE CAUSE SOLUTION
Evaporative cooler won’t start The unit is not connected to the power
supply.
The unit is turned off.
Connect the unit to a power supply.
Turn the unit on.
Evaporative cooler emits an odor The filter media is new.
The filter media contains mold.
The smell will dissipate after several
hours of use.
Replace the filter media immediately.
Evaporative cooler won’t respond to
the remote control
The unit is off.
The remote control batteries are
dead.
Remote control sensor on the unit is
blocked.
The unit is damaged.
Make sure the unit is plugged in and
turned on.
Replace the batteries.
Unblock the sensor.
If the unit doesn’t respond to the re-
mote control or the control panel, then
the unit may be damaged. Contact
customer service for repairs.
The fan is running, but the air isn’t cool The pump is turned off.
The water container is empty or the
water level is low.
The pump is damaged
Turn the pump on.
Fill the water container.
Contact customer service.
ACCESSORIES
To order these accessories, call 1-877-297-8911.
Filter Media ...........................................................................................................................................................MAC700*
*Available at HomeDepot.com
WARNING:
Current attachments and accessories available for use with this product are listed above. Do not use any attachments
or accessories not recommended by the manufacturer of this product. The use of attachments or accessories not
recommended can result in serious personal injury.

12 — English
NOTES

2 — Español
INSTRUCCIONES DE SEGURIDAD IMPORTANTES
Asegúrese de que el cordón de extensión esté en buen
estado. Al utilizar un cordón de extensión, utilice uno del
calibre suficiente para soportar la corriente que consume
el producto. Se recomienda que los conductores sean
de calibre 14 (A.W.G.) por lo menos, para un cordón de
extensión de 15,2 metros (50 pies) de largo o menos.
No se recomienda utilizar un cordón con más de 100 pies
(30 metros) de largo. Si tiene dudas, utilice un cordón del
siguiente calibre más grueso. Cuanto menor es el número
de calibre, mayor es el grueso del cordón. Un cordón de
un grueso insuficiente causa una caída en el voltaje de
línea, y produce recalentamiento y pérdida de potencia.
Inspeccione periódicamente los cordones eléctricos de
los aparatos, y si están dañados, permita que los reparen
en el centro de servicio autorizado de su preferencia de
la localidad. Observe constantemente la ubicación del
cordón eléctrico. Con el cumplimiento de esta regla se
reduce el riesgo de una descarga eléctrica o incendio.
Ubique el cable de alimentación con cuidado durante
el uso. Si el cable de alimentación se interpone en su
camino, corre el riesgo de tropezase.
Proteja el cable de alimentación de las pisadas y los
pellizcos, en particular en los enchufes, los tomacorrientes
y el punto en donde salen del producto.
Para reducir el riesgo de lesiones corporales serias, nunca
use los aparatos en presencia de llamas vivas.
No utilice este aparato en atmósferas explosivas, como
las existentes alrededor de líquidos, gases y polvos
inflamables.
No ponga en funcionamiento cerca de fuentes de calor,
como radiadores, rejillas de calefacción central, estufas
u otros dispositivos (incluso amplificadores) que irradien
calor.
Desenchufe el aparato de la fuente de alimentación y
vacíe el tanque de agua cuando la unidad no esté en uso
y antes de darle mantenimiento o limpiarla.
Desenchufe este producto durante las tormentas
eléctricas y cuando no se use.
Vístase adecuadamente. No vista ropas holgadas ni
joyas. Recójase el cabello si está largo. Mantenga el
cabello, la ropa y los guantes alejados de las piezas
móviles. Las ropas holgadas, las joyas y el cabello largo
pueden engancharse en las piezas móviles.
Si está dañado el cordón de corriente, debe ser
reemplazado únicamente por el fabricante o en un centro
de servicio autorizado para evitar riesgos.
¡ADVERTENCIA!
LEA, COMPRENDA Y GUARDE TODAS LAS
INSTRUCCIONES. El incumplimiento de cualquiera
de las instrucciones señaladas abajo puede causar
descargas eléctricas, incendios y lesiones corporales
serias.
Para reducir el riesgo de lesiones, se requiere una
estrecha supervisión cuando se use el aparato cerca de
niños.
Nunca permita que los niños usen el artefacto. No es un
juguete.
Para evitar lesiones y descargas eléctricas, no sumerja
el aparato ni el cable de alimentación en agua.
No utilice los aparatos si el interruptor de encendido y
apagado no funciona. Cualquier el aparato que no pueda
accionarse mediante el interruptor es peligroso y debe
ser reparado un centro de servicio autorizado.
Desconecte la clavija del suministro de corriente antes de
efectuar ajustes, al dar servicio o guardar los aparatos.
Dichas medidas preventivas de seguridad reducen el
riesgo de que el artefacto se encienda accidentalmente.
Mantenga todas las partes del cuerpo alejadas de toda
pieza móvil.
No subestime el propósito de seguridad del enchufe
polarizado o del enchufe con terminal de tierra. Un
enchufe polarizado tiene dos clavijas, una más ancha
que la otra. Un enchufe con terminal de tierra posee
dos clavijas y una tercera espiga de conexión a tierra.
La clavija ancha o la tercera espiga están para su
seguridad. Si el enchufe que se provee no encaja en su
tomacorriente, consulte a un electricista calificado para
reemplazar el tomacorriente obsoleto. No intente anular
esta característica de seguridad.
No exponga el aparato a la lluvia ni a condiciones
húmedas. Si entra agua en la parte electrónica del
aparato, aumenta el riesgo de que se produzca una
descarga eléctrica.
No maltrate el cordón eléctrico. Nunca utilice el cordón
para trasladar, desconectar o tirar de el aparato.
Mantenga el cable lejos del calor, aceite, bordes afilados
o piezas móviles. Los cordones eléctricos dañados o
enredados aumentan el riesgo de descargas eléctricas.
Para usarse sólo en el interior.

3 — Español
ADVERTENCIAS DE SEGURIDAD
DE REFRIGERADOR EVAPORATIVO
El mantenimiento del refrigerador evaporativo debe
dejarse en manos de un técnico de mantenimiento
capacitado. Todo servicio o mantenimiento efectuado
por personal no calificado puede significar un riesgo de
lesiones.
Cuando realice tareas de mantenimiento sobre el
refrigerador evaporativo, utilice únicamente repuestos
idénticos. Siga las instrucciones señaladas en la sección
Mantenimiento de este manual. El empleo de piezas no
autorizadas o el incumplimiento de las instrucciones de
mantenimiento puede significar un riesgo de descarga
eléctrica o de lesiones.
Cuando llene o drene agua del tanque de agua, tenga
cuidado de no derramarla. Asegúrese de que el tapón de
drenaje esté fijo en su lugar antes de llenar el tanque de
agua. El agua salpicada o derramada puede generar una
superficie resbaladiza y crear un riesgo de resbalones y
caídas y/o provocar daños a la propiedad.
Siempre traslade el aparato en posición completamente
vertical sobre las cuatro ruedas. No incline el aparato ni
lo coloque en posición horizontal; esto podría hacer que
se derrame agua, lo cual a su vez podría producir una
descarga eléctrica, hacer que alguien se resbale y se
caiga o causar daños materiales.
Para reducir el riesgo de incendio o descarga eléctrica, no
utilice este ventilador con ningún dispositivo de control
de velocidad de estado sólido.
Guarde estas instrucciones. Consúltelas con frecuencia
y empléelas para instruir a otras personas que puedan
utilizar esta producto. Si presta a alguien esta producto,
facilítele también estas instrucciones.
No obstruya el flujo de aire hacia la unidad ni desde la
misma durante el uso. Mantenga la unidad libre de toda
obstrucción para permitir una buena ventilación.
No introduzca los dedos ni objetos en el módulo del
ventilador durante el uso. Seguir esta regla reduce el
riesgo de sufrir una descarga eléctrica o una lesión grave.
Nunca deje el producto encendido sin supervisión.
Apague la bomba y el ventilador y desconecte la unidad
de la fuente de alimentación. No se aleje del aparato
hasta que se haya detenido por completo.
Tenga suma precaución para evitar resbalarse o caer.
Para reducir el riesgo de descargas eléctricas, siempre
desenchufe el refrigerador de la fuente de alimentación
antes de agregar agua al tanque.
Use ÚNICAMENTE agua limpia y fría. El refrigerador
evaporativo no es un equipo de aire acondicionado. No
tiene un sistema de refrigeración.
No use el refrigerador evaporativo para dispersar
medicamentos líquidos, productos químicos ni
ningún otro líquido que no sea agua limpia. Dispersar
estas sustancias podría provocar lesiones graves o
enfermedades al operador o a los transeúntes.
No use el refrigerador en “el modo de enfriamiento” sin
agua en el tanque, porque podría dañar la bomba.
Tenga precaución al colocar la producto para su uso.
Nunca dirija la corriente de aire hacia cables o dispositivos
eléctricos.
Nunca use la bomba el refrigerador sin el filtro instalado,
porque podría provocar daños graves a la unidad.
ADVERTENCIA:
Este producto y las sustancias que puedan llegar a ser aerotransportadas por su uso pueden contener sustancias
químicas (incluido el plomo) reconocidas por el estado de California como causantes de cáncer, defectos congénitos y
otras afecciones del aparato reproductor. Lávese las manos después de utilizar el aparato.
CALIFORNIA - PROPUESTA DE LEY NÚM. 65

4 — Español
SÍMBOLOS
Las siguientes palabras de señalización y sus significados tienen el objeto de explicar los niveles de riesgo relacionados
con este producto.
SÍMBOLO SEÑAL SIGNIFICADO
PELIGRO:
Indica una situación peligrosa inminente, la cual, si no se evita, causará la
muerte o lesiones serias.
ADVERTENCIA:
Indica una situación peligrosa posible, la cual, si no se evita, podría causar
la muerte o lesiones serias.
PRECAUCIÓN:
Indica una situación potencialmente peligrosa la cual, si no se evita, puede
causar lesiones leves o moderadas.
AVISO:
(Sin el símbolo de alerta de seguridad) Indica información importante no
relacionada con ningún peligro de lesiones, como una situación que puede
ocasionar daños físicos.
Es posible que se empleen en esta producto algunos de los siguientes símbolos. Le suplicamos estudiarlos y aprender su
significado. Una correcta interpretación de estos símbolos le permitirá utilizar mejor y de manera más segura la producto.
SÍMBOLO NOMBRE DENOMINACIÓN/EXPLICACIÓN
Alerta de seguridad Indica un peligro posible de lesiones personales.
Lea manual del operador
Para reducir el riesgo de lesiones, el usuario debe leer y
comprender el manual del operador antes de usar este producto.
Electrocución/descarga
eléctrica
Mantenga la descarga de agua y producto pulverizado alejada
de todos los dispositivos eléctricos para reducir el riesgo de
electrocución o de descarga eléctrica.
Alerta de condiciones húmedas No exponga la unidad a la lluvia ni la use en lugares húmedos.
Superficie resbalosa
Un error en la instalación del tanque de agua, el llenado en
exceso del tanque de agua y/o los derrames de agua pueden
provocar un riesgo de resbalones y caídas.
Cabello largo
Si no mantiene el cabello largo lejos de la entrada de aire puede
producirse lesiones.
Aspas del ventilador
El contacto con las aspas del ventilador en movimiento puede
provocar lesiones personales graves.
No inclinar ni colocar en
posición horizontal
No incline el aparato ni lo coloque en posición horizontal; esto
podría hacer que se derrame agua, lo cual a su vez podría
producir una descarga eléctrica, hacer que alguien se resbale
y se caiga o causar daños materiales.

5 — Español
ASPECTOS ELÉCTRICOS
CABLES DE EXTENSIÓN
Sólo utilice cables de extensión de 3 conductores con
clavijas de tres puntas y contactos de tres polos que acepten
la clavija del cable de la herramienta. Si la herramienta
eléctrica debe situarse a una distancia importante de la toma
de corriente, asegúrese de que el cable de extensión que
utilice tenga el grosor suficiente para soportar el consumo
de corriente de la herramienta. Un cable de extensión de
un grueso insuficiente causará caída del voltaje de la línea,
además de producir pérdida de potencia y recalentamiento
del motor. Básese en la tabla que se presenta abajo para
calcular el calibre mínimo requerido de los conductores del
cable de extensión. Solamente deben utilizarse cordones
con forro redondo registrados en Underwriter’s Laboratories
(UL).
**Amperaje (aparece en la placa de datos de la herramienta)
0-2,0 2,1-3,4 3,5-5,0 5,1-7,0 7,1-12,0 12,1-16,0
Longitud Calibre conductores
del cordón (AWG)
25´ 16 16 16 16 14 14
50´ 16 16 16 14 14 12
100´ 16 16 14 12 10 —
**Se usa en los circuitos de calibre 12, de 20 amperes.
NOTA: AWG = American Wire Gauge
Antes de utilizar un cable de extensión, inspecciónelo para
ver si tiene conductores flojos o expuestos y aislamiento
cortado o gastado.
ADVERTENCIA:
Inspeccione los cables de extensión cada vez
antes de usarlos. Si están dañados, reemplácelos
de inmediatamente. Nunca utilice la herramienta con un
cable dañado, ya que si toca la parte dañada puede sufrir
una descarga eléctrica, con las consecuentes lesiones
graves.
CONEXIÓN ELÉCTRICA
Esta producto está impulsada por un motor eléctrico
fabricado con precisión. Debe conectarse únicamente a
una línea de voltaje de 120 Volts, de corriente alterna
(corriente normal para uso doméstico), 60 Hertz. No
utilice esta herramienta con corriente continua (c.c.). Una
caída considerable de voltaje causa pérdida de potencia
y recalentamiento del motor. Si la sierra no funciona al
conectarla en una toma de corriente, vuelva a revisar el
suministro de corriente.
INSTRUCCIONES DE CONEXIÓN A TIERRA
Este producto debe conectarse a tierra. En caso de un mal
funcionamiento o desperfecto, la conexión a tierra brinda a
la corriente eléctrica una trayectoria de mínima resistencia
para disminuir el riesgo de una descarga eléctrica. Esta
herramienta está provista de un cable eléctrico con un
conductor y una clavija de conexión a tierra para equipos.
La clavija debe conectarse en una toma de corriente igual
que esté correctamente instalada y conectada a tierra, de
conformidad con los códigos y reglamentos de la localidad.
No modifique la clavija suministrada. Si no entra en la toma
de corriente, llame a un electricista calificado para que
instale una toma de corriente adecuada.
ADVERTENCIA:
Si se conecta de forma incorrecta el conductor de
conexión a tierra del equipo puede presentarse un riesgo
de descarga eléctrica. Si es necesaria la reparación o
reemplazo del cordón eléctrico o de la clavija, lleve la
unidad a un centro de servicio autorizado.
Consulte a un electricista calificado o técnico de servicio
si no ha comprendido completamente las instrucciones de
conexión a tierra o si no está seguro si la herramienta está
bien conectada a tierra.
Repare o reemplace de inmediatamente todo cordón dañado
o gastado.
Este producto se debe usar con un circuito de 120 V
nominales y tiene una clavija de conexión a tierra similar a
la clavija que se muestra en la figura 1. Conecte el producto
únicamente a una toma de corriente que tenga la misma
configuración que la clavija. No use un adaptador con este
producto.
/