Page is loading ...

Date Issued: 04/11/17 IS-3797-CB
We’re here to help 866-558-5706
Hrs: M-F 9am to 5pm EST
CAUTION – RISK OF SHOCK –
Disconnect power at the main circuit breaker panel or main fuse
box before starting and during the installation.
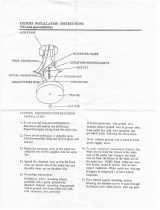
CHAIN DROP
1) Screw loop to threaded pipe on top of fixture.
2) Pass screws through holes from inside fixture. Thread
threaded balls onto screws.
3) Turn off power.
4) Find the appropriate threaded holes on mounting strap. As-
semble mounting screws into threaded holes.
5) Attach mounting strap to outlet box. (Screws not provided).
Mounting strap can be adjusted to suit position of fixture.
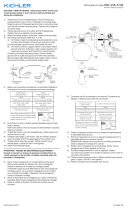
6) Grounding instructions: (See Illus. A or B).
A) On fixtures where mounting strap is provided with a hole
and two raise dimples. Wrap ground wire from outlet box
around green ground screw, and thread into hole.
B) On fixtures where a cupped washer is provided. Put
ground wire from outlet box under cupped washer and
green ground screw and thread screw into hole in mounting
strap.
If fixture is provided with ground wire. Connect fixture
ground wire to outlet box ground wire with wire connector,
(not provided) after following the above steps. Never con-
nect ground wire to black or white power supply wires.
7) Make wire connections (connectors not provided.) Refer-
ence chart below for correct connections and wire accord-
ingly.
8) Push fixture to ceiling, carefully passing mounting screws
through holes in canopy.
9) Secure fixture to ceiling with threaded balls.
10) Screw end of threaded pipe with hexnut already installed
into bottom of socket cluster.
11) Slip cupped washer over threaded pipe.
12) Raise glass up to fixture carefully passing threaded pipe
through hole in glass. Secure glass in place with rubber
washer, flat washer and hexnut.(DO NOT over tighten.)
13) Screw trim onto end of threaded pipe. (DO NOT over
tighten.)
GREEN GROUND
SCREW
CUPPED
WASHER
OUTLET BOX
GROUND
FIXTURE
GROUND
DIMPLES
WIRE CONNECTOR
OUTLET BOX
GROUND
GREEN GROUND
SCREW
FIXTURE
GROUND
A
B
Connect Black or
Red Supply Wire to:
Connect
White Supply Wire to:
Black White
*Parallel cord (round & smooth) *Parallel cord (square & ridged)
Clear, Brown, Gold or Black
without tracer
Clear, Brown, Gold or Black
with tracer
Insulated wire (other than green)
with copper conductor
Insulated wire (other than green)
with silver conductor
*Note: When parallel wires (SPT I & SPT II)
are used. The neutral wire is square shaped
or ridged and the other wire will be round in
shape or smooth (see illus.)
Neutral Wire
CAUTION – RISK OF SHOCK –
Disconnect power at the main circuit breaker panel or main fuse
box before starting and during the installation.
SEMI-FLUSH MOUNT
1) Remove loop from top of canopy.
2) Remove threaded balls from canopy. DO NOT discard
threaded balls.
3) Turn off power.
4) Find the appropriate threaded holes on mounting strap. As-
semble mounting screws into threaded holes.
5) Attach mounting strap to outlet box. (Screws not provided).
Mounting strap can be adjusted to suit position of fixture.
6) Grounding instructions: (See Illus. A or B).
A) On fixtures where mounting strap is provided with a hole
and two raise dimples. Wrap ground wire from outlet box
around green ground screw, and thread into hole.
B) On fixtures where a cupped washer is provided. Put
ground wire from outlet box under cupped washer and
green ground screw and thread screw into hole in mounting
strap.
If fixture is provided with ground wire. Connect fixture
ground wire to outlet box ground wire with wire connector,
(not provided) after following the above steps. Never con-
nect ground wire to black or white power supply wires.
7) Make wire connections (connectors not provided.) Refer-
ence chart below for correct connections and wire accord-
ingly.
8) Push fixture to ceiling, carefully passing mounting screws
through holes.
9) Secure fixture to ceiling with threaded balls.
10) Screw end of threaded pipe with hexnut already installed
into bottom of socket cluster.
11) Slip cupped washer over threaded pipe.
12) Raise glass up to fixture carefully passing threaded pipe
through hole in glass. Secure glass in place with rubber
washer, flat washer and hexnut.(DO NOT over tighten.)
13) Screw trim onto end of threaded pipe.
(DO NOT over tighten.)
GREEN GROUND
SCREW
CUPPED
WASHER
OUTLET BOX
GROUND
FIXTURE
GROUND
DIMPLES
WIRE CONNECTOR
OUTLET BOX
GROUND
GREEN GROUND
SCREW
FIXTURE
GROUND
A
B
Connect Black or
Red Supply Wire to:
Connect
White Supply Wire to:
Black White
*Parallel cord (round & smooth) *Parallel cord (square & ridged)
Clear, Brown, Gold or Black
without tracer
Clear, Brown, Gold or Black
with tracer
Insulated wire (other than green)
with copper conductor
Insulated wire (other than green)
with silver conductor
*Note: When parallel wires (SPT I & SPT II)
are used. The neutral wire is square shaped
or ridged and the other wire will be round in
shape or smooth (see illus.)
Neutral Wire
MOUNTING STRAP
MOUNTING STRAP
CANOPY
CANOPY
THREADED BALL
THREADED BALL
LOOP
SCREW FIXTURE
FIXTURE
THREADED PIPE
THREADED BALL
GLASS
TRIM
HEXNUT
RUBBER WASHER
FLAT WASHER
CUPPED
WASHER
SEE OTHER SIDE FOR CANADIAN FRENCH TRANSLATIONS.
VOIR L’AUTRE CÔTÉ POUR LES CANADIENS TRADUCTIONS EN FRANÇAIS.

Date Issued: 04/11/17 IS-3797-CB
We’re here to help 866-558-5706
Hrs: M-F 9am to 5pm EST
ATTENTION – RISQUE DE DÉCHARGES ÉLECTRIQUES –
Couper le courant au niveau du panneau du disjoncteur du
circuit principal ou de la boîte à fusibles principale avant de
procéder à l’installation.
CHAÎNETTE EN CHUTE :
1) Visser la boucle sur le tuyau fileté sur le dessus du lumi-
naire.
2) Passer les vis à travers les trous de l’intérieur du luminaire.
Visser les boules filetées sur les vis.
3) Couper l’alimentation.
4) Trouver les trous filetés appropriés sur l’étrier de montage.
Assembler les vis de montage dans les trous filetés.
5) Fixer l’étrier de montage sur la boîte de sortie (vis non
fournies).L’étrier de montage peut être positionné selon la
position du luminaire.
6) Connecter les fils (connecteurs non fournis.) Se référer au
tableau plus bas pour faire les connections et passer les fils
correctement.
7) Pousser le luminaire contre le plafond, en prenant soin de
passer les vis de montage à travers les trous du couvercle.
8) Immobiliser le luminaire sur le plafond à l’aide des boules
filetées.
9) Visser l’extrémité du tuyau fileté, avec l’écrou hexagonal
déjà installé, dans le dessous du groupe de douilles.
10) Glisser la rondelle concave par-dessus le tuyau fileté.
11) Glisser doucement le verre sur le luminaire en passant le
tuyau fileté à travers l’orifice dans le verre. Immobiliser le
verre en place à l’aide de la rondelle de caoutchouc, de la
rondelle plate et de l’écrou hexagonal.(NE PAS trop serrer).
12) Visser la garniture sur l’extrémité du tuyau fileté. (NE PAS
trop serrer.)
Connecter le fil noir ou
rouge de la boite
Connecter le fil blanc de la boîte
A Noir A Blanc
*Au cordon parallèle (rond et lisse)
*Au cordon parallele (à angles droits el strié)
Au bransparent, doré, marron, ou
noir sans fil distinctif
Au transparent, doré, marron, ou
noir avec un til distinctif
Fil isolé (sauf fil vert) avec
conducteur en cuivre
Fil isolé (sauf fil vert) avec
conducteur en argent
*Remarque: Avec emploi d’un fil paralléle
(SPT I et SPT II). Le fil neutre est á angles
droits ou strié et l’autre fil doit étre rond ou
lisse (Voir le schéma).
Fil Neutre
ÉTRIER DE MONTAGE
ÉTRIER DE MONTAGE
COUVERCLE
COUVERCLE
BOULE FILETÉE
BOULE FILETÉE
BOULE FILETÉE
LUMINAIRE
LUMINAIRE
BOUCLE
DES VIS
TUBE FILTÉ
RONDELLE CONCAVE
VERRE
RONDELLES
ÉCROU HEXAGONAL
MOULURE
ATTENTION – RISQUE DE DÉCHARGES ÉLECTRIQUES –
Couper le courant au niveau du panneau du disjoncteur du
circuit principal ou de la boîte à fusibles principale avant de
procéder à l’installation.
MONTURE SEMI-AFFLEURANTE :
1) Enlever la boucle du dessus du couvercle.
2) Enlever les boules filetées du couvercle. NE PAS jeter
les boules filetées.
3) Couper l’alimentation.
4) Trouver les trous filetés appropriés sur l’étrier de montage.
As-
sembler les vis de montage dans les trous filetés.
5) Fixer l’étrier de montage sur la boîte de sortie. (Vis non
fournies.)
L’étrier de montage peut être positionné en accord avec la
position du luminaire.
6) Connecter les fils (connecteurs non fournis.) Se référer au
tableau plus bas pour faire les connections et passer les fils
correctement.
7) Pousser le luminaire contre le plafond, en prenant soin de
passer les vis de montage à travers les trous du couvercle.
8) Immobiliser le luminaire sur le plafond à l’aide des boules
filetées.
9) Visser l’extrémité du tuyau fileté, avec l’écrou hexagonal déjà
installé, dans le dessous du groupe de douilles.
10) Glisser la rondelle concave par-dessus le tuyau fileté.
11) Glisser doucement le verre sur le luminaire en passant le
tuyau fileté à travers l’orifice dans le verre. Immobiliser le
verre en place à l’aide de la rondelle de caoutchouc, de la
rondelle plate et de l’écrou hexagonal.(NE PAS trop serrer).
12) Visser la garniture sur l’extrémité du tuyau fileté. (NE PAS
trop serrer.)
Connecter le fil noir ou
rouge de la boite
Connecter le fil blanc de la boîte
A Noir A Blanc
*Au cordon parallèle (rond et lisse)
*Au cordon parallele (à angles droits el strié)
Au bransparent, doré, marron, ou
noir sans fil distinctif
Au transparent, doré, marron, ou
noir avec un til distinctif
Fil isolé (sauf fil vert) avec
conducteur en cuivre
Fil isolé (sauf fil vert) avec
conducteur en argent
*Remarque: Avec emploi d’un fil paralléle
(SPT I et SPT II). Le fil neutre est á angles
droits ou strié et l’autre fil doit étre rond ou
lisse (Voir le schéma).
Fil Neutre
SEE OTHER SIDE FOR ENGLISH TRANSLATIONS.
VOIR L’AUTRE CÔTÉ DES TRADUCTIONS EN ANGLAIS.
SEE OTHER SIDE FOR ENGLISH TRANSLATIONS.
VOIR L’AUTRE CÔTÉ DES TRADUCTIONS EN ANGLAIS.
/